Tag: Visual edit |
m (→Walkthrough) |
||
| Line 48: | Line 48: | ||
! |
! |
||
! Story |
! Story |
||
| − | ! Ghost location |
+ | ! colspan="2" | Ghost location |
|- |
|- |
||
| [[File:F2P icon.png|link=|25px]] |
| [[File:F2P icon.png|link=|25px]] |
||
| [[Heralds of the Apocalypse]] |
| [[Heralds of the Apocalypse]] |
||
| North-east of the [[Edgeville]] lodestone |
| North-east of the [[Edgeville]] lodestone |
||
| + | | [[File:Ghost (Edgeville) location.png]] |
||
|- |
|- |
||
| [[File:F2P icon.png|link=|25px]] |
| [[File:F2P icon.png|link=|25px]] |
||
| [[The Group Gatestone]] |
| [[The Group Gatestone]] |
||
| [[Daemonheim]] (east of Abandoned 1 barrier) |
| [[Daemonheim]] (east of Abandoned 1 barrier) |
||
| + | | [[File:Ghost (Daemonheim, 2017 Hallowe'en event) location.png]] |
||
|- |
|- |
||
| [[File:F2P icon.png|link=|25px]] |
| [[File:F2P icon.png|link=|25px]] |
||
| [[Always and Forever]] |
| [[Always and Forever]] |
||
| North of [[Aubury's Rune Shop]] in [[Varrock]] |
| North of [[Aubury's Rune Shop]] in [[Varrock]] |
||
| + | | [[File:Ghost (Aubury's Rune Shop) location.png]] |
||
|- |
|- |
||
| [[File:F2P icon.png|link=|25px]] |
| [[File:F2P icon.png|link=|25px]] |
||
| [[By the Light of the Moon]] |
| [[By the Light of the Moon]] |
||
| West of [[Falador]]'s north gate |
| West of [[Falador]]'s north gate |
||
| + | | [[File:Ghost (Falador) location.png]] |
||
|- |
|- |
||
| [[File:F2P icon.png|link=|25px]] |
| [[File:F2P icon.png|link=|25px]] |
||
| [[Family Reunion]] |
| [[Family Reunion]] |
||
| South-west of the [[Varrock]] lodestone |
| South-west of the [[Varrock]] lodestone |
||
| + | | [[File:Ghost (Blue Moon Inn) location.png]] |
||
|- |
|- |
||
| [[File:P2P icon.png|link=|25px]] |
| [[File:P2P icon.png|link=|25px]] |
||
| [[Wool (2017 Hallowe'en event)|Wool]] |
| [[Wool (2017 Hallowe'en event)|Wool]] |
||
| Outside of the [[Taxidermist]] in [[Canifis]] |
| Outside of the [[Taxidermist]] in [[Canifis]] |
||
| + | | [[File:Ghost (Canifis) location.png]] |
||
|- |
|- |
||
|[[File:P2P icon.png|link=|25px]] |
|[[File:P2P icon.png|link=|25px]] |
||
| [[Asleep]] |
| [[Asleep]] |
||
|House southeast of the [[East Ardougne]] lodestone |
|House southeast of the [[East Ardougne]] lodestone |
||
| + | | [[File:Ghost (Ardougne) location.png]] |
||
|- |
|- |
||
|[[File:P2P icon.png|link=|25px]] |
|[[File:P2P icon.png|link=|25px]] |
||
| [[Clockwork (2017 Hallowe'even event)|Clockwork]] |
| [[Clockwork (2017 Hallowe'even event)|Clockwork]] |
||
|Southeast of general store in [[Burgh de Rott]] |
|Southeast of general store in [[Burgh de Rott]] |
||
| + | | [[File:Ghost (Burgh de Rott) location.png]] |
||
|- |
|- |
||
| [[File:P2P icon.png|link=|25px]] |
| [[File:P2P icon.png|link=|25px]] |
||
| [[Saradomin Have Mercy]] |
| [[Saradomin Have Mercy]] |
||
| Near the entrance to [[Barrows]] in [[Morytania]] |
| Near the entrance to [[Barrows]] in [[Morytania]] |
||
| + | | [[File:Ghost (Barrows) location.png]] |
||
|- |
|- |
||
|[[File:P2P icon.png|link=|25px]] |
|[[File:P2P icon.png|link=|25px]] |
||
| [[The Beginning and the End]] |
| [[The Beginning and the End]] |
||
|North of the Draynor Village lodestone. |
|North of the Draynor Village lodestone. |
||
| + | | [[File:Closure location.png]] |
||
|} |
|} |
||
Revision as of 02:21, 31 October 2017
| |
| Release date | 30 October 2017 (Update) |
|---|---|
| Reward | Headless Rider Outfit, Ghost Story, The Ghostwriter |
| Head developer | Unknown edit |
| Preceded by | 2016 Hallowe'en event |
| Succeeded by | N/A |
The 2017 Hallowe'en event consists of a quest called Ghost Stories of Gielinor and several other activities. It was released on 30 October 2017. In the quest players help Closure track down nine ghosts to collect their last moments. Ironmen can participate in the event.
Ghost Stories of Gielinor
Walkthrough
| Start point | |
|---|---|
| Member requirement | |
| Official difficulty | |
| Official length | Medium |
| Requirements | Skill requirements are not boostable unless marked with a [B] for boostable.
For total completion
|
| Items required | Items from the tool belt are not listed unless they do not work or are not automatically added.
|
| Recommended |
|
| Enemies to defeat |
|

To start this event, you need to speak to Closure who is located outside of Death's office, near the Draynor Village lodestone.
He will ask players to track down ghosts and collect their final moments in The Ghastly Grimoire. There are nine different ghosts that must be tracked down for Closure, located across Gielinor. They each reveal a different story when found.
After each story is collected, a chat message will inform you: You have discovered #/10 of the ghost stories.
You will also receive a Ghost treat for completing a story.
| Story | Ghost location | ||
|---|---|---|---|
| Heralds of the Apocalypse | North-east of the Edgeville lodestone | 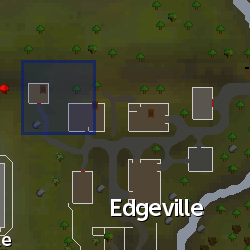
| |
| The Group Gatestone | Daemonheim (east of Abandoned 1 barrier) | 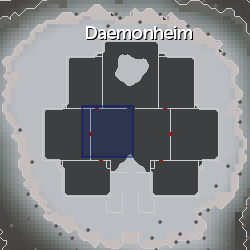
| |
| Always and Forever | North of Aubury's Rune Shop in Varrock | 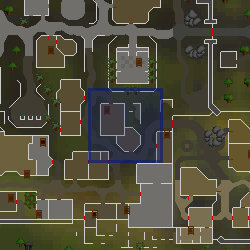
| |
| By the Light of the Moon | West of Falador's north gate | 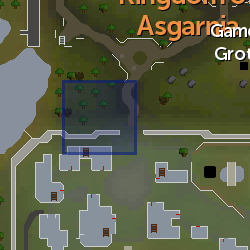
| |
| Family Reunion | South-west of the Varrock lodestone | 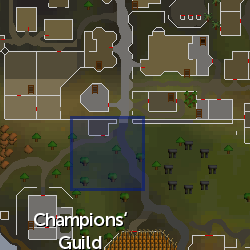
| |
| Wool | Outside of the Taxidermist in Canifis | 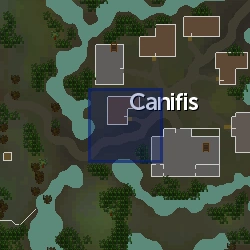
| |
| Asleep | House southeast of the East Ardougne lodestone | 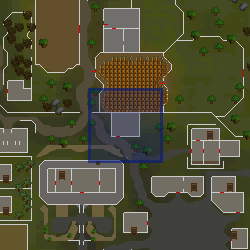
| |
| Clockwork | Southeast of general store in Burgh de Rott | 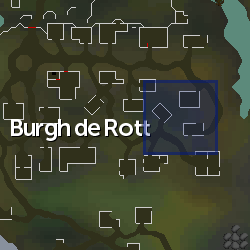
| |
| Saradomin Have Mercy | Near the entrance to Barrows in Morytania | 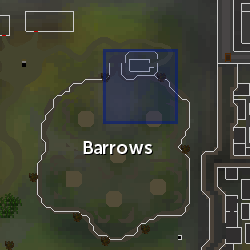
| |
| The Beginning and the End | North of the Draynor Village lodestone. | 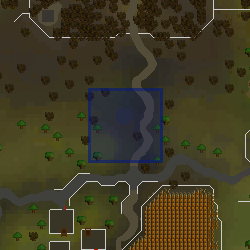
| |
Heralds of the Apocalypse

Head north-east of the Edgeville lodestone, next to the Wilderness wall, to find a ghost who requires food. Upon providing her with some, the food will turn to ash. She then asks for water, which when provided turns to steam and the container it was in is destroyed. She then reveals her story, completing this part of the quest.
The Group Gatestone
Travel to the lobby area of Daemonheim and bank everything except the book, then speak to the ghost who will lead you to a dungeon. Interacting with the ghost while wearing forbidden items results in a chatbox message stating You are wearing items that cannot be taken into this ghost's story.
Once inside the dungeon, read the Ominous Journal in the north-east part of the room. Pick up everything on the tables, and mine three novite ore and pick two salve nettles. Use an air rune on the furnace, then smelt the novite ore into novite bars, and spin the salve nettles into salve cloth on the nearby spinning wheel.
Use the anvil to create a primordial gatestone. Whilst using the spinning wheel, you prick your finger, causing your ring of kinship to be covered in blood. Remove the ring and use it on the primordial gatestone to create a bloodied gatestone. Finally, use the bloodied gatestone on the group gatestone portal.
Always and Forever

The ghost can be found north of Aubury's shop in Varrock.
After speaking to the ghost, read the grimoire, then search the broken crate directly south of the ghost to obtain 4 candles.
With the candles in your inventory, investigate the magical dye cauldron northeast of it. Dye the candles such that you have 1 of each colour (white, black, red, blue). Dye the blue candle white to get an ice blue candle. Dye the white candle black to get a smoke grey candle.
On the ritual circle, place the ice blue candle on the north, the blood red candle on the south, the shadow black candle on the east and the smoke grey candle on the west.
By the Light of the Moon
The ghost can be found West of the Falador north gate.
After speaking to the ghost, it will move outside the Rising Sun Inn. Speak to it again and it will tell you to head upstairs, to find a werewolf in order to avenge it. There are 6 NPCs upstairs, and the available dialogue options are:
- Where were you on the full moon?
- Did you see anything suspicious?
- Who do you suspect of being the werewolf?
- [Accuse (NPC) of being the werewolf.]
Wrongly accusing an NPC of being the werewolf will result in the death of said NPC. Accuse everyone until the werewolf is found. Return to the ghost to complete this section. Alternatively, Daniel is the werewolf (because they do not offer tea to drink at the pub), and he is at the northwest corner of the room so you can just accuse him without going through all of the conversations.
Family Reunion
The ghost can be found south-west of Varrock lodestone. Upon interacting with the ghost, it will shift to outside the entrance of the Blue Moon Inn. Interacting with it again will cause it to shift to the northwest room on the upper floor in the Blue Moon Inn.
In the same room as the ghost, pose in the mirror three times. The ghost will move to the southwest room.
Search the Wardrobe in the northeast room and put on the outfit. Talk to the ghost.
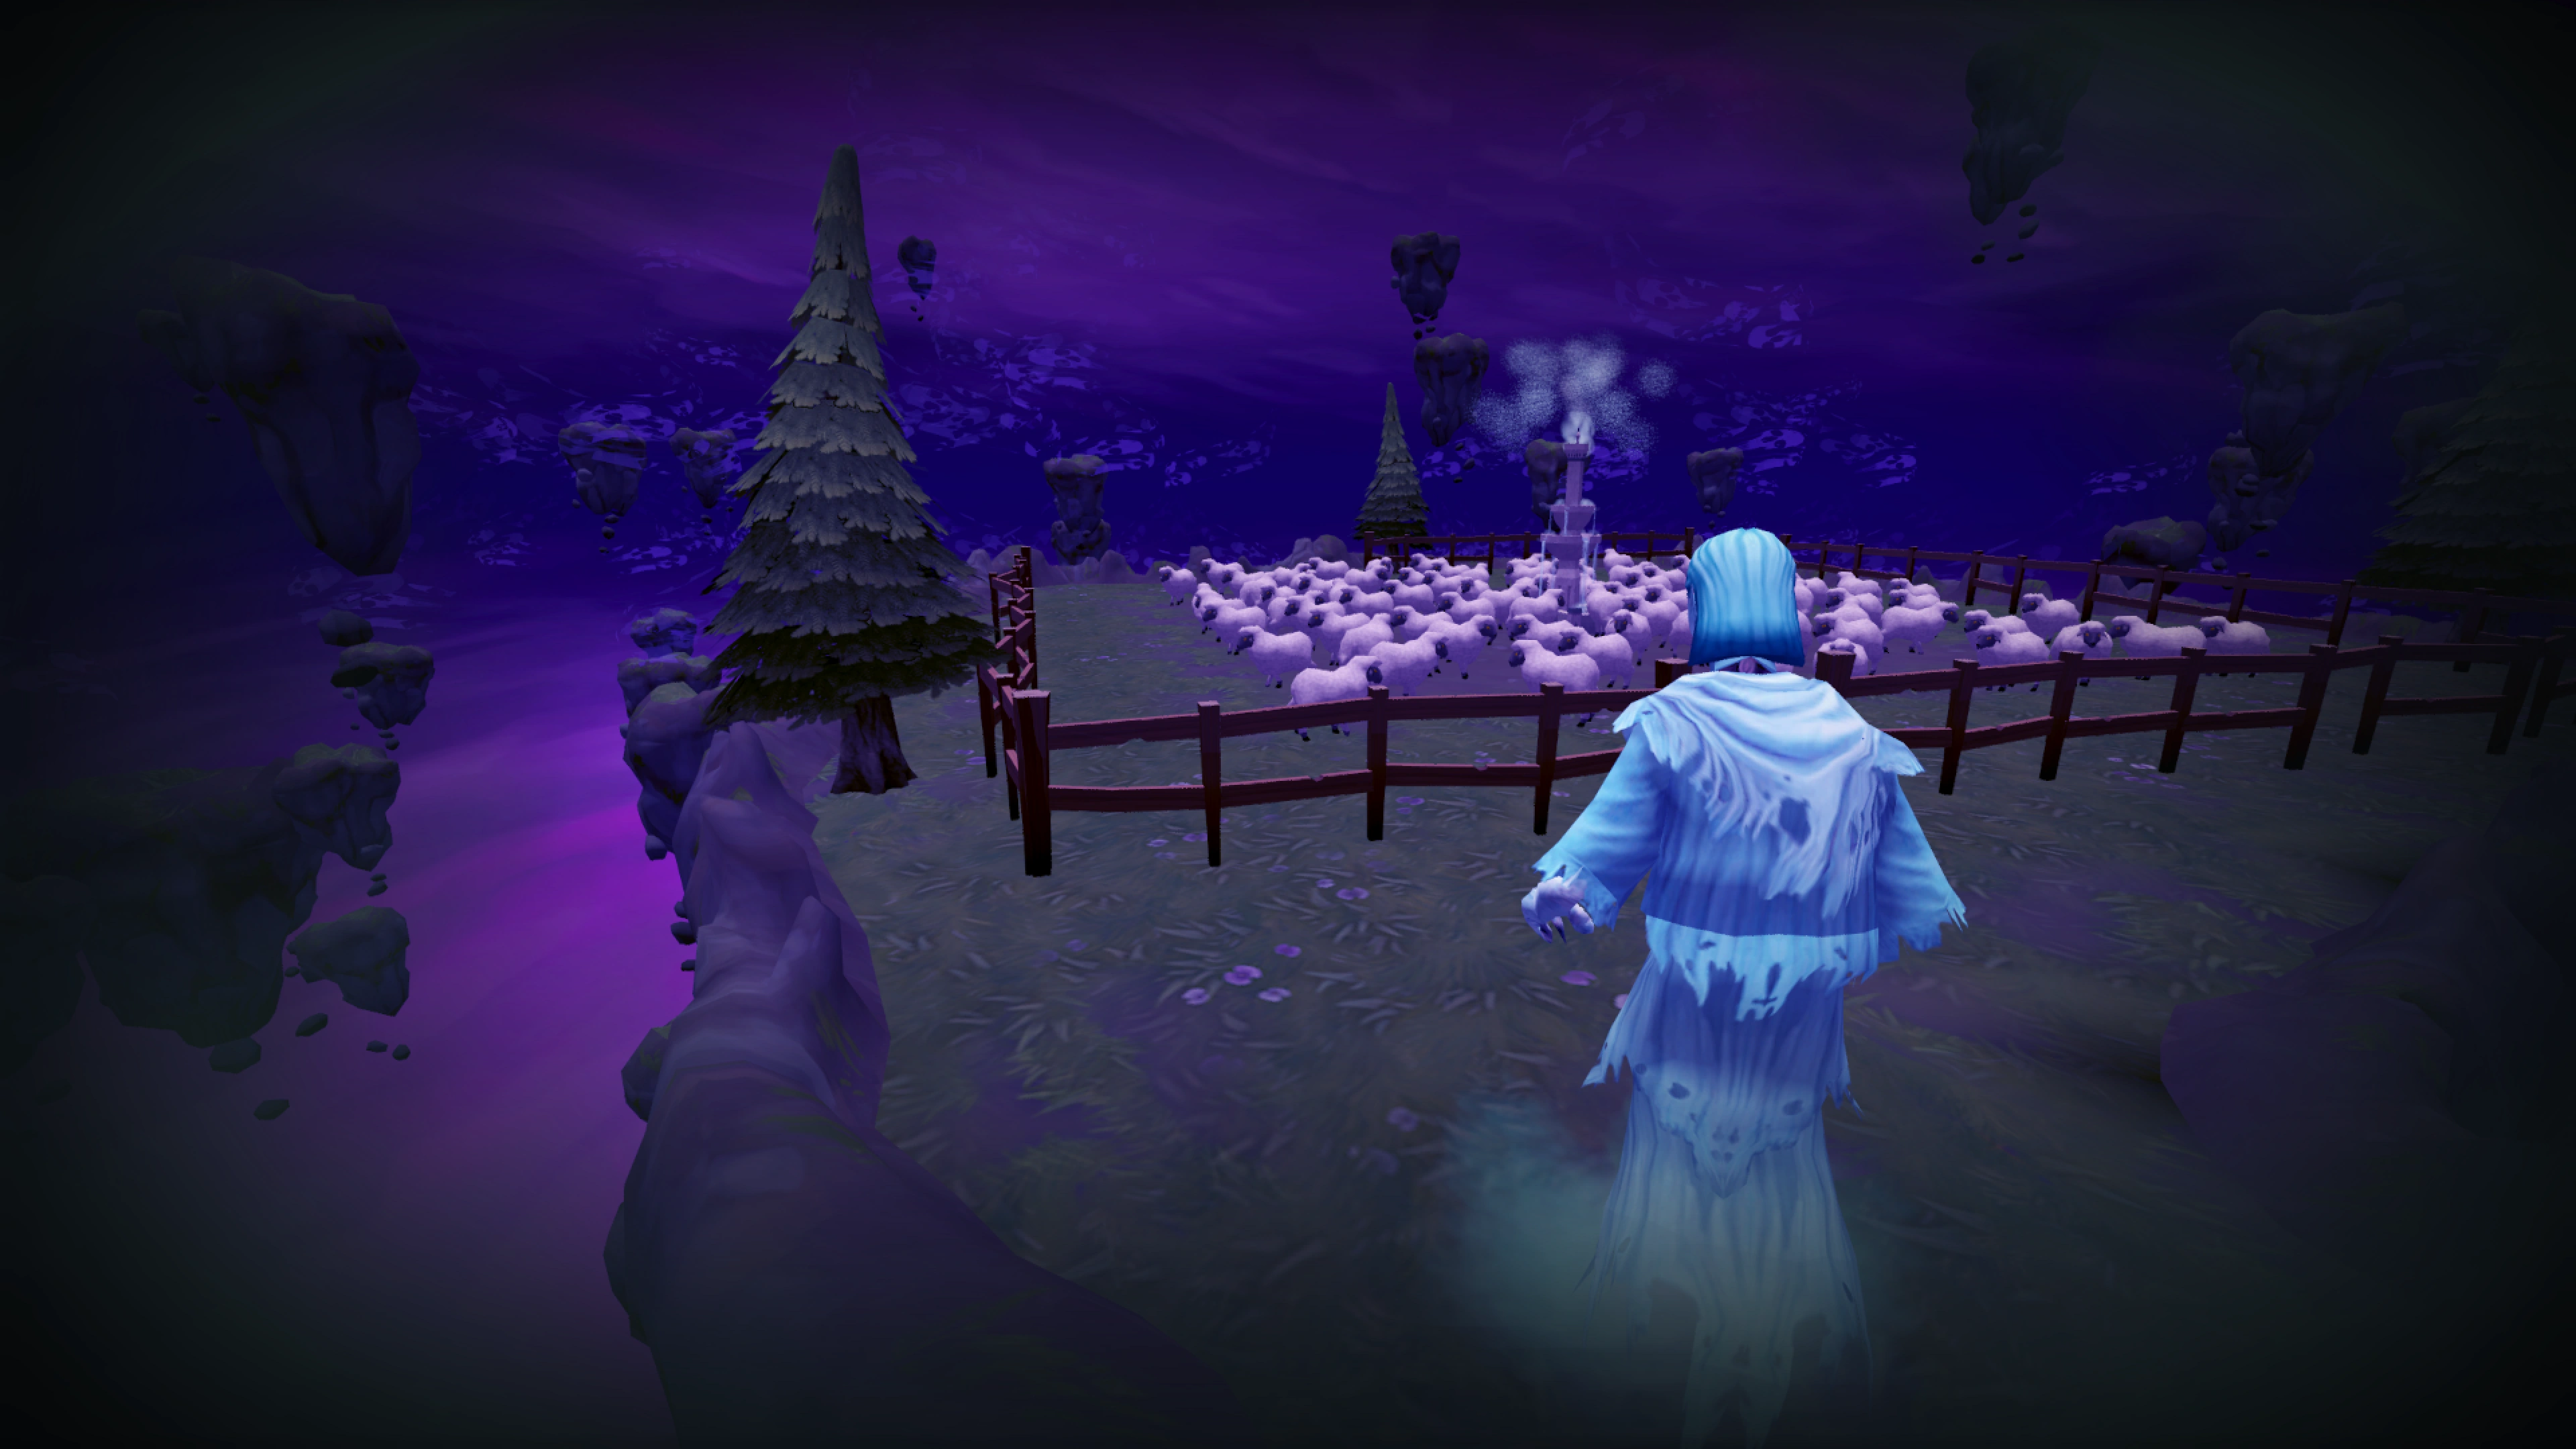
Wool (m)

The Solution
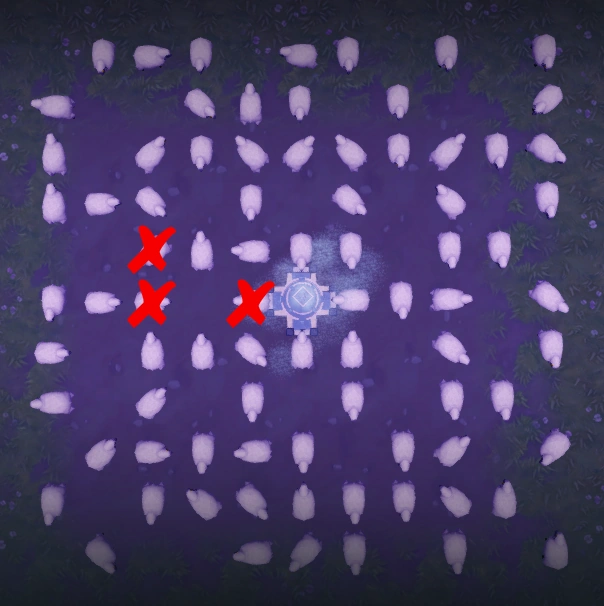
Outside of the Taxidermist in Canifis, talk to the ghost and offer to help in order to be transported to a location full of sheep with a fountain in the middle. The goal is to get to the center with only removing 3 sheep, no more no less. Start at the 5th row down on west side and aim to get towards the west side of the the fountain. The goal of this minigame is to get to the fountain and drink the water removing no more than three sheep.
Asleep (m)
Talk to the ghost in the house southeast of the Ardougne lodestone. Solve the memory afflicted puzzle. After solving it, the display will turn black and white and the puzzle will get a red hue. A monster will appear under the bed.
")
")
Tip: Exit the puzzle and enter the puzzle until you get a message "The ghost has pieced together as much of her memory as she can." The ghost will automatically complete a row each time until the last two rows are left to solve.
Clockwork (m)
Head to the ghost that's at the east end of Burgh de Rott. Talk to the ghost and offer your help. Then search the barrel, shelves and both bookcases, in the house next to the ghost for parts. Read the Inventor's Diary on book stand:
- Take the gear train and carefully attach the mainspring (use gear train on mainspring).
- This step is smudged. (Add the balance wheel).
- The escapement must then be carefully tightened on to the final gear.
- This step is smeared. (Add valve assembly).
- Finally, the pump must be slotted in place.
This makes a clockwork heart.
Saradomin Have Mercy (m)

Right next to the entrance to the Barrows area, talk to the ghost and offer to help and you will be transported into the Barrows tomb at the reward chest.
Do nothing. Don't open the chest. Wait for the scene to finish.
If you do click on the treasure chest, you will get a confirmation dialog box "Claim reward from chest?" with the options of "Yes" and "No". If you select "Yes", then you get the message "As you open the chest, all faith and hope abandons you." and you will harmlessly be sent back to the ghost next to the entrance to the Barrows area, where it asks for your help, "Show me how to resist temptation. Show me the strength of your faith."
The Beginning and the End (m)
Once you have collected all 9 stories, go back to Closure. You will be presented with a quiz based on the previous stories. Note that the questions will be asked in random order.
| Question | Answer |
|---|---|
| In 'Always and Forever', where was Trent trying to teleport to? | The Afterlife |
| In 'By the Light of the Moon', who was the werewolf? | Alice |
| In 'Family Reunion', what was the nickname of the dead girl? | Puffball |
| In 'Wool', what was the name of the taxidermist? | Fish Miller |
| In 'Asleep', what was written on the wall? | I know that you're awake. |
| In 'Clockwork', where was the child found? | Church |
| In 'Saradomin Have Mercy', what was being tested and lost? | Faith |
| In 'Heralds of the Apocalypse', which of the heralds calls Forinthry home. | War |
| In 'The Group Gatestone', on which floors were people trapped? | Abandoned |
Rewards

- 5 stories: Ghost Story emote and Headless Rider Outfit cosmetic override

- All 10 stories: [Name] the Ghostwriter
Balloon drop
Every 30 minutes, on :45 and :15 in game time, orange and black balloons drop near lodestones. There is a limit of 50 balloons popped per day. A global message is displayed two minutes prior to the drop:
Balloons will drop near all lodestones (except Prifddinas) in two minutes, as part of Gielinor's Hallowe'en celebrations!
Players can pop up to 50 of the balloons daily to receive a random assortment of the following:
| Item | Quantity | Rarity | GE price | |
|---|---|---|---|---|
| Coins | 213–4,966 | Common | 213–4,966 | |
| Ancient bones | 1 | Common | Not sold | |
| Bones | 2–3 | Common | 532–798 | |
| Sugar skull | 2–3 | Common | Not sold | |
| Toffee apple | 2–3 | Common | Not sold | |
| Accursed ashes | 2 | Unknown | 1,500 | |
| Bonus XP star (small) | 1 | Unknown | Not sold | |
| Congealed blood | 25–63 | Unknown | 1,725–4,347 | |
| Searing ashes | 2 | Unknown | 110,974 | |
| Small XP lamp | 1 | Unknown | Not sold | |
| Zogre bones | 2 | Unknown | 2,802 |
If you haven't already unlocked them, popping the balloons will also give players a chance at receiving the following:
| Item | Quantity | Rarity | GE price | |
|---|---|---|---|---|
| Deployable herb burner | 1 | Rare | Not sold | |
| Ectoplasmator | 1 | Rare | Not sold | |
| Cremation | 1 | Rare | Not sold |
If there is not enough inventory space when popping a balloon, the following message is shown:
Your prizes drop to the floor because you do not have enough inventory space.
Costume gathering
As with the 2016 event, strange boy and girl could be found organising a costume gathering on 31 October.
Decorations
During the event, the trees around the world were decorated for the occasion.
Trivia
- Some of the stories in the event were written by players, while others were written by Mod Raven, Scorpio, Mohawk, Rowley, and Osborne.[1]
- The "Asleep" story is a retelling of the Masterpiece Creepypasta.
- The "Heralds of the Apocalypse" story chronicles a civilian first-hand account of the destruction of Forinthry at the end of the Gielinorian God Wars. The 'red light' seen dancing on the horizon is the Stone of Jas in its unstable state being wielded by Zamorak, referencing the events seen in the flashback at the end of Dishonour among Thieves. The text also makes reference to the four horsemen of the apocalypse Death, Famine, Pestilence and War to describe the various fates befalling Forinthry in the days following the blast.
- During "The Group Gatestone" the player pricks their finger on the spinning wheel, which is likely a reference to Sleeping Beauty.
- During "The Group Gatestone", the player can interact with the doors in the room multiple times for some comical chat messages.
- Dark spirit door: "This isn't a hilarious story to share with your grandchildren.", "This is the door you will die on.", "Keep going. See what happens.", "That's the spirit."
- Guardian door: "The door won't unlock until everything in the room is dead...", "That includes you.", "You can't fool it.", "It's watching you..."
- Barred door: "You are too weak.", "You will always be too weak.", "You won't get out this way."
- The requirement for opening the door is always one level higher than your current Strength level, even if you boost it using the provided strong melee potion.
- Purple diamond door: "You don't have the right key.", "You can't save them from it.", "It's coming for you next.", "You should be afraid."
- After accusing Daniel during "By the Light of the Moon" of being a werewolf, he will say "I would have gotten away with it too, if it wasn't for you meddling World Guardians!" This is a reference to Scooby-Doo villains.
References
| Hallowe'en event | |
| Christmas event |
|
| Easter/Spring event |
|
| Summer Beach Party |
|
| Spring Fayre |
|
| Thanksgiving event |
|
| April Fools' |
|
| Cryptic Clue Fest |
|
| Winter event |
|
| Winter Weekends |
|
| RuneFest |
|
| Membership promotions |
|
| The Drop |
|
| Christmas Advent Calendar |
|
| Game Jam |
|
| Miscellaneous |
|