m (Fixed broken image caption.) Tag: sourceedit |
(added maps (will upload clue 5 location later added con)) Tag: sourceedit |
||
| Line 1: | Line 1: | ||
| + | {{Under construction}} |
||
{{QG}} |
{{QG}} |
||
| Line 82: | Line 83: | ||
====Clue 1==== |
====Clue 1==== |
||
[[File:Clue 1 location (AVD).png|thumb|left|The location of the first clue]] |
[[File:Clue 1 location (AVD).png|thumb|left|The location of the first clue]] |
||
| + | [[File:A Void Dance Clue 1 loctaion.png|thumb|left|Map of the first clue.]] |
||
*The first clue is a map, the location of which is south of the wheat field, west of Falador, south of Taverley and north of [[Nora T. Hagg]]'s house. |
*The first clue is a map, the location of which is south of the wheat field, west of Falador, south of Taverley and north of [[Nora T. Hagg]]'s house. |
||
*Bring a [[Spade]] |
*Bring a [[Spade]] |
||
| Line 88: | Line 90: | ||
====Clue 2==== |
====Clue 2==== |
||
[[File:Clue 2 location (AVD).png|thumb|left|The location of the second clue.]] |
[[File:Clue 2 location (AVD).png|thumb|left|The location of the second clue.]] |
||
| + | [[File:A Void Dance Clue 2 location.png|thumb|left|Map of the second clue.]] |
||
*Go east of the [[Crafting Guild]] and find the [[Man (A Void Dance)|man]] wandering with a walking stick around the area. Give him an onion and then select the [[wave]] option. You will receive another clue. |
*Go east of the [[Crafting Guild]] and find the [[Man (A Void Dance)|man]] wandering with a walking stick around the area. Give him an onion and then select the [[wave]] option. You will receive another clue. |
||
*If you don't already have an onion, you can pick one just southeast of the crafting guild, north of Rimmington. |
*If you don't already have an onion, you can pick one just southeast of the crafting guild, north of Rimmington. |
||
| Line 95: | Line 98: | ||
====Clue 3==== |
====Clue 3==== |
||
[[File:Clue scroll 3 AVD.png|thumb|left|The location of the third clue]] |
[[File:Clue scroll 3 AVD.png|thumb|left|The location of the third clue]] |
||
| + | [[File:A Void Dance Clue 3 location.png|thumb|left|Map of the third clue.]] |
||
*Enter the farmhouse south of Falador, and search the crate just beside the lobby entrance to receive another clue. |
*Enter the farmhouse south of Falador, and search the crate just beside the lobby entrance to receive another clue. |
||
| Line 100: | Line 104: | ||
====Clue 4==== |
====Clue 4==== |
||
[[File:Clue 4 location (AVD).png|thumb|left|The location of the fourth clue]] |
[[File:Clue 4 location (AVD).png|thumb|left|The location of the fourth clue]] |
||
| + | [[File:A Void Dance Clue 4 location.png|thumb|left|Map of the fourth clue.]] |
||
*Go to the [[Edgeville Monastery]]. |
*Go to the [[Edgeville Monastery]]. |
||
*Dig on the red flower north of the north-eastern fountain. |
*Dig on the red flower north of the north-eastern fountain. |
||
| Line 107: | Line 112: | ||
====Clue 5==== |
====Clue 5==== |
||
[[File:A Void Dance Clue Hatchway.png|thumb|left|The location of the hatch]] |
[[File:A Void Dance Clue Hatchway.png|thumb|left|The location of the hatch]] |
||
| + | [[File:A Void Dance Clue 5 location.png|thumb|left|Map of the hatch.]] |
||
*Go to the hatchway south-west of the [[Black Knights' Fortress (building)|Black Knights' Fortress]] and try to enter it. |
*Go to the hatchway south-west of the [[Black Knights' Fortress (building)|Black Knights' Fortress]] and try to enter it. |
||
Revision as of 00:21, 6 March 2017
Walkthrough
| Start point | |||
|---|---|---|---|
| Member requirement | |||
| Official difficulty | |||
| Official length | Long | ||
| Requirements | Skill requirements are not boostable unless marked with a [B] for boostable.
None of these skills can be boosted
| ||
| Items required | Items from the tool belt are not listed unless they do not work or are not automatically added.
| ||
| Recommended |
| ||
| Enemies to defeat |
|
Starting
- Speak with Commodore Tyr on the Void Knights' Outpost.
- Go through all chat options.
- Speak with Captain Korasi.
Pest-y Business

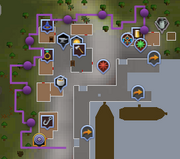
The path to take during this part of the quest.
- Make your way to the Port Sarim dock, and speak with Korasi.
- Speak with Captain Tobias, just north of Korasi.
- Speak with Gerrant in the fishing shop and tell him you are looking for an escaped animal.
- Follow the path shown in this image, searching the bushes, plants and stones.
- Finally check the mound.
- Return to Captain Korasi at the Port Sarim docks.
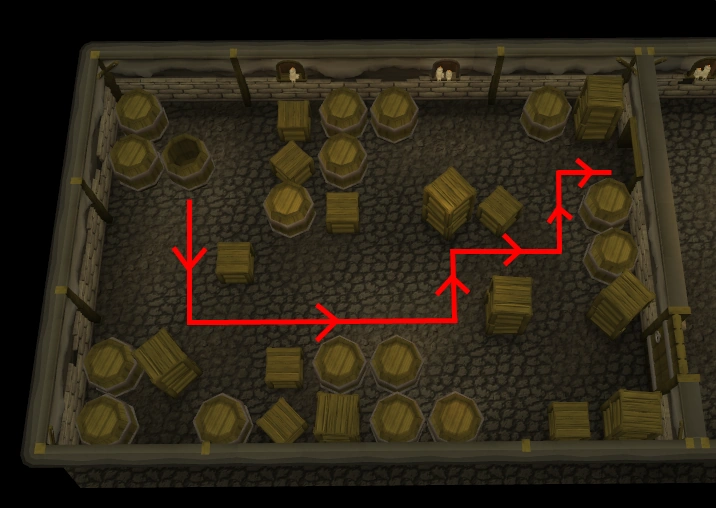

The barrels should be kicked into the positions as shown.
- Speak with the bartender.
- Search the piles of junk in the bar until you find a key.
- Go down the trapdoor behind the bar counter.
- Inspect the suspicious-looking wall on the north side.
- Make your way to the back of the room with the barrels and kick the empty barrel out. Follow the image shown if you are having trouble.
- Speak with the bartender again. It doesn't matter if you lie or not.
Getting Hotter...
- Speak with Korasi on the dock.
- Travel to Musa Point.
- Speak with Zambo in the pub about noticing anything odd.
- Speak with Shopkeeper Kofi in the general store directly west of the pub.
- Search the table in the south-west corner of the shop.

- Use the chisel on the plank, then the jointed plank on the jointed log.
- Use the joist on the broken wall on the north end of the shop.
- Talk to Kofi again.
- Follow the trail just like the one at Port Sarim.
- Check the mound again after Korasi and Jessika show up.
- Make sure you have at least 16 free inventory spaces and head to Rimmington.
- Speak with Rommik in the crafting shop about the waxwood.
Gooey Analysis
- Go to the chemist's house to the west and speak with Korasi and then with the chemist.
- Analyse the sample by keeping the power and heat at an OK level, and keeping the current ingredient as the desired one.
- The table in the top-right shows how to make each ingredient. Put the ingredient in the hopper. The following table for guidance on which machine to use for each problem.
| Power State | Indicators | Heat | Pressure |
|---|---|---|---|
| Low | Low, Very Low and SHORTFALL | Stoke the furnace | Turn the flywheel |
| High | High, Very High and OVERLOAD | Open the vent | Apply the brake |
- If you are struggling refer to the full guide for more details.
Predicament
- Accept Jessika's offer to teleport you to Falador Park.
- Speak with Sir Tiffy Cashien.
- Speak with Ali Tist south of the eastern Falador bank.
- Buy a box from him and attempt to open it.
- Speak with Sir Tiffy.
- Choose any of the chat options about how to open the box.
- Speak with Ali.
- Speak with Sir Tiffy.
- Speak with Sir Amik Varze on the 2nd floor[UK] of the western tower of White Knights' Castle.
- Speak with Ali and tell him you want to search his stock.
Whodunnit?
- Speak with Sir Tiffy.
- You do not need a sextant/chart/watch to complete this clue scroll, but you must have received the three for Sir Tiffy to let you continue.
Clue 1

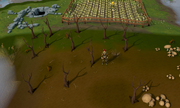
.png)
The location of the first clue
Map of the first clue.
- The first clue is a map, the location of which is south of the wheat field, west of Falador, south of Taverley and north of Nora T. Hagg's house.
- Bring a Spade
Clue 2
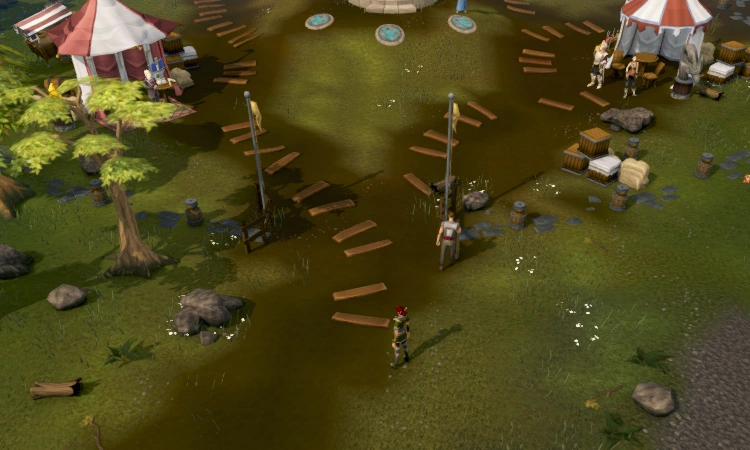

.png)
The location of the second clue.

Map of the second clue.
- Go east of the Crafting Guild and find the man wandering with a walking stick around the area. Give him an onion and then select the wave option. You will receive another clue.
- If you don't already have an onion, you can pick one just southeast of the crafting guild, north of Rimmington.
Clue 3
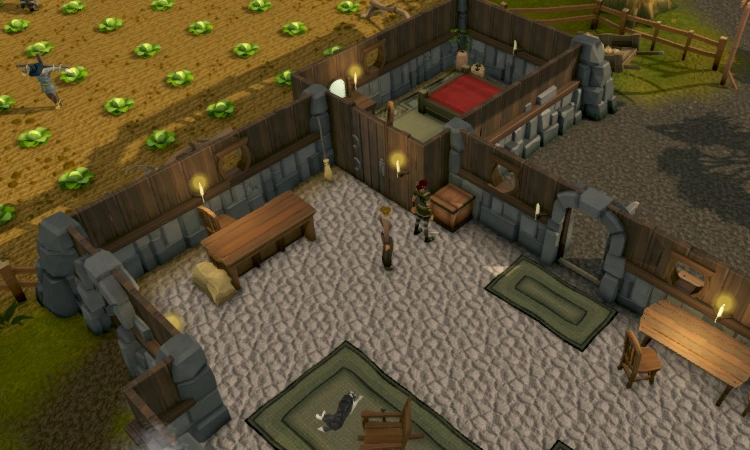

The location of the third clue

Map of the third clue.
- Enter the farmhouse south of Falador, and search the crate just beside the lobby entrance to receive another clue.
Clue 4
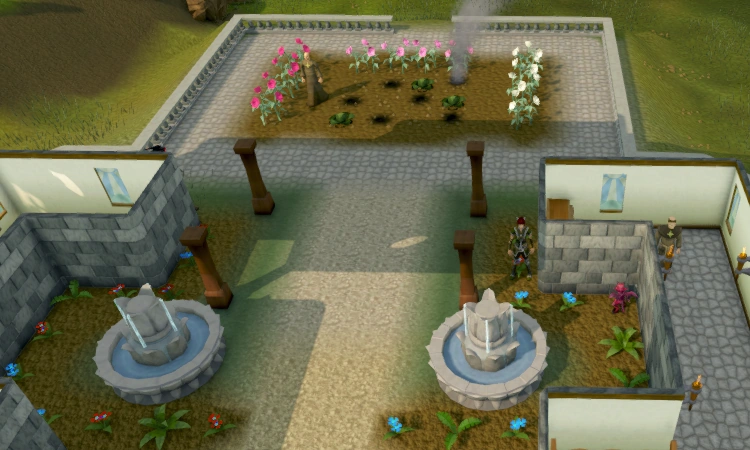

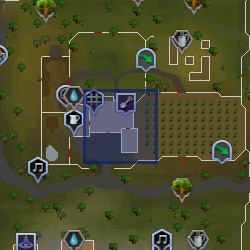
.png)
The location of the fourth clue

Map of the fourth clue.
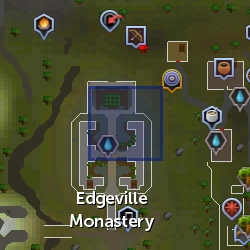
- Go to the Edgeville Monastery.
- Dig on the red flower north of the north-eastern fountain.
- Sometimes, using the dig function on the spade won't have any effect. In that case, use the spade on the red flower.
Clue 5
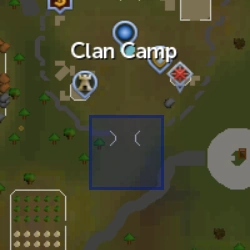
The location of the hatch

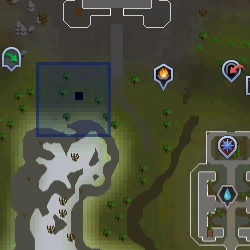
Map of the hatch.
- Go to the hatchway south-west of the Black Knights' Fortress and try to enter it.
Quick Thinking
- Try to enter the hatchway again, and then a 3rd time after the chat.
- Speak with Korasi.
- Speak with Korasi.
- Use the Void drone on the low box near the door (with the guard behind) without being caught by the workers.
- Wait until some workers go by then go and retrieve the bug.
- Speak with Jessika.
- Pickpocket a worker as they head away from the guarded door.
- Speak with Korasi.
- Knock on the guarded door.
- Speak with Korasi.
- Enter the next room and right click "Murder" on an indentured worker.
Finishing up
Be sure to drain your prayer points before entering the final room.
- Use the key on the next door and kill the level 77 Black Knight Guardian and the level 110 guardian.
- Speak with the Void leech, then kill it or set it free.
- Teleport back to the Void Knights' Outpost with Korasi.
- Talk to Commodore Tyr.
- Quest complete!