m (→Wilderness course: Added sources/appearances) |
No edit summary |
||
| Line 24: | Line 24: | ||
**[[Spottier Cape]] (level 66) 4.5 kg reduction. |
**[[Spottier Cape]] (level 66) 4.5 kg reduction. |
||
*[[Penance gloves]] from [[Barbarian Assault]] minigame reduces about 5 kg more. |
*[[Penance gloves]] from [[Barbarian Assault]] minigame reduces about 5 kg more. |
||
| + | * An [[Explorer's ring]] can restore run energy, depnding on what version you have. |
||
| − | |||
The training courses are identified with a running figure [[Image:Agility training.png]] [[icon]] on the [[map]]. |
The training courses are identified with a running figure [[Image:Agility training.png]] [[icon]] on the [[map]]. |
||
Revision as of 00:16, 18 July 2008
Agility is a members-only skill giving access to various shortcuts around RuneScape. A higher Agility level makes the player's energy recharge significantly more quickly. This skill was released on 12 December, 2002[1]. The current minimum to be ranked on the hiscores in Agility is 30 Agility and 13,363 experience.
Agility allows players to gain energy back faster, allowing them to run for longer periods.
A player uses Agility to cross a log.
Energy gain with 99 Agility
The energy indicator at the right side of your minimap
Agility courses
The player's Agility level is increased by training in various agility courses.
It is helpful in nearly all agility courses to take Food in case you fall, and Energy potions or Super energy potions made using the Herblore skill, allowing you to maintain a running pace continually around the courses, thus gaining experience faster. For each course you normally receive a set amount of experience per obstacle completed, and a bonus reward for completing the course, in some cases this bonus reward makes up the majority of the experience gained for running the course.
On many courses, the amount of damage taken after failing an obstacle is based on your remaining Hitpoints, so to conserve food, it is often worthwhile to keep your Hitpoints fairly low (except at the Werewolf course). For example, falling into the lava may cause 12 points of damage in the Wilderness course when you have full Hitpoints, but only cause 6 if you have 20 Hitpoints left.
It is also recommended that you wear:
- Boots of lightness obtained during the Temple of Ikov quest. These take 4.5 kg of weight off of you, which helps to conserve energy.
- The Hunter skill allows players to collect furs that can be traded for weight reducing capes:
- Spotted cape (requires level 40 Hunter to wear) 2 kg reduction or
- Spottier Cape (level 66) 4.5 kg reduction.
- Penance gloves from Barbarian Assault minigame reduces about 5 kg more.
- An Explorer's ring can restore run energy, depnding on what version you have.
The training courses are identified with a running figure File:Agility training.png icon on the map.
Gnome Stronghold course
Gnome stronghold course map
As it has no requirements, it is recommended that new Agility trainers begin here. It is located near the Grand Tree in the Tree Gnome Stronghold, northwest of Ardougne.
It is impossible to fail any of the obstacles at this course so no food is required, though some energy potions may be helpful for faster training. Whilst you move around the course, gnome trainers will shout insults and orders at you. Despite the simplicity of this course, the overall lack of sufficient experience gains makes it massively less attractive for those of a higher level to train, thus this course is recommended for those just starting out.
| Obstacle | XP Gain |
|---|---|
| Log Balance | 7.5 |
| Net Climb | 7.5 |
| Branch Climb | 5 |
| Balancing Rope | 7.5 |
| Net Climb | 7.5 |
| Tunnel | 7.5 |
| Agility Bonus | 39 |
| Total Gain | 86.5 |
It is possible to earn over 8,000 exp / hour using this course.
Brimhaven agility arena
The Brimhaven agility arena is different from other agility training spots as it isn't necessarily a course. In the arena, players tag pillars separated by several agility-based obstacles. When players are able to tag two or more pillars consecutively, they receive tickets, which are redeemable by Pirate Jackie the Fruit for various rewards.
When you combine the experienced earned from agility arena tickets with the experience you gain from the obstacles, it's possible to earn as much as 28,000 xp / hour using this course. Also note that Karamja gloves 2 provide a 10% bonus to the experience earned while on the course as well as the experience gained from redeeming the tickets. This means you can earn as much as 30,800 xp / hour while wearing the gloves on this course.
It is recommended players save tickets received from this minigame, as 1,000 tickets cashed in at once can earn massive experience, often rewarding players with several levels at a time.
Agility pyramid
The Agility pyramid is located in the Kharidian Desert and is available for players with a minimum of level 30 Agility. This agility course differs from others in that along with the primary goal of completing the circuit, players can also complete a secondary task of retrieving an artifact for an NPC. This artifact can then be exchanged for 1,000 coins.
It is possible to earn as much as 20,000 exp / hour using this course, though it should be noted the desert effect (water draining) is persistent throughout the course and food as well as water is recommended. Heavy armour is highly discouraged and should be replaced with light robes.
Penguin course
Penguin Outpost Agility course map
Only available to players after they have completed Cold War (level 30 Agility) and are in a penguin suit, this course offers some of the best Agility experience in the game. Players with low Hitpoints may find this course useful as minimal damage is received upon failure, despite giving similar experience to the werewolf course.
| Obstacle | XP Gain |
|---|---|
| Platform climb | 55 |
| Complete Platform Jumps | 80 |
| Icicles | 40 each or 160 total |
| Ice Slope | 180 |
| Agility Bonus | 65 |
| Total Gain | 540 |
Hints:
- When doing the crushers, click on the minimap.
- The platform jump depends on your Agility level.
- If you don't click on "tread softly" while going under the icicles, you will always get hurt.
- Finally, for the ice slope, if you click on it when it is plain without sparkles, you should make it.
Barbarian Outpost
The Barbarian Outpost map
The Barbarian Outpost Agility Training Area is available to players with level 35 Agility who have completed the Bar Crawl miniquest. This course is a lap-based obstacle course, similar to the Gnome Stronghold agility course. A completed lap yields 153 Agility experience. Food is recommended as players can possibly fail several times consecutively, quickly depleting hitpoints and food stashes for the ill-prepared.
| Obstacle | XP Gain |
|---|---|
| Entrance Tunnel | 10 |
| Rope Swing | 22 |
| Balance Log | 13.5 |
| Net | 8 |
| Balance Ledge | 22 |
| Wall climb | 13.5 |
| Agility Bonus | 46 |
| Total Gain | 152.0 |
The games necklace can be used to as a form of quick travel. One of the necklaces options are to tellport to the Barbarian Assult which is near the course. The necklaces are low leval crafting and enchanting making them easy to obtain, as well as fairly cheap.
Hint:
- Some parts of the course can repeated solely, so as to keep a continue path on a 'safe' obstacle rather than making full rounds.
Ape Atoll
The Ape Atoll agility course is available to players with an Agility level of 48 or higher who have completed the Monkey Madness quest. Also, players will need a Ninja greegree to begin the lap-based obstacle course. One completed lap gives 580 experience.
| Obstacle | XP Gain |
|---|---|
| Stepping Stone | 40 |
| Climbing Tree | 40 |
| Monkey Bars | 40 |
| Skull Slope Cliff Climb | 60 |
| Rope Swing | 100 |
| Zip Vine | 300 |
| Total Gain | 580 |
Hint: When you reach level 75 agility you will not fail any of the obstacles, thus making it a decent way to train agility if you are trying to achieve level 99. However, the Dorgesh-Kaan course is faster xp after approximately level 80 agility.
The Ape Atoll course maxes at approximately 53k xp per hour at 75+ agility.
Another notible benifit of this corse is the pinapple plant growing to the west of the hut on which the zip vine is atached. Unlike other pinapple plant, this plant gives only one pinapple at a time, but respwans at about the same amount of time as it take for a single lap. Instead of bringing food a player can bring a knif to make pinapple slices. Each slice gives two hp(health points), and a player recives four slices to each pinapple for a total of eight hp. Failing to make a jump on this course causes five damage, so a pinapple can sustain a player for a little more then one fall per lap. For those players who do not wish to carry loads of food which will drain their run faster, this is a good idea.
Wilderness course
The Wilderness agility course
The wilderness course requires level 52 Agility to enter, although a temporary agility boost (e.g. with an Agility potion) is sufficient to enter the course. After the entry, there are no agility constraints on using the course, making it one of the fastest agility experience gaining methods. Its only problem is the location, level 50-56 Wilderness: revenants can attack you within, some parts of the course entering multicombat areas, so be careful! A good idea is to bring a Spirit wolf with you, so he can Howl the revenants away.
One completed lap gives 571.5 Agility experience.
| Obstacle | XP Gain |
|---|---|
| Obstacle pipe | 12.5 |
| Ropeswing | 20 |
| Stepping stones | 20 |
| Log balance | 20 |
| Rock climb | 0 |
| Agility Bonus | 499 |
| Total Gain | 571.5 |
Hint:
- Bring cakes to peak average rounds
- Agility potions will increase players' speeds, generally letting them make more rounds per trip
- Staying on ancient magicks will allow players of high magic level to teleport back to the location upon death
Werewolf course
The werewolf course is located between Port Phasmatys and Canifis in the swamps. It is almost directly east of Canifis bank, but players will have to go around to reach it. They must have completed the Creature of Fenkenstrain quest to gain access to this course through the use of the Ring of Charos. The werewolf course requires level 60 Agility.
When players start the course (by jumping onto the stepping stones), the nearby trainer will throw a stick. Carry on over the jumps and through the pipe and pick up the stick. Players will gain an additional 190 experience if they return the stick to the trainer at the bottom of the death-slide.
The only obstacle player can fail on this course is the death-slide. However, this can cause over 30 damage, and players with low hitpoints are at risk of death. The higher the players' Strength, the less likely they are to fail this obstacle, so using the dragon battleaxe special every now and again on laps can really help. A low weight also is highly effective, so take any weight reducing equipment if possible. Consider bringing low-weight food items (e.g. baskets of strawberries) and super energy potions.
The deathslide contains an extremely irritating and slightly frightening glitch. If a player fails this obstacle they may find themselves falling into a black void, your character will appear in the middle of a completely black screen, you cannot use teleportation to leave the void, you must log out and log back in, if it fails the first time continue to log out and in, if you're still unable to escape "the void" try switching worlds and logging back in.
You will gain 350 experience for a successful lap, plus another 190 experience if you retrieved the stick for a total of 540 experience per lap.
Though this course has higher minimum Agility requirements than the wilderness course, the experience is slightly worse. Players can also take significantly more damage from falling, so they have to return to the bank more often. However, this course lacks the dangerous revenants who sometimes plague the Wilderness course.
The Deathslide
| Obstacle | XP Gain |
|---|---|
| Stepping Stones | 50 |
| Hurdles | 60 |
| Tunnels | 15 |
| Skull Slope | 25 |
| Deathslide | 200 |
| Agility Bonus | 190 |
| Total Gain | 540 |
Hint:
- At level 72 Agility, players will fail the death-slide so infrequently that food is no longer necessary.
- From level 93 Agility onwards the death-slide will always be successful.
Dorgesh-Kaan
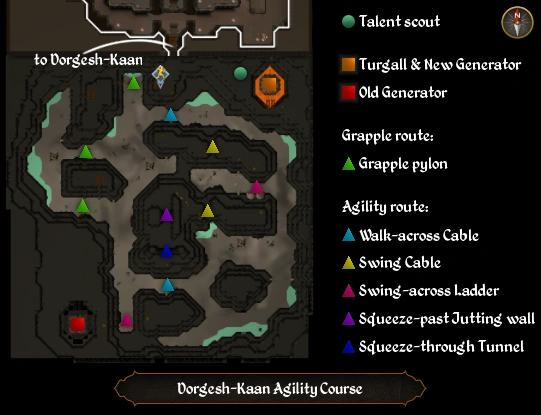
The Dorgesh-Kaan agility course
The Dorgesh-Kaan course was opened with the 20 March 2007 update. To access it requires 70 Agility, completion of the quest Death to the Dorgeshuun, and a light source. The course can be used to train Agility, Ranged, or split for both skills. The basic premise of the course is to cross obstacles using one of two routes to retrieve an item requested by the goblin Turgall. Either path can also be used to return an item to Turgall, who will bestow an experience bonus depending on which route the player used to depart and return. In order to train Ranged, a mithril grapple and appropriate crossbow will be required, along with 70 Strength and 70 Ranged. The course looms above the Dorgesh-Kaan South Dungeon.
| Route | Time | Agility Experience | Ranged Experience |
|---|---|---|---|
| Agility course both ways | 2.40 | 2750 | 0 |
| Agility course there, grapple route return, or vice-versa | 2.30 | 1444 | 625 |
| Grapple route both ways | 1.49 | 108 | 1250 |
| Heavy Items | Name |
|---|---|
| File:Cog2.PNG | Cog |
| File:Lever.PNG | Lever |
| File:Power box2.PNG | Powerbox |
Hints:
- There are large "hotspots" to click on for each obstacle (as opposed to 2-pixel wide targets at other courses), it involves a little brain-work (retrieving the correct item), and an option of using two separate paths go gain either Agility or Ranged experience, or both. One downside is that if you use the agility course all the time (as no doubt people will), is that any fall means that you receive a negligible amount of experience.
- A fairy ring AJQ is present at the eastern end of the Dorgesh-Kaan South Dungeon which is just below the agility course. The ladder to the agility course is north-east of the ring.
- A Mining helmet weighs less than a lantern, and should have no chance to become extinguished by accident.
- When Turgall tells you what to retrieve, type it in public chat but don't hit return - then cross all the way to the other generator and the item you need to get is always at the bottom of the screen. Or, you can put your spanner in an inventory space that corresponds to the item that you are asked to retrieve.
- It is estimated that you can obtain 68750xp per hour on the double long agility route, without failing once.
Other training
Werewolf Skullball
Skull ball is played in the Werewolf agility area east of Canifis. You need to be wearing the Ring of Charos gained through the Creature of Fenkenstrain quest. You must also have a minimum of level 25 Agility.
To play, talk to the Skullball boss at the start of the course. From there, you must kick the ball through a course of 10 obstacles. To kick the ball, right click on it and select how far you want to kick it. A tap advances the ball 1 space away from you, a kick is 5 spaces, and shoot is 10 spaces. You also have the option of having the map highlight the goal.
When you successfully get the ball through the final obstacle, you will get a reward based on your time. If it's under 4 minutes, you will gain the maximum 750 experience. Any more and the experience becomes less.
Gnome Ball
Gnome Ball is a small members only minigame in which one or more players aim to score goals against gnomes. This is done by throwing the gnome ball into the goal. Ranged experience is gained each time you throw the ball, you get Ranged and Agility experience when you score a goal too. When you enter the field, you should talk to the referee to get the rules, and how to play.
Toy Mouse
Players can make a Toy Mouse on a Crafting Table in their house or bought from a player who can make it. Winding, releasing and catching it will give you 3 Agility experience each time. It is also randomly obtained while using Ava's Accumulator, but it is quite rare.
Blast Furnace
The multi player blast furnace minigame has a facility to operate a belt to transport ores into the furnace. This gives a modest amount of agility experience. See the relevant page for more details.
Training for skill pures
As Monkey Madness is much too hard a quest for any level 3 or 4, pures may want to do most of their training at the Agility Arena. The agility arena offers modest experience averaging at only around 10,000 experience per hour. However the tickets awarded for playing the game can be cashed in every 1000 for 320,000 experience. Generally per hour players can average about 40 tickets. All traps on the course will do 2 damage if you fail so bring some cakes and keep an eye on your health. Some players bring toy mice down for extra exp in the arena when waiting for pillars to change. This is not exactly useful as they can get stuck in the middle of trap or can be lost in a random event.
Shortcuts
Shortcuts are identified with a twisting green arrow icon (File:Shortcuticon.PNG) on the minimap.
| Level | Obstacle | Location | Grapple? | Description | Xp |
|---|---|---|---|---|---|
| 1 | Stile | Spreaded | No | Free players can use these but, do not receive 1 Agility experience. members on the other hand do | 3 |
| 5 | Crumbling wall | Falador | No | Right next to the west bank. Provides easy access to the areas south of Taverley. | 14 |
| 8 | Broken raft | South of Lumbridge | Yes (requires 19 Strength and 37 Ranged) | Provides slightly quicker route between Lumbridge Swamp and Al Kharid. Goes both ways. | 15 |
| 10 | Rope swing | West Brimhaven | No | Provides access to small island with Moss Giants and a respawn of a slice of cake. | 3 |
| 11 | Wall | Falador | Yes (requires 37 Strength and 19 Ranged) | Allows you to climb the wall northeast of the Park. Faster access from Falador east bank to the north entrance of the Dwarven mine and Barbarian Village. | 15 |
| 12 | Stepping stones | Brimhaven Dungeon | No | A quick shortcut deeper into the dungeon. Just west of the entrance. | 3 |
| 13 | Small hole | Lumbridge cellar | No | Need to go through to progress in Lost Tribe | N/A |
| 15 | Monkey bars | Edgeville Dungeon | No | Provides access to the Earth Warriors | N/A |
| 16 | Underwall tunnel | Yanille | No | Near the Watchtower. Gives easy access to the west parts of Yanille from the teleport point. | 15 |
| 20 | Log balance | West of Seers' Village | No | Near the coal trucks. Provides easier access between the mining spot and the pickup location near Seers' Village | 5 |
| 21 | Underwall tunnel | Varrock | No | Northwest side of the Grand Exchange. Gives easier access to Edgeville. | 17 |
| 22 | Pipe squeeze | Brimhaven Dungeon | No | Provides easier access to the Moss Giants. Just west of the entrance. | 5 |
| 25 | Rope climb | Agility pyramid | No | Shortcut to Scabarite dungeon Dealing with Scabaras quest. | N/A |
| 26 | Underwall tunnel | Falador | No | Southwest corner of Falador. Provides easier travel between the west bank and Rimmington, as well as the Crafting Guild. | 15 |
| 30 | Stepping stones | Brimhaven Dungeon | No | Allows access to the Red Dragons. | N/A |
| 31 | Stepping stones | Near Draynor Manor | No | Allows you to cross the River Lum between the Manor and Varrock. | N/A |
| 32 | Rock | East Catherby | Yes (requires 35 Strength and 35 Ranged) | Allows easier passage from Catherby to Taverley. One way. Must have completed Fishing Contest. | 15 |
| 32 | Rock slide | East Cairn Isle | No | Allows access to Cairn Isle from Karamja Island and completion of an Easy task in the Karamja Achievement Diary. | N/A |
| 33 | Log balance | Ardougne | No | Allows easy passage across the river. | N/A |
| 34 | Pipe squeeze | Brimhaven Dungeon | No | Allows passage between the Red dragon and Black demon rooms. | N/A |
| 36 | Rock | Taverley Dungeon | Yes (requires 22 Strength and 39 Ranged) | Allows escape from the Taverley Dungeon by crossing the water to Catherby from the Water obelisk island. One way. | 15 |
| 37 | Rocks | Tree Gnome Stronghold | No | Northeast of the Grand Tree. Allows easy access to Barbarian Outpost and the Lighthouse. | N/A |
| 38 | Rocks | Al Kharid | No | Allows easy access into the desert mining area from the north end. | N/A |
| 39 | Wall | Yanille | Yes (requires 38 Strength and 21 Ranged) | South-west Yanille. Provides easier access to Gu'Tanoth and southern areas. | 15 |
| 40 | Balancing ledge | Yanille Agility dungeon | No | First obstacle into the Agility Dungeon, giving access to the Chaos druid warriors. Drops you into a pit of Poison spiders if you fail. | N/A |
| 41 | Rocks | Trollheim | No | Easy cliffside scramble. Allows easier travel over the hill near the Troll Stronghold. | N/A |
| 42 | Narrow crevice | Dwarven mine | No | Provides a shortcut between the two arms of the mine. | N/A |
| 43 | Rocks | Trollheim | No | Medium cliffside scramble. Allows easier travel over the hill near the Troll Stronghold. | N/A |
| 44 | Rocks | Trollheim | No | Advanced cliffside scramble. Allows easier travel over the hill near the Troll Stronghold. | N/A |
| 45 | Log balance | Tirannwn | No | Allows passage between different parts of the forest. | N/A |
| 46 | Narrow walkway | Zanaris | No | Provides faster travel between the bank and the Cosmic altar. | N/A |
| 47 | Rocks | Trollheim | No | Hard cliffside scramble. Allows easier travel over the hill near the Troll Stronghold. | N/A |
| 48 | Log balance | North of Camelot | No | Provides slightly faster travel to eastern Fremmenick province. | N/A |
| 49 | Pipe squeeze | Yanille Agility dungeon | No | Provides access to the small room with the Sinister chest. | N/A |
| 51 | Pipe squeeze | Varrock Sewers/Edgeville Dungeon | No | Allows passage between the eastern part of the Edgeville Dungeon and the Moss Giants in the Varrock Sewers. | N/A |
| 53 | Rock | Karamja | Yes (requires 21 Strength and 42 Ranged) | Provides easier travel between the Karamja volcano area and lower Karamja. | 15 |
| 57 | Monkey bars | Yanille Agility dungeon | No | Provides access to the Chaos druids deeper in the dungeon, as well as a lockpick respawn down the nearby stairs. | N/A |
| 58 | Weathered wall | Ectofuntus | No | Provides faster travel down to the pool of slime. | N/A |
| 59 | Rocks | Arandar | No | Easy cliffside scramble. Helps when using the elven shortcut to Tirannwn. | N/A |
| 60 | Rocks | God Wars Dungeon | No | Shortcut between God Wars Dungeon and Trollheim (2-way) OR Wilderness level 31 (1-way to The Forgotten Cemetery | N/A |
| 61 | Spiked chain | Slayer Tower | No | Shortcut between Crawling hand area and Aberrant Specter area on the second floor. | N/A |
| 62 | Narrow crevice | Slayer Dungeon | No | Shortcut between Basilisk area and Turoth area. | N/A |
| 64 | Rocks | Trollheim | No | Shortcut from Trollheim to level 20 Wilderness. One way. | N/A |
| 65 | Loose railing | River Salve | No | Slightly faster way to get from one bank to the other, bypassing the underground route. | N/A |
| 65 | Jutting Wall | Meiyerditch dungeon | No | Shortcut from Myreque shortcut to Meiyerditch dungeon and Blood altar. | N/A |
| 66 | Narrow walkway | Zanaris | No | Much faster travel between the bank and the Cosmic altar. | N/A |
| 67 | Pile of rubble | Yanille Agility dungeon | No | Access to an area with 4 Chaos druids and Salarin the Twisted. | N/A |
| 68 | Rocks | Arandar | No | Medium cliffside scramble. Helps when using the elven shortcut to Tirannwn. | N/A |
| 70 | Pipe squeeze | Taverley Dungeon | No | Quick passage between the entrance and the Blue dragon area. Bypasses need for the Dusty key. | N/A |
| 71 | Spiked chain | Slayer Tower | No | Shortcut between Infernal Mages area on the second floor and Nechraeyl area on the third floor. | N/A |
| 80 | Spiked blades | Taverley Dungeon | No | Shortcut between the entrance and the Poison spider area. Bypasses need for the Dusty key. | N/A |
| 81 | Spiked blades | Slayer Dungeon | No | Shortcut between the Cave crawler area and the Pyrefiend area. | N/A |
| 85 | Rocks | Arandar | No | Advanced cliffside scramble. Helps when using the elven shortcut to Tirannwn. | N/A |
Temporary boosts
A player wearing the Agility cape.
- An Agility potion will boost Agility by 3. You can make these using the Herblore skill.
- A Summer pie will boost Agility by 5. You can make these using the Cooking skill.
- A yellow Spicy stew will boost or lower Agility by up to 6.
- A Spirit Terrorbird's special can boost your agility by 2 levels.
Training suggestions
When training Agility, it may be beneficial to wear a bracelet of regeneration, which doubles the natural rate of hitpoints recovery. This can be very useful for dangerous agility courses. It can be an expensive item to buy, but players may sell it after they have trained enough Agility with it.
The rate of healing can be further enhanced with the Rapid Heal prayer. In conjunction, these provide a potent regeneration of one hitpoint every 15 seconds. Wearing a holy symbol provides a +8 bonus to Prayer, and thus would help keep this rapid healing going.
If you are out of food and at the "Wilderness course" and only have 3 items of value, wait until your hitpoints are low, and use the prayer "Redemption" to heal yourself by 25% of your maximum prayer level then continue doing the course until you die and respawn in Lumbridge, from which there is a bank nearby.
Spirit terrorbirds help with Agility training. Bring one pouch for every 36 minutes you plan to train at a course, and several Tireless run scrolls. Use the scrolls to maintain your run energy, or more frequently if you want the 2 level Agility boost renewed. Because you can run the whole time, the rate of receiving agility experience is increased.
| Level | Method | Notes |
|---|---|---|
| 1-35 | Gnome Stronghold | It is the only course to start off. Clockwork mice were formerly considered a good method for low-level agility training , but the experience gained for catching one has been reduced from 15 to 3, leaving the Gnome Stronghold a superior choice. |
| 30-35 | The Grand Tree | Completing this quest takes you from level 30 towards level 34 Agility, and is two laps of the Gnome Stronghold course away from 35. Good if you get bored of agility quickly. |
| 30-35 | Agility Pyramid | Though players can use the Gnome Stronghold until 35, the Agility Pyramid is more effective, although failure rates are higher compared to other courses in the same level. |
| 35-40 | Barbarian Outpost | Players can use a Games necklace to teleport to the Barbarian Outpost. |
| 40-52 | Agility Arena | This is the most efficient method until the Wilderness course. However, players may opt to train further than 52 to increase their chances in the Wilderness course. It is recommended to save tickets until you have large quantities, to gain more experience. |
| 40-70 | Agility Arena | If players choose not to use the Wilderness course, the Agility Arena is another alternative. |
| 52-70 | Wilderness course | This is the most dangerous course, but it is more efficient than the Agility arena, as the fail rate for the obstacles is lower. Players can use the Ape Atoll course at 48, but the fail rate is very high. Players may have a hard time now due to the revenants that roam the wilderness. |
| 60-70 | Werewolf course | This course isn't as dangerous as the wilderness course; however, more damage is received because of the chance of failing the death slide. Higher strength, as well as agility, and lighter weight reduce the chance of failing the death slide, as well as using the Dragon battleaxe special attack and setting its attack style to strength, which, together, give a 20% visible strength boost plus a +3 invisible boost. |
| 70-99 | Ape Atoll | As players reach 75 Agility, they will be able to succeed the obstacles at Ape Atoll without fail, making it an efficient method. |
| 80-99 | Dorgesh-kaan | An alternative to Ape Atoll is Dorgesh-kaan, for players with higher agility levels. |
See also
References
- RuneScape Game Guide
Template:Wpalso
| Combat | |
| Gathering |
|
| Artisan |
|
| Support |
|
| Elite |
|
| Upcoming |
|
| Former skills |
|