m (British flooring - Undid revision 5186203 by Marc of w84 (Talk)) |
m (Cleaning Up:, typos fixed: armor → armour, agressive → aggressive) |
||
| Line 27: | Line 27: | ||
[[File:Bloodveld icon.PNG|left]] |
[[File:Bloodveld icon.PNG|left]] |
||
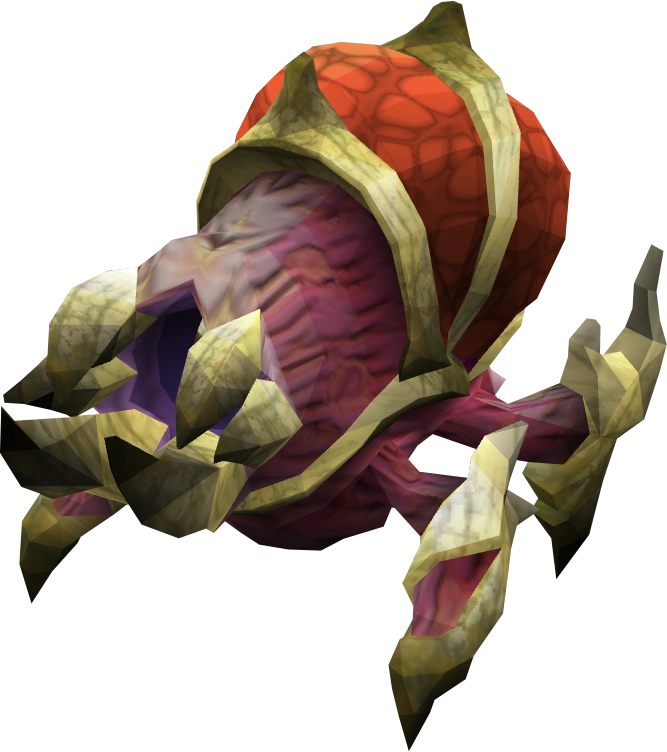
| − | A '''Bloodveld''' is a [[Slayer]] monster requiring level 50 Slayer to kill. They have similar drops to [[Lesser demon]]s, including [[Rune med helm]]s and [[Steel scimitar]]s. Other than for Slayer tasks, bloodveld are sometimes killed for their favourable [[green charm]] drop rate. The Bloodvelds are located on the {{FloorNumber|2}} in the [[Slayer Tower]].[[File: |
+ | A '''Bloodveld''' is a [[Slayer]] monster requiring level 50 Slayer to kill. They have similar drops to [[Lesser demon]]s, including [[Rune med helm]]s and [[Steel scimitar]]s. Other than for Slayer tasks, bloodveld are sometimes killed for their favourable [[green charm]] drop rate. The Bloodvelds are located on the {{FloorNumber|2}} in the [[Slayer Tower]].[[File:Old bloodveld.png|thumb|61px|A bloodveld before the graphical update.]] |
Their appearance changed upon release of the [[Smoking Kills]] quest on [[5 June]] [[2008]]. |
Their appearance changed upon release of the [[Smoking Kills]] quest on [[5 June]] [[2008]]. |
||
==Strengths and weaknesses== |
==Strengths and weaknesses== |
||
| − | Bloodveld attack via hand to hand combat. Though their attacks are [[melee]], the damage they do is based on magic/defence level and magic defence bonus. Players, therefore, with high [[Magic]] defence will take less damage. As such, it is strongly recommended that players wear [[Dragonhide armour]], Void Knight Robes, or other armour with higher magical defence bonuses in order to take as little damage as possible; Wearing black d'hide can reduce damage by 5 or 6 times as compared with rune |
+ | Bloodveld attack via hand to hand combat. Though their attacks are [[melee]], the damage they do is based on magic/defence level and magic defence bonus. Players, therefore, with high [[Magic]] defence will take less damage. As such, it is strongly recommended that players wear [[Dragonhide armour]], Void Knight Robes, or other armour with higher magical defence bonuses in order to take as little damage as possible; Wearing black d'hide can reduce damage by 5 or 6 times as compared with rune armour. Despite the mage/melee stat blending of the Bloodveld, the [[Protect from Melee]] prayer will completely protect players from Bloodveld attacks. |
{{Clear|left}}For mid-level players monkfish or better are the recommended food types. |
{{Clear|left}}For mid-level players monkfish or better are the recommended food types. |
||
| Line 50: | Line 50: | ||
The [[Slayer Tower]] is a popular place to fight Bloodveld, with a broad range of safe spots found behind chairs, heaps of bricks, and at several locations on the first floor, along the main wall that partitions the area of their habitat; specifically the end of the wall that separates the two southern rooms, and at the corner of the corridor to the north. The slayer tower is usually crowded.[[File:Doublebvsafespot.png|thumb|A double safe-spot is utilised to maximize kills.]] |
The [[Slayer Tower]] is a popular place to fight Bloodveld, with a broad range of safe spots found behind chairs, heaps of bricks, and at several locations on the first floor, along the main wall that partitions the area of their habitat; specifically the end of the wall that separates the two southern rooms, and at the corner of the corridor to the north. The slayer tower is usually crowded.[[File:Doublebvsafespot.png|thumb|A double safe-spot is utilised to maximize kills.]] |
||
| − | At the God Wars Dungeon, where Bloodveld can also be found, there are safe spots in the [[Zamorak]] area of the [[God Wars Dungeon]] near the entrance. The Bloodveld there are higher level, therefore have more life points which means more experience. These Bloodvelds are |
+ | At the God Wars Dungeon, where Bloodveld can also be found, there are safe spots in the [[Zamorak]] area of the [[God Wars Dungeon]] near the entrance. The Bloodveld there are higher level, therefore have more life points which means more experience. These Bloodvelds are aggressive, providing the player is not wearing an item pertaining to [[Zamorak]]. Another bonus of training at God Wars is that players still get the Slayer experience if another monster kills the Bloodveld, so long as the player has inflicted at least one damage on the Bloodveld first. For more details on this see the God Wars Dungeon guide. |
===Melee=== |
===Melee=== |
||
| Line 69: | Line 69: | ||
==Recommended Equipment== |
==Recommended Equipment== |
||
===Melee=== |
===Melee=== |
||
| − | *Head: [[ |
+ | *Head: [[Void melee helmet]] > [[Full slayer helmet|Slayer Helmet]] (if on task) > [[Black Mask]] (if on task) > [[Helm of Neitiznot]] |
*Neck: [[Amulet of Fury]] > [[Amulet of Glory]] |
*Neck: [[Amulet of Fury]] > [[Amulet of Glory]] |
||
| − | *Torso: [[Ganodermic top]]>[[Void knight top |
+ | *Torso: [[Ganodermic top]]>[[Void knight top]]> [[Karil's Top]] > [[Black d'hide body]] |
| − | *Legs:[[Ganodermic leggings]]>[[ |
+ | *Legs:[[Ganodermic leggings]]>[[Void knight robe]] > [[Karil's Leatherskirt]] > [[Black d'hide chaps]] |
*Boots: [[Dragon boots]] |
*Boots: [[Dragon boots]] |
||
*Gloves: [[Void knight gloves]] > [[Barrow gloves|Barrows gloves]] > [[Regen Bracelet]] |
*Gloves: [[Void knight gloves]] > [[Barrow gloves|Barrows gloves]] > [[Regen Bracelet]] |
||
Revision as of 05:49, 26 January 2012
Template:Floor
| ||||||||||||||||||||||||||||||||||||||||||||||||
| Release date | 26 January 2005 (Update) | |||||||||||||||||||||||||||||||||||||||||||||||
|---|---|---|---|---|---|---|---|---|---|---|---|---|---|---|---|---|---|---|---|---|---|---|---|---|---|---|---|---|---|---|---|---|---|---|---|---|---|---|---|---|---|---|---|---|---|---|---|---|
| Members | Yes | |||||||||||||||||||||||||||||||||||||||||||||||
| Combat level | 76/81 | |||||||||||||||||||||||||||||||||||||||||||||||
| XP per kill | 480/536 xp and 160/179 Constitution xp | |||||||||||||||||||||||||||||||||||||||||||||||
| Examine text | The tongue of evil. | |||||||||||||||||||||||||||||||||||||||||||||||
| Slayer info | ||||||||||||||||||||||||||||||||||||||||||||||||
| Slayer level | 50 | |||||||||||||||||||||||||||||||||||||||||||||||
| Slayer XP | 0.9 | |||||||||||||||||||||||||||||||||||||||||||||||
| Assigned by | Chaeldar, Sumona, Vannaka, Duradel or Lapalok, Kuradal | |||||||||||||||||||||||||||||||||||||||||||||||
| ||||||||||||||||||||||||||||||||||||||||||||||||
A Bloodveld is a Slayer monster requiring level 50 Slayer to kill. They have similar drops to Lesser demons, including Rune med helms and Steel scimitars. Other than for Slayer tasks, bloodveld are sometimes killed for their favourable green charm drop rate. The Bloodvelds are located on the 1st floor[UK] in the Slayer Tower.


A bloodveld before the graphical update.
Their appearance changed upon release of the Smoking Kills quest on 5 June 2008.
Strengths and weaknesses
Bloodveld attack via hand to hand combat. Though their attacks are melee, the damage they do is based on magic/defence level and magic defence bonus. Players, therefore, with high Magic defence will take less damage. As such, it is strongly recommended that players wear Dragonhide armour, Void Knight Robes, or other armour with higher magical defence bonuses in order to take as little damage as possible; Wearing black d'hide can reduce damage by 5 or 6 times as compared with rune armour. Despite the mage/melee stat blending of the Bloodveld, the Protect from Melee prayer will completely protect players from Bloodveld attacks.
For mid-level players monkfish or better are the recommended food types.
Tactics
Because Bloodvelds are big creatures (2x2 squares), fighting them using safe spots isn't difficult, but you will need to stand a few spaces away from them so that they can't hit you.
As Bloodveld are a common slayer task for mid level slayers and higher, it is worth noting several major tactics used to complete Bloodveld slayer tasks. One such tactic is for the player to use the Bones to Peaches spell or spell tablet works just as well. This is especially valid as Bloodveld commonly drop more than one set of bones. This method saves players time and effort by prolonging the time spent fighting the monsters, delaying regular banking trips for health restoring food.
Another method for prolonging one's stay there is to use an Enhanced Excalibur. These heal 200 or 400 Life Points depending on one's progress on the Seers' Village tasks over a short span of time, and boosts one's Defence level by 15%. Combined with Guthan's and high magic defence, one can stay for a very long time.
Bloodveld have rather low Defence and Strength for their combat level, and can only hit a maximum of 59 (level 76) or 80 (level 81). They have a higher attack level though, so while they hit low they are fairly accurate and will quickly deal significant damage to lower level players. No special equipment is required to fight them.
Ranged and Magic
A player safely ranging the Bloodveld in the Meiyerditch Dungeon.
Safe spotting is an often used tactic for these monsters given that Bloodvelds are susceptible to ranged attacks. There are significant amounts of locations in their habitat where a player can hide and attack these monsters using Ranged, Magic, or long-distance melee with a Halberd without having to deal with retribution from the monsters they attack. As they have an unusually high Constitution level, they are excellent targets for training the Ranged skill, with more experience per hour than a player will gain by using the established method of training on Fire giants. Bloodveld are difficult to fight effectively using magic if the player is at or below level 60 magic.
The Slayer Tower is a popular place to fight Bloodveld, with a broad range of safe spots found behind chairs, heaps of bricks, and at several locations on the first floor, along the main wall that partitions the area of their habitat; specifically the end of the wall that separates the two southern rooms, and at the corner of the corridor to the north. The slayer tower is usually crowded.
A double safe-spot is utilised to maximize kills.
At the God Wars Dungeon, where Bloodveld can also be found, there are safe spots in the Zamorak area of the God Wars Dungeon near the entrance. The Bloodveld there are higher level, therefore have more life points which means more experience. These Bloodvelds are aggressive, providing the player is not wearing an item pertaining to Zamorak. Another bonus of training at God Wars is that players still get the Slayer experience if another monster kills the Bloodveld, so long as the player has inflicted at least one damage on the Bloodveld first. For more details on this see the God Wars Dungeon guide.
Melee
The Full Guthan's set, with its healing effects is well put to use at Bloodveld, especially by players who have high magic levels, therefore a high innate magic defence. Although Guthan's gear itself does not give magic defence bonuses, the set special effect will activate as usual, healing the player. However, using the spear as a weapon, rather than a faster weapon, use of the special ability may be required more often than usual. To save wear-and-tear on Guthan's armour, some players also bring armour with high magical defence and only switch to Guthan's set when life points are low.
Also, using a bunyip or other healing familiars, can sustain most players for long periods of time with the health gained from it along with the occasional meat pizza drop. One could also utilise the bones to peaches spell as they drop bones every kill.
Wearing black d'hide with a saradomin sword or a whip and dragon defender are the most common setups, although void knight robe bottoms give higher magic defence, to use as they are cheap and effective and one can normally get through a task in only one trip.
With high defence and magic levels (90+ recommended), and a bunyip or other healing familiar, one can use Bandos armour for its strength bonus, thus speeding up the killing process. This is NOT recommended for lower levels, because damage is taken often, and a healing familiar, and if possible Soul Split (or other healing methods), are needed to survive for a full slayer task.
Karil's is great to use for its magical defence bonus, as bloodvelds possess a magical based melee attack.
With the innate characteristics of the Bloodveld including unprotected skin, they are noticeably weaker to slash attacks and stab attacks. As they are also demonic, they're also vulnerable to the meagre effects of Silverlight and Darklight.
The dragon halberd is also a good choice when fighting these, as the massive Slash power and long range works well with the area.
Recommended Equipment
Melee
- Head: Void melee helmet > Slayer Helmet (if on task) > Black Mask (if on task) > Helm of Neitiznot
- Neck: Amulet of Fury > Amulet of Glory
- Torso: Ganodermic top>Void knight top> Karil's Top > Black d'hide body
- Legs:Ganodermic leggings>Void knight robe > Karil's Leatherskirt > Black d'hide chaps
- Boots: Dragon boots
- Gloves: Void knight gloves > Barrows gloves > Regen Bracelet
- Cape: Fire cape > Skillcape (t) > Skillcape/Obsidian Cape
- Weapon: Chaotic longsword > Chaotic Rapier > Abyssal vine whip > Abyssal Whip > Dragon Scimitar
- Shield: Spectral Spirit Shield > Farseer Kiteshield > Dragonfire Shield > Dragon Defender
- Ring: Berserker Ring > Ring of Wealth > Ring of Life
Range
- Head: Full Slayer Helm (if on task) > Armadyl helmet > Third-age coif > Robin Hood Hat > Ranger hat > Blessed dragonhide coif > Black d'hide coif
- Neck: Amulet of Fury > Amulet of Ranging > Amulet of Glory
- Torso: Armadyl Chestplate > Karil's Top > Black d'hide body
- Legs: Armadyl Chainskirt > Karil's skirt > Black d'hide chaps
- Boots: Ranger boots > Snakeskin Boots > Dragon boots
- Gloves: Third-age vambraces > Barrows gloves > Black d'hide vambraces
- Cape: Ava's alerter > Ava's accumulator > Ava's Attractor
- Weapon: Chaotic Crossbow > Rune c'bow
- Shield: Spectral Spirit Shield > Dragonfire Shield > Unholy Book
- Ring: Archer's ring (i) > Archer's ring
- Ammunition: Broad-tipped Bolts
Demonic nature
Slayer Masters sometimes refer to Bloodveld as a "strange, demonic creature" or a "half-ton demon". Bloodveld drop various quantities of bones (they do not drop Demon Ashes) when they die, while all other demons crumble to various types of demon ashes that can be scattered for Prayer experience. It has been confirmed that Silverlight and Darklight have their special effects when attacking Bloodveld. As such, it appears Bloodveld are indeed a type of demon, despite their distinct dissimilarity with other creatures in that classification. This may be because Bloodveld seem to be the result of human/vampyre experimentation.
Locations
- Morytania Slayer Tower, 2nd floor (level 76)
- God Wars Dungeon (level 81)
- Meiyerditch Dungeon (level 76, 126, 146) Note that the level 126 and 146 Bloodveld are the Mutated bloodveld variants.
Drops
100% Drop
|}
Charms
| Item | Quantity | Rarity | GE price | |
|---|---|---|---|---|
| Bones | 1 | Always | 266 |
| No charm | ||||
|---|---|---|---|---|
| 54% | 9% | 31% | 5% | 1% |
| Represents a 90% confidence range based on a sample of 273,829 kills. 1 charm is dropped at a time. Add data to the log (requires JavaScript). | ||||
Weapons
|}
Armour
| Item | Quantity | Rarity | GE price | |
|---|---|---|---|---|
| Steel hatchet | 1 | Common | 3,019 | |
| Steel scimitar | 1 | Uncommon | 1,464 |
|}
Runes
| Item | Quantity | Rarity | GE price | |
|---|---|---|---|---|
| Steel full helm | 1 | Common | 1,065 | |
| Mithril sq shield | 1 | Uncommon | 2,669 | |
| Mithril chainbody | 1 | Uncommon | 2,619 | |
| Black boots | 1 | Uncommon | 1,590 | |
| File:Rune med helm.png | Rune med helm | 1 | Uncommon | Error |
| Rune full helm | 1 | Rare | 20,892 |
|}
Herbs and seeds
| Item | Quantity | Rarity | GE price | |
|---|---|---|---|---|
| Fire rune | 60 | Common | 9,540 | |
| Blood rune | 3; 10; 30 | Uncommon | 2,034–20,340 |
|}
Other
| Item | Quantity | Rarity | GE price | |
|---|---|---|---|---|
| Grimy guam | 1 | Uncommon | 709 | |
| Grimy marrentill | 1 | Uncommon | 2,307 | |
| Grimy tarromin | 1 | Uncommon | 105 | |
| Grimy harralander | 1 | Uncommon | 741 | |
| Grimy ranarr | 1 | Uncommon | 1,860 | |
| Grimy irit | 1 | Uncommon | 5,008 | |
| Grimy avantoe | 1 | Uncommon | 1,043 | |
| Grimy kwuarm | 1 | Uncommon | 11,782 | |
| Grimy cadantine | 1 | Uncommon | 4,322 | |
| Grimy lantadyme | 1 | Uncommon | 7,551 | |
| Grimy dwarf weed | 1 | Uncommon | 8,476 | |
| Jangerberry seed | 1 | Uncommon | 79 |
|}
- ^ In addition to the 100% bones.
Rare drop table drops
- This monster has access to the rare drop table.
Luck-enhancing items such as a ring of wealth or luck of the dwarves are not required to access the table.
| Item | Quantity | Rarity | GE price | |
|---|---|---|---|---|
| Coin | 10; 40; 120; 200; 460 | Common | Not sold | |
| Gold ore | 1 | Uncommon | 587 | |
| Bones | 2–3 | Uncommon[1] | 532–798 | |
| Big bones | 1; 4; 5 | Uncommon | 203–1,015 | |
| Meat pizza | 1 | Uncommon | 163 | |
| Gold ring | 1 | Rare | 1,207 | |
| Starved ancient effigy | 1 | Rare | Not sold |
| Show/hide rare drop table | ||||
|---|---|---|---|---|
| Item | Quantity | Rarity | GE price | |
| Coins | 250–500 | Common | 250–500 | |
| Uncut sapphire | 1 | Common | 809 | |
| Uncut emerald | 1 | Common | 2,555 | |
| Uncut ruby | 1 | Common | 1,842 | |
| Uncut diamond | 1 | Common | 4,843 | |
| Uncut diamond | 45–55 (noted) | Rare | 217,935–266,365 | |
| Loop half of a key | 1 | Common | 11,053 | |
| Tooth half of a key | 1 | Common | 11,538 | |
| Uncut dragonstone | 1 | Uncommon | 12,077 | |
| Uncut dragonstone | 45–55 (noted) | Rare | 543,465–664,235 | |
| Dragon longsword | 1 | Common | 56,212 | |
| Dragon spear | 1 | Rare | 35,861 | |
| Battlestaff | 180–220 (noted) | Rare | 542,160–662,640 | |
| Rune javelin | 5 | Rare | 905 | |
| Rune platebody | 1 | Uncommon | 37,480 | |
| Rune platebody | 15–25 (noted) | Rare | 562,200–937,000 | |
| Shield left half | 1 | Rare | 64,399 | |
| Dragon helm | 1 | Uncommon | 58,601 | |
| Rune arrowheads | 113–137 | Common | 14,916–18,084 | |
| Onyx bolts | 135–165 | Very rare | 1,003,725–1,226,775 | |
| Chaos talisman | 1 | Rare | 1,923 | |
| Nature talisman | 1 | Rare | 1,473 | |
| Water talisman | 65–82 (noted) | Rare | 164,320–207,296 | |
| Earth talisman | 65–82 (noted) | Rare | 12,025–15,170 | |
| Fire talisman | 25–35 (noted) | Rare | 5,225–7,315 | |
| Raw lobster | 135–165 (noted) | Common | 47,655–58,245 | |
| Raw shark | 225–275 (noted) | Uncommon | 321,075–392,425 | |
| Big bones | 68–82 (noted) | Uncommon | 13,804–16,646 | |
| Dragon bones | 180–220 (noted) | Rare | 384,480–469,920 | |
| Coal | 200–1,100 (noted) | Uncommon | 22,400–123,200 | |
| Gold ore | 90–110 (noted) | Common | 52,830–64,570 | |
| Adamantite ore | 180–220 (noted) | Uncommon | 40,860–49,940 | |
| Adamant bar | 14–16 (noted) | Common | 24,654–28,176 | |
| Adamant bar | 135–165 (noted) | Rare | 237,735–290,565 | |
| Runite ore | 90–110 (noted) | Rare | 127,710–156,090 | |
| Rune bar | 3 (noted) | Common | 8,955 | |
| Rune bar | 45–55 (noted) | Rare | 134,325–164,175 | |
| Grimy torstol | 90–110 (noted) | Uncommon | 485,010–592,790 | |
| Grimy snapdragon | 90–110 (noted) | Uncommon | 161,010–196,790 | |
| Super restore (4) | 45–55 (noted) | Uncommon | 125,910–153,890 | |
| Prayer potion (4) | 45–55 (noted) | Uncommon | 130,950–160,050 | |
| Lantadyme seed | 14–16 | Uncommon | 10,164–11,616 | |
| Dwarf weed seed | 14–16 | Uncommon | 11,508–13,152 | |
| Magic seed | 4 | Uncommon | 209,856 | |
| Palm tree seed | 10 | Rare | 396,000 | |
| Flax | 450–550 (noted) | Common | 43,200–52,800 | |
| Molten glass | 45–55 (noted) | Common | 27,585–33,715 | |
| Soft clay | 450–550 (noted) | Uncommon | 188,550–230,450 | |
| Yew logs | 68–82 (noted) | Uncommon | 11,356–13,694 | |
| Yew logs | 675–825 (noted) | Rare | 112,725–137,775 | |
| Teak plank | 45–55 (noted) | Uncommon | 16,740–20,460 | |
| Mahogany plank | 270–330 (noted) | Rare | 356,670–435,930 | |
| Blurberry Special | 1 | Uncommon | 12,008 | |
| Vecna skull | 1 | Very rare* | 124,871 | |
| Hazelmere's signet ring | 1 | Very rare* | 1,432,268,388 | |
| Brawling gloves (Melee) | 1 | Very rare | Not sold | |
| Brawling gloves (Magic) | 1 | Very rare | Not sold | |
| Brawling gloves (Ranged) | 1 | Very rare | Not sold | |
| Brawling gloves (Agility) | 1 | Very rare | Not sold | |
| Brawling gloves (Cooking) | 1 | Very rare | Not sold | |
| Brawling gloves (FM) | 1 | Very rare | Not sold | |
| Brawling gloves (Fishing) | 1 | Very rare | Not sold | |
| Brawling gloves (Hunter) | 1 | Very rare | Not sold | |
| Brawling gloves (Mining) | 1 | Very rare | Not sold | |
| Brawling gloves (Prayer) | 1 | Very rare | Not sold | |
| Brawling gloves (Smithing) | 1 | Very rare | Not sold | |
| Brawling gloves (Thieving) | 1 | Very rare | Not sold | |
| Brawling gloves (WC) | 1 | Very rare | Not sold | |
| Crystal triskelion fragment 1 | 1 | Very rare | Not sold | |
| Crystal triskelion fragment 2 | 1 | Very rare | Not sold | |
| Crystal triskelion fragment 3 | 1 | Very rare | Not sold | |
Trivia
- Bloodvelds are loyal to Zamorak, as shown in the God Wars Dungeon.
- Bloodvelds are one of the only two types of demon to drop bones rather than ashes, the other being hellhounds.
- The examine text of Bloodveld is very similar to the examine text of the Dust devil, Basilisk, and Rockslug. The Bloodveld is "the tongue of evil", the Dust devil is "The vacuumed face of evil", the Basilisk is "The eyes of evil" and the Rockslug "The slime of evil."
- A Bonecrusher doesn't automatically bury any Big Bones dropped because they are not a 100% drop, but rather a bonus drop.
- The bloodveld seems to attack twice in a row but it only attacks once, as seen on the hitsplats.
- Vampyres keep bloodvelds as pets, in a similar fashion to the way in which humans keep dogs. Harold, who belongs to Vanstrom Klause is one example, as are Grigan Kaninus' Bloodveld younglings.