mNo edit summary |
m (cleanup) |
||
| (191 intermediate revisions by 94 users not shown) | |||
| Line 1: | Line 1: | ||
| − | {{ |
+ | {{External|os}} |
| + | {{HasStrategy|hard=y}} |
||
| − | {{Infobox Monster |
+ | {{Infobox Monster new |
| + | |version1=Normal|version2=Hard Mode |
||
|name = Commander Zilyana |
|name = Commander Zilyana |
||
|image = [[File:Commander Zilyana.png|250px|Commander Zilyana]] |
|image = [[File:Commander Zilyana.png|250px|Commander Zilyana]] |
||
| − | | |
+ | |release1 = [[28 August]] [[2007]]|release2=[[30 April]] [[2013]] |
| − | | |
+ | |update1 = God Wars Dungeon|update2=Instanced God Wars & EoC Updates |
|aka = Saint Zilyana<!--Source: Citharede Abbey bookcase--> |
|aka = Saint Zilyana<!--Source: Citharede Abbey bookcase--> |
||
| − | |level = |
+ | |level = 596 |
| + | |lifepoints1 = 60000|lifepoints2= 100000 |
||
| − | |LP = 60,000 |
||
|attack = 75 |
|attack = 75 |
||
| − | |defence |
+ | |defence= 75 |
|magic = 75 |
|magic = 75 |
||
|ranged = 1 |
|ranged = 1 |
||
| + | |max_melee1 = 1800|max_melee2 = 1900 |
||
| ⚫ | |||
| − | | |
+ | |max_ranged = 0 |
| + | |max_magic1 = 2200|max_magic2 = 1990 |
||
| + | |max_spec = 0 |
||
| ⚫ | |||
|weakness = Nothing |
|weakness = Nothing |
||
| − | | |
+ | |style = melee, magic |
| + | |speed1=2|speed2=3 |
||
| − | |attack speed = 8 |
||
|members = Yes |
|members = Yes |
||
|aggressive = Yes |
|aggressive = Yes |
||
|poisonous = No |
|poisonous = No |
||
| − | | |
+ | |immune_to_poison = Yes |
| − | | |
+ | |immune_to_deflect = Yes |
| + | |immune_to_stun = Yes |
||
| − | |max hit = 2000 |
||
| + | |immune_to_drain = No |
||
| + | |armour1=1694|armour2=1694 |
||
| + | |acc_melee1=1694|acc_melee2=1694 |
||
| + | |acc_ranged=0 |
||
| + | |acc_magic1=1694|acc_magic2=1694 |
||
| + | |aff_weakness1=40|aff_weakness2=75 |
||
| + | |aff_melee1=40|aff_melee2=45 |
||
| + | |aff_ranged1=40|aff_ranged2=40 |
||
| + | |aff_magic1=40|aff_magic2=50 |
||
|always drops = [[Bones]] |
|always drops = [[Bones]] |
||
| − | |examine = Commander of Saradomin's forces. |
+ | |examine = {{*}} Commander of Saradomin's forces. <br>{{*}} Commander of Saradomin's forces. Her watchful eyes scan the horizon. |
}} |
}} |
||
| + | [[File:Commander Zilyana chathead.png|left]] |
||
| − | + | '''Commander Zilyana, Keeper of the Faith,''' is the leader of Saradomin's army in the [[God Wars Dungeon]]. She is an [[Icyene]], an ancient race of winged beings, chosen by Saradomin to guard his [[Saradomin hilt|hilt]]. Commander Zilyana uses a melee attack and a magic attack. She attacks with her multi-target magic attack when her sword glows with a bright blue aura and she raises it in the air. If the attack hits a player, a small wall of lightning will appear around the player. She attacks with melee when she simply slashes at the player with her sword. Her melee attack is not multi-target. |
|
| − | + | Both her magic and melee attacks only work at close range. She attacks every 1.2 seconds and they both hit at the same time (she will only use magic in melee distance). She targets the player closest to her upon spawning, but switches to the player who has currently done the most damage to her. |
|
| − | Commander Zilyana is located in the back room of Saradomin's Encampment. Players must have 70 Agility |
+ | Commander Zilyana is located in the back room of Saradomin's Encampment. Players must have 70 Agility to reach her. In addition, she has 3 bodyguards: [[Growler]] ([[magic]]), [[Bree]] ([[ranged]]) and [[Starlight]] ([[melee]]). |
| ⚫ | If [[blood spells]] are used on her consistently, the message ''"Commander Zilyana becomes more enraged by your spells and tries to channel them to increase her own power!"'' will appear in the chatbox, and her power will be boosted, granting her stronger attacks. This effect stacks (although there is a cap to it), so continued use of blood spells may prove fatal. A better alternative is [[Shadow Barrage]], which reduces her damage, whilst hitting Zilyana and everything around her. |
||
| − | '''Note: '''You can not reach her if you do not have 70 Agility (boosts such as [[Summer pies]] do '''not''' work). |
||
| + | Obtaining all unique drops will unlock the {{TitleAnchor|t=Finesse of the Icyene|c=#C2A155|loc=s|,=c}} title. |
||
| − | Commander Zilyana is dangerous and should not be underestimated. She is tied with fellow God Wars Dungeon bosses [[General Graardor]], [[K'ril Tsutsaroth]] and [[Kree'arra]], along with the [[Corporeal Beast]], for having the fifth highest combat level among monsters that can be fought with conventional means in ''RuneScape''. Only [[Nex]], the [[Queen Black Dragon]], [[Vorago]], the [[Kalphite King]], and the [[Barrows - Rise of the Six|Shadow Barrows Brothers]] are stronger. |
||
| + | ==History== |
||
| ⚫ | If [[ |
||
| ⚫ | |||
| + | ====Battle of Annakarl==== |
||
| + | Prior to arriving at the [[God Wars Dungeon|Temple of Lost Ancients]], Zilyana participated in the battle of [[Annakarl]], where it was under Saradominst control. She battled K'ril, but was overpowered by the demon and mortally wounded. Saradomin arrived, teleported her to the Stone of Jas, and used its powers to heal her otherwise fatal wounds. |
||
| + | ====The Godsword==== |
||
| ⚫ | |||
| + | Eventually, Zilyana was dispatched to the Temple of Lost Ancients to help a flock of Avianstese who were pinned by Zamorakian forces. Given a group of [[saradomin priest|priests]] and [[Knight of Saradomin|knights]], she also recruited peasants to strengthen her army. In her [[Zilyana's Notes|notes]], she states that it was foolish for the avianstese to retreat into the caverns, and was even more annoyed that [[General Graardor]] was sent for "assistance". The three groups were already on uneasy terms when Graardor tried to take the godsword for Bandos, leaving her and Kree'arra against Graador and K'ril. |
||
| ⚫ | |||
| ⚫ | |||
| ⚫ | |||
| ⚫ | |||
| + | During one of the skirmishes, her bodyguard [[Growler]] became seriously injured and she ordered a retreat, praying for Saradomin's aid. The next day, she found three amulets bearing the symbols of [[Saradomin's murmur|Armadyl]], [[Saradomin's whisper|Bandos]] and [[Saradomin's hiss|Zamorak]], which she immediately destroyed and began to find the supposed heretic. The next day, the amulets reappeared on the altar, and she realised that Saradomin was sending them, but was confused with their purpose. |
||
| ⚫ | |||
| ⚫ | |||
| ⚫ | |||
| + | Eventually, Zilyana had her bodyguards wear the amulets; [[Bree]] took the pendant with Armadyl's icon. Bree eventually went out with several soldiers to check on the progress of the battle. Zilyana heard the battle and mulled for Bree to return. Bree eventually returned and told Zilyana that it was as if she was calling for him. Zilyana soon realized the purpose of the amulets and praised Saradomin's wisdom. The situation deteriorated even further and now all sides were battling against each other. Zilyana eventually learned of Kree'arra's plan to attack her encampment, and using the power of the amulet, convinced him to do so. In the ensuing ambush, she claimed a [[Armadyl crossbow|powerful crossbow]] from his forces. |
||
| + | During the course of the fighting, a spell cast by an unknown army backfired upon the entire cavern, freezing the entire cave perfectly in place. Zilyana was amongst those left imprisoned. Very shortly after this occurred, the god Guthix established the Edicts of Guthix, preventing the direct involvement of any deity in Gielinor. The departure of the world's Gods and the subsequent end of the God Wars meant that the cavern was forgotten, and Zilyana would remain frozen in time with its warring armies for more than 2,000 years to come. |
||
| ⚫ | |||
| ⚫ | |||
| ⚫ | |||
| ⚫ | |||
| ⚫ | |||
| ⚫ | |||
| ⚫ | |||
| ⚫ | |||
| ⚫ | |||
| ⚫ | |||
| + | In the recent Fifth Age, investigations by both the dwarven explorer Nestor Peregrine and the Asgarnian Temple Knights nearly resulted in the cave's (and Zilyana's) rediscovery. In 169, tectonic movement in the neighbouring Wilderness caused large portions of the cave to defrost, eventually leading to the release of most of the cavern's population. Unaware that the God Wars have ended, Zilyana and the rest of the battle's leaders have resumed the battle for the godsword once again, seemingly unaware that centuries have passed since the end of the wars. |
||
| − | ==Hard Mode== |
||
| − | When entering the battle area players are given the option of fighting Zilyana in Hard Mode. When fought in Hard Mode, in addition to increased stats, Zilyana has two phases to the fight, with additional abilities. She also has better drops, although chances for rarer loot such as [[saradomin sword]]s is not increased. |
||
| − | === |
+ | ===The World Wakes=== |
| ⚫ | |||
| − | In Phase 1, Commander Zilyana has the same attacks as she does in standard mode, however, after being defeated once, Commander Zilyana will heal back to full health and must be defeated again, beginning Phase 2. |
||
| + | During the [[quests|quest]] [[The World Wakes]], Zilyana, along with [[K'ril Tsutsaroth]] and [[Kree'arra]], discover that the player had found [[Guthix|Guthix's]] home, and gather forces to break in to kill Guthix, ending his edicts and allowing their gods to return. Zilyana bides her time, while the Zamorakians and Bandosians attempt to brute force through the Guthixian defences. When they are repelled, Zilyana leads her soldiers into battle, attempting to break through [[Juna|Juna's]] barricade so they can reach and kill Guthix. In the ensuing battle, Zilyana sees the [[Guardians of Guthix|Guardian of Guthix]] [[Cres]] and kills him, believing that he is actually [[Guthix]] in disguise. She shows her disdain for the Zarosians when they appear after her failed assault. |
||
| + | When Sliske kills Guthix, Saradomin is the first to arrive at the scene. She later accompanies Saradomin when he leaves. If the player decided to simply kill Guthix, Juna will mention that Zilyana left a [[Zilyana's Gift|gift]] for them. |
||
| − | ===Phase 2=== |
||
| − | ====Lightning==== |
||
| − | During Phase 2, Zilyana gains the ability to summon squares of lightning throughout the room. Standing on these spaces can deal over 1000 damage. |
||
| − | === |
+ | ===Missing, Presumed Death=== |
| + | {{Listen |
||
| − | Once her health reaches 50 lifepoints, Commander Zilyana will lie down on the floor and a bar that looks similar to an adrenaline bar appears under her lifepoints bar. She is invulnerable during this time, and the only way to finish her off is to successfully hit her with an [[Ultimate Ability]] before the bar fills up. If this is not done, she heals 1/3 of her lifepoints. |
||
| + | |title = Zilyana argues with Ilfeen. |
||
| + | |align = right |
||
| + | |filename = Commander Zilyana and Ilfeen.ogg |
||
| ⚫ | |||
| ⚫ | Zilyana makes another appearance in the quest [[Missing, Presumed Death]]. She is at the [[Empyrean Citadel]], which was taken over by the [[Mahjarrat]] [[Sliske]] for his grand ascendacy into [[god]]hood. Zilyana is present here with [[Saradomin]] and appears once again as his chosen champion. As she did not receive a [[Invitation box|invitation]], Zilyana is left outside the entrance with the other generals. Zilyana was seen arguing with the [[elf]] [[Ifleen]] about the slaughter of Saradominist monks by an elven archer. The player can either side with Zilyana or Ifleen, or alternatively, tell her the truth. Her obedience to Saradomin can be seen when the player chooses to tell her the truth and she declines Ifleen's offer for a truce, declaring, "It is not truth until Saradomin decrees it so!" |
||
| + | After the quest, Zilyana leaves the citadel when Sliske lets the dragonkin [[Strisath]] loose. |
||
| ⚫ | |||
| ⚫ | |||
| − | During the [[quests|quest]] [[The World Wakes]], Zilyana, along with many other important followers of other gods discover that the player had found Guthix's home, and gather forces to break in to kill Guthix, ending his edicts and allowing their gods to return. During the quest, Zilyana kills the [[Guardian of Guthix]] [[Cres]], believing that he was Guthix in disguise. She was the only God Wars Dungeon boss along with [[Nex]] to make it to the last room of the Guthix ancient temple. |
||
| + | ===Sliske's Endgame=== |
||
| ⚫ | |||
| + | Zilyana plays a small role in [[Sliske's Endgame]], where she accompanies her god into the labyrinth. After the quest, she can be found at the top of the [[White Knights' Castle]], though she cannot be interacted with in any way. |
||
| ⚫ | Zilyana makes another appearance in the quest [[Missing, Presumed Death]]. She is at the [[Empyrean Citadel]], which was taken over by the [[Mahjarrat]] [[Sliske]] for his grand ascendacy into [[ |
||
| + | |||
| + | Prior to the release of the quest, she could be seen at the top of the White Knights' Castle, looking at the eclipse. She could not be interacted with in any way. |
||
==Strategy== |
==Strategy== |
||
| − | {{Main|Commander Zilyana/Strategies}} |
+ | {{Main|Commander Zilyana/Strategies|Commander Zilyana/Strategies/Hard mode}} |
| + | |||
| ⚫ | |||
| ⚫ | |||
| ⚫ | |||
| ⚫ | |||
| ⚫ | |||
| + | |||
| ⚫ | |||
| ⚫ | |||
| ⚫ | |||
| + | |||
| ⚫ | |||
| ⚫ | |||
| ⚫ | |||
| ⚫ | |||
| ⚫ | |||
| ⚫ | |||
| ⚫ | |||
| ⚫ | |||
| ⚫ | |||
| ⚫ | |||
==Drops== |
==Drops== |
||
| − | ===100%=== |
+ | ===100% drop=== |
{{DropsTableHead}} |
{{DropsTableHead}} |
||
{{DropsLine|Name=Bones|Quantity=1|Rarity=Always}} |
{{DropsLine|Name=Bones|Quantity=1|Rarity=Always}} |
||
| + | {{DropsTableBottom}} |
||
| ⚫ | |||
===Charms=== |
===Charms=== |
||
{{Charm:Commander Zilyana}} |
{{Charm:Commander Zilyana}} |
||
| − | === |
+ | ===Main drop (normal mode)=== |
| ⚫ | |||
| − | {{DropsLine|Name=Saradomin sword|Quantity=1|Rarity=Rare|Raritynotes=<ref>Estimated at 1/79 using [[RuneScape:Data/Adventurer's Logs (18 September 2012)#Effigy-assisted drop rates|gathered Adventurer's Log data]] as of 18 September 2012.</ref>}} |
||
| ⚫ | |||
| − | |} |
||
| − | |||
| − | ===Runes and Ammunition=== |
||
| − | {{DropsTableHead}} |
||
| ⚫ | |||
| ⚫ | |||
| − | |} |
||
| − | |||
| − | ===Armour=== |
||
{{DropsTableHead}} |
{{DropsTableHead}} |
||
| + | {{DropsLine|Name=Coins|Quantity=19501-21000|Rarity=Common}} |
||
| + | {{DropsLine|Name=Coins|Quantity=19501-21000|Rarity=Rare|Raritynotes={{CiteDevBlog|author=Mod Timbo|url=http://services.runescape.com/m=forum/forums.ws?74,75,52,65949497,goto,15#147|title=Revealing Drop Rates|blogdate=20 October 2017|notes=|name=Timbo}}<ref name="DR3-512">Drop rate: 3/512</ref>}} |
||
| + | {{DropsLine|Name=Coins|Quantity=20500-21000|Rarity=Rare|Raritynotes=<ref name="DR256">Drop rate: 1/256</ref><ref name=Timbo />}} |
||
| ⚫ | |||
| + | {{DropsLine|Name=Grimy ranarr|Quantity=5 (noted)|Rarity=Common}} |
||
| ⚫ | |||
| + | {{DropsLine|Name=Prayer potion (4)|Quantity=3|Rarity=Uncommon}} |
||
| + | {{DropsLine|Name=Saradomin brew (3)|Quantity=3|Rarity=Uncommon|Namenotes=<ref name="pots1">Saradomin brews and Super restore potions are dropped together</ref>}} |
||
| + | {{DropsLine|Name=Super restore (4)|Quantity=3|Rarity=Uncommon|Namenotes=<ref name="pots1"/>}} |
||
| + | {{DropsLine|Name=Super defence (3)|Quantity=3|Rarity=Uncommon|Namenotes=<ref name="pots2">Super defence potions and Super magic potions are dropped together</ref>}} |
||
| + | {{DropsLine|Name=Super magic potion (3)|Quantity=3|Rarity=Uncommon|Namenotes=<ref name="pots2"/>}} |
||
| ⚫ | |||
| + | {{DropsLine|Name=Battlestaff|Quantity=2 (noted)|Rarity=Uncommon}} |
||
| ⚫ | |||
{{DropsLine|Name=Rune plateskirt|Quantity=1|Rarity=Common}} |
{{DropsLine|Name=Rune plateskirt|Quantity=1|Rarity=Common}} |
||
{{DropsLine|Name=Adamant platebody|Quantity=1|Rarity=Uncommon}} |
{{DropsLine|Name=Adamant platebody|Quantity=1|Rarity=Uncommon}} |
||
{{DropsLine|Name=Rune kiteshield|Quantity=1|Rarity=Uncommon}} |
{{DropsLine|Name=Rune kiteshield|Quantity=1|Rarity=Uncommon}} |
||
| − | {{DropsLine|Name=Saradomin |
+ | {{DropsLine|Name=Saradomin sword|Quantity=1|Rarity=Rare|Raritynotes=<ref name="DR384">Drop rate: 1/384</ref><ref name=Timbo />}} |
| − | {{DropsLine|Name= |
+ | {{DropsLine|Name=Armadyl crossbow|Quantity=1|Rarity=Rare|Raritynotes=<ref name="DR384"/><ref name=Timbo />}} |
| − | {{DropsLine|Name= |
+ | {{DropsLine|Name=Off-hand Armadyl crossbow|Quantity=1|Rarity=Rare|Raritynotes=<ref name="DR384"/><ref name=Timbo />}} |
| − | {{DropsLine|Name= |
+ | {{DropsLine|Name=Saradomin's murmur|Quantity=1|Rarity=Rare|Raritynotes=<ref name="DR384"/><ref name=Timbo />}} |
| − | {{DropsLine|Name= |
+ | {{DropsLine|Name=Saradomin's hiss|Quantity=1|Rarity=Rare|Raritynotes=<ref name="DR384"/><ref name=Timbo />}} |
| − | {{DropsLine|Name= |
+ | {{DropsLine|Name=Saradomin's whisper|Quantity=1|Rarity=Rare|Raritynotes=<ref name="DR384"/><ref name=Timbo />}} |
| − | {{DropsLine|Name= |
+ | {{DropsLine|Name=Godsword shard 1|Quantity=1|Rarity=Rare|Raritynotes=<ref name="DR768">Drop rate: 1/768</ref><ref name=Timbo />}} |
| − | {{DropsLine|Name= |
+ | {{DropsLine|Name=Godsword shard 2|Quantity=1|Rarity=Rare|Raritynotes=<ref name="DR768"/><ref name=Timbo />}} |
| − | {{DropsLine|Name= |
+ | {{DropsLine|Name=Godsword shard 3|Quantity=1|Rarity=Rare|Raritynotes=<ref name="DR768"/><ref name=Timbo />}} |
| ⚫ | |||
| − | |} |
||
| ⚫ | |||
| + | {{DropsTableBottom}} |
||
| − | === |
+ | ===Main drop (hard mode)=== |
{{DropsTableHead}} |
{{DropsTableHead}} |
||
| − | {{DropsLine|Name= |
+ | {{DropsLine|Name=Coins|Quantity=10000-11000, 41258-120000|Rarity=Common}} |
| − | {{DropsLine|Name= |
+ | {{DropsLine|Name=Gold ore|Quantity=100-197 (noted)|Rarity=Uncommon}} |
| − | {{DropsLine|Name= |
+ | {{DropsLine|Name=Rune platebody|Quantity=2|Rarity=Uncommon}} |
| − | {{DropsLine|Name= |
+ | {{DropsLine|Name=Rune bar|Quantity=4-6 (noted)|Rarity=Common}} |
| − | {{DropsLine|Name= |
+ | {{DropsLine|Name=Rune plateskirt|Quantity=2|Rarity=Common}} |
| − | {{DropsLine|Name= |
+ | {{DropsLine|Name=Unicorn horn|Quantity=40 (noted)|Rarity=Uncommon}} |
| − | {{DropsLine|Name= |
+ | {{DropsLine|Name=Yew seed|Quantity=1|Rarity=Uncommon}} |
| − | {{DropsLine|Name= |
+ | {{DropsLine|Name=Uncut diamond|Quantity=20-30 (noted)|Rarity=Uncommon}} |
| + | {{DropsLine|Name=Magic logs|Quantity=33-39 (noted)|Rarity=Uncommon}} |
||
| − | |} |
||
| + | {{DropsLine|Name=Grimy ranarr|Quantity=20-24 (noted)|Rarity=Uncommon}} |
||
| + | {{DropsLine|Name=Wine of Saradomin|Quantity=1-4 (noted)|Rarity=Uncommon}} |
||
| + | {{DropsLine|Name=Super defence (3)|Quantity=3|Rarity=Uncommon|Raritynotes=<ref name="rangpot">Super ranging and super defence potions are dropped together.</ref>}} |
||
| + | {{DropsLine|Name=Super ranging potion (3)|Quantity=3|Rarity=Uncommon|Raritynotes=<ref name="rangpot"/>}} |
||
| ⚫ | |||
| + | {{DropsLine|Name=Coins|Quantity=19501-21000|Rarity=Rare|Raritynotes=<ref name="DR3-512"/><ref name=Timbo />}} |
||
| + | {{DropsLine|Name=Coins|Quantity=20500-21000|Rarity=Rare|Raritynotes=<ref name="DR256"/><ref name=Timbo />}} |
||
| + | {{DropsLine|Name=Saradomin sword|Quantity=1|Rarity=Rare|Raritynotes=<ref name="DR384"/><ref name=Timbo />}} |
||
| + | {{DropsLine|Name=Armadyl crossbow|Quantity=1|Rarity=Rare|Raritynotes=<ref name="DR384"/><ref name=Timbo />}} |
||
| + | {{DropsLine|Name=Off-hand Armadyl crossbow|Quantity=1|Rarity=Rare|Raritynotes=<ref name="DR384"/><ref name=Timbo />}} |
||
| + | {{DropsLine|Name=Saradomin's murmur|Quantity=1|Rarity=Rare|Raritynotes=<ref name="DR384"/><ref name=Timbo />}} |
||
| + | {{DropsLine|Name=Saradomin's hiss|Quantity=1|Rarity=Rare|Raritynotes=<ref name="DR384"/><ref name=Timbo />}} |
||
| + | {{DropsLine|Name=Saradomin's whisper|Quantity=1|Rarity=Rare|Raritynotes=<ref name="DR384"/><ref name=Timbo />}} |
||
| + | {{DropsLine|Name=Godsword shard 1|Quantity=1|Rarity=Rare|Raritynotes=<ref name="DR768"/><ref name=Timbo />}} |
||
| + | {{DropsLine|Name=Godsword shard 2|Quantity=1|Rarity=Rare|Raritynotes=<ref name="DR768"/><ref name=Timbo />}} |
||
| + | {{DropsLine|Name=Godsword shard 3|Quantity=1|Rarity=Rare|Raritynotes=<ref name="DR768"/><ref name=Timbo />}} |
||
| + | {{DropsLine|Name=Saradomin hilt|Quantity=1|Rarity=Rare|Raritynotes=<ref name="DR512"/><ref name=Timbo />}} |
||
| ⚫ | |||
| + | {{DropsTableBottom}} |
||
| + | ===Tertiary drop (both modes)=== |
||
| − | *Saradomin brew (3) and Super restore (4) are always dropped together. |
||
| ⚫ | |||
| − | *Super magic potion (3) and Super defence (4) are always dropped together. |
||
| + | {{DropsLine|Name=Warpriest of Saradomin helm|Quantity=1|Rarity=Varies|Raritynotes=<ref name="drop-rate">Players who previously bought this in the [[Battle of Lumbridge]] will have a greater chance of receiving this as a drop.</ref>}} |
||
| + | {{DropsLine|Name=Warpriest of Saradomin cuirass|Quantity=1|Rarity=Varies|Raritynotes=<ref name="drop-rate" />}} |
||
| + | {{DropsLine|Name=Warpriest of Saradomin greaves|Quantity=1|Rarity=Varies|Raritynotes=<ref name="drop-rate" />}} |
||
| + | {{DropsLine|Name=Warpriest of Saradomin gauntlets|Quantity=1|Rarity=Varies|Raritynotes=<ref name="drop-rate" />}} |
||
| + | {{DropsLine|Name=Warpriest of Saradomin boots|Quantity=1|Rarity=Varies|Raritynotes=<ref name="drop-rate" />}} |
||
| + | {{DropsLine|Name=Warpriest of Saradomin cape|Quantity=1|Rarity=Varies|Raritynotes=<ref name="drop-rate" />}} |
||
| ⚫ | |||
| + | {{DropsLine|Name=Auburn lock|Quantity=1|Rarity=Very rare|gemw=no|Raritynotes=<ref name="pet">Has a base drop rate of 1/5,000 (normal mode) or 1/1,000 chance (hard mode), both with a [[Boss pets#Pets unlocked by drops|threshold of 1000]].</ref>}} |
||
| ⚫ | |||
| + | {{DropsLine|Name=Sealed clue scroll (elite)|Quantity=1|Rarity=Rare|Raritynotes=<ref>There is a 1% chance of this being a [[sealed clue scroll (master)]] instead</ref>}} |
||
| + | {{DropsLine|Name=Starved ancient effigy|Quantity=1|Rarity=Rare|Raritynotes=<ref>Base drop chance of 1/128 - https://twitter.com/JagexPi/status/1026850193692655616</ref>}} |
||
| + | {{DropsTableBottom}} |
||
| − | [[File:Saradomin godsword equipped.png|thumb|right|x250px|A [[Godsword]] incorporating a [[Saradomin hilt]], one of the drops attainable from Commander Zilyana.]] |
||
| + | ===Tertiary drop (hard mode only)=== |
||
| − | ===Other=== |
||
{{DropsTableHead}} |
{{DropsTableHead}} |
||
| − | {{DropsLine|Name= |
+ | {{DropsLine|Name=Saradominist soulstone|Quantity=1|Rarity=Uncommon|Raritynotes=<ref>Drop rate of 1/25 - https://twitter.com/JagexTimbo/status/557600452150579200</ref>|gemw=no}} |
| + | {{DropsTableBottom}} |
||
| ⚫ | |||
| + | |||
| − | {{DropsLine|Name=Godsword shard 1|Quantity=1|Rarity=Rare|Raritynotes=<ref>Estimated at 1/480 using [[RuneScape:Data/Adventurer's Logs (18 September 2012)#Effigy-assisted drop rates|gathered Adventurer's Log data]] as of 18 September 2012.</ref>}} |
||
| + | <references /> |
||
| − | {{DropsLine|Name=Godsword shard 2|Quantity=1|Rarity=Rare|Raritynotes=<ref>Estimated at 1/654 using [[RuneScape:Data/Adventurer's Logs (18 September 2012)#Effigy-assisted drop rates|gathered Adventurer's Log data]] as of 18 September 2012.</ref>}} |
||
| − | {{DropsLine|Name=Godsword shard 3|Quantity=1|Rarity=Rare|Raritynotes=<ref>Estimated at 1/553 using [[RuneScape:Data/Adventurer's Logs (18 September 2012)#Effigy-assisted drop rates|gathered Adventurer's Log data]] as of 18 September 2012.</ref>}} |
||
| ⚫ | |||
| ⚫ | |||
| ⚫ | |||
| ⚫ | |||
| − | {{DropsLine|Name=Saradomin hilt|Quantity=1|Rarity=Rare|Raritynotes=<ref>Estimated at 1/480 using [[RuneScape:Data/Adventurer's Logs (18 September 2012)#Effigy-assisted drop rates|gathered Adventurer's Log data]] as of 18 September 2012.</ref>}} |
||
| ⚫ | |||
| ⚫ | |||
| − | |} |
||
| ⚫ | |||
===Rare drop table drops=== |
===Rare drop table drops=== |
||
| Line 159: | Line 212: | ||
===Universal drops=== |
===Universal drops=== |
||
{{Universal drops}} |
{{Universal drops}} |
||
| + | |||
| + | ==Achievements== |
||
| + | * {{Achievement|Traitorous|30|Defeat Commander Zilyana whilst wearing a full set of Proselyte Armour.}} |
||
| + | * {{Achievement|Sunshine Through The Rain|40|Defeat Hard Mode Commander Zilyana whilst under the effects of her cloud attack and the Sunshine ability.}} |
||
| + | * {{Achievement|Keeper of the Faith|0|Obtained a collection of unique drops from the Commander Zilyana.}} |
||
| + | * {{Achievement|Zilly Way To Die|5|Defeat Commander Zilyana several times depending on the tier.}} |
||
| + | * {{Achievement|Zillier Way To Die|5|Defeat Commander Zilyana in hard mode several times depending on the tier.}} |
||
==Trivia== |
==Trivia== |
||
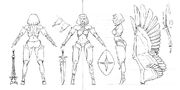
[[File:Zilyana concept art.jpg|thumb|right|Concept art of Commander Zilyana.]] |
[[File:Zilyana concept art.jpg|thumb|right|Concept art of Commander Zilyana.]] |
||
[[File:Zilyana concept art2.jpg|thumb|Older concept art of Zilyana.]] |
[[File:Zilyana concept art2.jpg|thumb|Older concept art of Zilyana.]] |
||
| − | *In the Saradomin Strikes Campaign on [[Armies of Gielinor]], it is revealed that at some point during the [[God Wars]], Zilyana was captured by [[Zamorak]], but then escaped. |
+ | * In the Saradomin Strikes Campaign on [[Armies of Gielinor]], it is revealed that at some point during the [[God Wars]], Zilyana was captured by [[Zamorak]], but then escaped. |
| − | *Commander Zilyana received several extra buffs on the release of the Triskelion Treasures update. If she is constantly attacked by blood spells, she will become "enraged". Along with the same update, her magical strength was drastically increased, changed her weakness from Water spells to nothing, and had an increased magical defence. |
+ | * Commander Zilyana received several extra buffs on the release of the Triskelion Treasures update. If she is constantly attacked by blood spells, she will become "enraged". Along with the same update, her magical strength was drastically increased, changed her weakness from Water spells to nothing, and had an increased magical defence. |
| − | *Zilyana has her own |
+ | * Zilyana has her own custom special attacks, made by [[Mod Chris L]], because she was the only original God Wars boss not to be fought during The World Wakes. |
| ⚫ | |||
| − | *Commander Zilyana is the only God Wars General to make a direct reference to the Godsword. |
||
| ⚫ | * Commander Zilyana features in a flashback during the [[Ritual of the Mahjarrat]] quest. She is seen facing [[K'ril Tsutsaroth]] in battle. As they battle, K'ril gets the upper hand and blasts Zilyana away, critically injuring her. He takes a final look at her body and departs. Saradomin himself comes to rescue her and takes her to the [[Fist of Guthix]] arena, where the [[Stone of Jas]] lies, and heals her. She also received a graphical update with the release of this quest. |
||
| ⚫ | |||
| ⚫ | |||
| ⚫ | *Commander Zilyana features in a flashback during the [[Ritual of the Mahjarrat]] quest. She is seen facing [[K'ril Tsutsaroth]] in battle. As they battle, K'ril gets the upper hand and blasts Zilyana away, critically injuring her. He takes a final look at her body and departs. Saradomin himself comes to rescue her and takes her to the [[Fist of Guthix]] arena, where the [[Stone of Jas]] lies, and heals her. She also received a graphical update with the release of this quest. |
||
| + | * As of [[1 February]] [[2018]], the highest kill count for this boss was 42,027 kills for normal mode and 3,384 for hard mode.{{CiteGeneral|url = https://www.reddit.com/r/runescape/comments/7uqej0/top_10_killers_per_boss/|title = Top 10 killers per Boss|author = Mod Shauny|date = 2 Feb 2018|accessdate = 2018-02-02|quote = Here are the top 10 kills for each Boss in RuneScape, be aware that we've not listed display names for privacy purposes however if you wish to brag about one number being yours then we won't stop you!}} |
||
| ⚫ | |||
| + | ** This had increased to 44,515 for normal mode and had not increased for hard mode by [[6 May]] 2018.{{CiteGeneral|url=https://www.reddit.com/r/runescape/comments/8hj2f0/top_boss_killers_6th_may_2018/|title=Top 10 killers per Boss|author=Mod Shauny|date=6 May 2018|accessdate=2018-05-07|quote=Here are the top 10 kills for each Boss in RuneScape, be aware that we've not listed display names for privacy purposes however if you wish to brag about one number being yours then we won't stop you!}}. |
||
| + | |||
| + | ==References== |
||
| ⚫ | |||
| ⚫ | |||
| − | {{Bosses}} |
||
| + | {{Soul Reaper}} |
||
| − | {{GodWarsDungeonBosses}} |
||
{{Icyene}} |
{{Icyene}} |
||
| ⚫ | |||
| ⚫ | |||
| + | {{Gower Quest}} |
||
| + | {{Sliske's Endgame}} |
||
| + | {{Top trumps}} |
||
[[nl:Commander Zilyana]] |
[[nl:Commander Zilyana]] |
||
[[fi:Commander Zilyana]] |
[[fi:Commander Zilyana]] |
||
[[es:Commander Zilyana]] |
[[es:Commander Zilyana]] |
||
| + | [[pt:Comandante Zyliana]] |
||
| − | [[Category:Missing,_Presumed_Death]] |
||
| ⚫ | |||
[[Category:Participants in the God Wars]] |
[[Category:Participants in the God Wars]] |
||
[[Category:Characters in Armies of Gielinor]] |
[[Category:Characters in Armies of Gielinor]] |
||
[[Category:Monsters featured on Duel Cards]] |
[[Category:Monsters featured on Duel Cards]] |
||
| ⚫ | |||
[[Category:Bosses]] |
[[Category:Bosses]] |
||
[[Category:Saradominists]] |
[[Category:Saradominists]] |
||
| + | [[Category:Tier 2 luck]] |
||
Latest revision as of 10:35, 8 June 2019
 | ||||||||||||||||||
| Release | 28 August 2007 (Update) | |||||||||||||||||
|---|---|---|---|---|---|---|---|---|---|---|---|---|---|---|---|---|---|---|
| AKA | Saint Zilyana | |||||||||||||||||
| Members | Yes | |||||||||||||||||
| Examine | ||||||||||||||||||
| • Commander of Saradomin's forces. • Commander of Saradomin's forces. Her watchful eyes scan the horizon. | ||||||||||||||||||
| Combat info | ||||||||||||||||||
| Level | LP | |||||||||||||||||
| 596 | 60,000 | 4,796.55 | 1,582.8 | |||||||||||||||
| Equipment XP (2H/MH & Armour/OH) | ||||||||||||||||||
| 287 / 191 / 95 | ||||||||||||||||||
| Aggressive | Poisonous | |||||||||||||||||
| Offensive | ||||||||||||||||||
| Max hit | ||||||||||||||||||
| 1800 | 0 | 2200 | 0 | |||||||||||||||
| Style | Speed | |||||||||||||||||
2 ticks (1.2s) | ||||||||||||||||||
| Combat levels | ||||||||||||||||||
| ||||||||||||||||||
| Defensive | ||||||||||||||||||
| Armour | Weakness | |||||||||||||||||
| 1694 | 75 | |||||||||||||||||
| Affinities | ||||||||||||||||||
| - | 40 | 40 | 40 | |||||||||||||||
| Immunities | ||||||||||||||||||

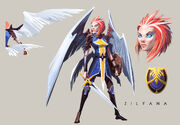
Commander Zilyana, Keeper of the Faith, is the leader of Saradomin's army in the God Wars Dungeon. She is an Icyene, an ancient race of winged beings, chosen by Saradomin to guard his hilt. Commander Zilyana uses a melee attack and a magic attack. She attacks with her multi-target magic attack when her sword glows with a bright blue aura and she raises it in the air. If the attack hits a player, a small wall of lightning will appear around the player. She attacks with melee when she simply slashes at the player with her sword. Her melee attack is not multi-target.
Both her magic and melee attacks only work at close range. She attacks every 1.2 seconds and they both hit at the same time (she will only use magic in melee distance). She targets the player closest to her upon spawning, but switches to the player who has currently done the most damage to her.
Commander Zilyana is located in the back room of Saradomin's Encampment. Players must have 70 Agility to reach her. In addition, she has 3 bodyguards: Growler (magic), Bree (ranged) and Starlight (melee).
If blood spells are used on her consistently, the message "Commander Zilyana becomes more enraged by your spells and tries to channel them to increase her own power!" will appear in the chatbox, and her power will be boosted, granting her stronger attacks. This effect stacks (although there is a cap to it), so continued use of blood spells may prove fatal. A better alternative is Shadow Barrage, which reduces her damage, whilst hitting Zilyana and everything around her.
Obtaining all unique drops will unlock the [Name], Finesse of the Icyene title.
History
The God Wars
Battle of Annakarl
Prior to arriving at the Temple of Lost Ancients, Zilyana participated in the battle of Annakarl, where it was under Saradominst control. She battled K'ril, but was overpowered by the demon and mortally wounded. Saradomin arrived, teleported her to the Stone of Jas, and used its powers to heal her otherwise fatal wounds.
The Godsword
Eventually, Zilyana was dispatched to the Temple of Lost Ancients to help a flock of Avianstese who were pinned by Zamorakian forces. Given a group of priests and knights, she also recruited peasants to strengthen her army. In her notes, she states that it was foolish for the avianstese to retreat into the caverns, and was even more annoyed that General Graardor was sent for "assistance". The three groups were already on uneasy terms when Graardor tried to take the godsword for Bandos, leaving her and Kree'arra against Graador and K'ril.
During one of the skirmishes, her bodyguard Growler became seriously injured and she ordered a retreat, praying for Saradomin's aid. The next day, she found three amulets bearing the symbols of Armadyl, Bandos and Zamorak, which she immediately destroyed and began to find the supposed heretic. The next day, the amulets reappeared on the altar, and she realised that Saradomin was sending them, but was confused with their purpose.
Eventually, Zilyana had her bodyguards wear the amulets; Bree took the pendant with Armadyl's icon. Bree eventually went out with several soldiers to check on the progress of the battle. Zilyana heard the battle and mulled for Bree to return. Bree eventually returned and told Zilyana that it was as if she was calling for him. Zilyana soon realized the purpose of the amulets and praised Saradomin's wisdom. The situation deteriorated even further and now all sides were battling against each other. Zilyana eventually learned of Kree'arra's plan to attack her encampment, and using the power of the amulet, convinced him to do so. In the ensuing ambush, she claimed a powerful crossbow from his forces.
During the course of the fighting, a spell cast by an unknown army backfired upon the entire cavern, freezing the entire cave perfectly in place. Zilyana was amongst those left imprisoned. Very shortly after this occurred, the god Guthix established the Edicts of Guthix, preventing the direct involvement of any deity in Gielinor. The departure of the world's Gods and the subsequent end of the God Wars meant that the cavern was forgotten, and Zilyana would remain frozen in time with its warring armies for more than 2,000 years to come.
In the recent Fifth Age, investigations by both the dwarven explorer Nestor Peregrine and the Asgarnian Temple Knights nearly resulted in the cave's (and Zilyana's) rediscovery. In 169, tectonic movement in the neighbouring Wilderness caused large portions of the cave to defrost, eventually leading to the release of most of the cavern's population. Unaware that the God Wars have ended, Zilyana and the rest of the battle's leaders have resumed the battle for the godsword once again, seemingly unaware that centuries have passed since the end of the wars.
The World Wakes

Zilyana kills Cres, mistaking him for Guthix.
During the quest The World Wakes, Zilyana, along with K'ril Tsutsaroth and Kree'arra, discover that the player had found Guthix's home, and gather forces to break in to kill Guthix, ending his edicts and allowing their gods to return. Zilyana bides her time, while the Zamorakians and Bandosians attempt to brute force through the Guthixian defences. When they are repelled, Zilyana leads her soldiers into battle, attempting to break through Juna's barricade so they can reach and kill Guthix. In the ensuing battle, Zilyana sees the Guardian of Guthix Cres and kills him, believing that he is actually Guthix in disguise. She shows her disdain for the Zarosians when they appear after her failed assault.
When Sliske kills Guthix, Saradomin is the first to arrive at the scene. She later accompanies Saradomin when he leaves. If the player decided to simply kill Guthix, Juna will mention that Zilyana left a gift for them.
Missing, Presumed Death
Zilyana makes another appearance in the quest Missing, Presumed Death. She is at the Empyrean Citadel, which was taken over by the Mahjarrat Sliske for his grand ascendacy into godhood. Zilyana is present here with Saradomin and appears once again as his chosen champion. As she did not receive a invitation, Zilyana is left outside the entrance with the other generals. Zilyana was seen arguing with the elf Ifleen about the slaughter of Saradominist monks by an elven archer. The player can either side with Zilyana or Ifleen, or alternatively, tell her the truth. Her obedience to Saradomin can be seen when the player chooses to tell her the truth and she declines Ifleen's offer for a truce, declaring, "It is not truth until Saradomin decrees it so!"
After the quest, Zilyana leaves the citadel when Sliske lets the dragonkin Strisath loose.
Sliske's Endgame
Zilyana plays a small role in Sliske's Endgame, where she accompanies her god into the labyrinth. After the quest, she can be found at the top of the White Knights' Castle, though she cannot be interacted with in any way.
Prior to the release of the quest, she could be seen at the top of the White Knights' Castle, looking at the eclipse. She could not be interacted with in any way.
Strategy
Bodyguards
Zilyana and her loyal bodyguards.
Quotes
When in battle, the Commander shouts several battle cries while fighting the players that dare to venture into her domain. She is voiced by Mod Ana.
- Death to the enemies of the light!
- Slay the evil ones!
- Saradomin lend me strength!
- By the power of Saradomin!
- May Saradomin be my sword!
- Good will always triumph!
- Forward! Our allies are with us!
- Saradomin is with us!
- In the name of Saradomin!
- Attack! Find the Godsword!
Drops
100% drop
| Item | Quantity | Rarity | GE price | |
|---|---|---|---|---|
| Bones | 1 | Always | 266 |
Charms
| No charm | ||||
|---|---|---|---|---|
| 29–32% | 16–18% | 18–21% | 22–25% | 9–11% |
| Represents a 90% confidence range based on a sample of 2,486 kills. 1 charm is dropped at a time. Add data to the log (requires JavaScript). | ||||
Main drop (normal mode)
| Item | Quantity | Rarity | GE price | |
|---|---|---|---|---|
| Coins | 19,501–21,000 | Common | 19,501–21,000 | |
| Coins | 19,501–21,000 | Rare[1][2] | 19,501–21,000 | |
| Coins | 20,500–21,000 | Rare[3][1] | 20,500–21,000 | |
| Diamond | 6 (noted) | Uncommon | 23,256 | |
| Grimy ranarr | 5 (noted) | Common | 9,300 | |
| Ranarr seed | 2 | Common | 1,952 | |
| Prayer potion (4) | 3 | Uncommon | 8,730 | |
| Saradomin brew (3)[4] | 3 | Uncommon | 44,676 | |
| Super restore (4)[4] | 3 | Uncommon | 8,394 | |
| Super defence (3)[5] | 3 | Uncommon | 23,478 | |
| Super magic potion (3)[5] | 3 | Uncommon | 35,361 | |
| Magic seed | 1 | Rare | 52,464 | |
| Battlestaff | 2 (noted) | Uncommon | 6,024 | |
| Rune dart | 30–40 | Common | 2,310–3,080 | |
| Rune plateskirt | 1 | Common | 37,061 | |
| Adamant platebody | 1 | Uncommon | 8,975 | |
| Rune kiteshield | 1 | Uncommon | 30,650 | |
| Saradomin sword | 1 | Rare[6][1] | 320,220 | |
| Armadyl crossbow | 1 | Rare[6][1] | 5,594,315 | |
| Off-hand Armadyl crossbow | 1 | Rare[6][1] | 5,598,386 | |
| Saradomin's murmur | 1 | Rare[6][1] | 700,235 | |
| Saradomin's hiss | 1 | Rare[6][1] | 153,600 | |
| Saradomin's whisper | 1 | Rare[6][1] | 120,794 | |
| Godsword shard 1 | 1 | Rare[7][1] | 148,863 | |
| Godsword shard 2 | 1 | Rare[7][1] | 148,621 | |
| Godsword shard 3 | 1 | Rare[7][1] | 148,582 | |
| Saradomin hilt | 1 | Rare[8][1] | 4,914,126 | |
| Rare drop table | 1 | Rare | Not sold |
Main drop (hard mode)
| Item | Quantity | Rarity | GE price | |
|---|---|---|---|---|
| Coins | 10,000–11,000; 41,258–120,000 | Common | 10,000–120,000 | |
| Gold ore | 100–197 (noted) | Uncommon | 58,700–115,639 | |
| Rune platebody | 2 | Uncommon | 74,960 | |
| Rune bar | 4–6 (noted) | Common | 11,940–17,910 | |
| Rune plateskirt | 2 | Common | 74,122 | |
| Unicorn horn | 40 (noted) | Uncommon | 136,160 | |
| Yew seed | 1 | Uncommon | 15,302 | |
| Uncut diamond | 20–30 (noted) | Uncommon | 96,860–145,290 | |
| Magic logs | 33–39 (noted) | Uncommon | 12,540–14,820 | |
| Grimy ranarr | 20–24 (noted) | Uncommon | 37,200–44,640 | |
| Wine of Saradomin | 1–4 (noted) | Uncommon | 54,571–218,284 | |
| Super defence (3) | 3 | Uncommon[9] | 23,478 | |
| Super ranging potion (3) | 3 | Uncommon[9] | 63,663 | |
| Magic seed | 1–3 | Rare | 52,464–157,392 | |
| Coins | 19,501–21,000 | Rare[2][1] | 19,501–21,000 | |
| Coins | 20,500–21,000 | Rare[3][1] | 20,500–21,000 | |
| Saradomin sword | 1 | Rare[6][1] | 320,220 | |
| Armadyl crossbow | 1 | Rare[6][1] | 5,594,315 | |
| Off-hand Armadyl crossbow | 1 | Rare[6][1] | 5,598,386 | |
| Saradomin's murmur | 1 | Rare[6][1] | 700,235 | |
| Saradomin's hiss | 1 | Rare[6][1] | 153,600 | |
| Saradomin's whisper | 1 | Rare[6][1] | 120,794 | |
| Godsword shard 1 | 1 | Rare[7][1] | 148,863 | |
| Godsword shard 2 | 1 | Rare[7][1] | 148,621 | |
| Godsword shard 3 | 1 | Rare[7][1] | 148,582 | |
| Saradomin hilt | 1 | Rare[8][1] | 4,914,126 | |
| Rare drop table | 1 | Rare | Not sold |
Tertiary drop (both modes)
| Item | Quantity | Rarity | GE price | |
|---|---|---|---|---|
| Warpriest of Saradomin helm | 1 | Varies[10] | Not sold | |
| Warpriest of Saradomin cuirass | 1 | Varies[10] | Not sold | |
| Warpriest of Saradomin greaves | 1 | Varies[10] | Not sold | |
| Warpriest of Saradomin gauntlets | 1 | Varies[10] | Not sold | |
| Warpriest of Saradomin boots | 1 | Varies[10] | Not sold | |
| Warpriest of Saradomin cape | 1 | Varies[10] | Not sold | |
| Zilyana's Notes | 1 | Rare[11] | Not sold | |
| Auburn lock | 1 | Very rare[12] | Not sold | |
| Sealed clue scroll (hard) | 1 | Rare | Not sold | |
| Sealed clue scroll (elite) | 1 | Rare[13] | Not sold | |
| Starved ancient effigy | 1 | Rare[14] | Not sold |
Tertiary drop (hard mode only)
| Item | Quantity | Rarity | GE price | |
|---|---|---|---|---|
| Saradominist soulstone | 1 | Uncommon[15] | Not sold |
- ^ a b c d e f g h i j k l m n o p q r s t u v w x Mod Timbo. "Revealing Drop Rates." 20 October 2017. Developers' Blogs.
- ^ a b Drop rate: 3/512
- ^ a b Drop rate: 1/256
- ^ a b Saradomin brews and Super restore potions are dropped together
- ^ a b Super defence potions and Super magic potions are dropped together
- ^ a b c d e f g h i j k l Drop rate: 1/384
- ^ a b c d e f Drop rate: 1/768
- ^ a b Drop rate: 1/512
- ^ a b Super ranging and super defence potions are dropped together.
- ^ a b c d e f Players who previously bought this in the Battle of Lumbridge will have a greater chance of receiving this as a drop.
- ^ Dropped to all players in the room, alongside one of the rare unique item drops.
- ^ Has a base drop rate of 1/5,000 (normal mode) or 1/1,000 chance (hard mode), both with a threshold of 1000.
- ^ There is a 1% chance of this being a sealed clue scroll (master) instead
- ^ Base drop chance of 1/128 - https://twitter.com/JagexPi/status/1026850193692655616
- ^ Drop rate of 1/25 - https://twitter.com/JagexTimbo/status/557600452150579200
Rare drop table drops
- This monster has access to the rare drop table.
Luck-enhancing items such as a ring of wealth or luck of the dwarves are not required to access the table.
| Show/hide rare drop table | ||||
|---|---|---|---|---|
| Item | Quantity | Rarity | GE price | |
| Coins | 250–500 | Common | 250–500 | |
| Uncut sapphire | 1 | Common | 809 | |
| Uncut emerald | 1 | Common | 2,555 | |
| Uncut ruby | 1 | Common | 1,842 | |
| Uncut diamond | 1 | Common | 4,843 | |
| Uncut diamond | 45–55 (noted) | Rare | 217,935–266,365 | |
| Loop half of a key | 1 | Common | 11,053 | |
| Tooth half of a key | 1 | Common | 11,538 | |
| Uncut dragonstone | 1 | Uncommon | 12,077 | |
| Uncut dragonstone | 45–55 (noted) | Rare | 543,465–664,235 | |
| Dragon longsword | 1 | Common | 56,212 | |
| Dragon spear | 1 | Rare | 35,861 | |
| Battlestaff | 180–220 (noted) | Rare | 542,160–662,640 | |
| Rune javelin | 5 | Rare | 905 | |
| Rune platebody | 1 | Uncommon | 37,480 | |
| Rune platebody | 15–25 (noted) | Rare | 562,200–937,000 | |
| Shield left half | 1 | Rare | 64,399 | |
| Dragon helm | 1 | Uncommon | 58,601 | |
| Rune arrowheads | 113–137 | Common | 14,916–18,084 | |
| Onyx bolts | 135–165 | Very rare | 1,003,725–1,226,775 | |
| Chaos talisman | 1 | Rare | 1,923 | |
| Nature talisman | 1 | Rare | 1,473 | |
| Water talisman | 65–82 (noted) | Rare | 164,320–207,296 | |
| Earth talisman | 65–82 (noted) | Rare | 12,025–15,170 | |
| Fire talisman | 25–35 (noted) | Rare | 5,225–7,315 | |
| Raw lobster | 135–165 (noted) | Common | 47,655–58,245 | |
| Raw shark | 225–275 (noted) | Uncommon | 321,075–392,425 | |
| Big bones | 68–82 (noted) | Uncommon | 13,804–16,646 | |
| Dragon bones | 180–220 (noted) | Rare | 384,480–469,920 | |
| Coal | 200–1,100 (noted) | Uncommon | 22,400–123,200 | |
| Gold ore | 90–110 (noted) | Common | 52,830–64,570 | |
| Adamantite ore | 180–220 (noted) | Uncommon | 40,860–49,940 | |
| Adamant bar | 14–16 (noted) | Common | 24,654–28,176 | |
| Adamant bar | 135–165 (noted) | Rare | 237,735–290,565 | |
| Runite ore | 90–110 (noted) | Rare | 127,710–156,090 | |
| Rune bar | 3 (noted) | Common | 8,955 | |
| Rune bar | 45–55 (noted) | Rare | 134,325–164,175 | |
| Grimy torstol | 90–110 (noted) | Uncommon | 485,010–592,790 | |
| Grimy snapdragon | 90–110 (noted) | Uncommon | 161,010–196,790 | |
| Super restore (4) | 45–55 (noted) | Uncommon | 125,910–153,890 | |
| Prayer potion (4) | 45–55 (noted) | Uncommon | 130,950–160,050 | |
| Lantadyme seed | 14–16 | Uncommon | 10,164–11,616 | |
| Dwarf weed seed | 14–16 | Uncommon | 11,508–13,152 | |
| Magic seed | 4 | Uncommon | 209,856 | |
| Palm tree seed | 10 | Rare | 396,000 | |
| Flax | 450–550 (noted) | Common | 43,200–52,800 | |
| Molten glass | 45–55 (noted) | Common | 27,585–33,715 | |
| Soft clay | 450–550 (noted) | Uncommon | 188,550–230,450 | |
| Yew logs | 68–82 (noted) | Uncommon | 11,356–13,694 | |
| Yew logs | 675–825 (noted) | Rare | 112,725–137,775 | |
| Teak plank | 45–55 (noted) | Uncommon | 16,740–20,460 | |
| Mahogany plank | 270–330 (noted) | Rare | 356,670–435,930 | |
| Blurberry Special | 1 | Uncommon | 12,008 | |
| Vecna skull | 1 | Very rare* | 124,871 | |
| Hazelmere's signet ring | 1 | Very rare* | 1,432,268,388 | |
| Brawling gloves (Melee) | 1 | Very rare | Not sold | |
| Brawling gloves (Magic) | 1 | Very rare | Not sold | |
| Brawling gloves (Ranged) | 1 | Very rare | Not sold | |
| Brawling gloves (Agility) | 1 | Very rare | Not sold | |
| Brawling gloves (Cooking) | 1 | Very rare | Not sold | |
| Brawling gloves (FM) | 1 | Very rare | Not sold | |
| Brawling gloves (Fishing) | 1 | Very rare | Not sold | |
| Brawling gloves (Hunter) | 1 | Very rare | Not sold | |
| Brawling gloves (Mining) | 1 | Very rare | Not sold | |
| Brawling gloves (Prayer) | 1 | Very rare | Not sold | |
| Brawling gloves (Smithing) | 1 | Very rare | Not sold | |
| Brawling gloves (Thieving) | 1 | Very rare | Not sold | |
| Brawling gloves (WC) | 1 | Very rare | Not sold | |
| Crystal triskelion fragment 1 | 1 | Very rare | Not sold | |
| Crystal triskelion fragment 2 | 1 | Very rare | Not sold | |
| Crystal triskelion fragment 3 | 1 | Very rare | Not sold | |
Universal drops
- Universal drops are dropped by nearly every monster outside of Daemonheim.
- These drops are dropped alongside main drops.
| Item | Quantity | Rarity | GE price | |
|---|---|---|---|---|
| Key token | 1 | Rare | Not sold | |
| Mimic kill token | 1 | Very rare | 5,575 |
Achievements
- Traitorous (
 30) - Defeat Commander Zilyana whilst wearing a full set of Proselyte Armour.
 - Sunshine Through The Rain ( 40) - Defeat Hard Mode Commander Zilyana whilst under the effects of her cloud attack and the Sunshine ability.
- Keeper of the Faith ( 0) - Obtained a collection of unique drops from the Commander Zilyana.
- Zilly Way To Die ( 5) - Defeat Commander Zilyana several times depending on the tier.
- Zillier Way To Die ( 5) - Defeat Commander Zilyana in hard mode several times depending on the tier.
Trivia
Concept art of Commander Zilyana.
Older concept art of Zilyana.
- In the Saradomin Strikes Campaign on Armies of Gielinor, it is revealed that at some point during the God Wars, Zilyana was captured by Zamorak, but then escaped.
- Commander Zilyana received several extra buffs on the release of the Triskelion Treasures update. If she is constantly attacked by blood spells, she will become "enraged". Along with the same update, her magical strength was drastically increased, changed her weakness from Water spells to nothing, and had an increased magical defence.
- Zilyana has her own custom special attacks, made by Mod Chris L, because she was the only original God Wars boss not to be fought during The World Wakes.

- Commander Zilyana features in a flashback during the Ritual of the Mahjarrat quest. She is seen facing K'ril Tsutsaroth in battle. As they battle, K'ril gets the upper hand and blasts Zilyana away, critically injuring her. He takes a final look at her body and departs. Saradomin himself comes to rescue her and takes her to the Fist of Guthix arena, where the Stone of Jas lies, and heals her. She also received a graphical update with the release of this quest.
- Zilyana is one of two icyenes shown in-game to have two sets of wings; one on her back near her shoulder-blades and another on her lower back near her lumbar. The other is Efaritay.
- As of 1 February 2018, the highest kill count for this boss was 42,027 kills for normal mode and 3,384 for hard mode.[1]
References
| Bosses |
| ||||||||||||||||
| Rewards |
| ||||||||||||||||
| NPCs |
| ||||||||
| Enemies |
| ||||||||
| Rewards |
| ||||||||
| Locations |
| ||||||||
| Music |
| ||||||||
| Miscellaneous |
| ||||||||


| NPCs |
| ||||||||
| Enemies |
| ||||||||
| Items |
| ||||||||
| Scenery |
| ||||||||
| Rewards |
| ||||||||
| Locations |
| ||||||||
| Music |
| ||||||||
| Miscellaneous | Quick guide • Transcript | ||||||||
| NPCs |
|
| Enemies |
|
| Items |
|
| Rewards |
|
| Locations |
|
| Music |
|
| Miscellaneous |
|
| Part 6 of the Sliske quest series | |||||||||
| NPCs |
| ||||||||
| Enemies |
| ||||||||
| Items |
| ||||||||
| Scenery |
| ||||||||
| Rewards |
| ||||||||
| Locations |
| ||||||||
| Music |
| ||||||||
| Miscellaneous |
| ||||||||
|