m (replacing deprecated parameters of inline templates (alt --> txt; 2 --> pic)) Tag: sourceedit |
No edit summary |
||
| (5 intermediate revisions by 4 users not shown) | |||
| Line 1: | Line 1: | ||
{{Strategy}} |
{{Strategy}} |
||
| − | Dark beasts are [[Slayer monster]]s requiring 90 [[Slayer]] to kill. They can attack with both melee and magic depending on their target's distance to them. They |
+ | Dark beasts are [[Slayer monster]]s requiring 90 [[Slayer]] to kill. They can attack with both melee and magic depending on their target's distance to them. They use melee attacks if their target is within melee distance, otherwise they will always use magic attacks. Dark beasts are weak to bolts, making Ranged a recommended way to kill them with lower tier equipment, but with decent equipment Magic and Melee work just as fine. |
| − | [[Soul Split]] along with [[Turmoil]], [[Torment]] or [[Anguish]] can completely negate the need of any kind of healing. If these cannot be used, [[Protect from Magic]] or [[Deflect Magic]] can help to negate |
+ | [[Soul Split]] along with [[Turmoil]], [[Torment]] or [[Anguish]] can completely negate the need of any kind of healing. If these cannot be used, [[Protect from Magic]] or [[Deflect Magic]] can help to negate some of the damage dark beasts deal, the latter also reflecting some of it back at them. |
| − | Since |
+ | Since dark beasts drop [[Big bones]], wearing [[Demon horn necklace]] or its equivalents in conjunction with [[Bonecrusher]] will restore Prayer Points, allowing Prayers to be used indefinitely while killing them. |
| + | [[Tirannwn quiver 4]] provides a +5% damage boost against dark Beasts, making it recommended to wear while killing them even if not using Ranged. |
||
| ⚫ | |||
| + | |||
| ⚫ | |||
| ⚫ | |||
| ⚫ | |||
| + | |||
| + | <tabber> |
||
| + | Magic= |
||
| + | With higher tier gear, Magic is the recommended way to kill dark beasts because of its higher amount of AoE abilities compared to Ranged and Melee. Long reach of Magic attacks also reduces the need of moving, allowing more kills per hour. |
||
| + | |||
| + | {{Recommended equipment|style = [[Magic]] |
||
| + | |helm1 = {{plink|Full slayer helmet}} / {{plink|Mask of Gloom}} (Task only) |
||
| ⚫ | |||
| + | |helm3 = {{plink|Refined Anima Core helm of Seren}} |
||
| + | |helm4 = {{plink|Virtus mask}} / {{plink|Anima Core helm of Seren}} |
||
| + | |helm5 = {{plink|Hood of subjugation}} |
||
| + | |neck1 = {{plink|Arcane blood necklace}} |
||
| + | |neck2 = {{plink|Blood amulet of fury}} |
||
| + | |neck3 = {{plink|Amulet of souls}} |
||
| + | |neck4 = {{plink|Arcane stream necklace}} |
||
| + | |cape1 = {{plink|Completionist cape}} |
||
| + | |cape2 = {{plink|TokHaar-Kal-Mej}} |
||
| + | |cape3 = {{plink|Max cape}} |
||
| + | |cape4 = {{plink|God cape|pic=Saradomin cape}} |
||
| + | |cape5 = {{plink|Cape of accomplishment|pic=Slayer cape}} |
||
| + | |body1 = {{plink|Tectonic robe top}} |
||
| + | |body2 = {{plink|Superior Zuriel's robe top}} |
||
| + | |body3 = {{plink|Refined Anima Core body of Seren}} |
||
| + | |body4 = {{plink|Virtus robe top}} / {{plink|Anima Core body of Seren}} |
||
| + | |body5 = {{plink|Garb of subjugation}} |
||
| + | |legs1 = {{plink|Tectonic robe bottom}} |
||
| + | |legs2 = {{plink|Superior Zuriel's robe bottom}} |
||
| + | |legs3 = {{plink|Refined Anima Core legs of Seren}} |
||
| + | |legs4 = {{plink|Virtus robe legs}}/{{plink|Anima Core legs of Seren}} |
||
| + | |legs5 = {{plink|Gown of subjugation}} |
||
| + | |weapon1 = {{plink|Wand of the praesul}} |
||
| + | |weapon2 = {{plink|Seismic wand}} |
||
| + | |weapon3 = {{plink|Wand of the Cywir elders}} |
||
| + | |weapon4 = {{plink|Seasinger kiba}} |
||
| + | |weapon5 = {{plink|Attuned crystal wand}} / {{plink|Virtus wand}} |
||
| + | |2hweapon1 = {{plink|Staff of Sliske}} |
||
| + | |2hweapon2 = {{plink|Noxious staff}} |
||
| + | |2hweapon3 = {{plink|Obliteration}} |
||
| + | |2hweapon4 = {{plink|Staff of darkness}} / {{plink|Camel staff}} |
||
| + | |2hweapon5 = {{plink|Attuned crystal staff}} / {{plink|Chaotic staff}} |
||
| + | |off1 = {{plink|Imperium core}} |
||
| + | |off2 = {{plink|Seismic singularity}} |
||
| + | |off3 = {{plink|Seasinger makigai}} |
||
| ⚫ | |||
| + | |gloves1 = {{plink|Cinderbane gloves}} |
||
| + | |gloves2 = {{plink|Celestial handwraps}} |
||
| + | |gloves3 = {{plink|Virtus gloves}} |
||
| + | |gloves4 = {{plink|Gloves of subjugation}} |
||
| + | |gloves5 = {{plink|Culinaromancer's gloves 10}} |
||
| + | |boots1 = {{plink|Hailfire boots}} |
||
| + | |boots2 = {{plink|Virtus boots}} |
||
| + | |boots3 = {{plink|Boots of subjugation}} |
||
| + | |boots4 = {{plink|Silverhawk boots}} |
||
| + | |ring1 = {{plink|Ferocious ring}} (Kuradal's dungeon only) |
||
| + | |ring2 = {{plink|Asylum surgeon's ring}} |
||
| + | |ring3 = {{plink|Ring of death}} |
||
| + | |ring4 = {{plink|Luck of the dwarves}} |
||
| + | |ring5 = {{plink|Sixth-Age circuit}} |
||
| + | |aura1 = {{plink|Maniacal aura}} |
||
| + | |aura2 = {{plink|Penance aura}} |
||
| + | |aura3 = {{plink|Vampyrism aura}} (if not soulsplit) |
||
| + | |ammo1 = {{plink|Tirannwn quiver 4}} |
||
| + | |pocket1 = {{plink|Bonecrusher}} only if using Demon horn necklace |
||
| + | |pocket2 = {{plink|Scrimshaw of the elements}} |
||
| + | |pocket3 = {{plink|Illuminated god book|pic=Illuminated Book of Wisdom}} |
||
| + | |pocket4 = {{plink|God Book|pic=Saradomin's Book of Wisdom}} |
||
| + | }} |
||
| + | |||
| + | |-| |
||
| ⚫ | |||
| ⚫ | |||
{{Recommended equipment|style = [[Ranged]] |
{{Recommended equipment|style = [[Ranged]] |
||
| Line 25: | Line 96: | ||
|cape5 = {{plink|Cape of accomplishment|pic=Slayer cape}} |
|cape5 = {{plink|Cape of accomplishment|pic=Slayer cape}} |
||
|body1 = {{plink|Sirenic hauberk}} |
|body1 = {{plink|Sirenic hauberk}} |
||
| − | |body2 = {{plink| |
+ | |body2 = {{plink|Superior Morrigan's leather body}} |
| − | |body3 = {{plink| |
+ | |body3 = {{plink|Refined Anima Core body of Zamorak}} |
| − | |body4 = {{plink| |
+ | |body4 = {{plink|Pernix body}} / {{plink|Anima Core body of Zamorak}} |
| + | |body5 = {{plink|Armadyl chestplate}} |
||
|legs1 = {{plink|Sirenic chaps}} |
|legs1 = {{plink|Sirenic chaps}} |
||
| − | |legs2 = {{plink| |
+ | |legs2 = {{plink|Superior Morrigan's leather chaps}} |
| − | |legs3 = {{plink| |
+ | |legs3 = {{plink|Refined Anima Core legs of Zamorak}} |
| − | |legs4 = {{plink| |
+ | |legs4 = {{plink|Pernix chaps}}/{{plink|Anima Core legs of Zamorak}} |
| + | |legs5 = {{plink|Armadyl chainskirt}} |
||
|weapon1 = {{plink|Ascension crossbow}} |
|weapon1 = {{plink|Ascension crossbow}} |
||
| − | |weapon2 = |
+ | |weapon2 = {{plink|Shadow glaive}} |
| − | |weapon3 = {{plink| |
+ | |weapon3 = {{plink|Death Lotus dart}} |
| − | |weapon4 = {{plink| |
+ | |weapon4 = {{plink|Attuned crystal chakram}} / {{plink|Chaotic crossbow}} |
| − | | |
+ | |weapon5 = {{plink|Armadyl crossbow}} |
| + | |2hweapon1 = {{plink|Seren godbow}} |
||
| ⚫ | |||
| − | | |
+ | |2hweapon2 = {{plink|Noxious longbow}} |
| + | |2hweapon3 = {{plink|Decimation}} |
||
| + | |2hweapon4 = {{plink|Wyvern crossbow}} |
||
| ⚫ | |||
|off1 = {{plink|Off-hand Ascension crossbow}} |
|off1 = {{plink|Off-hand Ascension crossbow}} |
||
|off2 = {{plink|Off-hand Death Lotus dart}} |
|off2 = {{plink|Off-hand Death Lotus dart}} |
||
| − | |off3 = {{plink|Off-hand |
+ | |off3 = {{plink|Off-hand attuned crystal chakram}} / {{plink|Off-hand shadow glaive}} / {{plink|Off-hand chaotic crossbow}} |
|off4 = {{plink|off-hand Armadyl crossbow}} |
|off4 = {{plink|off-hand Armadyl crossbow}} |
||
| − | |gloves1 = {{plink| |
+ | |gloves1 = {{plink|Cinderbane gloves}} |
| − | |gloves2 = {{plink| |
+ | |gloves2 = {{plink|Ascension grips}} |
| − | |gloves3 = {{plink| |
+ | |gloves3 = {{plink|Pernix gloves}} |
| − | |gloves4 = {{plink| |
+ | |gloves4 = {{plink|Armadyl gloves}} |
| + | |gloves5 = {{plink|Culinaromancer's gloves 10}} |
||
|boots1 = {{plink|Flarefrost boots}} |
|boots1 = {{plink|Flarefrost boots}} |
||
|boots2 = {{plink|Pernix boots}} |
|boots2 = {{plink|Pernix boots}} |
||
| Line 54: | Line 131: | ||
|ring2 = {{plink|Asylum surgeon's ring}} |
|ring2 = {{plink|Asylum surgeon's ring}} |
||
|ring3 = {{plink|Ring of death}} |
|ring3 = {{plink|Ring of death}} |
||
| − | |ring4 = {{plink| |
+ | |ring4 = {{plink|Luck of the dwarves}} |
| + | |ring5 = {{plink|Sixth-Age circuit}} |
||
|aura1 = {{plink|Reckless aura}} |
|aura1 = {{plink|Reckless aura}} |
||
|aura2 = {{plink|Penance aura}} |
|aura2 = {{plink|Penance aura}} |
||
| Line 60: | Line 138: | ||
|ammo1 = {{plink|Tirannwn quiver 4}} |
|ammo1 = {{plink|Tirannwn quiver 4}} |
||
|ammo2 = {{plink|Ascension bolts}} / {{plink|Araxyte arrow}} |
|ammo2 = {{plink|Ascension bolts}} / {{plink|Araxyte arrow}} |
||
| − | |ammo3 = {{plink| |
+ | |ammo3 = {{plink|Wyvern spines}} / {{plink|Wild arrow}} |
| + | |ammo4 = {{plink|Royal bolts}} |
||
|pocket1 = {{plink|Bonecrusher}} only if using Demon horn necklace |
|pocket1 = {{plink|Bonecrusher}} only if using Demon horn necklace |
||
|pocket2 = {{plink|Scrimshaw of cruelty}} |
|pocket2 = {{plink|Scrimshaw of cruelty}} |
||
| Line 67: | Line 146: | ||
}} |
}} |
||
| + | |-| |
||
| − | + | Melee= |
|
| − | Melee is also a viable way to kill |
+ | Melee is also a viable way to kill dark beasts, however due to the shorter range of Melee weaponry this may lead to lower amount of kills per hour unless using a weapon with longer reach like noxious scythe combined with AoE abilities. They are also relatively strong against Melee, so accuracy may be an issue with lower tier weaponry. |
{{Recommended equipment|style = Melee |
{{Recommended equipment|style = Melee |
||
| Line 86: | Line 166: | ||
|cape4 = {{plink|Cape of accomplishment|pic=Slayer cape}} |
|cape4 = {{plink|Cape of accomplishment|pic=Slayer cape}} |
||
|body1 = {{plink|Malevolent cuirass}} |
|body1 = {{plink|Malevolent cuirass}} |
||
| − | |body2 = {{plink| |
+ | |body2 = {{plink|Superior Statius's platebody}} / {{plink|Superior Vesta's Chainbody}} |
| − | |body3 = {{plink| |
+ | |body3 = {{plink|Refined Anima Core Body of Zaros}} |
| − | |body4 = {{plink| |
+ | |body4 = {{plink|Torva platebody}}/{{plink|Anima Core Body of Zaros}} |
| + | |body5 = {{plink|Bandos chestplate}} |
||
|legs1 = {{plink|Malevolent greaves}} |
|legs1 = {{plink|Malevolent greaves}} |
||
| − | |legs2 = {{plink| |
+ | |legs2 = {{plink|Superior Statius's platelegs}} / {{plink|Superior Vesta's plateskirt}} |
| − | |legs3 = {{plink| |
+ | |legs3 = {{plink|Refined Anima Core Legs of Zaros}} |
| − | |legs4 = {{plink| |
+ | |legs4 = {{plink|Torva platelegs}}/{{plink|Anima Core Legs of Zaros}} |
| + | |legs5 = {{plink|Bandos tassets}} |
||
| ⚫ | |||
| − | | |
+ | |weapon1 = {{plink|Khopesh of Tumeken}} |
| − | | |
+ | |weapon2 = {{plink|Drygore mace}} / {{plink|Drygore longsword}} / {{plink|Drygore rapier}} |
| + | |weapon3 = {{plink|Blade of Nymora}} |
||
| − | |weapon4 = {{plink|Chaotic longsword}}/{{plink|Chaotic rapier}}/{{plink|Chaotic claw}} |
||
| − | | |
+ | |weapon4 = {{plink|Tetsu katana}} / {{plink|Lava whip}} |
| − | | |
+ | |weapon5 = {{plink|Khopesh of the Kharidian}} |
| − | | |
+ | |2hweapon1 = {{plink|Zaros godsword}} |
| − | | |
+ | |2hweapon2 = {{plink|Noxious scythe}} |
| + | |2hweapon3 = {{plink|Dragon Rider lance}} |
||
| ⚫ | |||
| − | | |
+ | |2hweapon4 = {{plink|Annihilation}} |
| + | |2hweapon5 = {{plink|Attuned crystal halberd}} |
||
| ⚫ | |||
| − | | |
+ | |off1 = {{plink|Khopesh of Elidinis}} |
| ⚫ | |||
| ⚫ | |||
| − | | |
+ | |off3 = {{plink|Tetsu wakizashi}} |
| − | | |
+ | |off4 = {{plink|Off-hand khopesh of the Kharidian}} |
| ⚫ | |||
| + | |gloves1 = {{plink|Cinderbane gloves}} |
||
| + | |gloves2 = {{plink|Razorback gauntlets}} |
||
| + | |gloves3 = {{plink|Torva gloves}} |
||
| + | |gloves4 = {{plink|Bandos gloves}} |
||
| + | |gloves5 = {{plink|Culinaromancer's gloves 10}} |
||
|boots1 = {{plink|Emberkeen boots}} |
|boots1 = {{plink|Emberkeen boots}} |
||
|boots2 = {{plink|Torva boots}} |
|boots2 = {{plink|Torva boots}} |
||
| Line 115: | Line 202: | ||
|ring2 = {{plink|Asylum surgeon's ring}} |
|ring2 = {{plink|Asylum surgeon's ring}} |
||
|ring3 = {{plink|Ring of death}} |
|ring3 = {{plink|Ring of death}} |
||
| − | |ring4 = {{plink| |
+ | |ring4 = {{plink|Luck of the dwarves}} |
| + | |ring5 = {{plink|Sixth-Age circuit}} |
||
|ammo1 = {{plink|Tirannwn quiver 4}} |
|ammo1 = {{plink|Tirannwn quiver 4}} |
||
|pocket1 = {{plink|Bonecrusher}} |
|pocket1 = {{plink|Bonecrusher}} |
||
| Line 124: | Line 212: | ||
|aura3 = {{plink|Vampyrism aura}} (if not using Soulsplit) |
|aura3 = {{plink|Vampyrism aura}} (if not using Soulsplit) |
||
}} |
}} |
||
| + | </tabber> |
||
==Locations== |
==Locations== |
||
| Line 129: | Line 218: | ||
===[[Temple of Light]]=== |
===[[Temple of Light]]=== |
||
| − | [[File:Dark_beast_Temple.png|thumb|280px|A player ranging |
+ | [[File:Dark_beast_Temple.png|thumb|280px|A player ranging dark beasts in the Temple of Light.]] |
| − | Dark beasts in Mourner tunnels are numerous, and are found throughout the tunnels. [[ |
+ | Dark beasts in Mourner tunnels are numerous, and are found throughout the tunnels. The [[Oldak coil]] or [[dwarven multicannon]] can be set up here unlike Kuradal's Dungeon, making it highly preferred for players training Invention or just completing a slayer task. |
Players can enter through the mourner headquarters, '''or''' enter the Death Altar (via Abyss, Underground Pass or Wicked hood) and leave the Temple of Light. If you wish to return this way, ensure that the beam is aimed at the triple barrier, or you will need to go through the other side and set the beam back. |
Players can enter through the mourner headquarters, '''or''' enter the Death Altar (via Abyss, Underground Pass or Wicked hood) and leave the Temple of Light. If you wish to return this way, ensure that the beam is aimed at the triple barrier, or you will need to go through the other side and set the beam back. |
||
| Line 138: | Line 227: | ||
===[[Kuradal's Dungeon]]=== |
===[[Kuradal's Dungeon]]=== |
||
[[File:Kuradal's Dungeon map.png|link=Map:Kuradal's Dungeon|right|300px]] |
[[File:Kuradal's Dungeon map.png|link=Map:Kuradal's Dungeon|right|300px]] |
||
| − | The |
+ | The dark beasts in Kuradal's dungeon can only be killed while having them as a Slayer assignment. There are six of them in a small room, making it a very convenient place to kill them for those looking to finish their Slayer assignments quickly. Like with all Slayer monsters in the dungeon, the [[Ferocious ring]] will provide a 4% damage boost against dark beasts here. |
===[[Forinthry Dungeon]]=== |
===[[Forinthry Dungeon]]=== |
||
[[File:Forinthry Dungeon map.png|right|300px]] |
[[File:Forinthry Dungeon map.png|right|300px]] |
||
| − | There are nine |
+ | There are nine dark beasts in Forinthry dungeon which are relatively clumped compared to the other two locations. However, as it is in the Wilderness (level 27-31 Wilderness), players should not bring items that they are unwilling to lose. The area is almost always empty (as the other two locations are far safer), and a cannon may be used here, but given the risk, it is not recommended. Players should be wary of their surroundings and pick up every drop as leaving them may alert potential player killers of your location. |
| + | |||
| + | While the risk is incredibly high, players may obtain up to an additional 40% slayer experience by combining it with a [[demonic skull]] and a [[Slayer contract (Wilderness)|slayer contract]]. |
||
| − | A bank is relatively close to the dungeon; the merchants [[Sam]] and [[Edmond (cape merchant)|Edmond]] are the closest to the dungeon. |
+ | A bank is relatively close to the dungeon; the merchants [[Sam]] and [[Edmond (cape merchant)|Edmond]] are the closest to the dungeon. It is recommended to carry the [[Wilderness sword 2]] or higher as it provides free, unlimited teleports to [[Edgeville]] and the lower leveled dungeon exit. |
[[Category:Strategies]] |
[[Category:Strategies]] |
||
Latest revision as of 03:49, 30 July 2018
Dark beasts are Slayer monsters requiring 90 Slayer to kill. They can attack with both melee and magic depending on their target's distance to them. They use melee attacks if their target is within melee distance, otherwise they will always use magic attacks. Dark beasts are weak to bolts, making Ranged a recommended way to kill them with lower tier equipment, but with decent equipment Magic and Melee work just as fine.
Soul Split along with Turmoil, Torment or Anguish can completely negate the need of any kind of healing. If these cannot be used, Protect from Magic or Deflect Magic can help to negate some of the damage dark beasts deal, the latter also reflecting some of it back at them. Since dark beasts drop Big bones, wearing Demon horn necklace or its equivalents in conjunction with Bonecrusher will restore Prayer Points, allowing Prayers to be used indefinitely while killing them.
Tirannwn quiver 4 provides a +5% damage boost against dark Beasts, making it recommended to wear while killing them even if not using Ranged.
Recommended equipment
With higher tier gear, Magic is the recommended way to kill dark beasts because of its higher amount of AoE abilities compared to Ranged and Melee. Long reach of Magic attacks also reduces the need of moving, allowing more kills per hour.
Ranged is an easy way to kill dark beasts due to their weakness to Bolts and the fact Ranged armour provides good defence against their magic attacks. Long reach of Ranged attacks also helps to get more kills per hour.
Melee is also a viable way to kill dark beasts, however due to the shorter range of Melee weaponry this may lead to lower amount of kills per hour unless using a weapon with longer reach like noxious scythe combined with AoE abilities. They are also relatively strong against Melee, so accuracy may be an issue with lower tier weaponry.
Locations
Dark beasts are found in three locations:
Temple of Light

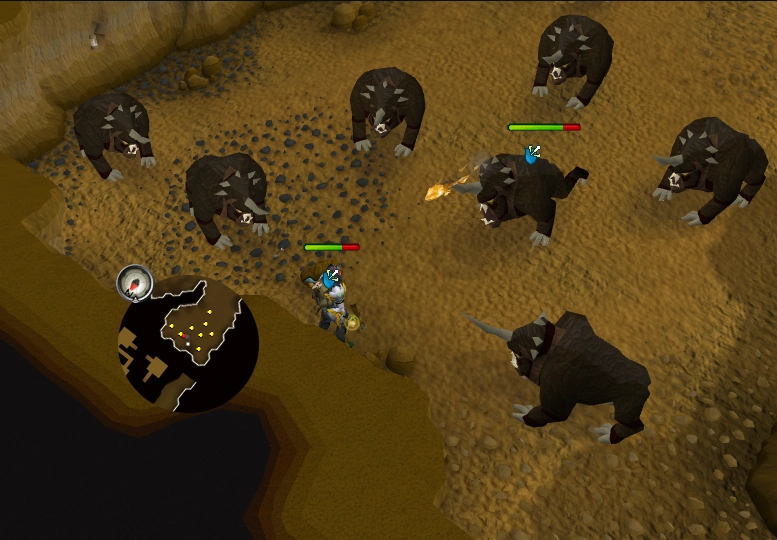
A player ranging dark beasts in the Temple of Light.
Dark beasts in Mourner tunnels are numerous, and are found throughout the tunnels. The Oldak coil or dwarven multicannon can be set up here unlike Kuradal's Dungeon, making it highly preferred for players training Invention or just completing a slayer task.
Players can enter through the mourner headquarters, or enter the Death Altar (via Abyss, Underground Pass or Wicked hood) and leave the Temple of Light. If you wish to return this way, ensure that the beam is aimed at the triple barrier, or you will need to go through the other side and set the beam back.
With Within the Light completed, you can use a crystal seed to teleport outside the Temple of Light. With Plague's End completed, you do not need to bring mourner gear; simply grab the new key from the head mourner's desk and use it on the door.
Kuradal's Dungeon
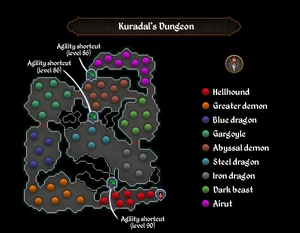
The dark beasts in Kuradal's dungeon can only be killed while having them as a Slayer assignment. There are six of them in a small room, making it a very convenient place to kill them for those looking to finish their Slayer assignments quickly. Like with all Slayer monsters in the dungeon, the Ferocious ring will provide a 4% damage boost against dark beasts here.
Forinthry Dungeon
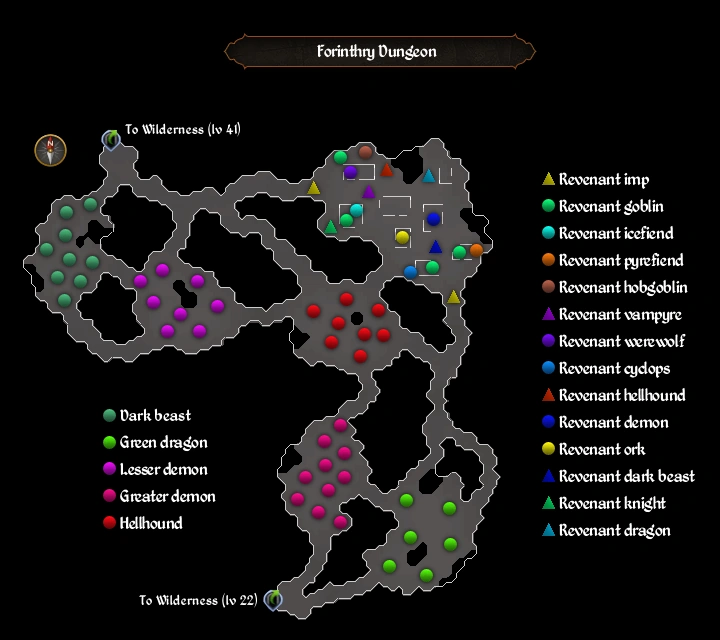
There are nine dark beasts in Forinthry dungeon which are relatively clumped compared to the other two locations. However, as it is in the Wilderness (level 27-31 Wilderness), players should not bring items that they are unwilling to lose. The area is almost always empty (as the other two locations are far safer), and a cannon may be used here, but given the risk, it is not recommended. Players should be wary of their surroundings and pick up every drop as leaving them may alert potential player killers of your location.
While the risk is incredibly high, players may obtain up to an additional 40% slayer experience by combining it with a demonic skull and a slayer contract.
A bank is relatively close to the dungeon; the merchants Sam and Edmond are the closest to the dungeon. It is recommended to carry the Wilderness sword 2 or higher as it provides free, unlimited teleports to Edgeville and the lower leveled dungeon exit.