| Also known as | Div |
|---|---|
| Release date | 20 August 2013 (Update) |
| Members only | Yes |
| Minimum level for Hiscores |
15 as of 12 Dec 2017 |
| Players with 99 |
96,752 as of 4 Feb 2023 |
| Players with 120 | 3,118 as of 4 Feb 2023 |
| Players with 200M XP |
986 as of 4 Feb 2023 |

Divination is a gathering and manufacturing skill that was developed by humans shortly after the beginning of the Sixth Age. It involves gathering Guthix's residual life-force, which is leaking throughout Gielinor. To do this, the players gather divine energy from wisps and then use this energy to make items such as portents, signs, and divine locations.
The current minimum requirement to be ranked (at approximately rank 506,313) on the hiscores for Divination is level 15. As of 04 February 2023, there are 96,752 current members that have achieved level 99 in Divination. There are 3,118 current members that have achieved level 120 in Divination.
History


Orla's camp.
In the Year 169 of the Fifth Age, the Assassination of Guthix took place. In Year 1 of the Sixth Age this has resulted in the manifestation of wisps and the appearance of craters throughout Gielinor. As researched by May Stormbrewer, the wisps are a fusion of memories and divine energy. The memories are remnants of Guthix's life force, which hold his residual power within them, and were expelled from Guthix after his death and thus spread throughout the world.
Divine energy is the result of the Edicts of Guthix, which were believed to be a physical barrier around the world which prevented the Gods from entering Gielinor. Upon Guthix's death however this barrier shattered and fell down to the surface. It is believed that the power of the shield is held within the divine energy. Divine energy and memories combined together and formed wisps.
Guthix's death also caused the various craters to open around Gielinor. It is highly speculated that the death of Guthix has damaged the world and that damage has manifested itself as the craters. It is probable that Guthix's death has rendered a great imbalance within Gielinor, and so the life force of the world (Anima Mundi) is now "bleeding" due to this imbalance. The wisps gather around these craters as they are attracted to this life force, because this is one of the powers that Guthix used to become so powerful. This same force, now saturates the wisps as his memories.
Those who study Divination west of the Lumbridge Crater, as well as many adventurers, are trying to return the memories to the various craters as it seems that giving Guthix's life force back to Gielinor, heals it to some extent, although it is unknown whether this ritual will be able to fully restore the Anima Mundi.
It is unknown at the moment if the world can be repaired without Guthix. It has been speculated that the life force of Gielinor may merely continue to leak from the craters, resulting in further degradation of the world. The consequences of such damage are unknown, but likely catastrophic.
Getting started


A wisp
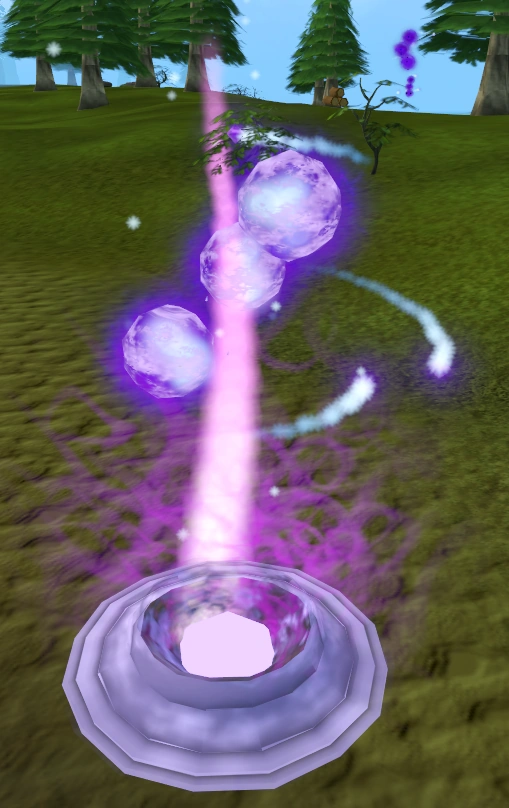
A spring
To learn about the Divination skill and to begin training, players can talk to Orla Fairweather in the Divination Camp south of the Draynor jail. She will say that there are many wisps located around Gielinor from which the player can gather memories. The player may then convert the memories into experience or energy to create products, such as signs or portents.
Harvesting


To harvest energy, a player must first activate a wisp. This is done simply by choosing the "harvest" option (left-click the wisp), at which point it will turn into the corresponding spring and the player will begin harvesting memories of the same tier for minimal experience. Every harvest provides the player a number of energy of the spring's type, depending on the player's level, and a good but not 100% chance of harvesting that type of memory. There is also a small chance that the player will harvest an enriched memory which provides double the normal experience.
The spring will persist for between 3 and 45 seconds, regardless of how many people are drawing from it. For the first third of its time it will have a tall purple cone of light running through the centre, for the second a small purple cone, and for the last it will be entirely absent. In this manner, the duration of the spring can be estimated.
In locations where the wisps have become spread out and distant from each other and the Energy Rift, the use of Escape or Surge can shorten movement between them.
Divine energy
The number of energies gained when harvesting a spring changes based on level. Energy is harvested from springs regardless of whether the player successfully gets a memory. From levels 1 to 54, the player will only harvest 1 energy at a time. At levels 55 through 74, this is increased to 2 energies per harvest. At levels 75 and beyond, the player will gain 3 energies every harvest.
Chronicle fragments
Around once per minute, each player has a chance that a chronicle fragment will spawn when collecting from wisps, with approximately a 1 in 25 chance. When a Chronicle fragment spawns, it is temporarily instanced so that only the player for whom it spawned may see it. After a short while, other players will be able to catch it. Catching a Chronicle fragment earns the player Hunter experience. Catching 10 of these will grant additional divination experience when given to May Stormbrewer, more if offered at Guthix's shrine. Up to 30 of these can be held by the player at one time, although it is recommended that players hand them in after obtaining 10, as the spawn rate will be reduced. The 10 fragments do not need to be in the player's inventory to turn in to May.
Note: The Chronicle Fragment spawn rate described here was the rate at the release of the skill; updates have since greatly reduced their appearance.
Enriched memories
There is a chance when harvesting from regular springs that any memory received may be an enriched one. These give double the experience on harvesting and on conversion. The higher your Divination level the more chance you have of harvesting an enriched memory.
In addition to regular wisps are the rare enriched wisps that spawn every 20 minutes (on the hour, 20 minutes past and 40 minutes past; due to server lag, they usually appear up to a minute later). These activate into enriched springs which always give double the experience on harvesting energy compared to regular springs, and guarantee that whenever a memory is harvested it will be an enriched one. In addition, any of the first four people to start harvesting from it who have at least one normal (not enriched) memory of the same type in their inventory will have one converted into an enriched memory. This makes the enriched pool last a little bit longer. If this happens, the player will get a message in their chatbox (does not appear if game messages are filtered). While harvesting enriched wisps, if your inventory becomes full, continuing to harvest will turn regular memories of the same type into enriched memories.
Converting

The memories (both standard and enriched) are to be deposited in the energy rifts nearby. There are 3 options with depositing at the rift:

- Memories to Energy
- Converts each memory into 2 to 5 energy; and enriched memories into twice the amount.
- This option produces the most resources but grants only 1 XP per conversion, the slowest rate.
- Memories to Experience
- Converts each memory into experience. Standard memories will be deposited before enriched memories.
- Memories and Energy to Experience
- Converts energy and memories into experience at a higher rate. Each standard memory will use up 5 energy, and each enriched memory will use up 10 energy. The result is a higher rate of experience at a greater cost. Enriched memories in your inventory will be deposited first automatically, followed by standard memories. You will automatically continue to convert memories for the normal experience rate when you run out of energy.
- This option provides a faster experience rate at the cost of resources.
- It should be noted that the experience per energy is fixed for each tier. For example, converting 5 energies and a flickering memory yields 1 bonus experience (without a boon), and 10 energies and an enriched flickering memory yields 2 bonus experience. This equals 0.2 bonus experience per energy used.
Rift locations
There are many energy rifts located around Gielinor, and even one on Freneskae. All of which require a higher Divination level than others.
Note that you can get 10% bonus experience from converting with the appropriate boon. See the respective wisp pages linked for information on the fastest means of travel. A player may have all boons (which they have the level to create) active at one time. The xp values below have not calculated the boost gained from boons.
| Level | Wisp type | Map | Location | Experience (Enriched) | ||||
|---|---|---|---|---|---|---|---|---|
| Harvest[1] | Convert Memory | Convert with Energy | ||||||
| Normal | Boon | Normal | Boon | |||||
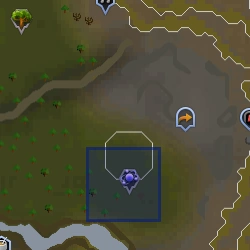
| 1 | (Wisp) |
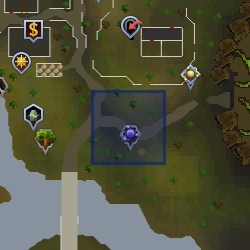
|
West of Lumbridge crater, near the Divination camp. Best Travel Option(s): Use an Amulet of Glory to teleport to Draynor Village or use a Faction Token, from The Battle of Lumbridge, to teleport to your respective camp. |
1 | 3 | N/A | 3.7 | N/A |
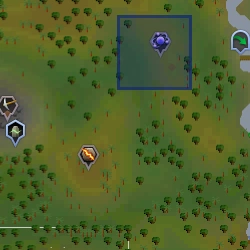
| 10 | (Wisp) |
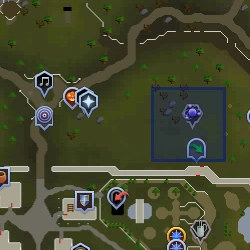
|
North of Falador, near the Guthix memorial site, and Standing Stones. Best Travel Option: Use the Falador Lodestone and head east. |
2 (4) | 4 (8) | 4.4 (8.8) | 5 (10) | 5.5 (11) |
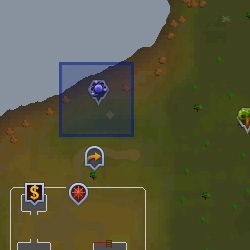
| 20 | (Wisp) |
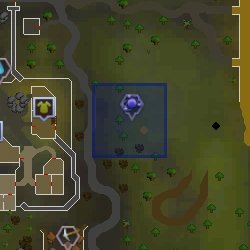
|
Between Varrock and the Digsite. Best Travel Option: Use the Digsite Pendant,or via gnome glider. |
3 (6) | 5 (10) | 5.5 (11) | 6.2 (12.4) | 6.8 (13.6) |
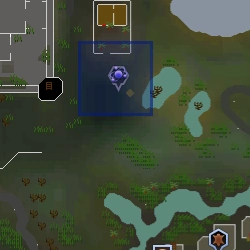
| 30 | (Wisp) |
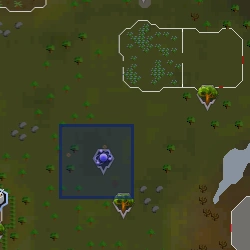
|
South-east of Seers' Village; just south of the flax field.
Best Travel Option: Use the Seers' Village Lodestone and then travel south-east, or travel north from fairy ring code BLR. |
4 (8) | 7 (14) | 7.7 (15.4) | 8.7 (17.4) | 9.5 (19.1) |
| 40 | (Wisp) |
|
South-east of Rellekka, near the Golden Apple Tree.
Best Travel Option: Ring of Slaying to teleport to Fremennik Slayer Dungeon or use the fairy ring code AJR, then run south. |
5 (10) | 12 (24) | 13.2 (26.4) | 15 (30) | 16.5 (33) |
| 50 | (Wisp) |
|
In the centre of the Karamja jungle, north-east of Shilo Village. Best Travel Option: Getting to the Nature Altar using either Nature Tabs or the Wicked Hood . You may use a Lodestone to teleport to Karamja and travel south east. Also the Spirit graahk can be use for quick travel. |
6 (12) | 19 (38) | 20.9 (41.8) | 23.7 (47.4) | 26 (52.1) |
| 60 | (Wisp) |
|
North of Mobilising Armies. Best Travel Option: Use Ring of Duelling to arrive there, a spirit tree or the Mobilising Armies teleport. |
7 (14) | 25 (50) | 27.5 (55) | 31.2 (62.5) | 34.3 (68.7) |
| 70 | (Wisp) |
|
North of Canifis, just to the east of the Slayer Tower. Best Travel Option: Use a Ring of Slaying to teleport in front of the Slayer Tower and head east. Alternatives are the Mask of the Abyss/Helm of Warping which has the option to teleport to Markus. You may use a lodestone to go to Canifis and travel north-west. |
8 (16) | 32 (64) | 35.2 (70.4) | 40 (80) | 44 (88) |
| 75 | (Wisp) |

|
In the Elder Halls upon completion of the Fate of the Gods quest. Best Travel Option: Teleport to the World Gate using the Sixth-Age circuit. (requires completion of The World Wakes) You may use a lodestone to go to Eagles' Peak and travel south along the mountains until you reach the World Gate. |
8.5 (16.5) | 33.5 (67) | 36.8 (73.7) | 41.8 (83.6) | 45.9 (92) |
| 80 | (Wisp) |
|
East of the Mage Training Arena. Best Travel Option: Use the fairy ring code BIP, then run south |
9 (18) | 35 (70) | 38.5 (77) | 43.7 (87.4) | 48 (96.1) |
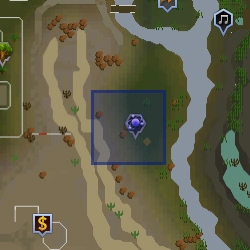
| 85 | (Wisp) |
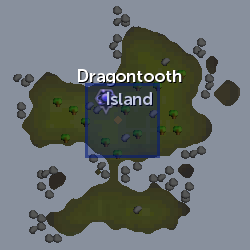
|
Best Travel Option: Hoardstalker ring from Sinkholes Minigame. One Of A Kind quest have to be done to access Dragontooth Celestial Dungeon teleport. From tele run north. Alternative: Use Ectophial, then travel with the ghost captain for free. You will need a Ghostspeak Amulet or Cramulet to understand the captain unless you have obtained the Morytania Legs 3. |
10 (20) | 38 (76) | 41.8 (83.6) | 47.5 (95) | 52.2 (104.5) |
| 90 | (Wisp) |
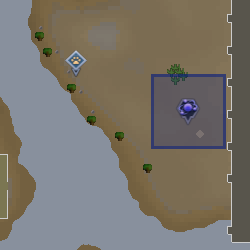
|
South of Sophanem. Best Travel Option: Teleport to Jalsavrah in Sophanem with the Pharaoh's Sceptre or Sceptre of the Gods and run the rest of the way. Note: Bring Waterskins with Humidify runes or an Enchanted water tiara. Wearing desert clothing will help as well. The Tome of frost is also a feasible option as you take minimal damage to be at risk. Wielding Tome of Frost and Regen bracelet is a very cost effective method (desert clothing is optional). |
11 (22) | 42 (84) | 46.2 (92.4) | 52.5 (105) | 57.7 (115.5) |
| 95 | (Wisp) |

|
South of the Poison Waste. Best Travel Option: Use the Spirit Tree to the Poison Waste, then run south and use the grapple option, then run west. Alternative: Use the fairy ring code BKP, to get to the south of Castle Wars, then run past the bridge on the west. |
12 (24) | 45 (90) | 49.5 (99) | 56.2 (112.4) | 61.8 (123.6) |
- ^ Each time a player harvests a wisp they may gain energy or energy and a memory; harvest xp is earned even if the player collects no memory.
Products
Boons

Boons are permanent, single-use items that give 10% more experience when converting memories of a given tier. Only one of each tier can be used, but once it is used the effect lasts forever. They are made by using a certain amount of energy of either the same tier or one tier below the boon being made.
| Boon | Level | Amount | Energy type[1] | Experience |
|---|---|---|---|---|
| 10 | 100 | Pale or Flickering | 3 | |
| 20 | 300 | Flickering or Bright | 5 | |
| 30 | 500 | Bright or Glowing | 7 | |
| 40 | 600 | Glowing or Sparkling | 9 | |
| 50 | 800 | Sparkling or Gleaming | 11 | |
| 60 | 1000 | Gleaming or Vibrant | 13 | |
| 70 | 1250 | Vibrant or Lustrous | 15 | |
| 75 | 1375 | Lustrous or Elder | 16 | |
| 80 | 1500 | Lustrous or Brilliant | 17 | |
| 85 | 1750 | Brilliant or Radiant | 19 | |
| 90 | 2000 | Radiant or Luminous | 21 | |
| 95 | 2250 | Luminous or Incandescent | 23 |
- ^ Be wary that the production interface only states the energy required as being the tier below the boon's namesake. For example, the Boon of flickering energy will only state that it can be made with Pale energy. However, it will consume energy from the namesake's tier if necessary; without warning.
Portents

Portents are single-use items carried in the backpack that activate automatically when certain conditions are met. There are four types: restoration, item protection, life, and passage (portent of passage is only available in Daemonheim - see also Dungeoneering/Divination).
- Restoration portents heal the player when they drop below 50% health.
- Item protection portents automatically keeps an additional item when a player dies.
- Life portents resurrects the player after death and provides 25% of the base life points.
- Passage portents allow you to pass through Dungeoneering skill doors that you normally cannot get through up to a certain number of skill levels above the door requirement.
Signs
Signs are single-use items carried in the pocket that activate automatically when certain conditions are met. There are five types: respite, porter, item protection, life, and death.
- Respite: Automatically extends your gravestone's timer when you die; can also be used to extend an existing timer.
- Porter: Automatically teleports certain collected items to your bank (urns will still work).
- Item protection: Automatically keeps an additional item when a player dies
- Life: Resurrects the player after death and provides 25% of the base life points.
- Death: Resurrects the player after death restoring up to 15% of their base life points while dealing that amount as damage to their target.
Divine locations

Divine locations (often referred to as nodes) are skilling hotspots which may be placed by the player at the expense of energy and a secondary ingredient. A player may only create one divine location per day, however to determine the amount of resources a player can collect per day, divide the player's total skill level by 10 (ex. 1000 total skill would allow a player to collect 100 resources per day from divine locations). Most divine locations last 30 seconds after the first interaction, however some of the higher level locations last for only 23–25 seconds.
Players often like to place divine locations in popular places such as the Grand Exchange or world 2 Burthorpe, so that other players have the opportunity to use their divine location as well.
Transmutation
You can use your divine energy to turn lower level resources into higher level resources.
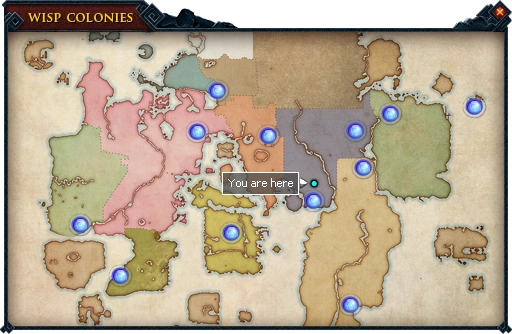
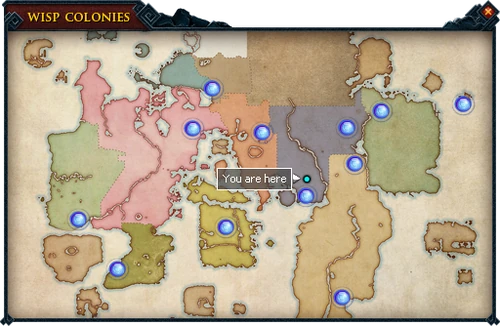
Guthixian Cache
Guthixian Cache is a Divination-themed Distraction and Diversion. There are no skill requirements for this Distraction and Diversion, but more points can be acquired at certain level thresholds.
Guthixian Cache requires the player to hop into an energy rift, found at any of the wisp colonies (except the Pale wisp colony) which appear for 10 minutes at 3 hour intervals, to collect memories of Guthix.
Temporary boosts

A player wearing a Divination cape and performing the Skillcape emote.
Divination boosts can be used to create Portents, Signs, Divine locations, and Transmute items that the player doesn't have the Divination level to make, but boosts can't be used to make Boons or collect from springs that the player doesn't have the level for (except in Daemonheim, where you can boost to harvest springs above your level). For example: a player with level 78 Divination can't boost their level by 2 and collect from the level 80 spot. They also have no effect on energy gained per harvest, meaning a player can't boost their level from 73 to 75 and gather 3 instead of 2 energy per harvest. The following items can be used to boost your Divination level.
- A brown spicy stew can temporarily boost or decrease one's Divination level by up to 5 levels.
- The Divination cape temporarily raises one Divination level when one right-clicks the cape whilst wearing it and selecting 'Boost'. However, similar to all Capes of Accomplishment, level 99 is required for this.
- A One-leaf clover necklace can grant a +5 boost to Divination. However, the chance for the necklace to choose Divination for the boost is highly uncommon due to it being chosen at random from all 26 skills.
- The God banner can boost Divination by +2 for 30 minutes once a day. However, it will not allow you to gather wisps above your base level.
Familiars
- Nightmare muspah provides extra storage for memories and gives a 3% passive boost towards finding enriched memories.
- Light creature grants a passive 10% chance, increasing to 50% if scrolls are used, of instantly converting harvested Divination memories.
Cape of Accomplishment
The Divination cape can be bought from Orla Fairweather for 99,000 coins upon achieving level 99 in Divination.
Pre-release
The skill was first announced in an IGN article[1] on 3 May 2013, which was later corroborated on 6 May by a Jagex Moderator (Mod Seven) on Twitter[2] to be the new skill.
The June 2013 BTS contained some fairly major hints on the matter.
| “ | Divination: Old-school training with new-school rewards. | ” |
— Mod Mark [3]
|
It was revealed that Divination would be released in August 2013, shortly after the release of RuneScape 3[4].
When asked about the mechanics of Divination as compared to Fishing and Mining, Mod Mark stated:
| “ | Yes, it will be much like fishing and mining, although there will be other mechanics built in. It's far more than *just* a gathering skill... | ” |
— Mod Mark
|
In the same 'Around the Campfire' Q&A BTS Video Mod Mark stated that Jagex planned to release a few weeks after RS3 but no confirmed date has been given. It was also confirmed that there will not be a quest to introduce the skill, like there was with the release of Summoning [5]. Mod Mark confirmed that Divination would not be available to free players, outside of the usual level 5 trial. He also confirmed that Divination, unlike Dungeoneering, would not be trainable up to level 120 [6]. A poll for the final skillcape design was started on 25 July.[7]
On 1 August 2013 it was confirmed while training the skill, you would collect divine energy from Wisps, which can be used to create new pocket or inventory items that activate under certain conditions and provide certain benefits such as preventing a killing blow being dealt to you.[8]
On 6 August 2013, the skill cape option 6 was confirmed out of the poll results.
Development team
| Content: |
|---|
| Developer: (Project Lead: Ana S) Krista G Additional Developer: Chris L |
| Graphics: |
| Characters: Damian C Environments: James L |
| Quality Assurance: |
| Core Testers: (Project Lead: Lesleyann W) James H, Kristina S, Anthony D, Gareth W, Sam D, Alex D, Ben L, Kyle R, Ryan P, Juliet T, Phil W, Ollie H, Rich D, Sarah J, Sarah P, Christina S |
| Audio: |
| Sound Effects: Adam B Voice Over: Adam R |
Gallery
")
")
.png "Divination cape winner (back only).png (44 KB)")
")
")
")
Trivia
- Divination's Cape of Accomplishment was the first to have its colour scheme decided in a guaranteed content poll.
- Training the skill was originally slightly faster. A number of training glitches were fixed within the first few hours:
- Players could double click on a dying spring to gain extra harvests.
- Multiple players could catch a single chronicle fragment.
- Enriched wisps were not synchronized, so players could hop worlds for continual harvesting.
- Prior to 17 December 2013, Divination was the only skill without a level-up jingle.
- The message received after Tears of Guthix is "You briefly feel the power of anima mundi pass over you".
- 10 tasks were added to the Burthorpe/Taverley task list to encourage players to try every part of Divination. After completing them, visiting Orla Fairweather at the Divination Camp in Draynor Village rewards 500 Flickering energy.
References
See also
Template:WP also
| Combat | |
| Gathering |
|
| Artisan |
|
| Support |
|
| Elite |
|
| Upcoming |
|
| Former skills |
|