mNo edit summary |
(Undoing LanellyWanderer7's vandalism.) |
||
| (21 intermediate revisions by 16 users not shown) | |||
| Line 17: | Line 17: | ||
|audio = Ian T, Adam B |
|audio = Ian T, Adam B |
||
}} |
}} |
||
| − | '''Do No Evil''' is a master quest in the [[Desert quest series]]. It involves assisting monkeys |
+ | '''Do No Evil''' is a master quest in the [[Desert quest series]]. It involves assisting monkeys in inhabiting the [[Kharidian Desert]] once again, in favour of the [[Gods|goddess]] [[Apmeken]], while discovering more of [[Amascut]]'s actions. |
==Official description== |
==Official description== |
||
| Line 28: | Line 28: | ||
|difficulty = Master |
|difficulty = Master |
||
|length = Very Long |
|length = Very Long |
||
| − | |etime= ~2 hours 23 minutes <!-- "2 hours 23 minutes" is an average from a massive amount of data, posted on a live stream https://www.reddit.com/r/runescape/comments/50dx07/tldw_226_qa_data_stream/ --> |
||
|members = Yes |
|members = Yes |
||
|requirements = |
|requirements = |
||
| Line 53: | Line 52: | ||
* [[Ava's accumulator]] |
* [[Ava's accumulator]] |
||
* [[Monkeyspeak amulet]] |
* [[Monkeyspeak amulet]] |
||
| − | * [[ |
+ | * [[Monkeyspeak amulet mould]] (can be purchased during the quest) |
* [[Ghostspeak amulet]] |
* [[Ghostspeak amulet]] |
||
* Enough runes for 20+ casts of [[ice spells]] (excluding [[ice rush]]) |
* Enough runes for 20+ casts of [[ice spells]] (excluding [[ice rush]]) |
||
| − | * At least 1,000 [[coins]] (11,000+ recommended) |
+ | * At least 1,000 [[coins]] (11,000+ recommended) |
|recommended = |
|recommended = |
||
* [[Waterskin]]s or an [[enchanted water tiara]] to survive the desert heat. Completing [[Crocodile Tears]] quest grants immunity against desert heat. |
* [[Waterskin]]s or an [[enchanted water tiara]] to survive the desert heat. Completing [[Crocodile Tears]] quest grants immunity against desert heat. |
||
| Line 76: | Line 75: | ||
Travel to [[Draynor Village]] and speak to [[Leela]], who is north of the jail. If you have started [[Stolen Hearts]] up to the point where Leela is involved, you must finish both Stolen Hearts and [[Diamond in the Rough]] before Leela will return to Draynor Village. Otherwise, she will not appear in front of the jail. If both quests are completed and Leela does not appear in Draynor Village, she will be in Senliten's tomb, which is south of [[Uzer]]. |
Travel to [[Draynor Village]] and speak to [[Leela]], who is north of the jail. If you have started [[Stolen Hearts]] up to the point where Leela is involved, you must finish both Stolen Hearts and [[Diamond in the Rough]] before Leela will return to Draynor Village. Otherwise, she will not appear in front of the jail. If both quests are completed and Leela does not appear in Draynor Village, she will be in Senliten's tomb, which is south of [[Uzer]]. |
||
| − | The two of you will travel to [[Uzer Mastaba]]. Talk to [[Senliten]] and Leela, and ask the queen if there is any way you can be of service. Senliten will say yes, but first she will tell you a story of her childhood; this story is about how she once played in the great forests that once existed in the Kharidian Empire, and how a group of monkeys saved her from a jackal. Monkeys during this time were both friendly and revered creatures. However now it appears that since the lands of her empire have turned to desert, the monkeys have died out. |
+ | The two of you will travel to [[Uzer Mastaba]]. Talk to [[Senliten]] and Leela, and ask the queen if there is any way you can be of service. Senliten will say yes, but first, she will tell you a story of her childhood; this story is about how she once played in the great forests that once existed in the Kharidian Empire, and how a group of monkeys saved her from a jackal. Monkeys during this time were both friendly and revered creatures. However, now it appears that since the lands of her empire have turned to desert, the monkeys have died out. |
She asks for your help in restoring the "sacred monkeys" to the land. She suggests that this is connected to the goddess [[Apmeken]], and directs players to [[Jex]] and the [[Sphinx]], both in [[Sophanem]], to learn all there is to know about Apmeken, which will illuminate the importance of the desert monkey. |
She asks for your help in restoring the "sacred monkeys" to the land. She suggests that this is connected to the goddess [[Apmeken]], and directs players to [[Jex]] and the [[Sphinx]], both in [[Sophanem]], to learn all there is to know about Apmeken, which will illuminate the importance of the desert monkey. |
||
| Line 88: | Line 87: | ||
===The three wise monkeys=== |
===The three wise monkeys=== |
||
| − | {{Needed|Any [[greegree]] and a [[monkeyspeak amulet]]|recommended=[[Teleport to Ape Atoll]] or a [[ninja monkey greegree (small)|ninja monkey greegree]] for the [[fairy ring]] on Ape Atoll ({{fairycode|CLR}}), 10 coins if a [[ |
+ | {{Needed|Any [[greegree]] and a [[monkeyspeak amulet]]|recommended=[[Teleport to Ape Atoll]] or a [[ninja monkey greegree (small)|ninja monkey greegree]] for the [[fairy ring]] on Ape Atoll ({{fairycode|CLR}}), 10 coins if a [[Monkeyspeak amulet mould]] is needed, and 15-20 empty inventory spaces}} |
[[File:Do No Evil map.png|right|link=Map:Do No Evil|300px|frame|Possible solution to the puzzle]] |
[[File:Do No Evil map.png|right|link=Map:Do No Evil|300px|frame|Possible solution to the puzzle]] |
||
With the required items, head to [[Ape Atoll]] and speak to any of the [[three wise monkeys]] in [[The Temple of Marimbo]]. After some conversation with the monkeys, admit to them that you are really human. They will ask for proof, meaning that you will have to lead the [[Monkey guard (Do No Evil)|monkey guard]] away from the three monkeys in order to safely show them your true form. |
With the required items, head to [[Ape Atoll]] and speak to any of the [[three wise monkeys]] in [[The Temple of Marimbo]]. After some conversation with the monkeys, admit to them that you are really human. They will ask for proof, meaning that you will have to lead the [[Monkey guard (Do No Evil)|monkey guard]] away from the three monkeys in order to safely show them your true form. |
||
| Line 100: | Line 99: | ||
After you have gotten the three wise monkeys to trust you, talk to [[King Awowogei]], who is in a building south of the temple. Convince him to start a colony. Make sure that you do not mention Apmeken to him or you will be imprisoned. He will immediately take up the idea, but insist on building one in [[Karamja]]. Persuade him that the desert would be a wiser option by telling him of the deliciousness and popularity of [[choc-ice]]s. (There is no penalty for choosing the other options, and you'll just be booted back to the previous list of options after a short dialogue.) The king will get excited and commission choc-ices in the shape of a monkey ([[chimp ice]]s). |
After you have gotten the three wise monkeys to trust you, talk to [[King Awowogei]], who is in a building south of the temple. Convince him to start a colony. Make sure that you do not mention Apmeken to him or you will be imprisoned. He will immediately take up the idea, but insist on building one in [[Karamja]]. Persuade him that the desert would be a wiser option by telling him of the deliciousness and popularity of [[choc-ice]]s. (There is no penalty for choosing the other options, and you'll just be booted back to the previous list of options after a short dialogue.) The king will get excited and commission choc-ices in the shape of a monkey ([[chimp ice]]s). |
||
| − | Before leaving Ape Atoll, it is |
+ | Before leaving Ape Atoll, it is recommended that you buy a [[Monkeyspeak amulet mould]] for 10 coins from [[Hamab]]'s [[Hamab's Crafting Emporium|Crafting Emporium]] directly west of the temple, as it is needed to make the chimp ice. It won't be consumed, so feel free to use one from your bank if you have one. |
===Chimp ice deliveries=== |
===Chimp ice deliveries=== |
||
{{Needed|[[monkeyspeak amulet mould]], [[monkeyspeak amulet]], any [[greegree]] except zombie, 1000 coins for buying a [[chimp ice]], an active [[Ancient Magicks]] spellbook, runes for an ice spell|recommended=Coins for buying more chimp ices in case they melt}} |
{{Needed|[[monkeyspeak amulet mould]], [[monkeyspeak amulet]], any [[greegree]] except zombie, 1000 coins for buying a [[chimp ice]], an active [[Ancient Magicks]] spellbook, runes for an ice spell|recommended=Coins for buying more chimp ices in case they melt}} |
||
| − | Make your way to [[Nardah]]. When you are ready to start the delivery, you will talk with [[Rokuh]], the owner of [[Rok's Chocs Box]]. Talk to him about making a "special choc-ice" in the shape of a monkey, and he'll tell you that he needs a mould to make one. Allow him to borrow the |
+ | Make your way to [[Nardah]]. When you are ready to start the delivery, you will talk with [[Rokuh]], the owner of [[Rok's Chocs Box]]. Talk to him about making a "special choc-ice" in the shape of a monkey, and he'll tell you that he needs a mould to make one. Allow him to borrow the Monkeyspeak amulet mould, and he'll agree to make you one for 1,000 [[coins]]. You can buy more later from him for the same price. |
He'll eagerly hand over a [[chimp ice]], but he'll warn you that because of its irregular shape, the magic used to keep the treat frozen is seeping out. To keep the chimp ice from melting, you'll have to periodically cast one of the Ancient Magicks ice spells on it (see the table below for more information). In order to freeze the treat, left-click on the chimp ice (the "Freeze"-option) to open an interface in the chatbox, then select an ice spell. As long as this interface is opened the ice will not melt. |
He'll eagerly hand over a [[chimp ice]], but he'll warn you that because of its irregular shape, the magic used to keep the treat frozen is seeping out. To keep the chimp ice from melting, you'll have to periodically cast one of the Ancient Magicks ice spells on it (see the table below for more information). In order to freeze the treat, left-click on the chimp ice (the "Freeze"-option) to open an interface in the chatbox, then select an ice spell. As long as this interface is opened the ice will not melt. |
||
| Line 132: | Line 131: | ||
This route requires having completed the [[Eagles' Peak]] quest for use of the [[eagle transport system]]. |
This route requires having completed the [[Eagles' Peak]] quest for use of the [[eagle transport system]]. |
||
| − | # From Nardah, use the magic carpet to |
+ | # From Nardah, use the magic carpet to Uzer. |
# Run north to the desert eagle lair located north of the [[Uzer Hunter area]] and north-east of the [[Dominion Tower]]. If you haven't used this eagle before, you will need to shift the boulder blocking the entrance. |
# Run north to the desert eagle lair located north of the [[Uzer Hunter area]] and north-east of the [[Dominion Tower]]. If you haven't used this eagle before, you will need to shift the boulder blocking the entrance. |
||
# Take a rope from the spawn in the cave and use it on the eagle to travel to [[Eagles' Peak (mountain)|Eagles' Peak]]. |
# Take a rope from the spawn in the cave and use it on the eagle to travel to [[Eagles' Peak (mountain)|Eagles' Peak]]. |
||
| Line 138: | Line 137: | ||
# Run along the west fence of the stronghold and through the terrorbird pen to get to the [[Grand Tree]]. |
# Run along the west fence of the stronghold and through the terrorbird pen to get to the [[Grand Tree]]. |
||
# Climb to the first floor, go east to [[Daero]], and select travel. |
# Climb to the first floor, go east to [[Daero]], and select travel. |
||
| − | # Take [[Waydar]]'s glider to [[Crash Island]], then [[Lumdo]]'s boat to Ape Atoll. |
+ | # Take [[Waydar]]'s glider to [[Crash Island]], then [[Lumdo]]'s boat to [[Ape Atoll]]. |
| − | # Run to mahogany tree just south of large gates then cast your freezing spell once more. |
+ | # Run to the mahogany tree just south of large gates then cast your freezing spell once more. |
# Go through the gates and run east to the king. |
# Go through the gates and run east to the king. |
||
| Line 145: | Line 144: | ||
This route requires having unlocked the [[balloon transport system]] to the Tree Gnome Stronghold, which requires the completion of [[Enlightened Journey]]. The route must be unlocked from Entrana, using 3 [[magic logs]] per attempt, after which each use of the route will cost 1 magic logs. Your weight must be less than 40kg when using the balloon. |
This route requires having unlocked the [[balloon transport system]] to the Tree Gnome Stronghold, which requires the completion of [[Enlightened Journey]]. The route must be unlocked from Entrana, using 3 [[magic logs]] per attempt, after which each use of the route will cost 1 magic logs. Your weight must be less than 40kg when using the balloon. |
||
| − | # From Nardah, use the magic carpet to [[Shantay Pass |
+ | # From Nardah, use the magic carpet to [[Shantay Pass]]. |
# Talk to Shantay, and get sent to jail, by asking him "What is this place?", "I am definitely an outlaw, prepare to die!" and "Deport me to Port Sarim!" |
# Talk to Shantay, and get sent to jail, by asking him "What is this place?", "I am definitely an outlaw, prepare to die!" and "Deport me to Port Sarim!" |
||
# From the Port Sarim jail, pick the lock and run north-west to the [[Crafting Guild]]. |
# From the Port Sarim jail, pick the lock and run north-west to the [[Crafting Guild]]. |
||
| Line 151: | Line 150: | ||
# Climb to the first floor, go east to [[Daero]], and select travel. |
# Climb to the first floor, go east to [[Daero]], and select travel. |
||
# Take [[Waydar]]'s glider to [[Crash Island]], then [[Lumdo]]'s boat to Ape Atoll. |
# Take [[Waydar]]'s glider to [[Crash Island]], then [[Lumdo]]'s boat to Ape Atoll. |
||
| − | # Run to mahogany tree just south of large gates then cast your freezing spell once more. |
+ | # Run to the mahogany tree just south of large gates then cast your freezing spell once more. |
# Go through the gates and run east to the king. |
# Go through the gates and run east to the king. |
||
====Charter ship route==== |
====Charter ship route==== |
||
| − | # From Nardah, use the magic carpet to [[Shantay Pass |
+ | # From Nardah, use the magic carpet to [[Shantay Pass]]. |
# Talk to Shantay, and get sent to jail, by asking him "What is this place?", "I am definitely an outlaw, prepare to die!" and "Deport me to Port Sarim!" |
# Talk to Shantay, and get sent to jail, by asking him "What is this place?", "I am definitely an outlaw, prepare to die!" and "Deport me to Port Sarim!" |
||
# Pick the lock on the Port Sarim jail and travel from [[Port Sarim]] to [[Catherby]] via the [[charter ship]]. |
# Pick the lock on the Port Sarim jail and travel from [[Port Sarim]] to [[Catherby]] via the [[charter ship]]. |
||
| Line 177: | Line 176: | ||
{{Needed|[[Ava's accumulator]], a [[spade]] (obtained during quest), and equipment for defeating [[small scarab]]s|recommended=Desert survival gear such as an [[enchanted water tiara]] or [[waterskins]]}} |
{{Needed|[[Ava's accumulator]], a [[spade]] (obtained during quest), and equipment for defeating [[small scarab]]s|recommended=Desert survival gear such as an [[enchanted water tiara]] or [[waterskins]]}} |
||
[[File:The spot to dig.png|thumb|The spot to dig for the crate]] |
[[File:The spot to dig.png|thumb|The spot to dig for the crate]] |
||
| − | Head to [[Draynor Manor]], e.g., by using the Draynor Village lodestone and running north, taking the metal crate and [[Ava's accumulator]], not equipped but in your inventory. Enter the hidden room in the west of the manor and talk to Ava about making a metal detector. She studies the crate and upgrades the device to [[Ava's alerter]]. In addition to an upgraded Ranged bonus and all the perks it gave before, the alerter will warn you when you're near a crate which is exactly like the one you showed her. |
+ | Head to [[Draynor Manor]], e.g., by using the Draynor Village lodestone and running north, taking the metal crate and [[Ava's accumulator]], not equipped but in your inventory. If you don't have your accumulator anymore you can buy it for 999 coins and 75 steel arrows, which she also sells. Enter the hidden room in the west of the manor and talk to Ava about making a metal detector. She studies the crate and upgrades the device to [[Ava's alerter]]. In addition to an upgraded Ranged bonus and all the perks it gave before, the alerter will warn you when you're near a crate which is exactly like the one you showed her. |
Ava hides the crate in the grounds of the manor and asks you to find it to test the alerter. Equip the alerter and go to the south-eastern room of the manor and pick up a spade. Go outside from here and go to the fountain in the south-west corner of the grounds. Make sure you are not wearing metallic armour, or the alerter will not work. Walk from the fountain a short distance north-east and beside two trees: you will know you have stepped on the right spot when your alerter says "Bwuk!" four times in a single line. Use the spade to dig up the crate and return to Ava to tell her of the good news: she will take the crate. If you have more accumulators with you then you can now upgrade them to alerters by talking to Ava again. |
Ava hides the crate in the grounds of the manor and asks you to find it to test the alerter. Equip the alerter and go to the south-eastern room of the manor and pick up a spade. Go outside from here and go to the fountain in the south-west corner of the grounds. Make sure you are not wearing metallic armour, or the alerter will not work. Walk from the fountain a short distance north-east and beside two trees: you will know you have stepped on the right spot when your alerter says "Bwuk!" four times in a single line. Use the spade to dig up the crate and return to Ava to tell her of the good news: she will take the crate. If you have more accumulators with you then you can now upgrade them to alerters by talking to Ava again. |
||
| Line 201: | Line 200: | ||
{{Needed|[[Monkeyspeak amulet]], [[masked earmuffs]] or [[slayer helm]], and a [[ghostspeak amulet]]|recommended=Coins for [[magic carpet]] rides or access to [[fairy ring]]s for transport to the [[Uzer Mastaba]] ({{fairycode|DLQ}})}} |
{{Needed|[[Monkeyspeak amulet]], [[masked earmuffs]] or [[slayer helm]], and a [[ghostspeak amulet]]|recommended=Coins for [[magic carpet]] rides or access to [[fairy ring]]s for transport to the [[Uzer Mastaba]] ({{fairycode|DLQ}})}} |
||
[[File:Osman and Leela.png|thumb|Osman confronts Leela.]] |
[[File:Osman and Leela.png|thumb|Osman confronts Leela.]] |
||
| − | After handing over the knives to the three wise monkeys, return to [[Senliten]], where a cutscene will show [[Osman]] demanding that [[Leela]] return to her post in Draynor, but she will refuse. Senliten will congratulate you on what a great job you've done, but then she pauses and notes that something is wrong. She asks you to return to the colony quickly. You won't be able to use the magic carpet to get there, so use the Bandit Camp lodestone. When you arrive, you will find the colony in ruins. Investigate a corpse to make a [[dead monkey]] appear. You won't be able to understand it unless you somehow figure out how to get the effects of both the monkeyspeak amulet and the ghostspeak amulet. |
+ | After handing over the knives to the three wise monkeys, return to [[Senliten]], where a cutscene will show [[Osman]] demanding that [[Leela]] return to her post in Draynor, but she will refuse. In order to get the cutscene, make sure to enter the pyramid and choose the "Directly to Queen" option (If you travel via speaking to Leela in Draynor, first return to surface and re-enter the pyramid). Senliten will congratulate you on what a great job you've done, but then she pauses and notes that something is wrong. She asks you to return to the colony quickly. You won't be able to use the magic carpet to get there, so use the Bandit Camp lodestone. When you arrive, you will find the colony in ruins. Investigate a corpse to make a [[dead monkey]] appear. You won't be able to understand it unless you somehow figure out how to get the effects of both the monkeyspeak amulet and the ghostspeak amulet. |
[[File:Monkey camp attacked.png|thumb|The ruins of the colony.]] |
[[File:Monkey camp attacked.png|thumb|The ruins of the colony.]] |
||
| Line 224: | Line 223: | ||
{{Needed|[[Cramulet]]|recommended=Equipment, food, [[antipoison]], or 2 [[rope]] if you have not visited the Kalphite Queen previously.}} |
{{Needed|[[Cramulet]]|recommended=Equipment, food, [[antipoison]], or 2 [[rope]] if you have not visited the Kalphite Queen previously.}} |
||
[[File:Ayuni chathead.png|left]] |
[[File:Ayuni chathead.png|left]] |
||
| − | [[File:Kalphite Hive map.png|250px|right|link=Map:Kalphite Hive]] |
||
[[File:Ayuni cutscene.png|Iiii see you...|thumb]] |
[[File:Ayuni cutscene.png|Iiii see you...|thumb]] |
||
[[File:Fighting Ayuni.png|Running too far away from Ayuni will cause her to use a very powerful attack|thumb]] |
[[File:Fighting Ayuni.png|Running too far away from Ayuni will cause her to use a very powerful attack|thumb]] |
||
| Line 230: | Line 228: | ||
You may want to get to Ayuni first and quickly exit her lair through a secret entrance; this will unlock a shortcut near the colony for quick future access to Ayuni or, after the quest is completed, a room full of kalphites and one click away from the Queen. If you die, your gravestone appears outside the Kalphite Hive in the desert. If you respawn in Lumbridge, you can run back to your grave in under 2 minutes. |
You may want to get to Ayuni first and quickly exit her lair through a secret entrance; this will unlock a shortcut near the colony for quick future access to Ayuni or, after the quest is completed, a room full of kalphites and one click away from the Queen. If you die, your gravestone appears outside the Kalphite Hive in the desert. If you respawn in Lumbridge, you can run back to your grave in under 2 minutes. |
||
| + | |||
| + | It should be noted that prayer is highly ineffective while fighting Ayuni, as her attacks drastically drain your prayer points. |
||
After the battle, Apmeken will appear again. She will say that "she" chipped her sight from her eyes, which bore Ayuni. She could no longer watch over the desert people, so that they turned to darkness, crime and hate. |
After the battle, Apmeken will appear again. She will say that "she" chipped her sight from her eyes, which bore Ayuni. She could no longer watch over the desert people, so that they turned to darkness, crime and hate. |
||
| Line 237: | Line 237: | ||
Amascut was furious. War was her tool for destruction. She cursed the pharaoh and hunted down Apmeken. They fought in the desert, where Amascut was stronger, but unable to destroy Apmeken, so she cursed her by stealing her sight, hearing and speech. Perhaps due to the curse, or in sympathy, the desert monkeys lost their senses, explaining the disabilities of the wise monkeys. |
Amascut was furious. War was her tool for destruction. She cursed the pharaoh and hunted down Apmeken. They fought in the desert, where Amascut was stronger, but unable to destroy Apmeken, so she cursed her by stealing her sight, hearing and speech. Perhaps due to the curse, or in sympathy, the desert monkeys lost their senses, explaining the disabilities of the wise monkeys. |
||
| − | However Amascut was not yet satisfied |
+ | However, Amascut was not yet satisfied and forged three foul creatures from Apmeken's stolen senses: Leeuni, Ayuni and Eruni, setting them upon the monkeys. The three monkeys were able to escape by helping each other. They travelled to Karamja, where they heard about Ape Atoll and went there, presumably the only survivors of the massacre. |
Talk to Mizaru again to return to the colony with him. Speak with the ghost monkey, and he will tell you that he has found the location of the last monkey, somewhere in the ruins of [[Uzer]]. Prepare for the final fight and head over to Uzer to rescue the last monkey. |
Talk to Mizaru again to return to the colony with him. Speak with the ghost monkey, and he will tell you that he has found the location of the last monkey, somewhere in the ruins of [[Uzer]]. Prepare for the final fight and head over to Uzer to rescue the last monkey. |
||
| Line 276: | Line 276: | ||
===Finishing up=== |
===Finishing up=== |
||
[[File:Apmeken3.png|thumb|Oh my god, a goddess!]] |
[[File:Apmeken3.png|thumb|Oh my god, a goddess!]] |
||
| − | Once back at the colony, speak to the three wise monkeys. Mizaru will say that they always meant to return, since the desert was their real home. However life in Ape Atoll was comfortable and they had plenty of scope for mischief with the influx of half-witted gnomes. It was only the mention of Apmeken that brought them back, along with humans who would help them build a colony. With a colony they could forge alliances with the locals and arm their guards to battle Amascut's monsters. Once they were destroyed, they were sure Apmeken would be restored. |
+ | Once back at the colony, speak to the three wise monkeys. Mizaru will say that they always meant to return, since the desert was their real home. However, life in Ape Atoll was comfortable and they had plenty of scope for mischief with the influx of half-witted gnomes. It was only the mention of Apmeken that brought them back, along with humans who would help them build a colony. With a colony they could forge alliances with the locals and arm their guards to battle Amascut's monsters. Once they were destroyed, they were sure Apmeken would be restored. |
Apmeken will appear and speak to you, as your deeds have restored her senses. As the three wise monkeys cannot sense her, they will think that you have gone insane. You have a short chat with Apmeken, in which she says that she will return to her duties as a goddess, and if needs be, battle Amascut herself. The camp will be rebuilt with hours of your hard labour, and you can return to [[Pharaoh Queen|Senliten]] to finally complete the quest. She will thank you for all that you have done, and reward you for your efforts. |
Apmeken will appear and speak to you, as your deeds have restored her senses. As the three wise monkeys cannot sense her, they will think that you have gone insane. You have a short chat with Apmeken, in which she says that she will return to her duties as a goddess, and if needs be, battle Amascut herself. The camp will be rebuilt with hours of your hard labour, and you can return to [[Pharaoh Queen|Senliten]] to finally complete the quest. She will thank you for all that you have done, and reward you for your efforts. |
||
| Line 293: | Line 293: | ||
* New [[magic carpet]] destinations. |
* New [[magic carpet]] destinations. |
||
* [[Cramulet]] and the ability to add other speaking amulets to it ([[camulet]] and [[catspeak amulet]]). |
* [[Cramulet]] and the ability to add other speaking amulets to it ([[camulet]] and [[catspeak amulet]]). |
||
| − | * The ability to upgrade [[Ava's accumulator]] to [[Ava's alerter]] |
+ | * The ability to upgrade [[Ava's accumulator]] to [[Ava's alerter]]. |
| − | * Ability to run [[chimp ice]] for further rewards |
+ | * Ability to run [[chimp ice]] for further rewards. |
| − | * Ability to pickpocket [[monkey knife fighter]]s |
+ | * Ability to pickpocket [[monkey knife fighter]]s. |
| − | * Access to a passageway from the desert (rockslide south of the [[Kalphite Hive]] entrance) to a new area with kalphites. This is unlocked if you left the Ayuni room from the hole while you were in it |
+ | * Access to a passageway from the desert (rockslide south of the [[Kalphite Hive]] entrance) to a new area with kalphites. This is unlocked if you left the Ayuni room from the hole while you were in it. |
| − | * Access to the [[Monkey colony]] |
+ | * Access to the [[Monkey colony]]. |
* One "free" [[clue scroll (elite)]] with [[Ava's alerter]]. This clue scroll can be found in either [[Meiyerditch]], on the [[Iceberg]], in [[Isafdar]] or on [[Lunar Isle]]. |
* One "free" [[clue scroll (elite)]] with [[Ava's alerter]]. This clue scroll can be found in either [[Meiyerditch]], on the [[Iceberg]], in [[Isafdar]] or on [[Lunar Isle]]. |
||
|post quest = |
|post quest = |
||
| ⚫ | |||
| ⚫ | |||
| ⚫ | |||
| ⚫ | |||
| − | <gallery align="center"> |
||
| ⚫ | |||
| ⚫ | |||
| − | </gallery> |
||
|music = |
|music = |
||
* [[Monkey See, Monkey Do]] |
* [[Monkey See, Monkey Do]] |
||
* [[Simian Scuffle]] |
* [[Simian Scuffle]] |
||
}} |
}} |
||
| + | |||
| + | ==Achievements== |
||
| + | * {{Achievement|Are You Needing Access?|10|Gain access to the secret treasure room from the 'Do No Evil' quest.}} |
||
| + | * {{Achievement|Do No Elite|10|Claim the elite clue scroll using Ava's alerter from the 'Do No Evil' quest.}} |
||
| + | * {{Achievement|Ice Ice Chimpy|25|Complete 25 chimp ice deliveries.}} |
||
==Required for completing== |
==Required for completing== |
||
[[File:Do No Evil noticeboard.png|thumb|right|250px|''Help re-establish a simian society in an unlikely locale.'']] |
[[File:Do No Evil noticeboard.png|thumb|right|250px|''Help re-establish a simian society in an unlikely locale.'']] |
||
* [[Our Man in the North]] |
* [[Our Man in the North]] |
||
| − | * [[Desert |
+ | * [[Desert achievements]]: |
** '''[[Desert Tasks#Hard tasks|Hard]]:''' "Say It, Don't Spray It" (along with [[Enakhra's Lament]]) |
** '''[[Desert Tasks#Hard tasks|Hard]]:''' "Say It, Don't Spray It" (along with [[Enakhra's Lament]]) |
||
** '''[[Desert Tasks#Elite tasks|Elite]]:''' "Ankle Support" and "Sun Shade" (Eruni, Ayuni and Leeuni need to be killed in the [[Dominion Tower]]) |
** '''[[Desert Tasks#Elite tasks|Elite]]:''' "Ankle Support" and "Sun Shade" (Eruni, Ayuni and Leeuni need to be killed in the [[Dominion Tower]]) |
||
| Line 341: | Line 344: | ||
{{Monkey quest series}} |
{{Monkey quest series}} |
||
[[nl:Do No Evil]] |
[[nl:Do No Evil]] |
||
| − | [[Category:Wikia Game Guides quests]] |
||
Latest revision as of 13:58, 3 March 2019
| |||||||||||||||||||||||||||
| Release date | 1 December 2010 (Update) | ||||||||||||||||||||||||||
|---|---|---|---|---|---|---|---|---|---|---|---|---|---|---|---|---|---|---|---|---|---|---|---|---|---|---|---|
| Members | Yes | ||||||||||||||||||||||||||
| Voice Over | No | ||||||||||||||||||||||||||
| Official difficulty | Master | ||||||||||||||||||||||||||
| Quest series | Desert Monkey | ||||||||||||||||||||||||||
| Age | Fifth Age | ||||||||||||||||||||||||||
| |||||||||||||||||||||||||||
Do No Evil is a master quest in the Desert quest series. It involves assisting monkeys in inhabiting the Kharidian Desert once again, in favour of the goddess Apmeken, while discovering more of Amascut's actions.
Official description
Having awoken from her sleep, Senliten, the Pharaoh Queen, can sense that something is missing from the desert. That 'something' isn't water, vegetation or a sense of right and wrong: it's monkeys! Generations ago, when Apmeken, the monkey god, roamed the desert, monkeys were as common as a blackjack mugging in the desert; but when she left the desert, the monkeys left too. Can you convince Awowogei to send a colony of simians to the desert? And how will they fare in a climate where even the hardiest of adventurers have perished?
Walkthrough
| Start point | |||
|---|---|---|---|
| Member requirement | |||
| Official difficulty | |||
| Official length | Very Long | ||
| Requirements | Skill requirements are not boostable unless marked with a [B] for boostable.
| ||
| Items required | Items from the tool belt are not listed unless they do not work or are not automatically added.
| ||
| Recommended |
| ||
| Enemies to defeat |
|
Monkeys in the desert

Travel to Draynor Village and speak to Leela, who is north of the jail. If you have started Stolen Hearts up to the point where Leela is involved, you must finish both Stolen Hearts and Diamond in the Rough before Leela will return to Draynor Village. Otherwise, she will not appear in front of the jail. If both quests are completed and Leela does not appear in Draynor Village, she will be in Senliten's tomb, which is south of Uzer.
The two of you will travel to Uzer Mastaba. Talk to Senliten and Leela, and ask the queen if there is any way you can be of service. Senliten will say yes, but first, she will tell you a story of her childhood; this story is about how she once played in the great forests that once existed in the Kharidian Empire, and how a group of monkeys saved her from a jackal. Monkeys during this time were both friendly and revered creatures. However, now it appears that since the lands of her empire have turned to desert, the monkeys have died out.
She asks for your help in restoring the "sacred monkeys" to the land. She suggests that this is connected to the goddess Apmeken, and directs players to Jex and the Sphinx, both in Sophanem, to learn all there is to know about Apmeken, which will illuminate the importance of the desert monkey.
Accumulating information
Items recommended: Menaphos lodestone, Pharaoh's sceptre or coins for magic carpet rides, and access to fairy rings for quick return to Uzer Mastaba (DLQ).

Go to Sophanem, ideally by using the Pharaoh's sceptre to teleport to Jalsavrah. Alternatives to this method include using the magic carpets from Shantay Pass to get there via Pollnivneach or teleporting to Menaphos and running directly east from the lodestone through the gate by the guards into Sophanem. Talk to Jex at the wrecked temple in the north-east part of the city. Ask him about minor gods, then ask him all the questions about Apmeken. Next, go to the Sphinx with your cat, ask about minor gods, then about Apmeken.
Go back to the Pharaoh Queen, e.g., by using fairy ring code DLQ and running east. She says that although Apmeken is the most humble god, allowing her monkeys to die was a great affront to her honour. People should not be surprised that the desert is a cruel, harsh and unfriendly place when they have turned their back on the goddess of friendship. She asks players to reintroduce monkeys to the desert, not as pets, but as free creatures.
The three wise monkeys
Items recommended: Teleport to Ape Atoll or a ninja monkey greegree for the fairy ring on Ape Atoll (CLR), 10 coins if a Monkeyspeak amulet mould is needed, and 15-20 empty inventory spaces

Possible solution to the puzzle
With the required items, head to Ape Atoll and speak to any of the three wise monkeys in The Temple of Marimbo. After some conversation with the monkeys, admit to them that you are really human. They will ask for proof, meaning that you will have to lead the monkey guard away from the three monkeys in order to safely show them your true form.
Take some green bananas from the crate to the east of the monkeys and lay a trail from the monkey to the crate by dropping bananas on the ground at regular intervals, starting from the northwest to the southwest, southeast, then northeast in the room. There should not be more than 2 spots between bananas, counting a diagonal move as one. It is recommended to have 15 or more bananas in your inventory when laying the bananas (putting the bananas on the action bar allows for them to be dropped quickly). If the trail ends at any time before the guard is within sight of the pile of bananas, he will return to his original position by the monkeys.
Pay close attention to the location of other monkey guards, which may eat bananas that are placed near them. The banana trail must be placed quickly, as the bananas disappear after a short time. If the bananas are dropped in sequence quickly enough, the guard will not catch up to the player. When laying the trail, keep in mind that the guard cannot see around the corners of the fire pits, and that the guard will not pick up bananas that rest on the trap door of the temple.
After successfully luring the guard to the crate, talk to the three wise monkeys again. After you remove your greegree to show them that you really are human, they urge you to quickly put it back on before you are discovered. They will then test your knowledge of Apmeken by asking you a couple of questions about her. Respond that Apmeken has a baboon head when she is in a comical mood. Next, tell them that the only place the squirrel could sit that the monkey couldn't was "on the monkey's shoulders".
After you have gotten the three wise monkeys to trust you, talk to King Awowogei, who is in a building south of the temple. Convince him to start a colony. Make sure that you do not mention Apmeken to him or you will be imprisoned. He will immediately take up the idea, but insist on building one in Karamja. Persuade him that the desert would be a wiser option by telling him of the deliciousness and popularity of choc-ices. (There is no penalty for choosing the other options, and you'll just be booted back to the previous list of options after a short dialogue.) The king will get excited and commission choc-ices in the shape of a monkey (chimp ices).
Before leaving Ape Atoll, it is recommended that you buy a Monkeyspeak amulet mould for 10 coins from Hamab's Crafting Emporium directly west of the temple, as it is needed to make the chimp ice. It won't be consumed, so feel free to use one from your bank if you have one.
Chimp ice deliveries
Items recommended: Coins for buying more chimp ices in case they melt
Make your way to Nardah. When you are ready to start the delivery, you will talk with Rokuh, the owner of Rok's Chocs Box. Talk to him about making a "special choc-ice" in the shape of a monkey, and he'll tell you that he needs a mould to make one. Allow him to borrow the Monkeyspeak amulet mould, and he'll agree to make you one for 1,000 coins. You can buy more later from him for the same price.
He'll eagerly hand over a chimp ice, but he'll warn you that because of its irregular shape, the magic used to keep the treat frozen is seeping out. To keep the chimp ice from melting, you'll have to periodically cast one of the Ancient Magicks ice spells on it (see the table below for more information). In order to freeze the treat, left-click on the chimp ice (the "Freeze"-option) to open an interface in the chatbox, then select an ice spell. As long as this interface is opened the ice will not melt.
| Spell | Runes | Freeze time | ||
|---|---|---|---|---|
| Ice Rush | 58 | 1 |
0s | |
| Ice Burst | 70 | 2 |
45s | |
| Ice Blitz | 82 | 1 |
35s | |
| Ice Barrage | 94 | 2 |
60s | |
Due to the volatile nature of the magic holding the chimp ice together, you are restricted to routes that don't use teleportation, commercial gnome gliders, spirit trees, or grand tree pods. In order to get to Ape Atoll, you will have to speak with Daero, Waydar, and Lumdo (three gnomes from the Monkey Madness quest). Daero can be found in the south-east corner on the first floor of the Grand Tree. Various routes can be used to get from Nardah to the Tree Gnome Stronghold.
The timer on your chimp ice will not advance when using a bank, the world map, transportation such as carpets and eagles, and when talking to NPCs. If you run out of run energy, you can rest and pull up the world map without the ice melting. An easy way to quickly freeze your chimp ice is to assign a slot on your action bar to the chimp ice. Doing this will mean that you can quickly bring up the display to use a spell on it.
Once you reach Ape Atoll there is a "chocpoint", so if your chimp ice melts you may start again by returning to Lumdo at the south-east corner of the island. Allowing yourself to be captured and locked up will get you a lot closer to the king; freezing the chimp ice one last time before escaping should get you there with enough time.
Eagle route
This route requires having completed the Eagles' Peak quest for use of the eagle transport system.
- From Nardah, use the magic carpet to Uzer.
- Run north to the desert eagle lair located north of the Uzer Hunter area and north-east of the Dominion Tower. If you haven't used this eagle before, you will need to shift the boulder blocking the entrance.
- Take a rope from the spawn in the cave and use it on the eagle to travel to Eagles' Peak.
- Exit the cave through the north-west entrance.
- Run along the west fence of the stronghold and through the terrorbird pen to get to the Grand Tree.
- Climb to the first floor, go east to Daero, and select travel.
- Take Waydar's glider to Crash Island, then Lumdo's boat to Ape Atoll.
- Run to the mahogany tree just south of large gates then cast your freezing spell once more.
- Go through the gates and run east to the king.
Balloon route
This route requires having unlocked the balloon transport system to the Tree Gnome Stronghold, which requires the completion of Enlightened Journey. The route must be unlocked from Entrana, using 3 magic logs per attempt, after which each use of the route will cost 1 magic logs. Your weight must be less than 40kg when using the balloon.
- From Nardah, use the magic carpet to Shantay Pass.
- Talk to Shantay, and get sent to jail, by asking him "What is this place?", "I am definitely an outlaw, prepare to die!" and "Deport me to Port Sarim!"
- From the Port Sarim jail, pick the lock and run north-west to the Crafting Guild.
- Take the hot air balloon just northwest of the guild to the Tree Gnome Stronghold and run north to the Grand Tree.
- Climb to the first floor, go east to Daero, and select travel.
- Take Waydar's glider to Crash Island, then Lumdo's boat to Ape Atoll.
- Run to the mahogany tree just south of large gates then cast your freezing spell once more.
- Go through the gates and run east to the king.
Charter ship route
- From Nardah, use the magic carpet to Shantay Pass.
- Talk to Shantay, and get sent to jail, by asking him "What is this place?", "I am definitely an outlaw, prepare to die!" and "Deport me to Port Sarim!"
- Pick the lock on the Port Sarim jail and travel from Port Sarim to Catherby via the charter ship.
- Run to the Grand Tree, resting at the musician at the Fishing Guild on the way.
- Continue from step 5 above onwards.
Finishing up
While still a monkey, talk to the king. He will eat the chimp ice and enjoy it so much that he grants you permission to set up the desert colony and supplies a barrel of monkeys to populate it. Talk again to the wise monkeys in the temple. When you ask where they want to go, they tell you to take them "between the camels humps". They jump into the barrel and you can head out.
Founding the colony
Items recommended: Desert survival gear such as an enchanted water tiara or waterskins

The location for the new monkey colony

The monkey colony
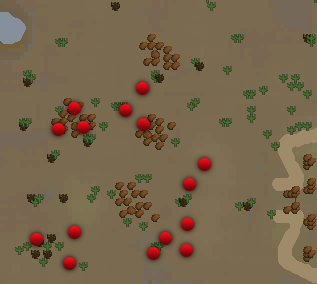
The location for the new monkey colony is the camel hump-like mountain in the Kharidian Desert, southwest of the Desert Mining Camp as shown in the map to the right. The easiest way to get there is via the Bandit Camp lodestone. After you release the monkeys, the Monkey colonists and Unarmed monkey guards will make a camp of sorts and the wise monkeys will sit on some convenient rocks. Talk to the wise monkeys, and they will demand that they be given a carpet route to and from their colony, and they tell you to speak to Ali Morrisane.
Go to Al Kharid and with your ring of charos (a) equipped, talk to Ali Morrisane to the north of the lodestone. Ask him about starting a new carpet route, but he says he isn't interested since he has lost money trying to start new routes in the past. With a bit of persuasion, he will tell you that he was trying to set up a route to the pyramid north of Menaphos, but when transporting a carpet it got caught in a sandstorm. His cousin Alex the Brave barely escaped with his life and the goods were lost in the desert. The goods were kept in five large metal crates and he has heard tales of a Ava's work with undead chickens and magnets.
He was intending to have her build him a device that could detect metal underground, but he doesn't have time to do it himself. You ask him if he has one of the crates handy, and he'll give you one. If you ask him to hire you for the task of recovering the crates, he'll say you'd only find the rugs and use them yourself, to which you reply "That's not a bad idea."
Finding crates
Items recommended: Desert survival gear such as an enchanted water tiara or waterskins

The spot to dig for the crate
Head to Draynor Manor, e.g., by using the Draynor Village lodestone and running north, taking the metal crate and Ava's accumulator, not equipped but in your inventory. If you don't have your accumulator anymore you can buy it for 999 coins and 75 steel arrows, which she also sells. Enter the hidden room in the west of the manor and talk to Ava about making a metal detector. She studies the crate and upgrades the device to Ava's alerter. In addition to an upgraded Ranged bonus and all the perks it gave before, the alerter will warn you when you're near a crate which is exactly like the one you showed her.
Ava hides the crate in the grounds of the manor and asks you to find it to test the alerter. Equip the alerter and go to the south-eastern room of the manor and pick up a spade. Go outside from here and go to the fountain in the south-west corner of the grounds. Make sure you are not wearing metallic armour, or the alerter will not work. Walk from the fountain a short distance north-east and beside two trees: you will know you have stepped on the right spot when your alerter says "Bwuk!" four times in a single line. Use the spade to dig up the crate and return to Ava to tell her of the good news: she will take the crate. If you have more accumulators with you then you can now upgrade them to alerters by talking to Ava again.
Possible crate locations
Return to the desert using the Bandit Camp lodestone and search for the crates in the area west of the Desert Mining Camp, north-east of the monkey camp. The approximate location of each of the crates is shown to the right; the exact location varies for each player. If you have metal armour to fight the scarab, don't equip it until finding the location, otherwise the alerter won't work. Small scarabs may appear when you try to dig up the metal crates, so you will have to defeat them before trying to dig up the crate again. The crates will contain either gems, waterskins, the bundle of carpets, or nothing. Do not cut any gems you receive, as they can be used in the next part.
Bring the carpets back to the three wise monkeys and talk to them. They will then set up carpet routes with the Shantay Pass and southern Pollnivneach. Iwazaru will hand you a book, Economy building for dummies, detailing what items you'll need to build the colony. Return to a bank, gather the supplies, and proceed with the next section. The most convenient bank is probably the chest at the Shantay Pass, which can be easily reached through the new carpet route.
Building the colony

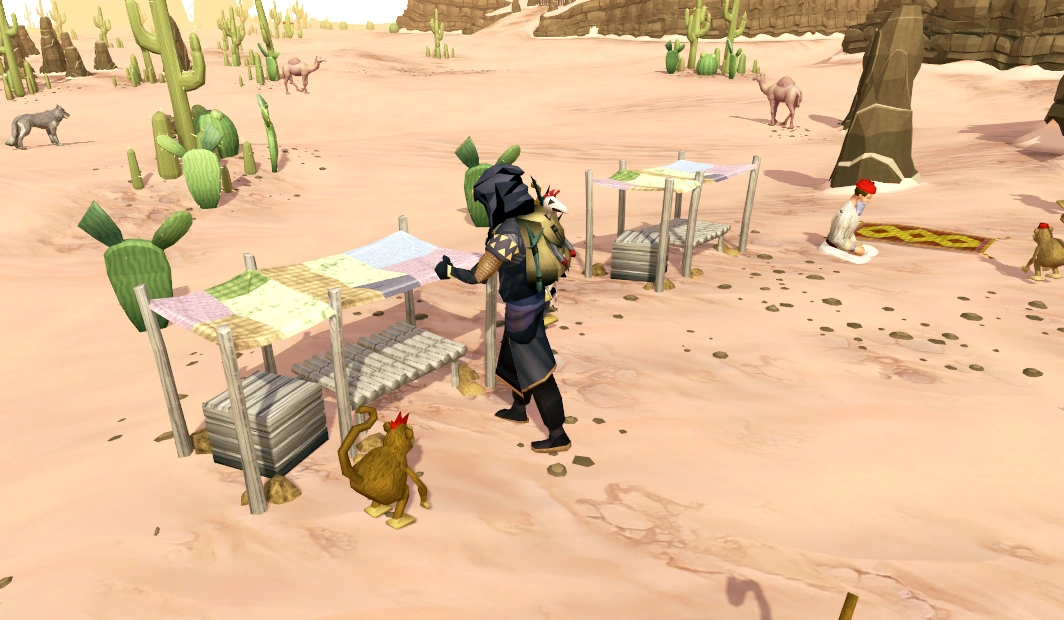
Constructing a stall for the monkey colony
The Economy building for dummies book must be read in order to be able to start this section. It is recommended to wear the desert clothing and note the 10 bananas, 3 knives, and 3 waterskins, so that all items can be carried in one trip.
To start building, remove the rubble from the four building spots. Build the stalls in the stall plots and build the tent in the tent plot. When the stalls are built, they must be stocked with goods. You can simply click on the stall and navigate through the interface.
Arming the colony
Items recommended: Teleport to Ape Atoll or a ninja monkey greegree for the fairy ring on Ape Atoll (CLR)
After building the colony, the wise monkeys will complain that they aren't adequately protected and send you to steal six monkey knives from the king's guards. The wise monkeys tell you that you will need great strength to knock them out and pickpocket them, so you will need a gorilla greegree. Head back to Ape Atoll and find the building with the monkey knife fighters, located directly north of Tutab's Magical Market.
After collecting all six knives, return to the three wise monkeys and hand the knives over. After handing the knives over, talk to the three wise monkeys again to find out they are finally done with your help.
Not over yet...
Items recommended: Coins for magic carpet rides or access to fairy rings for transport to the Uzer Mastaba (DLQ)

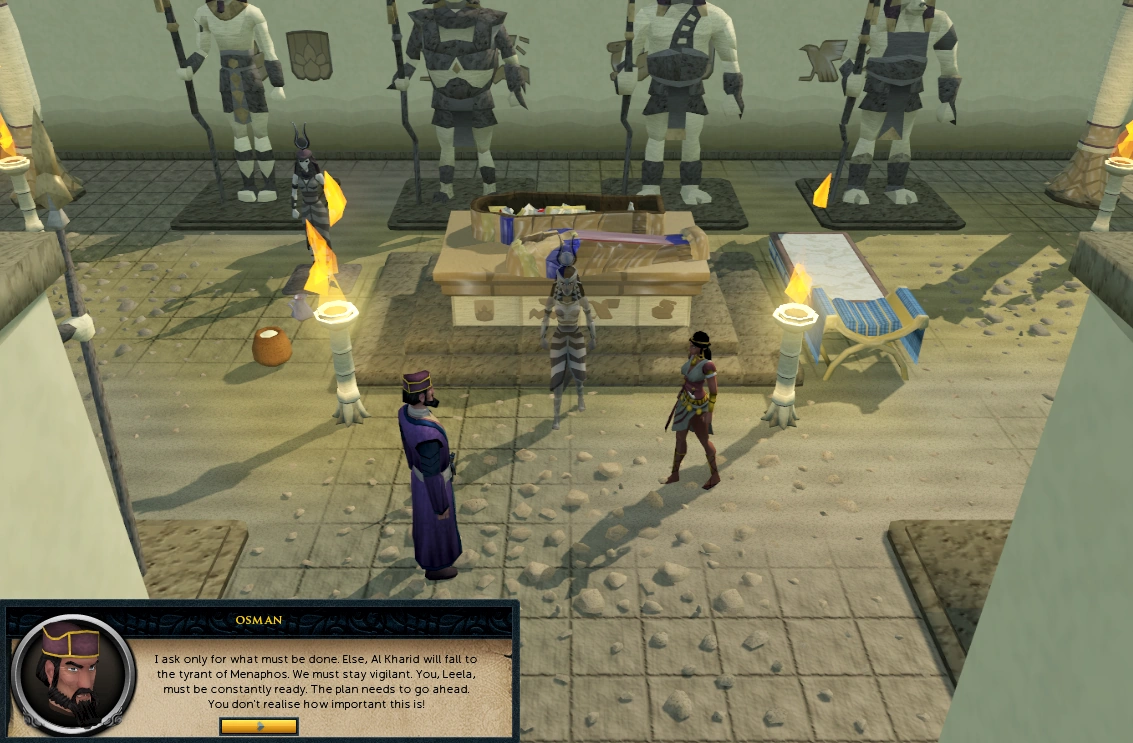
Osman confronts Leela.
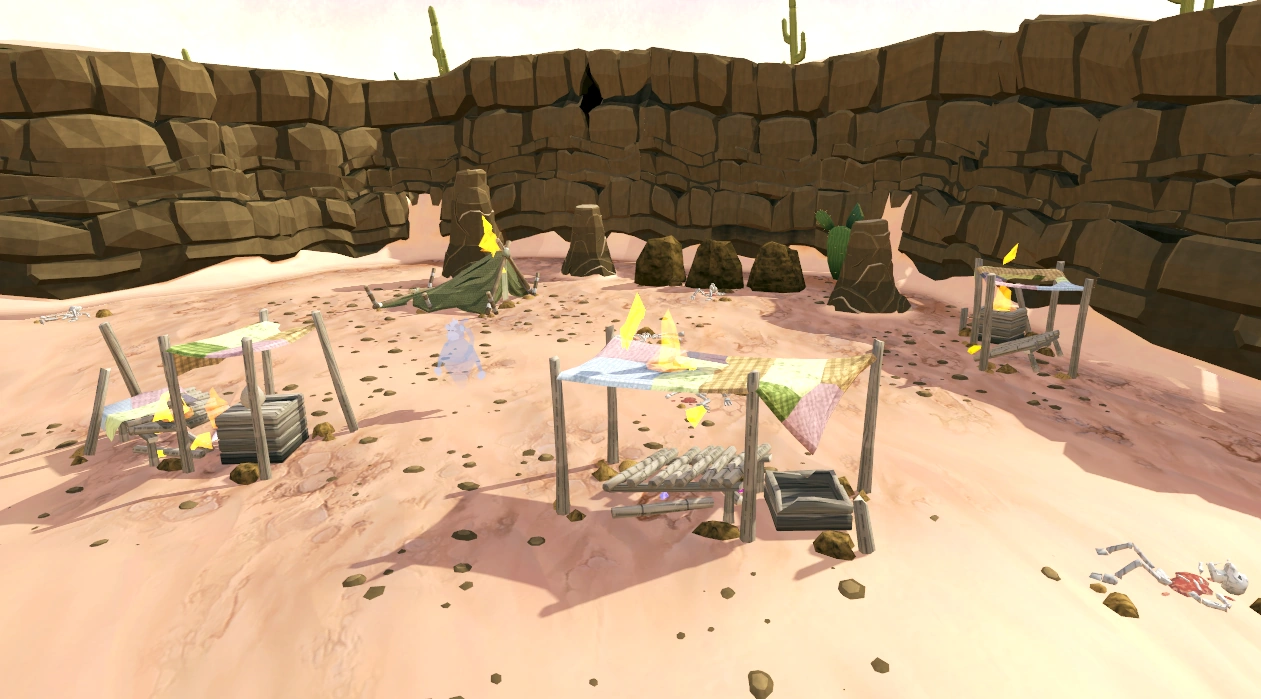
After handing over the knives to the three wise monkeys, return to Senliten, where a cutscene will show Osman demanding that Leela return to her post in Draynor, but she will refuse. In order to get the cutscene, make sure to enter the pyramid and choose the "Directly to Queen" option (If you travel via speaking to Leela in Draynor, first return to surface and re-enter the pyramid). Senliten will congratulate you on what a great job you've done, but then she pauses and notes that something is wrong. She asks you to return to the colony quickly. You won't be able to use the magic carpet to get there, so use the Bandit Camp lodestone. When you arrive, you will find the colony in ruins. Investigate a corpse to make a dead monkey appear. You won't be able to understand it unless you somehow figure out how to get the effects of both the monkeyspeak amulet and the ghostspeak amulet.
The ruins of the colony.
Use one of the amulets on the other to combine them to make a cramulet, and then try to talk to the ghost monkey again. (You can additionally combine a camulet and a catspeak amulet with the cramulet.) Wearing your newly combined amulet, the ghost monkey will tell you that three masked murderers kidnapped the three wise monkeys and massacred everyone else in the colony, although he will claim that he somehow managed to stay alive. The ghost monkey will tell you that he knows where they are keeping Iwazaru and will direct you to the Pollnivneach Slayer Dungeon.
Leeuni


This can't be good...

Apmeken?
Leeuni is the first boss monster encountered, a creation of Amascut. She is located in the Pollnivneach Slayer Dungeon where the Banshee Mistress was located during Smoking Kills. However, killing a mighty banshee to pass the barrier is not required this time.
On passing the barrier a cut scene will play. It is possible that the last cut scene from Smoking Kills plays when you pass the barrier, although Leeuni and Iwazaru are in place. In this case you will need to pass the barrier again to trigger this quest's cut scene.
During the fight, Leeuni can force the player's helmet off, which can cause the player to take damage from the smoke and lower their player's stats if not re-equipped fast enough. If the player's inventory is full, Leeuni cannot remove the player's helmet and becomes enraged, instantly dealing damage. Therefore, it is highly recommended that you keep one item slot free and watch your inventory.
If you should die, your grave appears outside of the well. This can easily be reached using a chipped house teleport tablet or a slayer ring.
After defeating Leeuni, Apmeken will appear. She says that "she" plucked words from her lips and moulded them into Leeuni. She could no longer reassure the desert people, so they turned distrustful and fought with one another. You will then talk to Iwazaru, and you will automatically return with him to the colony. Speak to the ghost monkey again (the cramulet will be required) and he says that he's managed to locate Mizaru. Mizaru is being held hostage in the Kalphite Hive in a room adjacent to that of the Kalphite Queen.
Ayuni
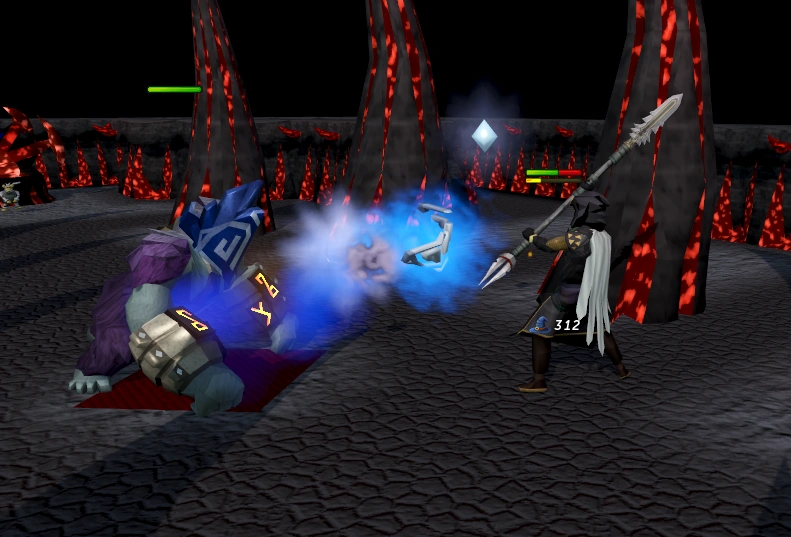
Items recommended: Equipment, food, antipoison, or 2 rope if you have not visited the Kalphite Queen previously.

Iiii see you...
Running too far away from Ayuni will cause her to use a very powerful attack
Ayuni is the second boss monster encountered and can be accessed through a tunnel in the north wall of the Kalphite Queen's chamber in the Kalphite Hive (BIQ). As it is very likely that you will be attacked by the Kalphite Queen or one of the guardians, it is useful to bring an antipoison for the trip (or the poison purge aura). It's also necessary to bring two ropes to get down the tunnel entrance if you have never visited the Kalphite Queen.
You may want to get to Ayuni first and quickly exit her lair through a secret entrance; this will unlock a shortcut near the colony for quick future access to Ayuni or, after the quest is completed, a room full of kalphites and one click away from the Queen. If you die, your gravestone appears outside the Kalphite Hive in the desert. If you respawn in Lumbridge, you can run back to your grave in under 2 minutes.
It should be noted that prayer is highly ineffective while fighting Ayuni, as her attacks drastically drain your prayer points.
After the battle, Apmeken will appear again. She will say that "she" chipped her sight from her eyes, which bore Ayuni. She could no longer watch over the desert people, so that they turned to darkness, crime and hate.
Equip the cramulet and talk to Mizaru, and he will tell you what is going on. He says how a long time ago, when he was young, there were two goddesses: Apmeken the goddess of friendship and Amascut the goddess of evil and destruction. It was said that Amascut considered Apmeken too weak and insignificant to deal with. However, Apmeken was secretly working with some of the lesser deities to bring peace to the desert, and they patched the ill-feeling between Al Kharid and Menaphos. Fifty years ago, the progressive young Pharaoh of Menaphos, a worshipper of Apmeken, proposed an alliance with Al Kharid.
Amascut was furious. War was her tool for destruction. She cursed the pharaoh and hunted down Apmeken. They fought in the desert, where Amascut was stronger, but unable to destroy Apmeken, so she cursed her by stealing her sight, hearing and speech. Perhaps due to the curse, or in sympathy, the desert monkeys lost their senses, explaining the disabilities of the wise monkeys.
However, Amascut was not yet satisfied and forged three foul creatures from Apmeken's stolen senses: Leeuni, Ayuni and Eruni, setting them upon the monkeys. The three monkeys were able to escape by helping each other. They travelled to Karamja, where they heard about Ape Atoll and went there, presumably the only survivors of the massacre.
Talk to Mizaru again to return to the colony with him. Speak with the ghost monkey, and he will tell you that he has found the location of the last monkey, somewhere in the ruins of Uzer. Prepare for the final fight and head over to Uzer to rescue the last monkey.
Eruni
Items recommended: Equipment and food


Eruni summons lesser demons to aid and protect her during the fight

Eruni attacks with Magic and Ranged at the same time
Eruni is the final boss of the quest. She is located through the portal to the demonic realm where Agrith-Naar was defeated in the Shadow of the Storm quest, in the basement below the city of Uzer ruins. Unlike her sisters, Eruni will remain stationary in the centre of the room for the entire fight. Also unlike her sisters, she has no melee attack and only uses the projectile attack that deals simultaneous ranged and magic damage and hence can only be partially blocked.
This is the hardest of the three boss battles. Eruni is able to do some damage with her range/mage while players are busy dealing with the Lesser demons that she summons. When the demons are spawned, she becomes invulnerable, and the demons must be slain for her to become vulnerable again.
It is possible to safe-spot Eruni by hiding behind the horn-like pillars. Doing this will mitigate a large amount of damage whilst fighting the lesser demons.
| Eruni's |
# demons spawned |
|---|---|
| 100% | 1 |
| 75% | 2 |
| 50% | 3 |
| 25% | 4 |
After defeating Eruni, Apmeken will appear once again. She says that "she" crafted Eruni after stealing all sound from her ears. She could no longer hear the voices of the desert people, and she became isolated from them. Soon the desert people became deaf to each other's pleas, losing reason and mercy.
Speak to Kikazaru, who will return you to the monkey colony.
Finishing up
Oh my god, a goddess!
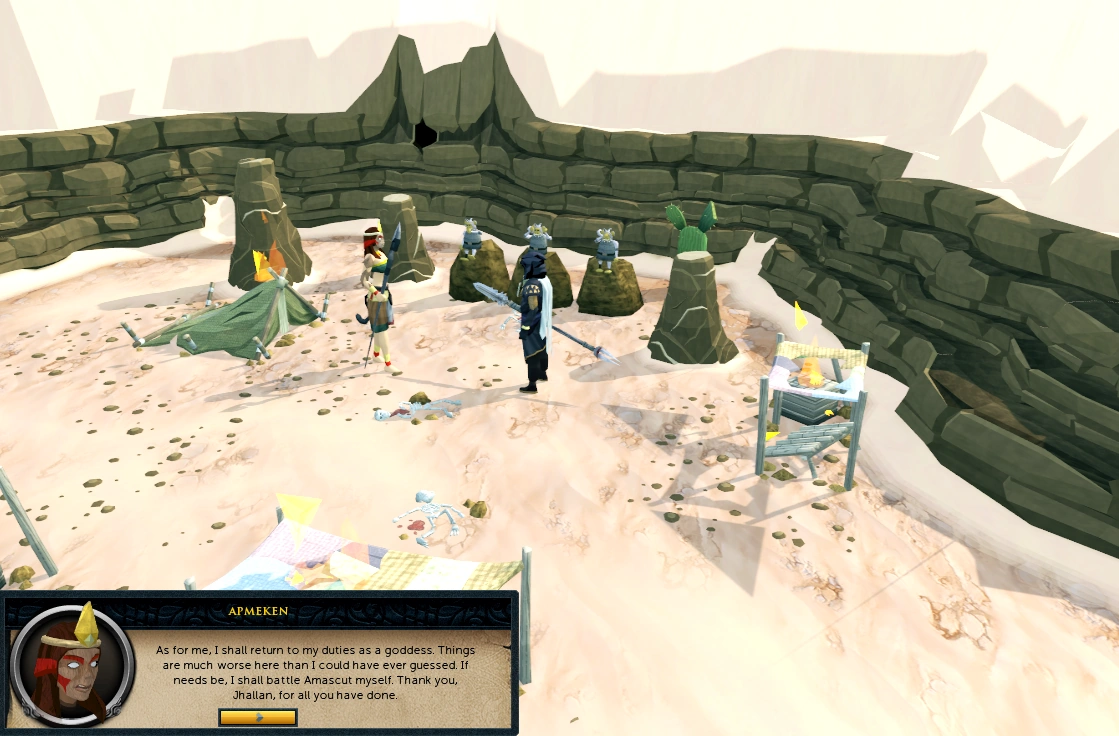
Once back at the colony, speak to the three wise monkeys. Mizaru will say that they always meant to return, since the desert was their real home. However, life in Ape Atoll was comfortable and they had plenty of scope for mischief with the influx of half-witted gnomes. It was only the mention of Apmeken that brought them back, along with humans who would help them build a colony. With a colony they could forge alliances with the locals and arm their guards to battle Amascut's monsters. Once they were destroyed, they were sure Apmeken would be restored.
Apmeken will appear and speak to you, as your deeds have restored her senses. As the three wise monkeys cannot sense her, they will think that you have gone insane. You have a short chat with Apmeken, in which she says that she will return to her duties as a goddess, and if needs be, battle Amascut herself. The camp will be rebuilt with hours of your hard labour, and you can return to Senliten to finally complete the quest. She will thank you for all that you have done, and reward you for your efforts.
Quest complete!
Rewards
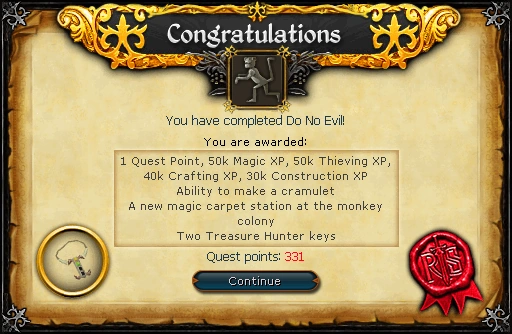
- 1 quest point
- 50,000
 experience
 - 50,000 experience
- 40,000 experience
- 30,000 experience
- New magic carpet destinations.
- Cramulet and the ability to add other speaking amulets to it (camulet and catspeak amulet).
- The ability to upgrade Ava's accumulator to Ava's alerter.
- Ability to run chimp ice for further rewards.
- Ability to pickpocket monkey knife fighters.
- Access to a passageway from the desert (rockslide south of the Kalphite Hive entrance) to a new area with kalphites. This is unlocked if you left the Ayuni room from the hole while you were in it.
- Access to the Monkey colony.
- One "free" clue scroll (elite) with Ava's alerter. This clue scroll can be found in either Meiyerditch, on the Iceberg, in Isafdar or on Lunar Isle.
- 2 Treasure Hunter keys and 2 Hearts of Ice
- Additional rewards/activities


The entrance to the Apmeken tomb.

The Apmeken tomb.
- Players with level 80 (boosts may be used) can enter (climb exit) a cavern on the cliff that makes up the south wall of the Monkey colony for 20,000 experience, and access to a secret treasure room, which contains an Apmeken mask and an ankh.
- Music unlocked
Achievements
- Are You Needing Access? ( 10) - Gain access to the secret treasure room from the 'Do No Evil' quest.
- Do No Elite ( 10) - Claim the elite clue scroll using Ava's alerter from the 'Do No Evil' quest.
- Ice Ice Chimpy ( 25) - Complete 25 chimp ice deliveries.
Required for completing

Help re-establish a simian society in an unlikely locale.
- Our Man in the North
- Desert achievements:
- Hard: "Say It, Don't Spray It" (along with Enakhra's Lament)
- Elite: "Ankle Support" and "Sun Shade" (Eruni, Ayuni and Leeuni need to be killed in the Dominion Tower)
Transcript
Trivia
- On the first day of release in the knowledge base, the reward spoiler was: "Iwazaru tried to mime the rewards, Kikazaru thought we were asking about 'cheeseboards', and Mizaru mistook the reward for a choc ice. Come back tomorrow when we can piece together the truth".
- The names of the three bosses hint at their origins: "Lee" for lips, "Ay" for eyes, and "Er" for ear. It can be seen on their masks the sense which they possess. Leeuni has a caricature of a pair of lips on her mask, Eruni a pair of ears and Ayuni an eye.
- When talking to the wise monkeys for the first time, Mizaru sings, "Born from an egg on a mountain top. The punkiest monkey that ever popped-". These are the first two lines of the song Monkey Magic, which is based on the Chinese novel Journey to the West.
- When showing the three wise monkeys you are a human, Kikazaru exclaims, "By Curious George, he's a human!", a reference to the titular monkey in the children's book series Curious George.
| Main series | |
| Related |
|
| Former |
|
| Quest recollector |
|
|