No edit summary |
Jezu (Message Wall | contribs) m (Fixed the part about needing Battered Key - You no longer need it after the first part of the quest series.) Tag: Visual edit |
||
| Line 36: | Line 36: | ||
* 2 pieces of [[elemental ore]] to complete the quest, or 7 if you want the full [[Elemental Workshop equipment#Chaos|chaos equipment set]] (obtainable during the quest) |
* 2 pieces of [[elemental ore]] to complete the quest, or 7 if you want the full [[Elemental Workshop equipment#Chaos|chaos equipment set]] (obtainable during the quest) |
||
* 8 pieces of [[coal]] (or 28 for the full set of chaos equipment) |
* 8 pieces of [[coal]] (or 28 for the full set of chaos equipment) |
||
| − | * The [[battered key]] from previous Elemental Workshop quests |
||
'''Recommended:''' |
'''Recommended:''' |
||
* [[Coal bag]] to store the coal and save inventory space. |
* [[Coal bag]] to store the coal and save inventory space. |
||
| Line 48: | Line 47: | ||
Start the quest by searching the northern bookcase on the ground floor of the [[Sorcerer's Tower]] to find a [[notched book]]. The tower is located south of [[Seers' Village]] (use the World Map in-game to confirm its location). On the floor next to the bookcase there is a [[knife]] you can take if you don't already have one. Read the book and head to the anvil room adjacent to the bank. Once in the building, before going underground, use a knife on the whetstone near the anvils in the southeast corner of the room to create a [[keyblade]]. The keyblade will be necessary in order to access the cosmic and chaos parts of the workshop. |
Start the quest by searching the northern bookcase on the ground floor of the [[Sorcerer's Tower]] to find a [[notched book]]. The tower is located south of [[Seers' Village]] (use the World Map in-game to confirm its location). On the floor next to the bookcase there is a [[knife]] you can take if you don't already have one. Read the book and head to the anvil room adjacent to the bank. Once in the building, before going underground, use a knife on the whetstone near the anvils in the southeast corner of the room to create a [[keyblade]]. The keyblade will be necessary in order to access the cosmic and chaos parts of the workshop. |
||
| − | Open the odd-looking wall |
+ | Open the odd-looking wall and head down into the workshop. If you do not already have two primed bars, you will need to make them before continuing with the quest. |
====Making the primed bar==== |
====Making the primed bar==== |
||
Revision as of 10:24, 7 June 2014
| |||||||||||||||||||||||||
| Also called | EW4 | ||||||||||||||||||||||||
|---|---|---|---|---|---|---|---|---|---|---|---|---|---|---|---|---|---|---|---|---|---|---|---|---|---|
| Release date | 1 March 2011 (Update) | ||||||||||||||||||||||||
| Members | Yes | ||||||||||||||||||||||||
| Voice Over | No | ||||||||||||||||||||||||
| Official difficulty | Intermediate | ||||||||||||||||||||||||
| Quest series | Elemental Workshop (#4) | ||||||||||||||||||||||||
| Age | Fifth Age | ||||||||||||||||||||||||
| |||||||||||||||||||||||||
The Elemental Workshop IV is the fourth installment of the Elemental Workshop quest series. The quest continues on themes of the previous quests in the series, uncovering the cosmic and chaos portions of the elemental workshop.
Official Description
| “ | Thormac at the Sorcerer's Tower recently discovered a book in his collection that he didn't recognise, all about the fabled Elemental Workshop. As he'd heard that this was something you're researching, and he's more 'mystic' and this book's all 'cosmic', he'd love for you to pop by to pick it up. | ” |
Walkthrough
| Start point | |||
|---|---|---|---|
| Member requirement | |||
| Official difficulty | |||
| Official length | Medium | ||
| Requirements | Skill requirements are not boostable unless marked with a [B] for boostable.
| ||
| Items required | Items from the tool belt are not listed unless they do not work or are not automatically added.
Recommended:
| ||
| Enemies to defeat | 2 earth elementals (level 64) (for making the bars) |
Starting the Quest
The Sorcerer's Tower's location.
Start the quest by searching the northern bookcase on the ground floor of the Sorcerer's Tower to find a notched book. The tower is located south of Seers' Village (use the World Map in-game to confirm its location). On the floor next to the bookcase there is a knife you can take if you don't already have one. Read the book and head to the anvil room adjacent to the bank. Once in the building, before going underground, use a knife on the whetstone near the anvils in the southeast corner of the room to create a keyblade. The keyblade will be necessary in order to access the cosmic and chaos parts of the workshop.
Open the odd-looking wall and head down into the workshop. If you do not already have two primed bars, you will need to make them before continuing with the quest.
Making the primed bar
Each primed bar requires 4 pieces of coal and 1 elemental ore. Elemental ore may be obtained in the western part of the workshop by attempting to mine one of the purple veined rocks. This will bring an earth elemental to life, which must be killed in order to obtain an elemental ore. Using the coal and elemental ore on the furnace in the southern portion of the workshop will result in an elemental bar. By processing the bar through the conveyor belt and jig machine system one level below, the elemental bar will be turned into a primed bar.
The Cosmic Room
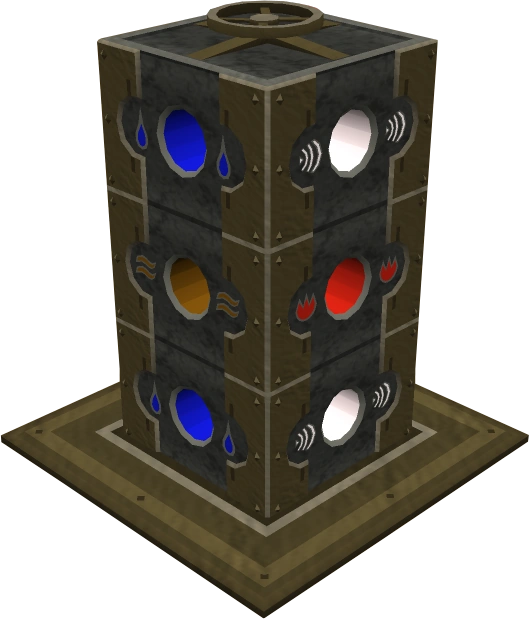
Proceed into the bottom floor of the workshop, where the mind and body rooms are found and use the keyblade on the door at the southern end of the hallway. You will lose the keyblade, but the door will be unlocked permanently. After entering through the door, head east through the Cosmic Door into the Pillar Room. The room will contain a matrix of pillars with coloured circles on them along with a control panel (in the southeast corner) to interface them.
The goal of the puzzle is to line up the coloured circles of adjacent pillars so that a beam of light may pass through without interference. As each stage of the puzzle is completed, the succeeding stage will be more difficult, involving more pillars and more possible levels through which the light may pass through the puzzle. The colour of the light is dependent on what rune is placed on the emitters on the walls of the room. Fire runes correspond to red light, water to blue, earth to brown, and air to white.
Some of the emitters already have runes in place, but you may have to place runes in most of them so that the correct colour beam is emitted through the correct row or column. From the control panel interface, it is possible to adjust the height of the emitters. This is not necessary for the first puzzle, but the height of the emitters may need to be adjusted for the other two.
The pillars may be rotated from the control panel interface in order to line the colours up. When the colours have been correctly lined up, pressing the "Power Up" option will send beams of coloured light from the emitters through the pillars. If the puzzle is not correct, the beams of light will be obstructed and be unable to pass through.
In the second and third puzzles, the control panel can also be used to change the height of the emitters using the sliders around the edge of the grid of dots interface. This is necessary to complete the 2nd and 3rd puzzle as there is no way to fully match only the bottom stories of the pillars. Moving the emitters up or down allows the player to match different stories of the pillars and still complete the power up.
One tip for solving this puzzle is to line up one line of pillars successfully. There is only one possibility for matching a row, so this dramatically limits the ways that the other pillars must face. Use this tactic to create something of a process of elimination and complete the puzzle with relative ease. If you are successful, beams of light will pass straight through the pillars, activating the next stage of the puzzle.

Da-Vi the automaton under the cosmic draining machine.
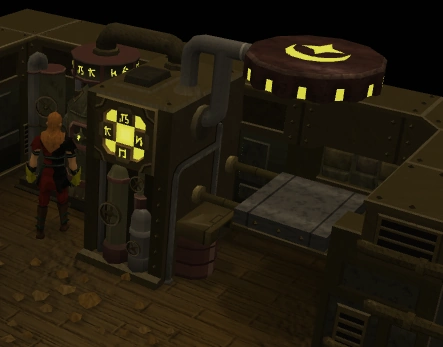
After completing all three puzzles, click - or right click - on the draining machine in the very southeast corner to operate it. This will start a cut scene where the automaton in the machine is activated and opens the chaos portion of the workshop.
Important: Before heading to the chaos room, place one of your primed bars on the shelf (jig) on the right side of the machine (The shelf was behind the automaton and is visible after it leaves.) Return to the control panel and power it up. Note: Because one of the pillars will have turned after you powered up the machine, operate the control panel once more to correct its alignment and operate the machine again. Then operate the Draining machine, retrieve a yellow Cosmic bar and head upstairs to the nearest Workbench and make Cosmic gloves which you will need in the next room. Also note that operating the Draining machine will drain your Runecrafting level.
Puzzle gallery
")
The Chaos Room
After making the cosmic gloves, head back down to the lowest level of the workshop. Go through the door that Da-vi (the automaton) opened which leads into the Chaos room found opposite the Cosmic room. Against the west wall you will find a Shabby book on the table (In the north-west corner). Take this and read it.
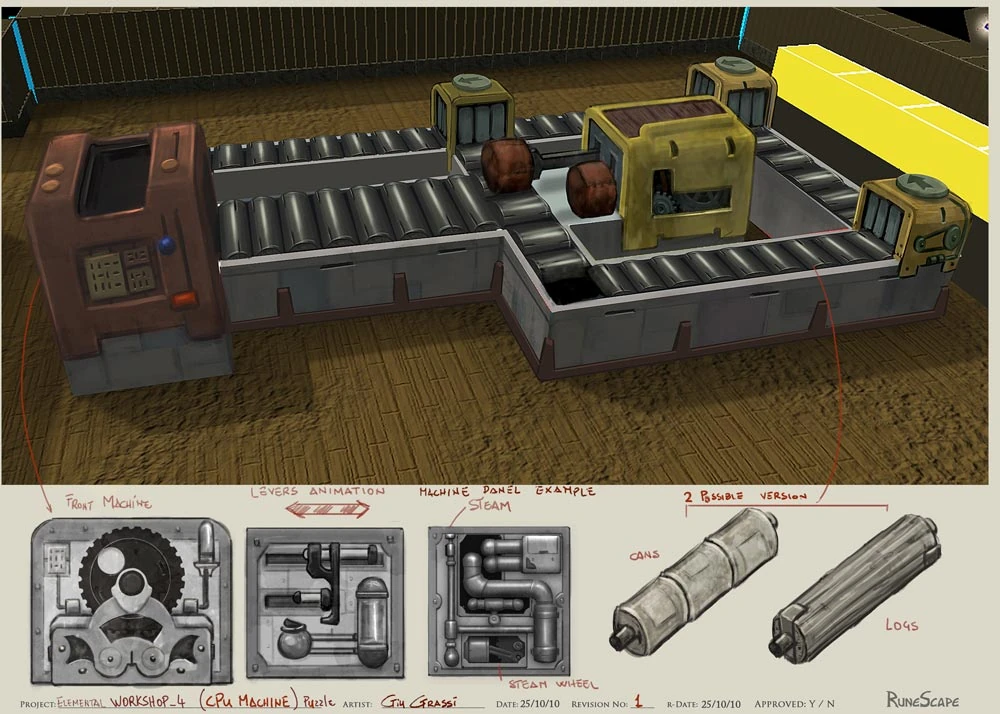
The basic idea of this puzzle is to give Da-Vi commands by feeding an instruction cube with an address cube into the CPU. The player must use the RAM device to select 2 cubes to be sent to the CPU device so Da-Vi may perform the task. Unfortunately, you will find that a few of the essential command cubes have not yet been placed onto the conveyor belt. Your job is to instruct him to retrieve the missing cubes so that you can, ultimately, instruct him to smash through the wall containing the chamber where the chaos machine is located. Further complicating matters, one location or "address" is broken (Astral Plate). You will need to use other commands to fix this tile in order to get the plate needed to access the chaos machine.
On the south-east side of the machine, there are a series of levers. The two on the south-facing wall operate the RAMs, which send cubes into the CPU. The four other levers all activate the conveyor belt, moving the cubes on it either five steps or one step in either direction; the northernmost one runs five steps counterclockwise, the next down runs only one step counterclockwise, the next runs one step clockwise, and the last one runs five steps clockwise. If you put the wrong instruction into the CPU, right clicking it gives a "Flush CPU" option to clear it out.
To operate the computer, Da-vi must be given an instruction and an address, represented by two cubes in the CPU (in any order). The instruction cubes are "get", "put", "break", and "operate". "Get" will make Da-Vi pick up objects at the address, if able. "Put" will make him put an object he is holding down at a specified address. "Break" will make him smash one of the two "temporary walls" on the south side of the chamber. "Operate" is used to power up the chaos machine. The addresses, all named after runes and their symbols, are the large stone tokens with rune symbols on them. Note that the astral token is broken, so this must be fixed before Da-Vi can be issued a command involving it.
You will need to have Da-Vi smash the wall, then retrieve a blank token from the south-western corner and put it on the workbench. You carve a new astral icon on the token, then you pick it up and replace the broken astral token. You will need to "get" multiple tokens from the stacks in order to achieve this. Simply repeat the first two steps below changing the token destination for Da-vi.
NOTE: If the symbols on the blocks are hard to see, hover over the block with your mouse to see what it is. The machine will only execute a command when a pair of cubes (instruction and address) have individually been RAMmed into the CPU (in either order). The conveyor belt can be moved anytime, so the required cubes do not have to be adjacent to end up in the CPU together. To repair the astral floor token, the instructions are:
- Get + Nature (tells him to get the cube on the shelf over the nature token)
- Put + Mind (this puts whatever he is holding onto the machine)
This should have put the cube with the law rune on it onto the conveyor belt.
- Get + Cosmic
- Put + Mind
This should have put the cube with the fire rune on it onto the conveyor belt.
- Break + Law
- Get + Fire
- Put + Water
This puts a blank token on the workbench.

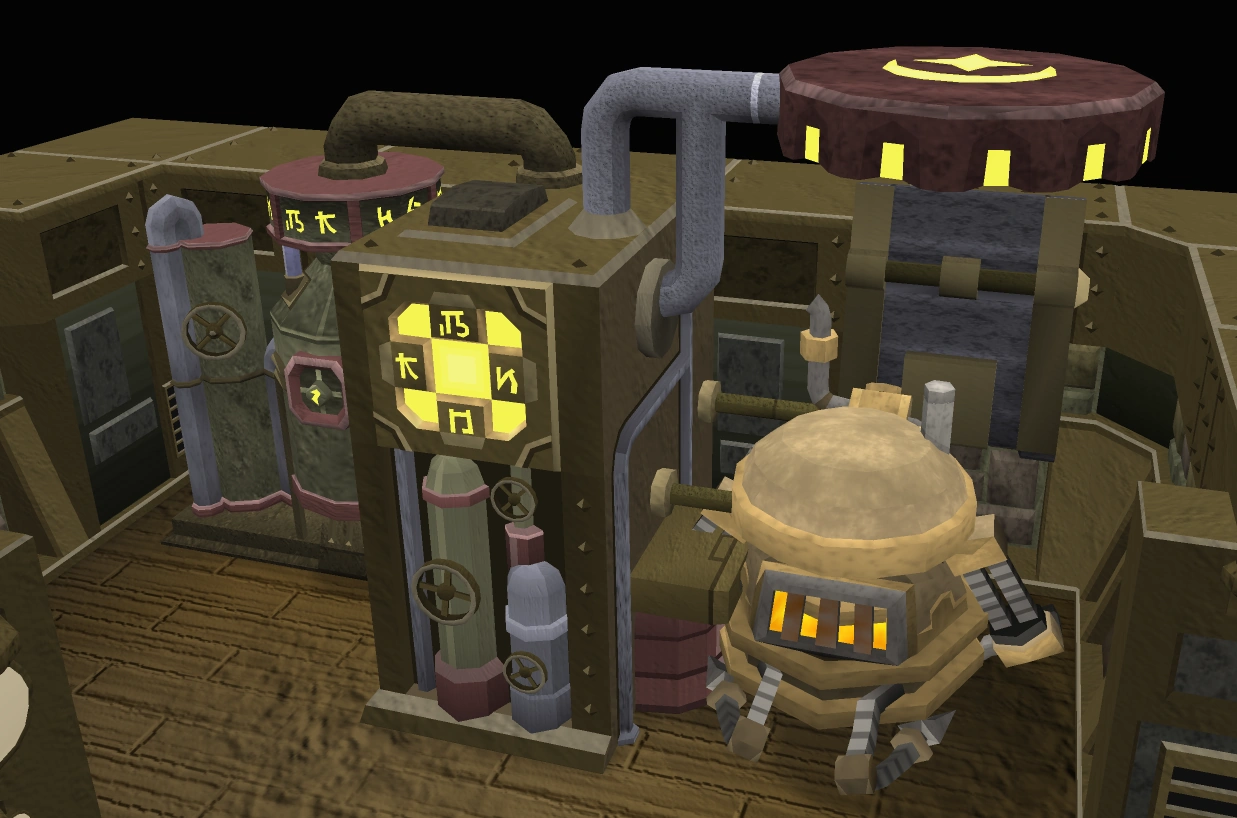
Chaos machine concept art.
You must then carve it using a chisel and hammer, and you receive an Astral token. Use the token on the broken astral token to replace it.
To break the second wall, Da-vi needs to get the earth cube, which requires getting the astral cube first. So now you should tell Da-vi to:
- Get + Body
- Put + Mind
- Get + Astral
- Put + Mind
This should have put the cube with the earth rune on it onto the conveyor belt.
- Break + Earth
- Operate + Chaos
This instructs Da-Vi to break the second wall, then turn the chaos machine on. You cannot safely use the chaos machine unless you have equipped the Cosmic Gloves you made earlier. You will take damage and have to instruct Da-Vi to turn it back on, however, you will not be drained of thieving levels if you misfire the machine.
Once you are properly prepared, place a primed bar on the Machine table and operate the Draining machine to charge it into a chaos bar. This machine will drain your thieving level by 39. If players want to make more chaos bars, they must go back to the CPU and again enter:
Operate + Chaos
(Remember to wear your Cosmic Gloves)
It is suggested to either use super restores, find a creative way to die (bank your items first of course), or teleport to Daemonheim, enter a dungeon and then exit, as 39 thieving levels will take roughly 39 minutes to recharge normally (1 level per 60 seconds). Once the desired number of chaos bars has been acquired, return upstairs to the first basement level and use the bar(s) on the workbench (with the shabby book in your inventory) to make your choice of chaos equipment. To complete the quest, the player must make at least one set of Chaos boots which requires only the Shabby book in your inventory to make, or else a message will appear saying "You don't know how to work this bar yet."
Congratulations, Quest Complete!
Rewards
- 2 Quest Points
- 9000
 experience
 - 7500 experience
- 50 Coal (noted)
- Ability to make and equip elemental cosmic equipment, and chaos equipment.
- Ability to make boot and glove equipment from all known elemental metals.
- 2 Treasure Hunter keys and 2 Hearts of Ice
Music unlocked
- Logical Progression - In the cosmic and chaos rooms.
Trivia
- In the Chaos Elemental's letter from the 46th Postbag from the Hedge it was suggested that there is yet another Elemental Workshop coming. The Nature Door also gives this away.
- When the quest first came out the spoiler read: "The chaos machine is currently parsing the rewards. Results will be ready in 'about a day'..."
- The Adventurer's log entry for this quest reads: "I made some chaos boots from the bar I powered up in the chaos machine."
- "Da-vi" is a possible reference to Leonardo da Vinci. It states in the 'Notched Book' (or Book of the Elemental Gloves) "Vitruvius named it 'Da-vi', inspired by something an old artist friend of his had once drawn." The Vitruvian Man is also a Da Vinci piece of art.
- The quest references various computer components in the Chaos room, such as the CPU and the RAM machines (referring to a computers Central Processing Unit and Random Access Memory).
- Further down from the Chaos room, there are obvious rooms available for the next Elemental Workshop quests. They are the Astral and Nature rooms. There is only an examine option for these as of yet, and they read "Has a nature symbol on it" and "Has an astral symbol on it". There is also another door that says "It leads deeper into the workshop."
- One of the commands with the blocks "Law Rune" and "Break" which is used to access the tablet room may be a play on words referencing term/phrase "breaking the law." Interestingly, Jagex wants its players to report anyone for "Encouraging rule breaking" and "Breaking real-world laws". Some players joke that they should report Jagex for their actions in forcing players to break the Law wall.
- The Automaton shares the name with The World Wakes chamber protectors.
Template:Elemental Workshop