(Updated the GE description to match its change in the recent patch.) Tag: Visual edit |
m (All three of these items can be purchased on the GE) |
||
| (26 intermediate revisions by 15 users not shown) | |||
| Line 1: | Line 1: | ||
| − | {{Otheruses|def=no|other uses|Enchanted key}} |
+ | {{external|os=Enchanted Key}}{{Otheruses|def=no|other uses|Enchanted key}} |
{{Redirect3|Treasure hunting|For other articles involving a treasure hunt, see [[Treasure]]}} |
{{Redirect3|Treasure hunting|For other articles involving a treasure hunt, see [[Treasure]]}} |
||
{{Infobox miniquest |
{{Infobox miniquest |
||
| Line 9: | Line 9: | ||
|developer = |
|developer = |
||
}} |
}} |
||
| − | '''Enchanted key''' is a two-part [[miniquest]] that uses the [[Enchanted key|item of the same name]] to find hidden treasures after [[Making History]] and [[Meeting History]]. There are 11 treasure sites in each part of the miniquest. The main rewards of the miniquest are the [[Guthix mjolnir]], [[Saradomin mjolnir]], and [[Zamorak mjolnir]] |
+ | '''Enchanted key''' is a two-part [[miniquest]] that uses the [[Enchanted key|item of the same name]] to find hidden treasures after [[Making History]] and [[Meeting History]]. There are 11 treasure sites in each part of the miniquest. The main rewards of the miniquest are the [[Guthix mjolnir]], [[Saradomin mjolnir]], and [[Zamorak mjolnir]]. |
| + | |||
| + | The treasures from Making History must be looted before being able to loot the ones from Meeting History. |
||
| + | |||
| ⚫ | |||
==Walkthrough== |
==Walkthrough== |
||
| Line 15: | Line 19: | ||
|start = Use the enchanted key after Making History. |
|start = Use the enchanted key after Making History. |
||
|members = Yes |
|members = Yes |
||
| + | |difficulty = None |
||
|length = Short |
|length = Short |
||
|requirements = |
|requirements = |
||
| Line 20: | Line 25: | ||
* [[Meeting History]] |
* [[Meeting History]] |
||
|items = |
|items = |
||
| − | * [[Enchanted key]] - used to located the buried chests |
+ | * [[Enchanted key]] - used to located the buried chests |
| − | * [[Spade]] - used to dig the buried chests |
+ | * [[Spade]] - used to dig the buried chests |
| + | |recommended = |
||
| − | |||
| ⚫ | |||
| − | '''Recommended:''' |
||
| ⚫ | |||
| ⚫ | |||
| − | * [[ |
+ | * [[Spottier cape|Spottier]], [[Spotted cape]] or [[Wicked cape]] - to maintain energy levels |
| − | * [[ |
+ | * [[Agile top]] or [[Wicked robe top]] - to maintain energy levels |
| − | * [[Agile |
+ | * [[Agile legs]] or [[Wicked legs]] - to maintain energy levels |
| − | * [[ |
+ | * [[Penance gloves]] - to maintain energy levels |
| ⚫ | |||
}} |
}} |
||
===Making History=== |
===Making History=== |
||
| − | The first treasure site will always be Fremennik Province. After that, all other locations are at a random order for each player (random as in that |
+ | The first treasure site will always be Fremennik Province. After that, all other locations are at a random order for each player (random as in that before you can loot the one in Ardougne Monastery, you will need to loot the one in Al-Kharid). There are a total of 11 treasure sites to be found. Remember, these are not exact spots (Example: Body altar means actually near Dwarf mine entrance). |
{| class="wikitable lighttable" |
{| class="wikitable lighttable" |
||
| Line 47: | Line 51: | ||
|Just north/northwest of the [[Agility]] shortcut to the [[Sinclair Mansion]] |
|Just north/northwest of the [[Agility]] shortcut to the [[Sinclair Mansion]] |
||
|{{coords|13|56|n||8|43|e}} |
|{{coords|13|56|n||8|43|e}} |
||
| − | |20 {{plink|Steel arrow}} |
+ | |20 {{plink|Steel arrow}}<br />10 Mithril Stone Spirit<br />15 {{plink|Law rune}} |
|[[File:Enchanted Key MH1 - Rellekka.png|200px|Click to enlarge]] |
|[[File:Enchanted Key MH1 - Rellekka.png|200px|Click to enlarge]] |
||
|- |
|- |
||
|[[Monastery (Kandarin)|Ardougne Monastery]] |
|[[Monastery (Kandarin)|Ardougne Monastery]] |
||
| − | |[[Ardougne cloak |
+ | |[[Ardougne cloak 1]]/[[Ardougne cloak 2|2]]/[[Ardougne cloak 3|3]]/[[Ardougne cloak 4|4]]<br /> Fairy ring {{fairycode|DJP}} |
|West of the bush located northeast of the [[Bush]] patch north of the [[Ardougne Monastery|Monastery]] near the broken cart |
|West of the bush located northeast of the [[Bush]] patch north of the [[Ardougne Monastery|Monastery]] near the broken cart |
||
|{{coords|2|28|n||5|24|e}} |
|{{coords|2|28|n||5|24|e}} |
||
| − | |36 {{plink|Pure essence}}<br />15 |
+ | |36 {{plink|Pure essence}}<br />15 Iron Stone Spirit<br />20 {{plink|Fire rune}} |
|[[File:Enchanted Key MH1 - Ardougne Monastery.png|200px|Click to enlarge]] |
|[[File:Enchanted Key MH1 - Ardougne Monastery.png|200px|Click to enlarge]] |
||
|- |
|- |
||
|[[Outpost]] |
|[[Outpost]] |
||
| − | |[[ |
+ | |[[Eagle's peak]] lodestone<br />[[Sixth-Age circuit]] teleport to the [[World Gate]] |
|South of the southernmost gnome bench, northwest of the outpost |
|South of the southernmost gnome bench, northwest of the outpost |
||
|{{coords|6|54|n||0|45|w}} |
|{{coords|6|54|n||0|45|w}} |
||
| Line 65: | Line 69: | ||
|- |
|- |
||
|[[Gnome Stronghold]] |
|[[Gnome Stronghold]] |
||
| − | |[[Spirit |
+ | |[[Spirit tree]] teleport<br />[[Gnome glider]] to [[Ta Quir Priw]] |
|In the [[Gnome Stronghold]], north of the bank and just northeast of some mushrooms. Not to be confused with the West Ardougne location, which is just outside the stronghold |
|In the [[Gnome Stronghold]], north of the bank and just northeast of some mushrooms. Not to be confused with the West Ardougne location, which is just outside the stronghold |
||
|{{coords|8|54|n||0|15|e}} |
|{{coords|8|54|n||0|15|e}} |
||
| Line 75: | Line 79: | ||
|Directly west of the [[body altar]], near the dirt road in between the body altar and the [[dwarven mine]] |
|Directly west of the [[body altar]], near the dirt road in between the body altar and the [[dwarven mine]] |
||
|{{coords|8|33|n||18|30|e}} |
|{{coords|8|33|n||18|30|e}} |
||
| + | |10 Mithril Stone Spirit |
||
| − | + | 15 Iron Stone Spirit<br />45 {{plink|Earth rune}} |
|
|[[File:Enchanted Key MH1 - Body Altar.png|200px|Click to enlarge]] |
|[[File:Enchanted Key MH1 - Body Altar.png|200px|Click to enlarge]] |
||
|- |
|- |
||
|[[Wayne's Chains]] |
|[[Wayne's Chains]] |
||
| − | |[[ |
+ | |[[Port Sarim]] lodestone<br />[[Clan vexillum]] teleport |
|In the Clan Camp, just west of the large private meeting tent, south of [[Wayne's Chains]] |
|In the Clan Camp, just west of the large private meeting tent, south of [[Wayne's Chains]] |
||
|{{coords|4|20|n||16|31|e}} |
|{{coords|4|20|n||16|31|e}} |
||
| Line 89: | Line 94: | ||
|Northeast of the [[Asgarnian Ice Dungeon]] and southeast of [[Endwyr, Emissary of Seren]] |
|Northeast of the [[Asgarnian Ice Dungeon]] and southeast of [[Endwyr, Emissary of Seren]] |
||
|{{coords|0|5|s||17|58|e}} |
|{{coords|0|5|s||17|58|e}} |
||
| − | |15 |
+ | |15 Iron Ore Spirits<br />20 {{plink|Mithril arrow}}s<br />15 {{plink|Death rune}} |
|[[File:Enchanted Key MH1 - Mudskipper Point.png|200px|Click to enlarge]] |
|[[File:Enchanted Key MH1 - Mudskipper Point.png|200px|Click to enlarge]] |
||
|- |
|- |
||
| + | |[[Shattered Worlds]] entrance |
||
| − | |[[Lumbridge Swamp Caves]] |
||
|[[Lumbridge]] lodestone<br />[[Amulet of glory]] teleport to [[Draynor]] |
|[[Lumbridge]] lodestone<br />[[Amulet of glory]] teleport to [[Draynor]] |
||
|North of [[Shattered Worlds]] |
|North of [[Shattered Worlds]] |
||
| Line 99: | Line 104: | ||
|[[File:Enchanted Key MH1 - Lumbridge Swamp.png|200px|Click to enlarge]] |
|[[File:Enchanted Key MH1 - Lumbridge Swamp.png|200px|Click to enlarge]] |
||
|- |
|- |
||
| − | |[[Al |
+ | |[[Al Kharid]] |
|[[Duelling ring]] to [[Duel Arena]]<br />[[Al Kharid]] lodestone |
|[[Duelling ring]] to [[Duel Arena]]<br />[[Al Kharid]] lodestone |
||
|Between the ponds and the small obelisk, west of the [[Duel Arena]] |
|Between the ponds and the small obelisk, west of the [[Duel Arena]] |
||
|{{coords|2|35|n||26|56|e}} |
|{{coords|2|35|n||26|56|e}} |
||
| − | |40 {{plink|Pure essence}}<br />10 |
+ | |40 {{plink|Pure essence}}<br />10 Mithril Stone Spirits<br />{{plink|Zamorak mjolnir}} |
|[[File:Enchanted Key MH1 - Al Kharid.png|200px|Click to enlarge]] |
|[[File:Enchanted Key MH1 - Al Kharid.png|200px|Click to enlarge]] |
||
|- |
|- |
||
| Line 110: | Line 115: | ||
|West of the [[Exam Centre]], on the road heading north from the T-junction |
|West of the [[Exam Centre]], on the road heading north from the T-junction |
||
|{{coords|5|33|n||26|54|e}} |
|{{coords|5|33|n||26|54|e}} |
||
| − | |40 {{plink|Pure essence}}<br />15 |
+ | |40 {{plink|Pure essence}}<br />15 Iron Stone Spirits<br />{{plink|Guthix mjolnir}} |
|[[File:Enchanted Key MH1 - Exam Centre.png|200px|Click to enlarge]] |
|[[File:Enchanted Key MH1 - Exam Centre.png|200px|Click to enlarge]] |
||
|- |
|- |
||
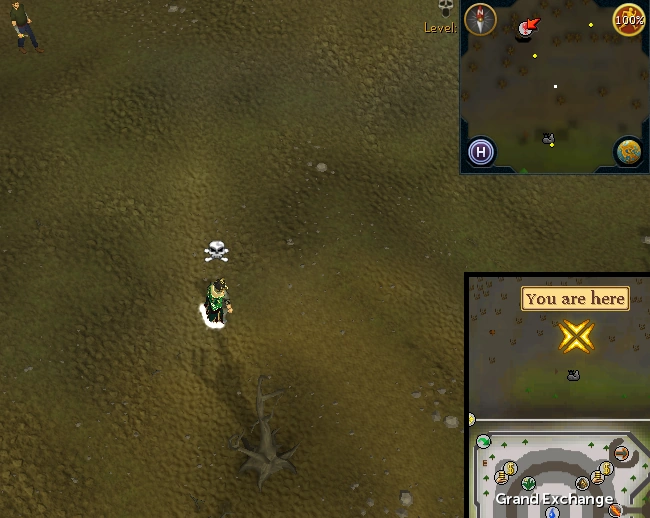
|[[Grand Exchange]] |
|[[Grand Exchange]] |
||
| − | |[[Ring of wealth]]/[[Ring of fortune]] |
+ | |[[Ring of wealth]]/[[Ring of fortune]]<br />[[Varrock]] lodestone |
|West/southwest of the tent in the middle of the Grand Exchange |
|West/southwest of the tent in the middle of the Grand Exchange |
||
|{{coords|10|18|n||22|26|e}} |
|{{coords|10|18|n||22|26|e}} |
||
| Line 133: | Line 138: | ||
|- |
|- |
||
|1. [[Gnome Ball|Gnomeball field]] |
|1. [[Gnome Ball|Gnomeball field]] |
||
| − | |[[Gnome |
+ | |[[Gnome glider]] to [[Ta Quir Priw]]<br />[[Spirit tree]] to the [[Grand Tree]] |
|South of the [[gnome ball]] field, 4 steps west of crystal tree |
|South of the [[gnome ball]] field, 4 steps west of crystal tree |
||
|{{coords|9|45|n||1|3|w}} |
|{{coords|9|45|n||1|3|w}} |
||
| Line 140: | Line 145: | ||
|- |
|- |
||
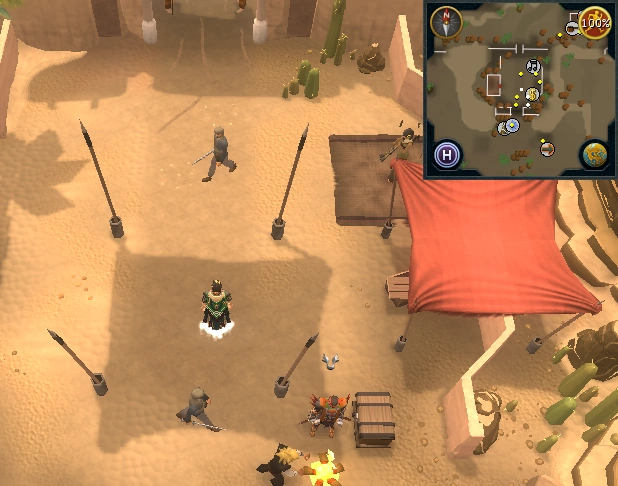
|2. [[Shantay Pass]] |
|2. [[Shantay Pass]] |
||
| − | |[[Al |
+ | |[[Amulet of glory]]<br />[[Al Kharid]] lodestone<br />[[Broomstick]] to [[Sorceress's Garden]] |
|[[Shantay Pass]], 3 steps west of the musician |
|[[Shantay Pass]], 3 steps west of the musician |
||
|{{coords|1|5|s||26|58|e}} |
|{{coords|1|5|s||26|58|e}} |
||
| Line 147: | Line 152: | ||
|- |
|- |
||
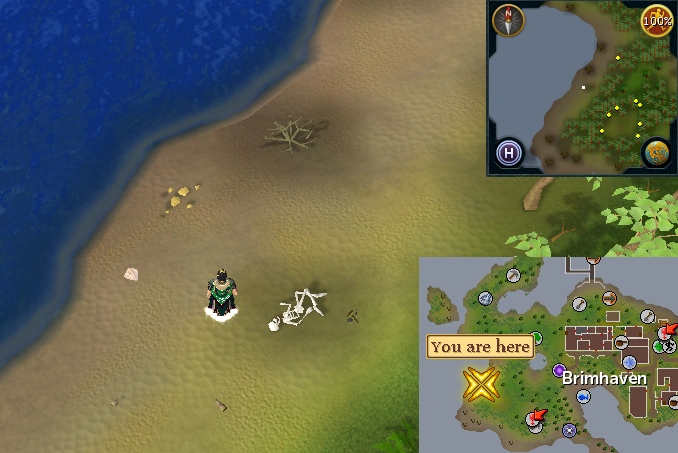
|3. [[Brimhaven]] |
|3. [[Brimhaven]] |
||
| − | |[[Karamja]] lodestone |
+ | |[[Karamja]] lodestone |
|West of the lake west of [[Brimhaven]] |
|West of the lake west of [[Brimhaven]] |
||
|{{coords|0|9|n||8|43|e}} |
|{{coords|0|9|n||8|43|e}} |
||
| Line 161: | Line 166: | ||
|- |
|- |
||
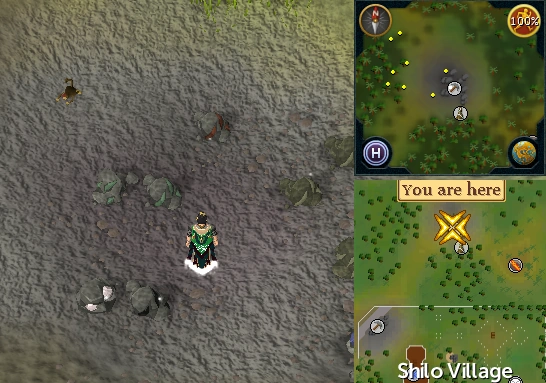
|5. [[Tai Bwo Wannai]] |
|5. [[Tai Bwo Wannai]] |
||
| − | |[[Karamja]] lodestone<br />[[Spirit graahk]] teleport<br />Fairy ring {{fairycode|CKR}}<br />[[Karamja gloves 3]], [[Wicked |
+ | |[[Karamja]] lodestone<br />[[Spirit graahk]] teleport<br />Fairy ring {{fairycode|CKR}}<br />[[Karamja gloves 3]], [[Wicked hood]] teleport to Nature Altar |
|Mine east of Tai Bwo Wannai. This is the one near the [[Small obelisk]], NOT the [[Shilo Village (city)|Shilo]] gem mine! |
|Mine east of Tai Bwo Wannai. This is the one near the [[Small obelisk]], NOT the [[Shilo Village (city)|Shilo]] gem mine! |
||
| − | |{{coords| |
+ | |{{coords|3|56|s||12|45|e}} |
|{{Coins|750}}<br />2 {{plink|Green charm}}s<br />10 {{plink|Cosmic rune}}s<br />30 {{plink|Mithril arrow}}s |
|{{Coins|750}}<br />2 {{plink|Green charm}}s<br />10 {{plink|Cosmic rune}}s<br />30 {{plink|Mithril arrow}}s |
||
|[[File:Enchanted key dig spot Karamja.png|200px|Click to enlarge]] |
|[[File:Enchanted key dig spot Karamja.png|200px|Click to enlarge]] |
||
|- |
|- |
||
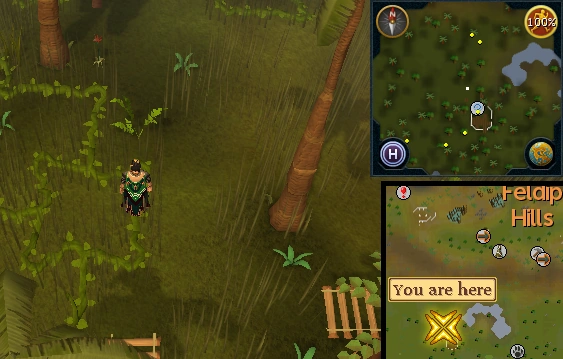
|6. [[Feldip Hills]] |
|6. [[Feldip Hills]] |
||
| − | |[[Oo'glog]] lodestone<br />Fairy ring {{fairycode|AKS}}<br />[[Gnome |
+ | |[[Oo'glog]] lodestone<br />Fairy ring {{fairycode|AKS}}<br />[[Gnome glider]] to [[Lemantolly Undri]] (requires [[One Small Favour]]) |
|West of [[Hunting expert]] |
|West of [[Hunting expert]] |
||
|{{coords|7|26|s||2|26|e}} |
|{{coords|7|26|s||2|26|e}} |
||
| Line 182: | Line 187: | ||
|- |
|- |
||
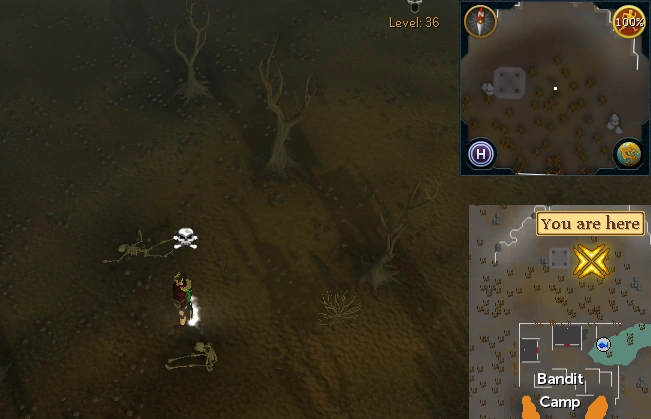
|8. [[Bandit Camp (Wilderness)]] |
|8. [[Bandit Camp (Wilderness)]] |
||
| − | |[[Wilderness |
+ | |[[Wilderness obelisk]] |
| − | |North of the [[Bandit Camp (Wilderness)|Bandit Camp]] in Level 27 [[Wilderness]], just east of the [[Wilderness |
+ | |North of the [[Bandit Camp (Wilderness)|Bandit Camp]] in Level 27 [[Wilderness]], just east of the [[Wilderness obelisk]] |
|{{coords|17|50|n||18|56|e}} |
|{{coords|17|50|n||18|56|e}} |
||
|{{Coins|950}}<br />2 {{plink|Crimson charm}}s<br />3 {{plink|Uncut emerald}}s<br />15 {{plink|Chaos rune}}s |
|{{Coins|950}}<br />2 {{plink|Crimson charm}}s<br />3 {{plink|Uncut emerald}}s<br />15 {{plink|Chaos rune}}s |
||
| Line 190: | Line 195: | ||
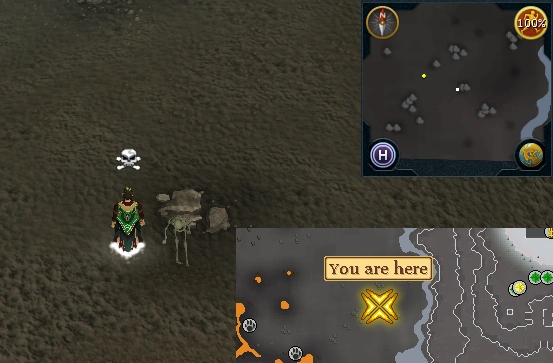
|9. [[Daemonheim]] |
|9. [[Daemonheim]] |
||
|[[Ancient Magick]]s teleport to [[Carrallangar]]<br />[[Ring of kinship]] teleport to [[Daemonheim]] |
|[[Ancient Magick]]s teleport to [[Carrallangar]]<br />[[Ring of kinship]] teleport to [[Daemonheim]] |
||
| − | |Level |
+ | |Level 20 [[Wilderness]] southeast of [[Clan Wars]], past the [[black salamander hunter area]], just east of the [[green dragon]]s |
|{{coords|16|3|n||28|45|e}} |
|{{coords|16|3|n||28|45|e}} |
||
|{{Coins|950}}<br />1 {{plink|Blue charm}}<br />20 {{plink|Pure essence}}<br />5 {{plink|Gold bar}}s |
|{{Coins|950}}<br />1 {{plink|Blue charm}}<br />20 {{plink|Pure essence}}<br />5 {{plink|Gold bar}}s |
||
|[[File:enchantedkey meeting 9.png|200px|Click to enlarge]] |
|[[File:enchantedkey meeting 9.png|200px|Click to enlarge]] |
||
|- |
|- |
||
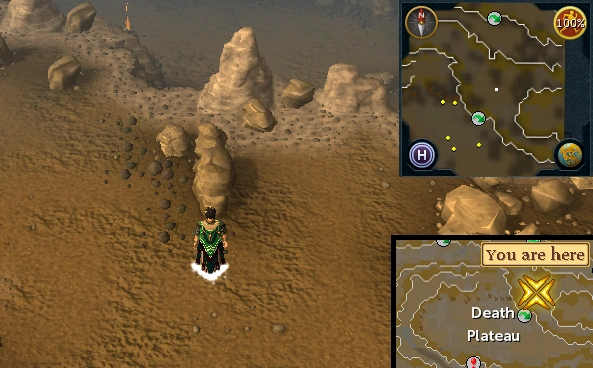
| − | |10. [[Death Plateau]] |
+ | |10. [[Death Plateau (location)|Death Plateau]] |
| − | |[[Burthorpe]] lodestone<br />[[Games |
+ | |[[Burthorpe]] lodestone<br />[[Games necklace]] to [[Troll Invasion]] ([[Climbing boots]] not needed) |
| − | |Just north of the thrower trolls on [[Death Plateau]], on the ridge that you access through Sabbot's cave, continue toward the entrance to the |
+ | |Just north of the thrower trolls on [[Death Plateau (location)|Death Plateau]], on the ridge that you access through [[Sabbot]]'s cave, continue toward the entrance to the Death Plateau |
|{{coords|13|56|n||13|30|e}} |
|{{coords|13|56|n||13|30|e}} |
||
|{{Coins|1010}}<br />1 {{plink|Blue charm}}<br />20 {{plink|Pure essence}}<br />10 {{plink|Blood rune}}s |
|{{Coins|1010}}<br />1 {{plink|Blue charm}}<br />20 {{plink|Pure essence}}<br />10 {{plink|Blood rune}}s |
||
| Line 203: | Line 208: | ||
|- |
|- |
||
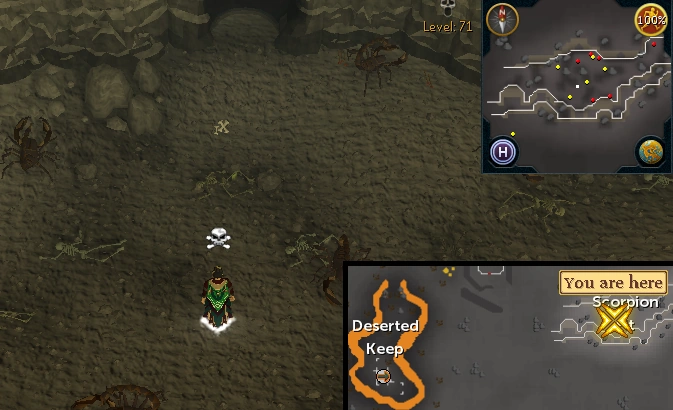
|11. [[Scorpion Pit]] |
|11. [[Scorpion Pit]] |
||
| − | |Teleport lever in [[Ardougne]] or [[Edgeville]], go east towards the [[Scorpion Pit]] ( |
+ | |Teleport lever in [[Ardougne]] or [[Edgeville]], go east towards the [[Scorpion Pit]] (beware of the [[Chaos Elemental]] which resides nearby) |
|Level 53 [[Wilderness]], middle of the [[Scorpion Pit]] east of the [[magic axe hut]] |
|Level 53 [[Wilderness]], middle of the [[Scorpion Pit]] east of the [[magic axe hut]] |
||
|{{coords|24|30|n||25|0|e}} |
|{{coords|24|30|n||25|0|e}} |
||
| Line 215: | Line 220: | ||
===Making History=== |
===Making History=== |
||
'''Ores:''' |
'''Ores:''' |
||
| − | * 60 |
+ | * 60 Iron Stone Spirits |
| − | * 30 |
+ | * 30 Mithril Stone Spirits |
'''Runes & essence:''' |
'''Runes & essence:''' |
||
| Line 270: | Line 275: | ||
All these rewards add up to {{coins|{{#expr:{{formatnum:{{GEPrice|Pure essence|60}}+{{GEPrice|Law rune|15}}+{{GEPrice|Cosmic rune|15}}+{{GEPrice|Nature rune|15}}+{{GEPrice|Chaos rune|15}}+{{GEPrice|Death rune|15}}+{{GEPrice|Blood rune|10}}+{{GEPrice|Mithril arrow|50}}+{{GEPrice|Uncut sapphire|3}}+{{GEPrice|Uncut emerald|5}}+{{GEPrice|Uncut ruby|3}}+{{GEPrice|Gold bar|20}}|R}}+8640}}}} coins, presuming they are sold on G.E. for the current market price. |
All these rewards add up to {{coins|{{#expr:{{formatnum:{{GEPrice|Pure essence|60}}+{{GEPrice|Law rune|15}}+{{GEPrice|Cosmic rune|15}}+{{GEPrice|Nature rune|15}}+{{GEPrice|Chaos rune|15}}+{{GEPrice|Death rune|15}}+{{GEPrice|Blood rune|10}}+{{GEPrice|Mithril arrow|50}}+{{GEPrice|Uncut sapphire|3}}+{{GEPrice|Uncut emerald|5}}+{{GEPrice|Uncut ruby|3}}+{{GEPrice|Gold bar|20}}|R}}+8640}}}} coins, presuming they are sold on G.E. for the current market price. |
||
| − | ==Re-obtaining the |
+ | ==Re-obtaining the mjolnirs== |
After the player completes the miniquest, they can pay [[Jorral]] 6,000 coins to hunt the mjolnirs again, but only if they do not own any mjolnirs. In that case, the player will find the [[Guthix mjolnir]], [[Saradomin mjolnir]], and [[Zamorak mjolnir]] in that order before the key disappears again. The mjolnirs are all found in their original locations, but the secondary rewards that were originally with them will not be found again. This cycle can be repeated as many times as the player wants. If the player logs out or loses connection before obtaining all three mjolnirs, the key will need to be paid for again. |
After the player completes the miniquest, they can pay [[Jorral]] 6,000 coins to hunt the mjolnirs again, but only if they do not own any mjolnirs. In that case, the player will find the [[Guthix mjolnir]], [[Saradomin mjolnir]], and [[Zamorak mjolnir]] in that order before the key disappears again. The mjolnirs are all found in their original locations, but the secondary rewards that were originally with them will not be found again. This cycle can be repeated as many times as the player wants. If the player logs out or loses connection before obtaining all three mjolnirs, the key will need to be paid for again. |
||
| − | (One of) the fastest ways of obtaining the mjolnirs would be to start by teleporting to Jorral using a [[traveller's necklace]]; Teleporting to the Al Kharid mine using a [[Dungeoneering |
+ | (One of) the fastest ways of obtaining the mjolnirs would be to start by teleporting to Jorral using a [[traveller's necklace]]; Teleporting to the Al Kharid mine using a [[Dungeoneering skillcape]] (option 0 - 5) or a [[hoardstalker ring]] for the Guthix mjolnir; then teleporting to the clan camp using a [[clan vexilium]] for the Saradomin mjolnir, and finally teleporting to the duel arena using a [[ring of duelling]] for the Zamorak mjolnir. It's possible to get over 40 mjolnir sets per hour using this method. |
| − | |||
| − | ==Required for completing== |
||
| − | Completing this miniquest is a requirement for: |
||
| ⚫ | |||
| − | * Obtaining the [[master quest cape]] |
||
| + | ==Achievement== |
||
| ⚫ | |||
| + | * {{Achievement|Banking History|25|Find all hidden treasures from the 'Making History' quest.}} |
||
| ⚫ | |||
==Trivia== |
==Trivia== |
||
| − | * |
+ | *The coin rewards from the Meeting History treasures are some of the few examples in which money is not added directly to the money pouch. |
{{Enchanted key quest series}} |
{{Enchanted key quest series}} |
||
{{Miniquests}} |
{{Miniquests}} |
||
[[Category:Enchanted key]] |
[[Category:Enchanted key]] |
||
| − | [[Category:Master quest cape requirements]] |
||
| − | [[Category:Trimmed completionist cape requirements]] |
||
Latest revision as of 04:15, 13 February 2019
| Release date | 22 November 2005 (Update) |
|---|---|
| Members | Yes |
| Quest series | Enchanted key quest series |
| Developer(s) | Unknown edit |
| Age | Fifth Age |
Enchanted key is a two-part miniquest that uses the item of the same name to find hidden treasures after Making History and Meeting History. There are 11 treasure sites in each part of the miniquest. The main rewards of the miniquest are the Guthix mjolnir, Saradomin mjolnir, and Zamorak mjolnir.
The treasures from Making History must be looted before being able to loot the ones from Meeting History.
Completing this miniquest is a requirement for obtaining the trimmed completionist cape and master quest cape.
Walkthrough
| Start point | |
|---|---|
| Member requirement | |
| Official difficulty | None |
| Official length | Short |
| Requirements | Skill requirements are not boostable unless marked with a [B] for boostable. |
| Items required | Items from the tool belt are not listed unless they do not work or are not automatically added.
|
| Recommended |
|
| Enemies to defeat |
|
Making History
The first treasure site will always be Fremennik Province. After that, all other locations are at a random order for each player (random as in that before you can loot the one in Ardougne Monastery, you will need to loot the one in Al-Kharid). There are a total of 11 treasure sites to be found. Remember, these are not exact spots (Example: Body altar means actually near Dwarf mine entrance).
| Area | Getting there | Location | Coords | Loot | Map |
|---|---|---|---|---|---|
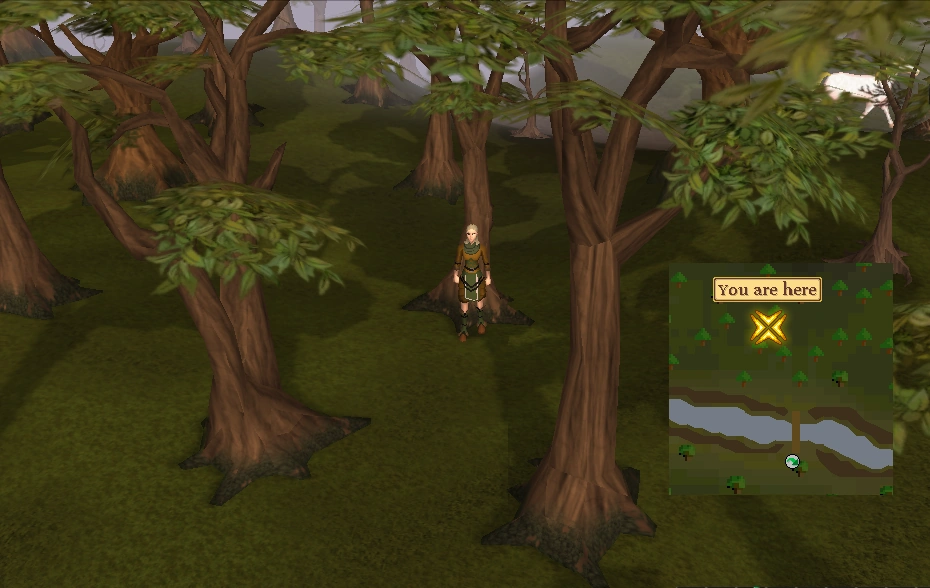
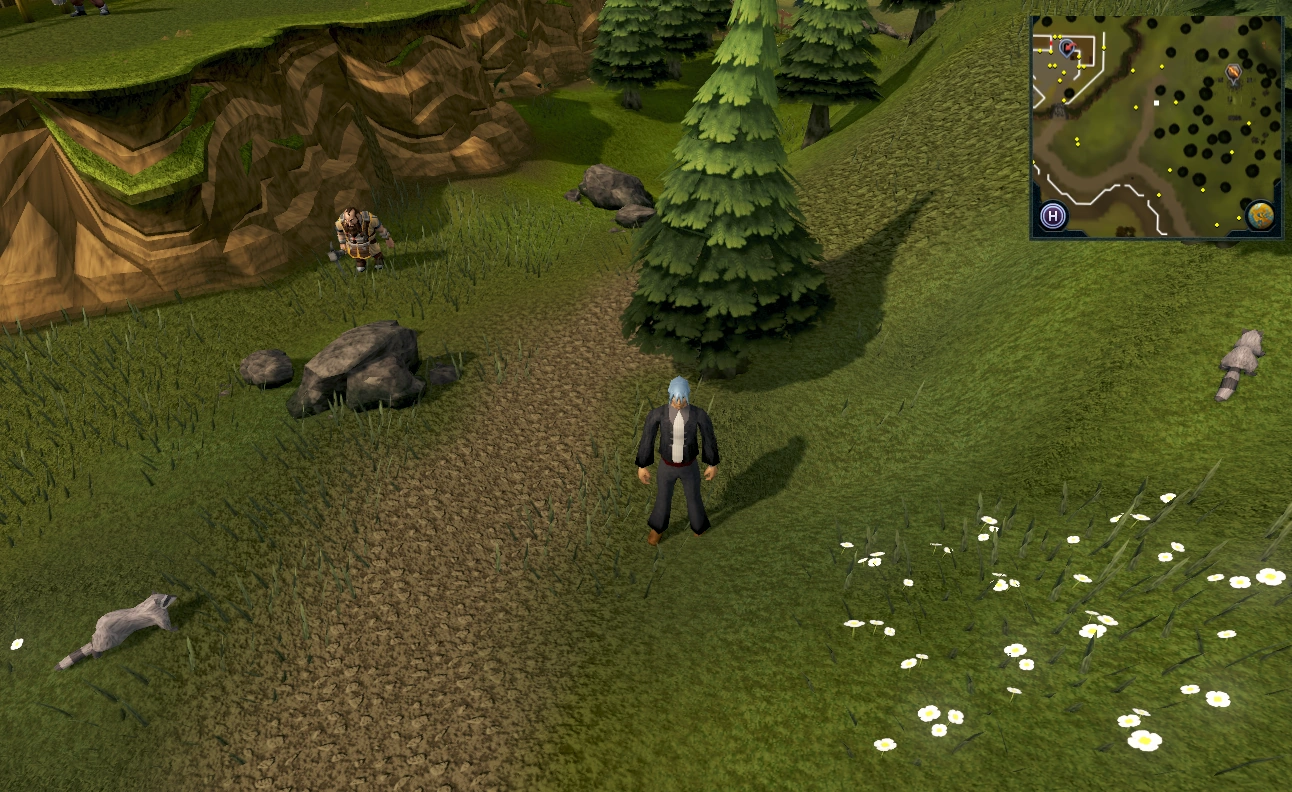
| Rellekka | Fairy ring CJR Enchanted lyre teleport Rellekka house portal |
Just north/northwest of the Agility shortcut to the Sinclair Mansion | 13° 56' N 8° 43' E |
20 10 Mithril Stone Spirit 15 |
|
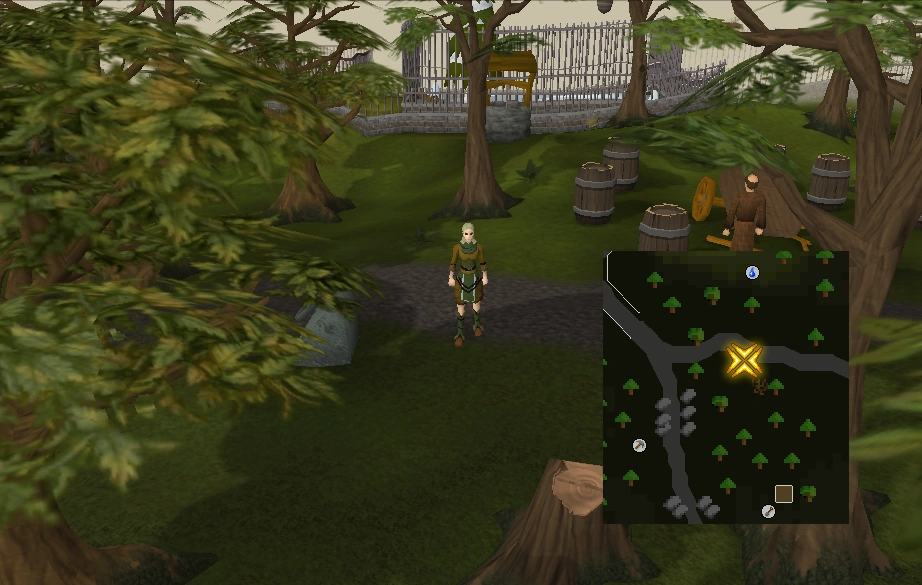
| Ardougne Monastery | Ardougne cloak 1/2/3/4 Fairy ring DJP |
West of the bush located northeast of the Bush patch north of the Monastery near the broken cart | 2° 28' N 5° 24' E |
36 15 Iron Stone Spirit 20 |
|
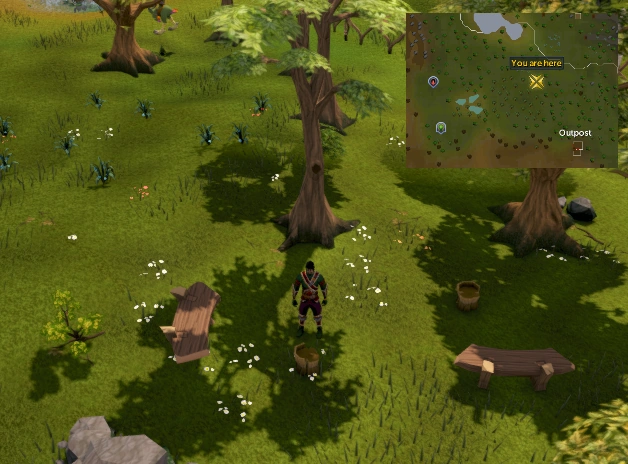
| Outpost | Eagle's peak lodestone Sixth-Age circuit teleport to the World Gate |
South of the southernmost gnome bench, northwest of the outpost | 6° 54' N 0° 45' W |
40 20 20 |
|
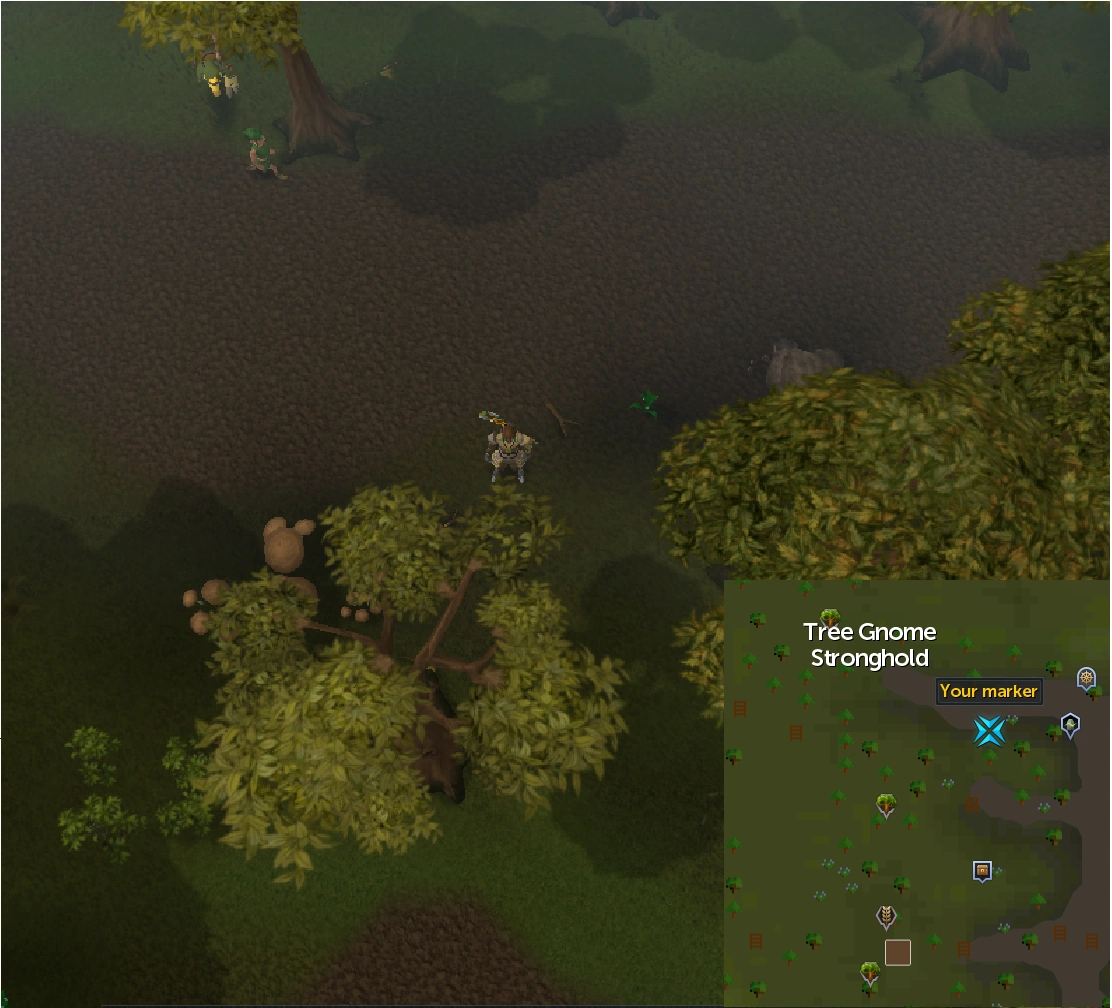
| Gnome Stronghold | Spirit tree teleport Gnome glider to Ta Quir Priw |
In the Gnome Stronghold, north of the bank and just northeast of some mushrooms. Not to be confused with the West Ardougne location, which is just outside the stronghold | 8° 54' N 0° 15' E |
39 20 30 |
|
| Body altar | Edgeville/Falador lodestone Skull sceptre teleport |
Directly west of the body altar, near the dirt road in between the body altar and the dwarven mine | 8° 33' N 18° 30' E |
10 Mithril Stone Spirit
15 Iron Stone Spirit |
|
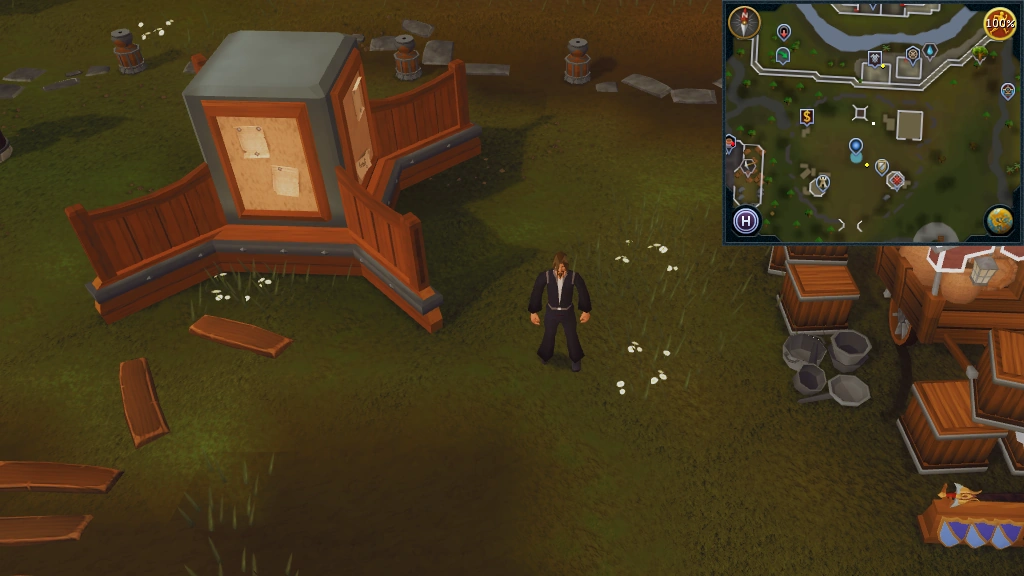
| Wayne's Chains | Port Sarim lodestone Clan vexillum teleport |
In the Clan Camp, just west of the large private meeting tent, south of Wayne's Chains | 4° 20' N 16° 31' E |
15 20 |
|
| Mudskipper Point | Fairy ring AIQ | Northeast of the Asgarnian Ice Dungeon and southeast of Endwyr, Emissary of Seren | 0° 5' S 17° 58' E |
15 Iron Ore Spirits 20 15 |
|
| Shattered Worlds entrance | Lumbridge lodestone Amulet of glory teleport to Draynor |
North of Shattered Worlds | 0° 15' S 22° 37' E |
29 20 20 |
|
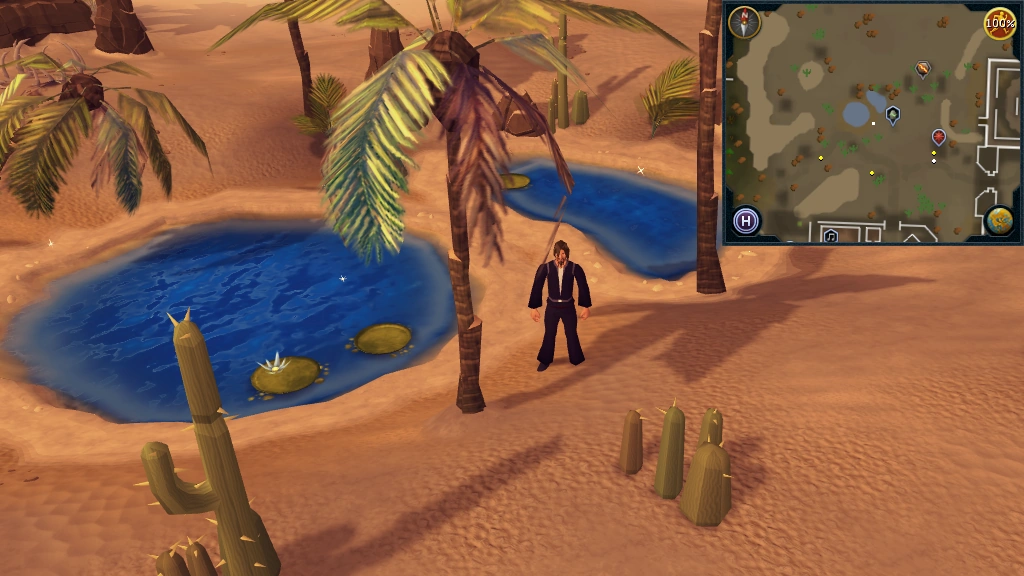
| Al Kharid | Duelling ring to Duel Arena Al Kharid lodestone |
Between the ponds and the small obelisk, west of the Duel Arena | 2° 35' N 26° 56' E |
40 10 Mithril Stone Spirits |
|
| Exam Centre | Digsite pendant Varrock teleport Gnome glider to Lemanto Andra |
West of the Exam Centre, on the road heading north from the T-junction | 5° 33' N 26° 54' E |
40 15 Iron Stone Spirits |
|
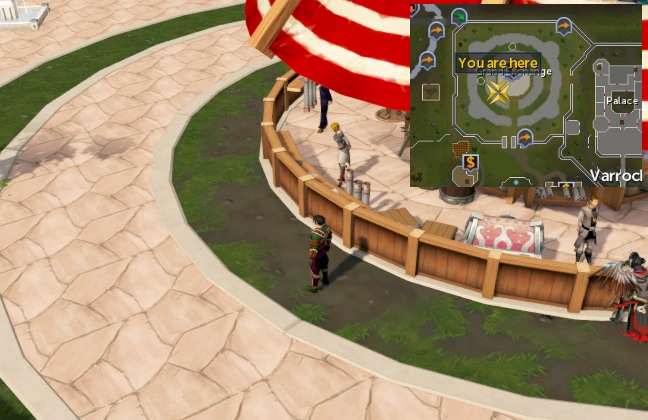
| Grand Exchange | Ring of wealth/Ring of fortune Varrock lodestone |
West/southwest of the tent in the middle of the Grand Exchange | 10° 18' N 22° 26' E |
39 10 15 |
|
Meeting History
The rewards always follow the following pattern. The order of the treasures is not random.
| Area | Getting there | Location | Coords | Loot | Map |
|---|---|---|---|---|---|
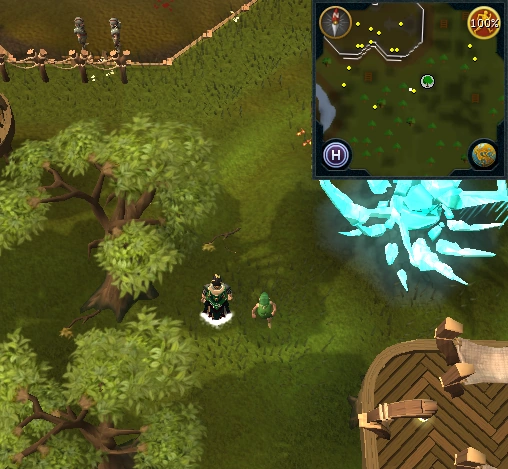
| 1. Gnomeball field | Gnome glider to Ta Quir Priw Spirit tree to the Grand Tree |
South of the gnome ball field, 4 steps west of crystal tree | 9° 45' N 1° 3' W |
510 3 15 20 |
|
| 2. Shantay Pass | Amulet of glory Al Kharid lodestone Broomstick to Sorceress's Garden |
Shantay Pass, 3 steps west of the musician | 1° 5' S 26° 58' E |
530 3 10 3 |
|
| 3. Brimhaven | Karamja lodestone | West of the lake west of Brimhaven | 0° 9' N 8° 43' E |
560 1 5 2 |
|
| 4. Wilderness | Edgeville/Wilderness lodestone Ring of wealth/Ring of fortune to GE |
South of Chaos tunnel entrance in level 4 Wilderness, north of Grand Exchange | 12° 5' N 22° 41' E |
650 1 10 1 |
|
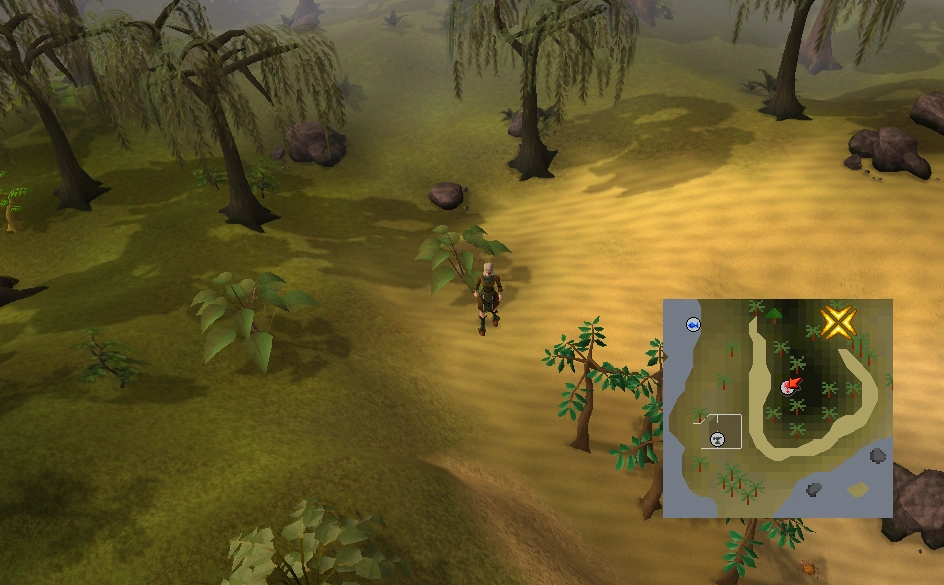
| 5. Tai Bwo Wannai | Karamja lodestone Spirit graahk teleport Fairy ring CKR Karamja gloves 3, Wicked hood teleport to Nature Altar |
Mine east of Tai Bwo Wannai. This is the one near the Small obelisk, NOT the Shilo gem mine! | 3° 56' S 12° 45' E |
750 2 10 30 |
|
| 6. Feldip Hills | Oo'glog lodestone Fairy ring AKS Gnome glider to Lemantolly Undri (requires One Small Favour) |
West of Hunting expert | 7° 26' S 2° 26' E |
800 30 1 15 |
|
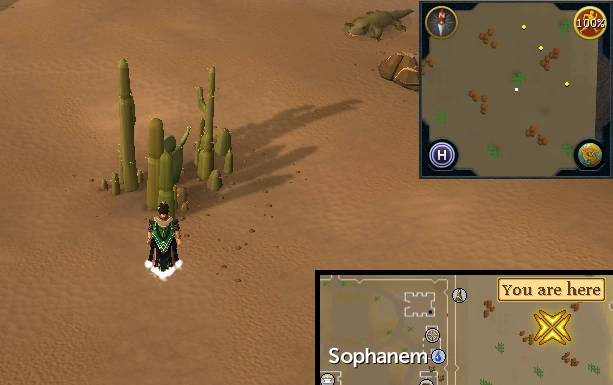
| 7. Agility Pyramid | Pharaoh's sceptre teleport to Jaleustrophos Desert amulet 2 (or higher) magic carpet to Pollnivneach/Sophanem |
In the desert east of Sophanem, south of the Agility Pyramid | 11° 26' S 28° 35' E |
830 1 5 Death runes 2 |
|
| 8. Bandit Camp (Wilderness) | Wilderness obelisk | North of the Bandit Camp in Level 27 Wilderness, just east of the Wilderness obelisk | 17° 50' N 18° 56' E |
950 2 3 15 |
|
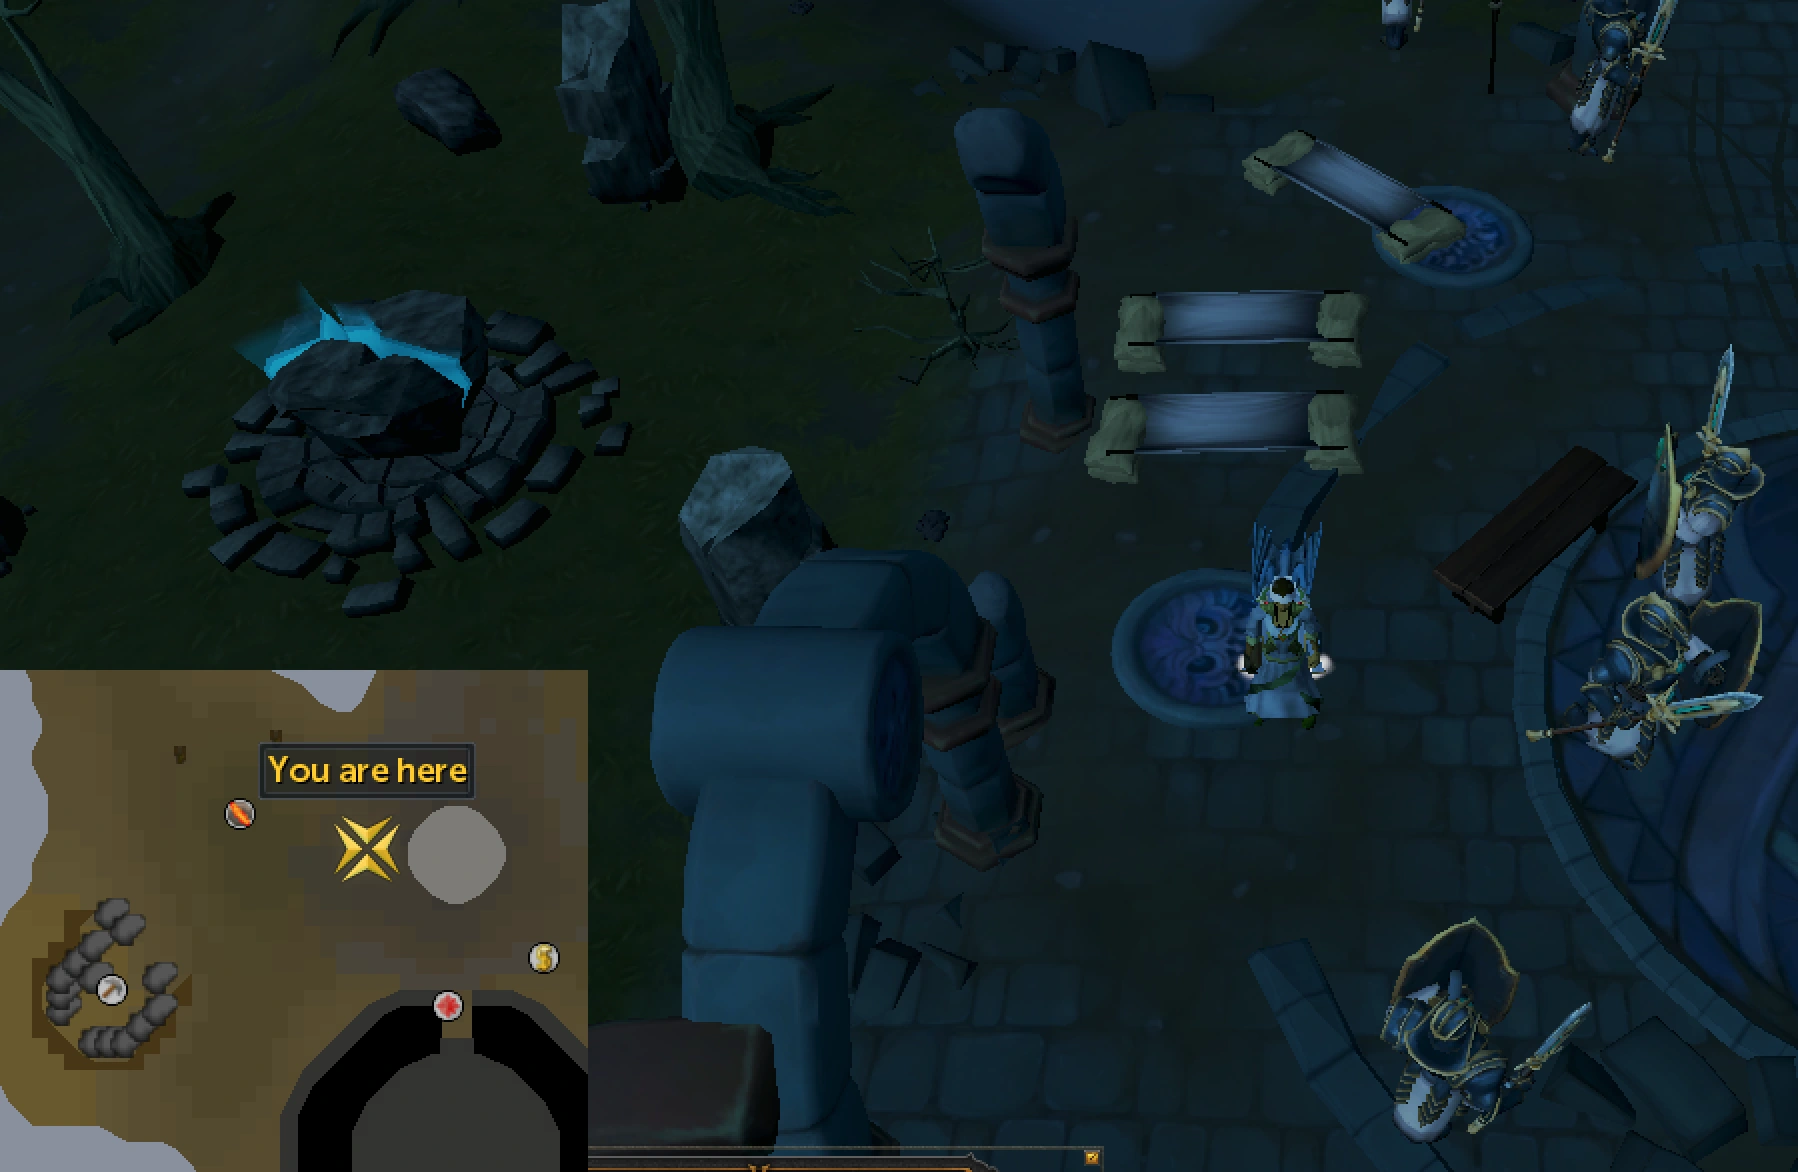
| 9. Daemonheim | Ancient Magicks teleport to Carrallangar Ring of kinship teleport to Daemonheim |
Level 20 Wilderness southeast of Clan Wars, past the black salamander hunter area, just east of the green dragons | 16° 3' N 28° 45' E |
950 1 20 5 |
|
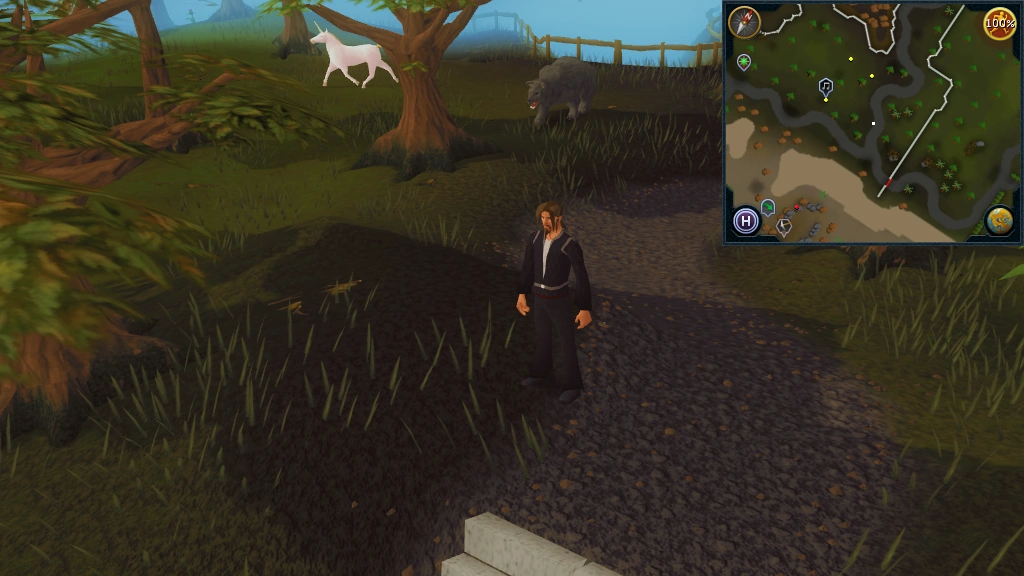
| 10. Death Plateau | Burthorpe lodestone Games necklace to Troll Invasion (Climbing boots not needed) |
Just north of the thrower trolls on Death Plateau, on the ridge that you access through Sabbot's cave, continue toward the entrance to the Death Plateau | 13° 56' N 13° 30' E |
1,010 1 20 10 |
|
| 11. Scorpion Pit | Teleport lever in Ardougne or Edgeville, go east towards the Scorpion Pit (beware of the Chaos Elemental which resides nearby) | Level 53 Wilderness, middle of the Scorpion Pit east of the magic axe hut | 24° 30' N 25° 0' E |
1,100 2 15 10 |
|
Congratulations, miniquest complete!
Rewards
Making History
Ores:
- 60 Iron Stone Spirits
- 30 Mithril Stone Spirits
Runes & essence:
- 263
 Pure essence
 - 15 Air runes
- 20 Mind runes
- 5 Earth runes
- 20 Fire runes
- 30 Water runes
- 30 Law runes
- 15 Death runes
Arrows and arrowtips:
- 20 Iron arrows
- 40 Steel arrows
- 30 Mithril arrows
- 40 Iron arrowheads
Unique god spears:
All these rewards add up to 303,928 coins, presuming they are sold on G.E. for the current market price.
Meeting History
Runes and essence:
- 60 Pure essence
- 15 Law runes
- 15 Cosmic runes
- 15 Nature runes
- 15 Chaos runes
- 15 Death runes
- 10 Blood runes
Arrows:
Charms:
- 36 Gold charms
- 4 Green charms
- 4 Crimson charms
- 4 Blue charms
Gems:
Other:
All these rewards add up to 88,923 coins, presuming they are sold on G.E. for the current market price.
Re-obtaining the mjolnirs
After the player completes the miniquest, they can pay Jorral 6,000 coins to hunt the mjolnirs again, but only if they do not own any mjolnirs. In that case, the player will find the Guthix mjolnir, Saradomin mjolnir, and Zamorak mjolnir in that order before the key disappears again. The mjolnirs are all found in their original locations, but the secondary rewards that were originally with them will not be found again. This cycle can be repeated as many times as the player wants. If the player logs out or loses connection before obtaining all three mjolnirs, the key will need to be paid for again.
(One of) the fastest ways of obtaining the mjolnirs would be to start by teleporting to Jorral using a traveller's necklace; Teleporting to the Al Kharid mine using a Dungeoneering skillcape (option 0 - 5) or a hoardstalker ring for the Guthix mjolnir; then teleporting to the clan camp using a clan vexilium for the Saradomin mjolnir, and finally teleporting to the duel arena using a ring of duelling for the Zamorak mjolnir. It's possible to get over 40 mjolnir sets per hour using this method.
Achievement
- Banking History ( 25) - Find all hidden treasures from the 'Making History' quest.
- Despite the game guide saying the player only has to find the rewards from Making History, both the rewards from Making History and Meeting History must be found for these unlocks.
Trivia
- The coin rewards from the Meeting History treasures are some of the few examples in which money is not added directly to the money pouch.
| Quests | |
| Related (mini)quests |
|