No edit summary Tag: sourceedit |
No edit summary |
||
| (14 intermediate revisions by 10 users not shown) | |||
| Line 1: | Line 1: | ||
| + | {{Otheruses|Divination craters|the 2017 Christmas activity|Energy rift (2017 Christmas event)}} |
||
| − | {{incomplete|Elder Halls energy rift needs mentioning/added}} |
||
{{Infobox interactive scenery |
{{Infobox interactive scenery |
||
| − | |name = Energy |
+ | |name = Energy rift |
| − | |image = [[File:Energy |
+ | |image = [[File:Energy rift.png|250px]] |
|release = [[20 August]] [[2013]] |
|release = [[20 August]] [[2013]] |
||
|update = Divination Skill - Now Live |
|update = Divination Skill - Now Live |
||
| Line 8: | Line 8: | ||
|quest = No |
|quest = No |
||
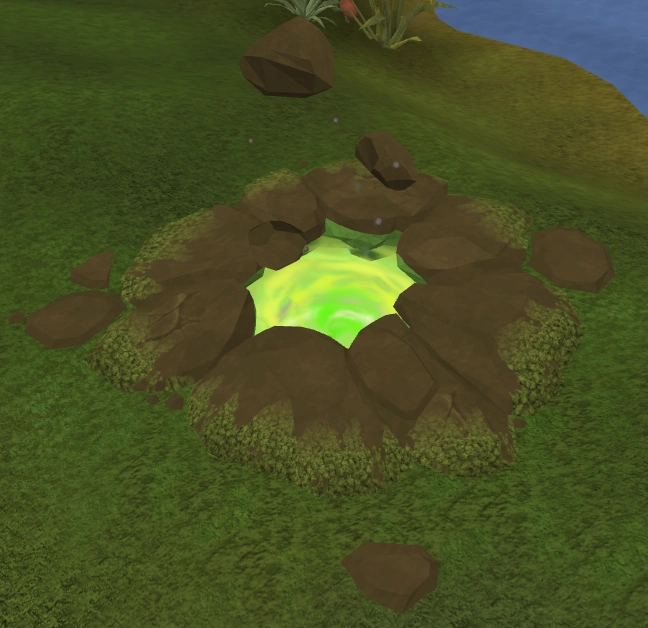
|examine = {{*}} The crater shows damage to Gielinor. Memories can be donated here to repair it in exchange for Divination experience or divine energy.<br/>{{*}} The structure of this cavern seems to funnel anima from the surface into this energy rift. |
|examine = {{*}} The crater shows damage to Gielinor. Memories can be donated here to repair it in exchange for Divination experience or divine energy.<br/>{{*}} The structure of this cavern seems to funnel anima from the surface into this energy rift. |
||
| + | {{*}} Something strange is happening to this rift! It can still be used to convert memories, but you feel a strange power calling you inside... (when a Guthixian cache is active) |
||
|location = Varies |
|location = Varies |
||
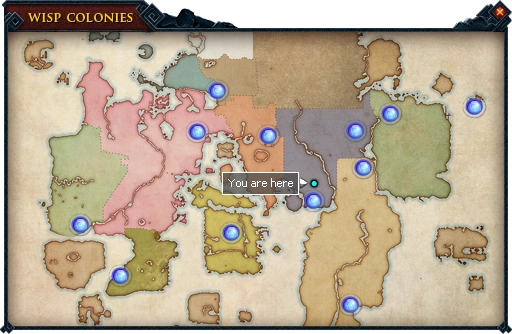
| − | |map = [[File:Wisp Colonies map.png| |
+ | |map = [[File:Wisp Colonies map.png|250px|center]] |
}} |
}} |
||
| − | '''Energy |
+ | '''Energy rifts''' are rips in the integrity of the earth of Gielinor. They play a vital part of training the [[Divination]] skill. At an energy rift, a player may deposit various [[memories]] from harvesting the different kinds of [[wisp]]s and [[spring (Divination)|springs]], in exchange for divination [[experience]]. There is an energy rift present at every wisp colony. There is also a rift in the starting room of every dungeon in [[Daemonheim]]. According to their examine, depositing energy and memories will help restore the damage done to [[Gielinor]]. An energy rift is also found in the [[Elder Halls]] on [[Freneskae]]. |
| ⚫ | |||
Players have three different choices on what to deposit into the energy rift: To transmute memories into varying amounts of energies, to convert the memories into divination experience, and to convert memories along with some energies of the same type for increased experience. Depositing only memories is the choice done for general training while still keeping energy for making special objects, but depositing memories along with energy is the method of choice for those who want optimal experience without other items or for those who don't care for items or profit. |
Players have three different choices on what to deposit into the energy rift: To transmute memories into varying amounts of energies, to convert the memories into divination experience, and to convert memories along with some energies of the same type for increased experience. Depositing only memories is the choice done for general training while still keeping energy for making special objects, but depositing memories along with energy is the method of choice for those who want optimal experience without other items or for those who don't care for items or profit. |
||
| − | If the player has chosen to convert both energy and memories into experience, and their energy runs out, the |
+ | If the player has chosen to convert both energy and memories into experience, and their energy runs out, the rift would continue to convert memories into experience without warning. When converting both into experience, enriched memories will be prioritised. When converting memories only, normal memories will be prioritised. Different tiers of memories can be converted in the same energy rift. The normal memories will be converted to experience by order in the inventory regardless of tier, although enriched memories follow the rules above. |
| ⚫ | |||
| + | |||
| + | {{clear}} |
||
==Locations== |
==Locations== |
||
| + | {{Needs image|elder energy map}} |
||
{| class="wikitable" style="width:100%;" |
{| class="wikitable" style="width:100%;" |
||
|- |
|- |
||
| Line 34: | Line 38: | ||
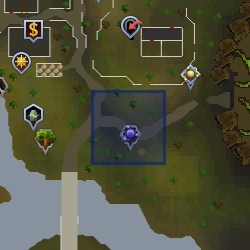
|[[File:Pale energy 1.png]] [[Pale energy|Pale]]<br />([[Pale wisp|Wisp]]) |
|[[File:Pale energy 1.png]] [[Pale energy|Pale]]<br />([[Pale wisp|Wisp]]) |
||
|[[File:Pale wisp location.png|130px]] |
|[[File:Pale wisp location.png|130px]] |
||
| ⚫ | |||
| ⚫ | |||
| ⚫ | |||
| − | Best Travel Option(s): Use an [[ |
+ | Best Travel Option(s): Use an [[amulet of glory]] to teleport to [[Draynor Village]] or use a [[faction token]], from The [[Battle of Lumbridge]], to teleport to your respective camp. |
|style="text-align:center;"|1 |
|style="text-align:center;"|1 |
||
|style="text-align:center;"|3 |
|style="text-align:center;"|3 |
||
| Line 45: | Line 48: | ||
|[[File:Flickering energy 1.png]] [[Flickering energy|Flickering]]<br />([[Flickering wisp|Wisp]]) |
|[[File:Flickering energy 1.png]] [[Flickering energy|Flickering]]<br />([[Flickering wisp|Wisp]]) |
||
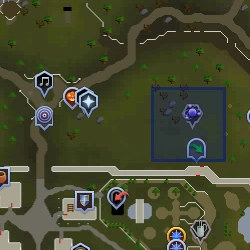
|[[File:Flickering wisp location.png|130px]] |
|[[File:Flickering wisp location.png|130px]] |
||
| + | |North of [[Falador]], near the [[Tribute stone|Guthix memorial site]]. |
||
| − | | |
||
| − | + | Best Travel Option: Use the [[Falador]] [[Lodestone]] and head east. |
|
| − | Best Travel Option: Use the [[Falador]] [[Lodestone]] and head east. |
||
|style="text-align:center;"|2 (4) |
|style="text-align:center;"|2 (4) |
||
|style="text-align:center;"|4 (8)<br />'''Boon:'''<br />4.4 (8.8) |
|style="text-align:center;"|4 (8)<br />'''Boon:'''<br />4.4 (8.8) |
||
| Line 55: | Line 57: | ||
|[[File:Bright energy 1.png]] [[Bright energy|Bright]]<br />([[Bright wisp|Wisp]]) |
|[[File:Bright energy 1.png]] [[Bright energy|Bright]]<br />([[Bright wisp|Wisp]]) |
||
|[[File:Bright wisp location.png|130px]] |
|[[File:Bright wisp location.png|130px]] |
||
| + | |Between [[Varrock]] and the [[Digsite]]. |
||
| − | | |
||
| − | + | Best Travel Option: Use the [[Digsite pendant]]. |
|
| − | Best Travel Option: Use the [[Digsite Pendant]]. |
||
|style="text-align:center;"|3 (6) |
|style="text-align:center;"|3 (6) |
||
|style="text-align:center;"|5 (10)<br />'''Boon:'''<br />5.5 (11) |
|style="text-align:center;"|5 (10)<br />'''Boon:'''<br />5.5 (11) |
||
| Line 74: | Line 75: | ||
|[[File:Sparkling energy 1.png]] [[Sparkling energy|Sparkling]]<br />([[Sparkling wisp|Wisp]]) |
|[[File:Sparkling energy 1.png]] [[Sparkling energy|Sparkling]]<br />([[Sparkling wisp|Wisp]]) |
||
|[[File:Sparkling wisp location.png|130px]] |
|[[File:Sparkling wisp location.png|130px]] |
||
| − | |South-east of [[Rellekka]], near the [[Golden |
+ | |South-east of [[Rellekka]], near the [[Golden apple tree]]. |
| − | Best Travel Option: Ring of |
+ | Best Travel Option: [[Ring of slaying]] to teleport to [[Fremennik Slayer Dungeon]] or use the fairy ring code {{Fairycode|AJR}}, then run south. |
|style="text-align:center;"|5 (10) |
|style="text-align:center;"|5 (10) |
||
|style="text-align:center;"|12 (24)<br />'''Boon:'''<br />13.2 (26.4) |
|style="text-align:center;"|12 (24)<br />'''Boon:'''<br />13.2 (26.4) |
||
| Line 84: | Line 85: | ||
|[[File:Gleaming energy 1.png]] [[Gleaming energy|Gleaming]]<br />([[Gleaming wisp|Wisp]]) |
|[[File:Gleaming energy 1.png]] [[Gleaming energy|Gleaming]]<br />([[Gleaming wisp|Wisp]]) |
||
|[[File:Gleaming wisp location.png|130px]] |
|[[File:Gleaming wisp location.png|130px]] |
||
| ⚫ | |||
| − | | |
||
| ⚫ | |||
| − | Best Travel Option: Getting to the Nature Altar using either Nature |
+ | Best Travel Option: Getting to the [[Nature Altar]] using either [[Nature tab]]s or the [[Wicked hood]]. |
| − | You may use a [[Lodestone]] to teleport to [[Karamja]] and travel south east. Also the [[ |
+ | You may use a [[Lodestone]] to teleport to [[Karamja]] and travel south east. Also, the [[spirit graahk]] can be used for quick travel. |
|style="text-align:center;"|6 (12) |
|style="text-align:center;"|6 (12) |
||
|style="text-align:center;"|19 (38)<br />'''Boon:'''<br />20.9 (41.8) |
|style="text-align:center;"|19 (38)<br />'''Boon:'''<br />20.9 (41.8) |
||
| Line 96: | Line 96: | ||
|[[File:Vibrant energy 1.png]] [[Vibrant energy|Vibrant]]<br />([[Vibrant wisp|Wisp]]) |
|[[File:Vibrant energy 1.png]] [[Vibrant energy|Vibrant]]<br />([[Vibrant wisp|Wisp]]) |
||
|[[File:Vibrant wisp location.png|130px]] |
|[[File:Vibrant wisp location.png|130px]] |
||
| ⚫ | |||
| − | | |
||
| ⚫ | |||
| − | Best Travel Option: Use |
+ | Best Travel Option: Use [[ring of duelling]] to arrive there, a [[spirit tree]] or the Mobilising Armies teleport. |
| style="text-align:center;"|7 (14) |
| style="text-align:center;"|7 (14) |
||
| style="text-align:center;"|25 (50)<br />'''Boon:'''<br />27.5 (55) |
| style="text-align:center;"|25 (50)<br />'''Boon:'''<br />27.5 (55) |
||
| Line 107: | Line 106: | ||
|[[File:Lustrous energy 1.png]] [[Lustrous energy|Lustrous]]<br />([[Lustrous wisp|Wisp]]) |
|[[File:Lustrous energy 1.png]] [[Lustrous energy|Lustrous]]<br />([[Lustrous wisp|Wisp]]) |
||
|[[File:Lustrous wisp location.png|130px]] |
|[[File:Lustrous wisp location.png|130px]] |
||
| ⚫ | |||
| − | | |
||
| ⚫ | |||
| − | Best Travel Option: Use a [[Ring of |
+ | Best Travel Option: Use a [[Ring of slaying]] to teleport in front of the Slayer Tower and head east. Alternatives are the [[Mask of the Abyss]]/[[Helm of Warping]] which has the option to teleport to [[Markus]]. |
You may use a [[lodestone]] to go to [[Canifis]] and travel north-west. |
You may use a [[lodestone]] to go to [[Canifis]] and travel north-west. |
||
| style="text-align:center;"|8 (16) |
| style="text-align:center;"|8 (16) |
||
| style="text-align:center;"|32 (64)<br />'''Boon:'''<br />35.2 (70.4) |
| style="text-align:center;"|32 (64)<br />'''Boon:'''<br />35.2 (70.4) |
||
| style="text-align:center;"|40 (80)<br />'''Boon:'''<br />44 (88) |
| style="text-align:center;"|40 (80)<br />'''Boon:'''<br />44 (88) |
||
| ⚫ | |||
| + | |style="text-align:center;"|75 |
||
| + | |[[File:Elder energy 1.png]] [[Elder energy|Elder]]<br />([[Elder wisp|Wisp]]) |
||
| + | ||In the [[Elder Halls]] on [[Freneskae]]. |
||
| + | |||
| + | Best Travel Option: Use the [[Sixth-Age circuit]] to teleport to the [[World Gate]], or use the [[Eagles' Peak (location)|Eagles' Peak]] lodestone and run south. |
||
| + | | style="text-align:center;"|8.5 (17) |
||
| + | | style="text-align:center;"|33.5 (67)<br />'''Boon:'''<br />36.8 (73.6) |
||
| + | | style="text-align:center;"|41.8 (83.6)<br />'''Boon:'''<br />45.9 (91.8) |
||
|- |
|- |
||
|style="text-align:center;"|80 |
|style="text-align:center;"|80 |
||
|[[File:Brilliant energy 1.png]] [[Brilliant energy|Brilliant]]<br />([[Brilliant wisp|Wisp]]) |
|[[File:Brilliant energy 1.png]] [[Brilliant energy|Brilliant]]<br />([[Brilliant wisp|Wisp]]) |
||
|[[File:Brilliant wisp location.png|130px]] |
|[[File:Brilliant wisp location.png|130px]] |
||
| ⚫ | |||
| − | | |
||
| ⚫ | |||
Best Travel Option: Use the fairy ring code {{Fairycode|BIP}}, then run south |
Best Travel Option: Use the fairy ring code {{Fairycode|BIP}}, then run south |
||
| Line 130: | Line 136: | ||
|[[File:Radiant energy 1.png]] [[Radiant energy|Radiant]]<br />([[Radiant wisp|Wisp]]) |
|[[File:Radiant energy 1.png]] [[Radiant energy|Radiant]]<br />([[Radiant wisp|Wisp]]) |
||
|[[File:Radiant wisp location.png|130px]] |
|[[File:Radiant wisp location.png|130px]] |
||
| ⚫ | |||
| − | | |
||
| ⚫ | |||
| − | Best Travel Option: Use |
+ | Best Travel Option: Use [[Ectophial]], then travel with the [[ghost captain]] for free. Or teleport to the [[Dragontooth Island resource dungeon|Dragontooth celestial dragon dungeon]] using the [[Dungeoneering cape]] perk. |
| style="text-align:center;"|10 (20) |
| style="text-align:center;"|10 (20) |
||
| style="text-align:center;"|38 (76)<br />'''Boon:'''<br />41.8 (83.6) |
| style="text-align:center;"|38 (76)<br />'''Boon:'''<br />41.8 (83.6) |
||
| Line 141: | Line 146: | ||
|[[File:Luminous energy 1.png]] [[Luminous energy|Luminous]]<br />([[Luminous wisp|Wisp]]) |
|[[File:Luminous energy 1.png]] [[Luminous energy|Luminous]]<br />([[Luminous wisp|Wisp]]) |
||
|[[File:Luminous wisp location.png|130px]] |
|[[File:Luminous wisp location.png|130px]] |
||
| ⚫ | |||
| − | | |
||
| ⚫ | |||
| − | Best Travel Option: Teleport to Jalsavrah in Sophanem with the Pharaoh's |
+ | Best Travel Option: Teleport to [[Jalsavrah]] in Sophanem with the [[Pharaoh's sceptre]] or [[Sceptre of the gods]] and run the rest of the way. |
| − | '''Note:''' Bring [[ |
+ | '''Note:''' Bring [[waterskins]] with [[Humidify]] runes or an [[Enchanted water tiara]]. Wearing [[desert clothing]] will help as well. The [[Tome of frost]] is also a feasible option as you take minimal damage to be at risk. Wielding Tome of frost and [[Regen bracelet]] is a very cost effective method (desert clothing is optional). |
| style="text-align:center;"|11 (22) |
| style="text-align:center;"|11 (22) |
||
| style="text-align:center;"|42 (84)<br />'''Boon:'''<br />46.2 (92.4) |
| style="text-align:center;"|42 (84)<br />'''Boon:'''<br />46.2 (92.4) |
||
| Line 154: | Line 158: | ||
|style="white-space:nowrap;"|[[File:Incandescent energy 1.png]] [[Incandescent energy|Incandescent]]<br />([[Incandescent wisp|Wisp]]) |
|style="white-space:nowrap;"|[[File:Incandescent energy 1.png]] [[Incandescent energy|Incandescent]]<br />([[Incandescent wisp|Wisp]]) |
||
|[[File:Incandescent wisp location.png|130px]] |
|[[File:Incandescent wisp location.png|130px]] |
||
| ⚫ | |||
| − | | |
||
| ⚫ | |||
| − | Best Travel Option: Use the |
+ | Best Travel Option: Use the spirit tree to the Poison Waste, then run south and use the grapple option, then run west. |
| − | Alternative: Use the fairy ring code {{Fairycode|BKP}}, to get to the south of Castle Wars, then run past the bridge on the west. |
+ | Alternative: Use the fairy ring code {{Fairycode|BKP}}, to get to the south of [[Castle Wars]], then run past the bridge on the west. |
| style="text-align:center;"|12 (24) |
| style="text-align:center;"|12 (24) |
||
| style="text-align:center;"|45 (90)<br />'''Boon:'''<br />49.5 (99) |
| style="text-align:center;"|45 (90)<br />'''Boon:'''<br />49.5 (99) |
||
| Line 168: | Line 171: | ||
==Guthixian Cache== |
==Guthixian Cache== |
||
{{main|Guthixian Cache}} |
{{main|Guthixian Cache}} |
||
| − | + | Every hour, an [[Server-wide Announcements|announcement]] will appear saying that a Guthixian Cache has opened. Energy rifts (excluding the Energy rift near the [[Pale wisp]] colony) for the next 10 minutes will have a new temporary option when right-clicked displaying "Enter cache", as well as the rift changing colour. Entering the cache will begin the Guthixian Cache [[Distraction and Diversion]]. |
|
<gallery> |
<gallery> |
||
Memory conversion.png|The interface that appears when interacting with an energy rift. |
Memory conversion.png|The interface that appears when interacting with an energy rift. |
||
Energy Rift (Dungeoneering).png|An energy rift in Daemonheim. |
Energy Rift (Dungeoneering).png|An energy rift in Daemonheim. |
||
| + | Freneskae Elder Halls.png|The energy rift found on Freneskae. |
||
</gallery> |
</gallery> |
||
{{Divination}} |
{{Divination}} |
||
| − | [[Category:Interactive scenery]] |
||
Latest revision as of 21:47, 27 December 2017
| |
| Release date | 20 August 2013 (Update) |
|---|---|
| Members | No |
| Quest | No |
| Location | Varies |
| Examine | • The crater shows damage to Gielinor. Memories can be donated here to repair it in exchange for Divination experience or divine energy. • The structure of this cavern seems to funnel anima from the surface into this energy rift. • Something strange is happening to this rift! It can still be used to convert memories, but you feel a strange power calling you inside... (when a Guthixian cache is active) |
 | |
Energy rifts are rips in the integrity of the earth of Gielinor. They play a vital part of training the Divination skill. At an energy rift, a player may deposit various memories from harvesting the different kinds of wisps and springs, in exchange for divination experience. There is an energy rift present at every wisp colony. There is also a rift in the starting room of every dungeon in Daemonheim. According to their examine, depositing energy and memories will help restore the damage done to Gielinor. An energy rift is also found in the Elder Halls on Freneskae.
Players have three different choices on what to deposit into the energy rift: To transmute memories into varying amounts of energies, to convert the memories into divination experience, and to convert memories along with some energies of the same type for increased experience. Depositing only memories is the choice done for general training while still keeping energy for making special objects, but depositing memories along with energy is the method of choice for those who want optimal experience without other items or for those who don't care for items or profit.
If the player has chosen to convert both energy and memories into experience, and their energy runs out, the rift would continue to convert memories into experience without warning. When converting both into experience, enriched memories will be prioritised. When converting memories only, normal memories will be prioritised. Different tiers of memories can be converted in the same energy rift. The normal memories will be converted to experience by order in the inventory regardless of tier, although enriched memories follow the rules above.

Locations
| Level | Wisp type | Map | Location | Experience (Enriched) | ||
|---|---|---|---|---|---|---|
| Harvest[1] | Convert Memory | Convert with Energy | ||||
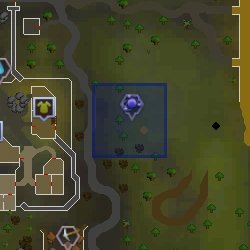
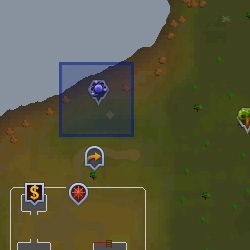
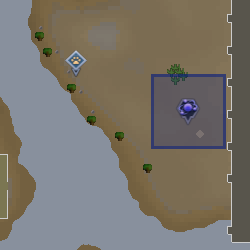
| 1 | (Wisp) |
|
West of Lumbridge crater, near the Divination camp.
Best Travel Option(s): Use an amulet of glory to teleport to Draynor Village or use a faction token, from The Battle of Lumbridge, to teleport to your respective camp. |
1 | 3 | 3.7 |
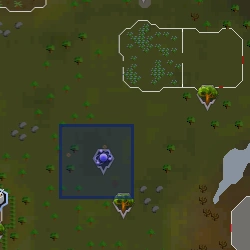
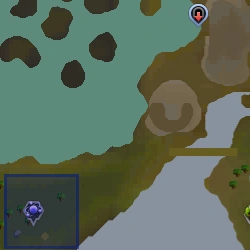
| 10 | (Wisp) |
|
North of Falador, near the Guthix memorial site.
Best Travel Option: Use the Falador Lodestone and head east. |
2 (4) | 4 (8) Boon: 4.4 (8.8) |
5 (10) Boon: 5.5 (11) |
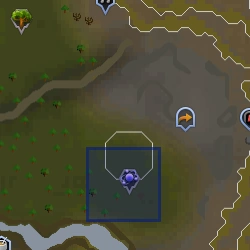
| 20 | (Wisp) |
|
Between Varrock and the Digsite.
Best Travel Option: Use the Digsite pendant. |
3 (6) | 5 (10) Boon: 5.5 (11) |
6.2 (12.4) Boon: 6.82 (13.64) |
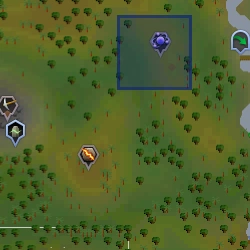
| 30 | (Wisp) |
|
South-east of Seers' Village; just south of the flax field.
Best Travel Option: Use the Seers' Village Lodestone and then travel south-east, or travel north from fairy ring code BLR. |
4 (8) | 7 (14) Boon: 7.7 (15.4) |
8.7 (17.4) Boon: 9.57 (19.14) |
| 40 | (Wisp) |
|
South-east of Rellekka, near the Golden apple tree.
Best Travel Option: Ring of slaying to teleport to Fremennik Slayer Dungeon or use the fairy ring code AJR, then run south. |
5 (10) | 12 (24) Boon: 13.2 (26.4) |
15 (30) Boon: 16.5 (33) |
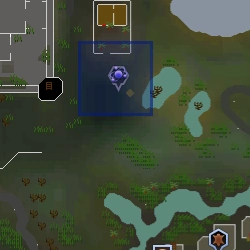
| 50 | (Wisp) |
|
In the centre of the Karamja jungle, north-east of Shilo Village.
Best Travel Option: Getting to the Nature Altar using either Nature tabs or the Wicked hood. You may use a Lodestone to teleport to Karamja and travel south east. Also, the spirit graahk can be used for quick travel. |
6 (12) | 19 (38) Boon: 20.9 (41.8) |
23.7 (47.4) Boon: 26.07 (52.14) |
| 60 | (Wisp) |
|
North of Mobilising Armies.
Best Travel Option: Use ring of duelling to arrive there, a spirit tree or the Mobilising Armies teleport. |
7 (14) | 25 (50) Boon: 27.5 (55) |
31.25 (62.5) Boon: 34.375 (68.75) |
| 70 | (Wisp) |
|
North of Canifis, just to the east of the Slayer Tower.
Best Travel Option: Use a Ring of slaying to teleport in front of the Slayer Tower and head east. Alternatives are the Mask of the Abyss/Helm of Warping which has the option to teleport to Markus. You may use a lodestone to go to Canifis and travel north-west. |
8 (16) | 32 (64) Boon: 35.2 (70.4) |
40 (80) Boon: 44 (88) |
| 75 | (Wisp) |
In the Elder Halls on Freneskae.
Best Travel Option: Use the Sixth-Age circuit to teleport to the World Gate, or use the Eagles' Peak lodestone and run south. |
8.5 (17) | 33.5 (67) Boon: 36.8 (73.6) |
41.8 (83.6) Boon: 45.9 (91.8) | |
| 80 | (Wisp) |
|
East of the Mage Training Arena.
Best Travel Option: Use the fairy ring code BIP, then run south |
9 (18) | 35 (70) Boon: 38.5 (77) |
43.7 (87.4) Boon: 48.07 (96.14) |
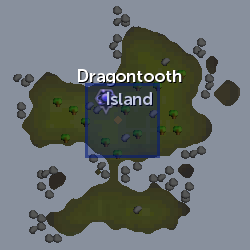
| 85 | (Wisp) |
|
On Dragontooth Island.
Best Travel Option: Use Ectophial, then travel with the ghost captain for free. Or teleport to the Dragontooth celestial dragon dungeon using the Dungeoneering cape perk. |
10 (20) | 38 (76) Boon: 41.8 (83.6) |
47.5 (95) Boon: 52.25 (104.5) |
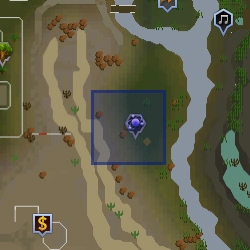
| 90 | (Wisp) |
|
South of Sophanem.
Best Travel Option: Teleport to Jalsavrah in Sophanem with the Pharaoh's sceptre or Sceptre of the gods and run the rest of the way. Note: Bring waterskins with Humidify runes or an Enchanted water tiara. Wearing desert clothing will help as well. The Tome of frost is also a feasible option as you take minimal damage to be at risk. Wielding Tome of frost and Regen bracelet is a very cost effective method (desert clothing is optional). |
11 (22) | 42 (84) Boon: 46.2 (92.4) |
52.5 (105) Boon: 57.75 (115.5) |
| 95 | (Wisp) |
|
South of the Poison Waste.
Best Travel Option: Use the spirit tree to the Poison Waste, then run south and use the grapple option, then run west. Alternative: Use the fairy ring code BKP, to get to the south of Castle Wars, then run past the bridge on the west. |
12 (24) | 45 (90) Boon: 49.5 (99) |
56.2 (112.4) Boon: 61.82 (123.64) |
- ^ Each time a player harvests a wisp they may gain energy or energy and a memory; harvest xp is earned even if the player collects no memory.
Guthixian Cache
Every hour, an announcement will appear saying that a Guthixian Cache has opened. Energy rifts (excluding the Energy rift near the Pale wisp colony) for the next 10 minutes will have a new temporary option when right-clicked displaying "Enter cache", as well as the rift changing colour. Entering the cache will begin the Guthixian Cache Distraction and Diversion.
")
.png "Energy Rift (Dungeoneering).png (382 KB)")
")