(→Trivia) Tags: Visual edit apiedit |
m (cleanup) |
||
| (40 intermediate revisions by 29 users not shown) | |||
| Line 1: | Line 1: | ||
| − | {{External|os}} |
+ | {{External|os=Monkey Madness I}} |
{{Otheruses|the quest|the music track of the same name|Monkey Madness (music track)}} |
{{Otheruses|the quest|the music track of the same name|Monkey Madness (music track)}} |
||
{{Has quick guide}} |
{{Has quick guide}} |
||
| Line 10: | Line 10: | ||
|update = Monkey Madness |
|update = Monkey Madness |
||
|members = Yes |
|members = Yes |
||
| − | |series = [[Gnome quest series|Gnome]] |
+ | |series = [[Gnome quest series|Gnome]]<br />[[Monkey quest series|Monkey]] |
|difficulty = Master |
|difficulty = Master |
||
| − | |length = Very long |
||
|number = 65 |
|number = 65 |
||
|developer = Rahul V |
|developer = Rahul V |
||
| Line 27: | Line 26: | ||
==Walkthrough== |
==Walkthrough== |
||
{{Quest details |
{{Quest details |
||
| − | |start=Talk to King [[Narnode Shareen]] in the [[Grand Tree]]. |
+ | |start = Talk to King [[Narnode Shareen]] in the [[Grand Tree]]. |
| − | |difficulty=Master |
+ | |difficulty = Master |
| − | |length= |
+ | |length = Very Long |
| − | |members=Yes |
+ | |members = Yes |
| − | |requirements= |
+ | |requirements = |
{{Questreq|Monkey Madness}} |
{{Questreq|Monkey Madness}} |
||
'''Recommended:''' |
'''Recommended:''' |
||
| − | *Level 43+ {{Skill clickpic|Prayer}} (for the protection prayers) |
+ | * Level 43+ {{Skill clickpic|Prayer}} (for the protection prayers) |
| − | *Level 10+ {{Skill clickpic|Thieving}} (for increased success chance in lock-picking) |
+ | * Level 10+ {{Skill clickpic|Thieving}} (for increased success chance in lock-picking) |
| − | |items= |
+ | |items = |
| + | * [[Gold bar]] |
||
* [[Ball of wool]] |
* [[Ball of wool]] |
||
* [[Monkey bones]] from [[Karamja]] (or a [[monkey corpse]] or [[monkey skull]]) |
* [[Monkey bones]] from [[Karamja]] (or a [[monkey corpse]] or [[monkey skull]]) |
||
* 5 [[Bananas]] (can be obtained in Ape Atoll) |
* 5 [[Bananas]] (can be obtained in Ape Atoll) |
||
| + | |recommended = |
||
| − | '''Recommended:''' |
||
| − | *[[Antipoison]] potions ([[Antipoison++]] recommended), [[antipoison totem]] , the [[poison purge]] aura or a dip in the [[thermal bath]] to reduce poison damage |
+ | * [[Antipoison]] potions ([[Antipoison++]] recommended), [[antipoison totem]] , the [[poison purge]] aura or a dip in the [[thermal bath]] to reduce poison damage |
| − | *[[Prayer potion]]s or the [[Reverence]] auras for slower prayer drain and more effective prayer restoration |
+ | * [[Prayer potion]]s or the [[Reverence]] auras for slower prayer drain and more effective prayer restoration |
| − | *[[Super energy]] potions, a charged [[explorer's ring]], [[mint cake]]s or a dip in the [[salt-water pool]] for run energy boosts |
+ | * [[Super energy]] potions, a charged [[explorer's ring]], [[mint cake]]s or a dip in the [[salt-water pool]] for run energy boosts |
| + | * [[Ring of duelling]] |
||
| − | *Miscellaneous: |
||
| − | *[[ |
+ | * [[Amulet of glory]] |
| ⚫ | |||
| − | *[[Amulet of glory]] |
||
| ⚫ | |||
| ⚫ | |||
| ⚫ | |||
| ⚫ | |||
| + | |kills = |
||
| ⚫ | |||
| − | + | * [[Jungle demon]] (level 70) |
|
| ⚫ | |||
}} |
}} |
||
| Line 61: | Line 62: | ||
===The tree guardians=== |
===The tree guardians=== |
||
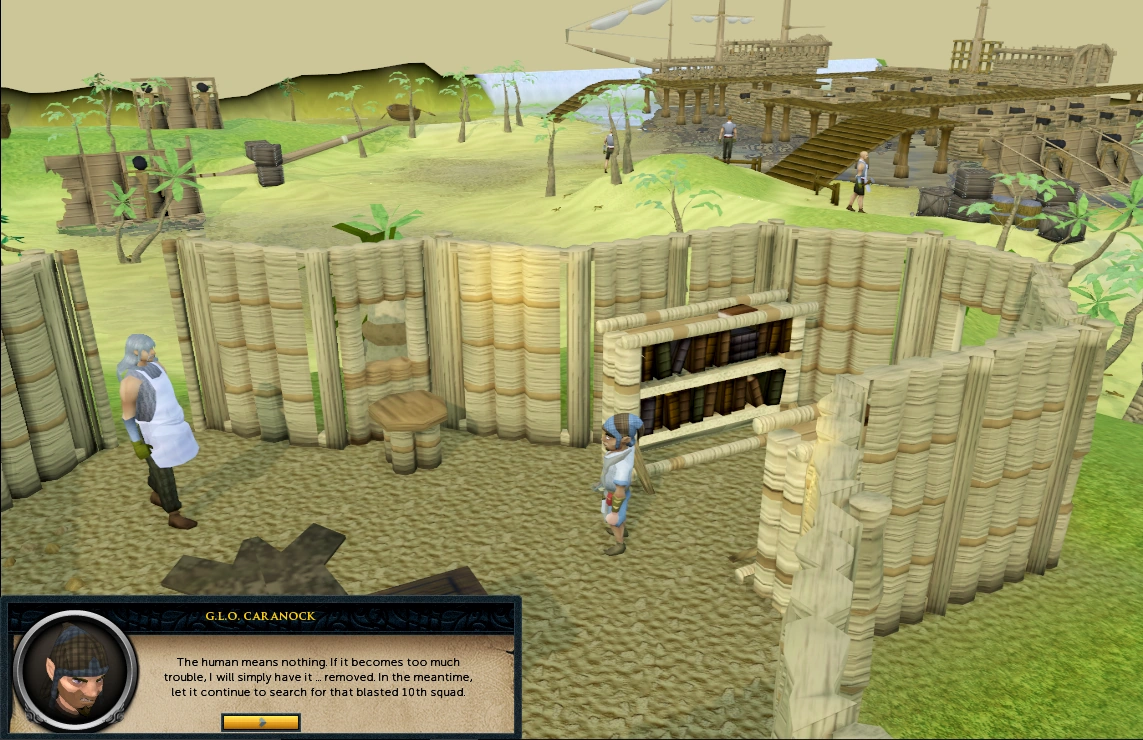
| − | Ascend the tree and take the [[glider]] to [[Karamja]] (Gandius). On the island, head north along the coast to reach the [[shipyard]] and try to enter through the gate. A shipyard worker will stop you, but quickly withdraws once you show him the royal seal. Now, speak with [[G.L.O. Caranock]], the gnome that resides in the building in the southern area of the shipyard - he doesn't provide any useful information but is seemingly acting very suspicious. |
+ | Ascend the tree to the top and take the [[glider]] to [[Karamja]] (Gandius). On the island, head north along the coast to reach the [[shipyard]] and try to enter through the gate. A shipyard worker will stop you, but quickly withdraws once you show him the royal seal. Now, speak with [[G.L.O. Caranock]], the gnome that resides in the building in the southern area of the shipyard - he doesn't provide any useful information but is seemingly acting very suspicious. |
| − | Return to Narnode and tell him about the journey. He writes up some [[Narnode's orders|orders]] that you must convey to [[Daero]]. Daero can be found on the first floor of the [[Grand Tree]] at the eastern side, near [[Blurberry's Bar]]. Show him the king's orders, and he'll tell you that he has been appointed the lead in a reconnaissance mission to investigate the 10th Squad's whereabouts and to communicate with [[Sergeant Garkor]], the squad leader. |
+ | Return to [[King Narnode Shareen]] and tell him about the journey. He writes up some [[Narnode's orders|orders]] that you must convey to [[Daero]]. Daero can be found on the first floor of the [[Grand Tree]] at the eastern side, near [[Blurberry's Bar]]. Show him the king's orders, and he'll tell you that he has been appointed the lead in a reconnaissance mission to investigate the 10th Squad's whereabouts and to communicate with [[Sergeant Garkor]], the squad leader. |
Daero needs to chart a course for the unexplored region far south of [[Karamja]] - the most probable location for finding the squad - for the human who played a major role in ousting Glough and foiling his plans. |
Daero needs to chart a course for the unexplored region far south of [[Karamja]] - the most probable location for finding the squad - for the human who played a major role in ousting Glough and foiling his plans. |
||
| Line 76: | Line 77: | ||
[[File:Monkey madness puzzle.png|thumb|220px]] |
[[File:Monkey madness puzzle.png|thumb|220px]] |
||
Speak to Daero and begin the puzzle by clicking on the panel in the south-eastern region of the hangar, in front of the long pipe. Your objective is to rearrange the scrambled tiles to create a complete picture. To complete the puzzle, you are provided with two choices: |
Speak to Daero and begin the puzzle by clicking on the panel in the south-eastern region of the hangar, in front of the long pipe. Your objective is to rearrange the scrambled tiles to create a complete picture. To complete the puzzle, you are provided with two choices: |
||
| − | *You can solve the puzzle yourself; for help, see the [[puzzle box guide]]. |
+ | * You can solve the puzzle yourself; for help, see the [[puzzle box guide]]. |
| − | ** |
+ | ** The middle and bottom tile on the left-most column look similar, but the latter has a darker shade of blue and the cloud is positioned slightly lower. Also, avoid logging out or teleporting as the puzzle will reset. |
| − | *Alternatively, you can pay 200,000 coins to [[Glough]] as a bribe (he is located in the tree house south-east of the Grand Tree). This option leaves the puzzle with only a single piece out of place. After paying him, talk to Daero on the first floor of the Grand Tree, in Blurberry's Pub, to transport back to Waydar. |
+ | * Alternatively, you can pay 200,000 coins to [[Glough]] as a bribe (he is located in the tree house south-east of the Grand Tree). This option leaves the puzzle with only a single piece out of place. After paying him, talk to Daero on the first floor of the Grand Tree, in Blurberry's Pub, to transport back to Waydar. |
Regardless of whether you solved the puzzle yourself or paid Glough to do it, you're now ready to fly south. First speak to [[Daero]], and then to [[Waydar]] - he reminds you to stock up on food and anti-poison before leaving. |
Regardless of whether you solved the puzzle yourself or paid Glough to do it, you're now ready to fly south. First speak to [[Daero]], and then to [[Waydar]] - he reminds you to stock up on food and anti-poison before leaving. |
||
| + | |||
| + | '''There may be a bug where items in your inventory will disappear after the puzzle is solved; to solve this - just log out and back in and your items will re-appear.''' |
||
===Welcome to the jungle=== |
===Welcome to the jungle=== |
||
'''While you are in human form, every creature on Ape Atoll will be aggressive.''' |
'''While you are in human form, every creature on Ape Atoll will be aggressive.''' |
||
| + | |||
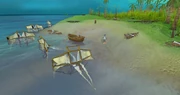
[[File:Crash island.png|thumb|The wrecked gliders.]] |
[[File:Crash island.png|thumb|The wrecked gliders.]] |
||
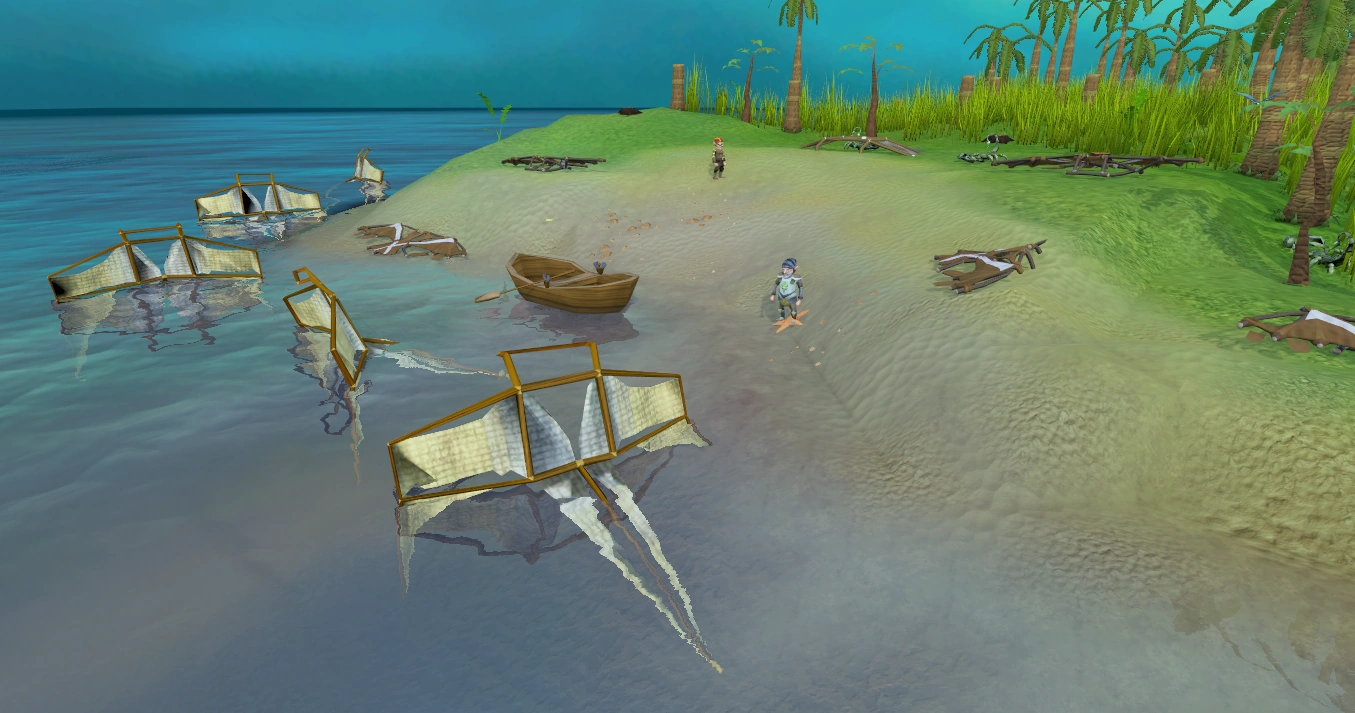
When you are ready, Waydar will fly you to [[Crash Island]], where you meet with a member of the 10th Squad, [[Lumdo]]. He tells you that the strong winds blew their lightweight gliders onto this island. While falling, Sergeant Garkor noticed some land nearby and gathered his battalion to sail there in recently made boats, leaving Lumdo to guard the gliders. |
When you are ready, Waydar will fly you to [[Crash Island]], where you meet with a member of the 10th Squad, [[Lumdo]]. He tells you that the strong winds blew their lightweight gliders onto this island. While falling, Sergeant Garkor noticed some land nearby and gathered his battalion to sail there in recently made boats, leaving Lumdo to guard the gliders. |
||
| Line 96: | Line 100: | ||
===The A-Team=== |
===The A-Team=== |
||
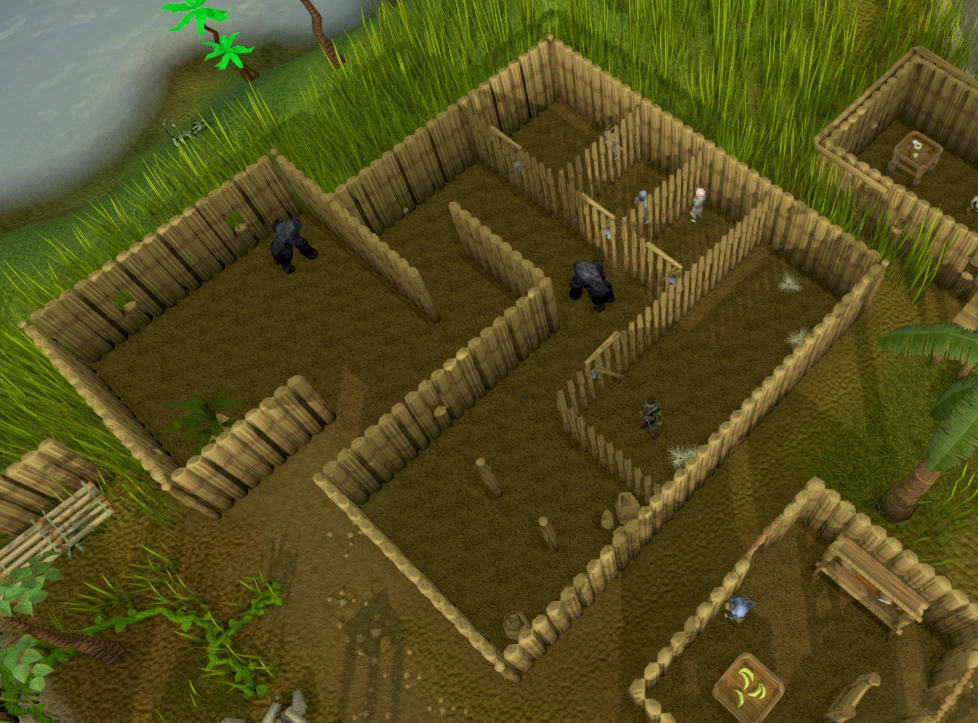
| − | You awake in a prison cell, closely guarded by gorillas, namely [[Trefaji]] and [[Aberab]]. The nearby cells hold a few members of the 10th Squad - [[Lumo]], [[Bunkdo]] and [[Carado]]. Speak to Lumo, who'll tell you that they've had no luck in their attempts at escape but that you might have better luck in lock-picking the gate. |
+ | You awake in a prison cell, closely guarded by gorillas, namely [[Trefaji]] and [[Aberab]]. The nearby cells hold a few members of the 10th Squad - [[Lumo]], [[Bunkdo]] and [[Carado]]. Speak to Lumo, who'll tell you that they've had no luck in their attempts at escape but that you might have better luck in lock-picking the gate. |
Your aim is to unlock the prison door and escape the jail. If you come within two squares of the gorillas' range, even if you are inside the cell, you will be punched back and dealt up to 20% of your current life points as typeless damage, so be very attentive. |
Your aim is to unlock the prison door and escape the jail. If you come within two squares of the gorillas' range, even if you are inside the cell, you will be punched back and dealt up to 20% of your current life points as typeless damage, so be very attentive. |
||
| + | |||
[[File:Ape Atoll Jail Ideal Lock-Pick Time.png|thumb|right|The lock should be picked at this moment, when the guard is facing away.]] |
[[File:Ape Atoll Jail Ideal Lock-Pick Time.png|thumb|right|The lock should be picked at this moment, when the guard is facing away.]] |
||
| − | The gorillas patrol their route through the corridor twice, before switching. Take the time to observe their pattern. As soon as the patrolling gorilla turns to walk back up the path towards the other gorilla, pick the lock and run |
+ | The gorillas patrol their route through the corridor twice, before switching. Take the time to observe their pattern. As soon as the patrolling gorilla turns to walk back up the path towards the other gorilla, pick the lock and run behind him. Be careful not to run ahead of him as he moves slowly. As soon as he is in the guard room to the north-west, run out of the jail and hide in the tall grass along the northern wall of the jail. |
Speaking to a monkey, with the exception of [[Hafuba]], will have you thrown back into jail. Find [[Karam]], the 10th Squad's High Assassin, in the jungle grass just east of the prison (he appears in other places on the island, but you will not be able to talk to him elsewhere). He isn't very informative, but he lets you know that he is there if you need any help. |
Speaking to a monkey, with the exception of [[Hafuba]], will have you thrown back into jail. Find [[Karam]], the 10th Squad's High Assassin, in the jungle grass just east of the prison (he appears in other places on the island, but you will not be able to talk to him elsewhere). He isn't very informative, but he lets you know that he is there if you need any help. |
||
| Line 115: | Line 120: | ||
====The monkeyspeak amulet==== |
====The monkeyspeak amulet==== |
||
{{Needed|A [[gold bar]] and [[ball of wool]].}} |
{{Needed|A [[gold bar]] and [[ball of wool]].}} |
||
| − | |||
To create the monkeyspeak amulet, you require some [[monkey dentures]], a [[m'amulet mould]] and a gold bar. For the dentures and mould, you must head to the U-shaped building in the southern side of the colony. It is east of the general store and west of the mini summoning obelisk. It is recommended that you enter using the southern door of the building. |
To create the monkeyspeak amulet, you require some [[monkey dentures]], a [[m'amulet mould]] and a gold bar. For the dentures and mould, you must head to the U-shaped building in the southern side of the colony. It is east of the general store and west of the mini summoning obelisk. It is recommended that you enter using the southern door of the building. |
||
| Line 131: | Line 135: | ||
===Zooknock=== |
===Zooknock=== |
||
| − | Zooknock can be found in the [[Ape Atoll Dungeon|dungeon]] located in the southern part of [[Ape Atoll]]. To exit the city, climb the ladder on the scaffolding just south of Garkor and jump down. Be wary of a monkey wandering the graveyard around the ladder: He can call the monkey guards to send you back to into prison. It is also possible to teleport out and come back to the island by speaking to Daero. |
+ | Zooknock can be found in the [[Ape Atoll Dungeon|dungeon]] located in the southern part of [[Ape Atoll]]. To exit the city, climb the ladder on the scaffolding just south of Garkor and jump down. Be wary of a monkey wandering the graveyard around the ladder: He can call the monkey guards to send you back to into prison. It is also possible to teleport out and come back to the island by speaking to Daero. |
[[File:Ape Atoll Dungeon map.png|center|350px|link=Map:Ape Atoll Dungeon]] |
[[File:Ape Atoll Dungeon map.png|center|350px|link=Map:Ape Atoll Dungeon]] |
||
| − | Once you're back in the jungle region, head straight west and go down the ladder into the dungeon. To reach the gnome, you must navigate through the dungeon, passing the monsters, traps and falling rocks. Activating [[Protect from Melee]] will significantly reduce the amount of damage taken while travelling through the dungeon. |
+ | Once you're back in the jungle region, head straight west and go down the ladder into the dungeon. To reach the gnome, you must navigate through the dungeon, passing the monsters, traps and falling rocks. Activating [[Protect from Melee]] will significantly reduce the amount of damage taken while travelling through the dungeon. If you have level 30 Magic, you can use the [[Surge]] ability to get across traps without taking damage. |
Speak to Zooknock at the end of the dungeon and he'll tell you about their story after arriving on the heavily guarded island. Tell him that you are there on Garkor's suggestion of having an insider, and he explains that since humans are more closely linked to monkeys than gnomes, you are the perfect candidate for the mission. |
Speak to Zooknock at the end of the dungeon and he'll tell you about their story after arriving on the heavily guarded island. Tell him that you are there on Garkor's suggestion of having an insider, and he explains that since humans are more closely linked to monkeys than gnomes, you are the perfect candidate for the mission. |
||
| Line 143: | Line 147: | ||
[[File:Making the monkeyspeak amulet.png|left|thumb|250px|Making the amulet with the Temple of Marimbo dungeon fire pits.]] |
[[File:Making the monkeyspeak amulet.png|left|thumb|250px|Making the amulet with the Temple of Marimbo dungeon fire pits.]] |
||
| − | Return to the monkey colony and travel east towards the temple. With [[Protect from Melee]] on, enter the temple and climb down the trapdoor along the eastern wall of the temple. If it is blocked by the ape guards, simply climb a ladder where there are very few guards, and back down the one leading right next to the trapdoor. |
+ | Return to the monkey colony and travel east towards the temple. With [[Protect from Melee]] on, enter the temple and climb down the trapdoor along the eastern wall of the temple. If it is blocked by the ape guards, simply climb a ladder where there are very few guards, and back down the one leading right next to the trapdoor. The guards in the temple will attack you if you get too close, however they will not send you to jail. |
In the basement are two flaming pits and lots of zombie monkeys, so do not turn off protect from melee. Use the enchanted bar with either pit to create an unstrung amulet. If you do not have the [[m'amulet mould]] in your inventory, you will get the message "You do not have anything suitable for smithing an enchanted bar". Use a ball of wool on it to complete the [[monkeyspeak amulet]]. While the amulet does give you the ability to talk to monkeys, talking to them (except for the monkey child) without a disguise will result in you being thrown into monkey jail. |
In the basement are two flaming pits and lots of zombie monkeys, so do not turn off protect from melee. Use the enchanted bar with either pit to create an unstrung amulet. If you do not have the [[m'amulet mould]] in your inventory, you will get the message "You do not have anything suitable for smithing an enchanted bar". Use a ball of wool on it to complete the [[monkeyspeak amulet]]. While the amulet does give you the ability to talk to monkeys, talking to them (except for the monkey child) without a disguise will result in you being thrown into monkey jail. |
||
| Line 149: | Line 153: | ||
====The monkey greegree==== |
====The monkey greegree==== |
||
{{Needed|The [[monkeyspeak amulet]], either some [[monkey bones]], a [[monkey corpse]] or a [[monkey skull]] (these '''must''' be from a Karamjan monkey). If bringing bones, it is recommended to get more than one set as you may accidentally bury them. As a time saver, it is also recommended that you bring the supplies for any additional types of greegrees you may want in the future.}} |
{{Needed|The [[monkeyspeak amulet]], either some [[monkey bones]], a [[monkey corpse]] or a [[monkey skull]] (these '''must''' be from a Karamjan monkey). If bringing bones, it is recommended to get more than one set as you may accidentally bury them. As a time saver, it is also recommended that you bring the supplies for any additional types of greegrees you may want in the future.}} |
||
| − | |||
[[File:Monkeyaunt.png|thumb|300px|Players should enter the garden as soon as the aunt begins to move.]] |
[[File:Monkeyaunt.png|thumb|300px|Players should enter the garden as soon as the aunt begins to move.]] |
||
Return to Ape Atoll to be placed in the jail cell; escape another time. Under the safety of the jungle grass, travel a short distance west to the banana garden. Wait for [[the monkey's aunt]] to leave through the southern entrance and quickly go into the garden through the corridor at its north-east corner. When she is returning through the western gate, run back into the corridor to avoid being detected by the aunt. If you fail this step, you'll be ambushed by ninja monkeys and sent back to jail (though you will get to keep the bananas that you took from the trees); if she does spot you, just climb up the stairs and wait for about five seconds. |
Return to Ape Atoll to be placed in the jail cell; escape another time. Under the safety of the jungle grass, travel a short distance west to the banana garden. Wait for [[the monkey's aunt]] to leave through the southern entrance and quickly go into the garden through the corridor at its north-east corner. When she is returning through the western gate, run back into the corridor to avoid being detected by the aunt. If you fail this step, you'll be ambushed by ninja monkeys and sent back to jail (though you will get to keep the bananas that you took from the trees); if she does spot you, just climb up the stairs and wait for about five seconds. |
||
| Line 159: | Line 162: | ||
[[File:G.L.O. meets Waydar.png|thumb|left|230px|G.L.O. Caranock speaks with Waydar.]] |
[[File:G.L.O. meets Waydar.png|thumb|left|230px|G.L.O. Caranock speaks with Waydar.]] |
||
| + | You must now return to the dungeon again and give Zooknock the regular [[monkey bones]] (or corpse) and the talisman. |
||
| ⚫ | |||
| + | |||
| + | In the event that you bring the wrong bones, you will still receive a type of [[greegree]] but it will not be the one you need to progress with the quest. You'll know that you had the wrong bones if Zooknock gives you anything other than a [[monkey greegree]]. The greegree will still work as a disguise on the island, and you can use it to buy another talisman from [[Tutab's Magical Market]] for Zooknock to make you the proper greegree. [[Ninja monkey greegree]], [[Zombie monkey greegree]], or [[Gorilla greegree]] will not work for this quest. |
||
| + | |||
| ⚫ | He will enchant the talisman into a [[monkey greegree]], allowing you to transform into a monkey and blend inside the colony. Unfortunately, Zooknock was not able to completely infuse his magic and therefore the greegree has a limited working range, only working on Ape Atoll, and the wielder is unable to use weapons in the disguised form. |
||
A [[cutscene]] ensues, in which Caranock and Waydar are seen having a conversation in the [[Banana plantation (Ape Atoll)|island's banana plantation]]. Having been part of a conspiracy all along, Waydar informs Caranock of the current situation. Caranock tells him that they need to finish Glough's mission and that he has hatched a plan to do just so. He wants to execute the entire [[10th Squad]] and blame their deaths on the Karamjan humans, forcing Narnode to act recklessly out of anger and maybe even invade the human kingdoms. |
A [[cutscene]] ensues, in which Caranock and Waydar are seen having a conversation in the [[Banana plantation (Ape Atoll)|island's banana plantation]]. Having been part of a conspiracy all along, Waydar informs Caranock of the current situation. Caranock tells him that they need to finish Glough's mission and that he has hatched a plan to do just so. He wants to execute the entire [[10th Squad]] and blame their deaths on the Karamjan humans, forcing Narnode to act recklessly out of anger and maybe even invade the human kingdoms. |
||
| Line 170: | Line 177: | ||
You can pick bananas from the trees by the child to restore your health without eating your inventory food. |
You can pick bananas from the trees by the child to restore your health without eating your inventory food. |
||
| − | Head to the south-east part of the colony and speak to Garkor. Impressed with your outfit, he wants you seek an audience with [[Awowogei]] by pretending to be a Karamjan envoy, here to seek an alliance with him. Try to enter the throne room, but you'll be stopped by an [[Elder Guard]], who informs you that only the Captain of the Monkey Guard, or people authorised by him, are allowed to speak to the king. |
+ | Head to the south-east part of the colony and speak to Garkor. Impressed with your outfit, he wants you to seek an audience with [[Awowogei]] by pretending to be a Karamjan envoy, here to seek an alliance with him. Try to enter the throne room, but you'll be stopped by an [[Elder Guard]], who informs you that only the Captain of the Monkey Guard, or people authorised by him, are allowed to speak to the king. |
[[File:Giving Awowogei a monkey.png|thumb|left|220px|Giving King Awowogei a monkey from Ardougne Zoo]] |
[[File:Giving Awowogei a monkey.png|thumb|left|220px|Giving King Awowogei a monkey from Ardougne Zoo]] |
||
[[File:Kruk location.png|right|frame|Kruk's location]] |
[[File:Kruk location.png|right|frame|Kruk's location]] |
||
| − | The guard points you in the direction of the Captain, |
+ | The guard points you in the direction of the Captain, named [[Kruk]]. To get to him, head west to beyond the town gate and climb to the vantage point of the hill from its south-west entrance. Next, climb the ladder and walk across the bridge and down the other side. Speak to Kruk there and request him to allow you to speak to the king. He assesses you and agrees to solicit a meeting between you and Awowogei. |
Inside the throne room, speak to the monkey king and play an envoy's part. When you tell him that the Karamjan monkeys would like to serve under his rule, Awowogei decides to test your mettle. He agrees to sign a pact if you can use your resourcefulness to rescue a [[Monkey (item)|monkey]] from the [[Ardougne Zoo]] and bring it to him. |
Inside the throne room, speak to the monkey king and play an envoy's part. When you tell him that the Karamjan monkeys would like to serve under his rule, Awowogei decides to test your mettle. He agrees to sign a pact if you can use your resourcefulness to rescue a [[Monkey (item)|monkey]] from the [[Ardougne Zoo]] and bring it to him. |
||
===Divided we fall=== |
===Divided we fall=== |
||
| − | Head to the Ardougne Zoo any way you can. Enter the zoo and wield the greegree again. You must use the regular monkey greegree, not the ninja monkey greegree. Try talking to the [[Monkey Minder]] near the northern entrance, and he'll catch you and put you inside with the other monkeys. Speak to any one of the monkeys and convince them to jump into your inventory. Now, unequip the greegree and speak to the minder to be let out of the enclosure. |
+ | Head to the Ardougne Zoo any way you can (make sure to either unequip your greegree, or keep a free inventory space before teleporting, otherwise you will lose your greegree and you will need to obtain another one). Enter the zoo and wield the greegree again. You must use the regular monkey greegree, not the ninja monkey greegree. Try talking to the [[Monkey Minder]] near the northern entrance, and he'll catch you and put you inside with the other monkeys. Speak to any one of the monkeys and convince them to jump into your inventory. Now, unequip the greegree and speak to the minder to be let out of the enclosure. |
| − | '''Do not teleport''' with the monkey in the inventory or he will run off. Using teleportation channels such as [[spirit tree]]s and the [[fairy ring]]s will also cause the monkey to disappear. Since the monkey cannot be banked, your only option is to walk or run to the [[Grand Tree]] and talk to [[Daero]] to return to Ape Atoll. |
+ | '''Do not teleport''' with the [[monkey (item)|monkey]] in the inventory or he will run off. Using teleportation channels such as [[spirit tree]]s and the [[fairy ring]]s will also cause the monkey to disappear. Since the monkey cannot be banked, your only option is to walk or run to the [[Grand Tree]] and talk to [[Daero]] to return to Ape Atoll. |
[[File:Monkey Madness chapter 3 final cutscene.png|thumb|left|220px|Caranock, Waydar and King Awowogei.]] |
[[File:Monkey Madness chapter 3 final cutscene.png|thumb|left|220px|Caranock, Waydar and King Awowogei.]] |
||
| Line 195: | Line 202: | ||
The foe that you must defeat to save the 10th Squad is a level 70 [[jungle demon]], having 15,000 life points but a fairly low defence. It uses magic attacks if you are out of range and both magic and melee when within two squares of it. It does not have any particular weakness to a combat style. |
The foe that you must defeat to save the 10th Squad is a level 70 [[jungle demon]], having 15,000 life points but a fairly low defence. It uses magic attacks if you are out of range and both magic and melee when within two squares of it. It does not have any particular weakness to a combat style. |
||
| + | |||
| + | Players with combat stats of 70+ need not bring food or potions, you will be able to kill the demon very easily. |
||
Some points to consider before rubbing the sigil are: |
Some points to consider before rubbing the sigil are: |
||
| − | * The sigil will teleport you to the battle 5 seconds after activating it, and you do not need to be in Ape Atoll to use it. |
+ | * The sigil will teleport you to the battle 5 seconds after activating it, and you do not need to be in Ape Atoll to use it. |
* Begin the battle with [[Protect from Magic]] active to considerably reduce the damage output of the demon. |
* Begin the battle with [[Protect from Magic]] active to considerably reduce the damage output of the demon. |
||
| Line 218: | Line 227: | ||
==Rewards== |
==Rewards== |
||
| + | {{Quest rewards |
||
| ⚫ | |||
| ⚫ | |||
| − | * 3 [[quest points]] |
||
| + | |qp = 3 |
||
| ⚫ | |||
| + | |rewards = |
||
| − | * {{Coins|10000}} [[coins]] |
||
| ⚫ | |||
| + | * {{NoCoins|10000|c}} |
||
* 3 cut [[diamond]]s |
* 3 cut [[diamond]]s |
||
* Access to [[Ape Atoll]] |
* Access to [[Ape Atoll]] |
||
| Line 228: | Line 239: | ||
* The ability to create more monkey [[greegree]]s to transform into different versions of the primates. You must bring the bones of the type of desired monkey, and a monkey talisman, to [[Zooknock]] in his tunnel. |
* The ability to create more monkey [[greegree]]s to transform into different versions of the primates. You must bring the bones of the type of desired monkey, and a monkey talisman, to [[Zooknock]] in his tunnel. |
||
* The [[Monkey (item)|monkey]] in your backpack can spit out a [[medium clue scroll]] when it is fed bananas. This is a 1 in 256 chance and is a requirement for obtaining the [[master quest cape]]. |
* The [[Monkey (item)|monkey]] in your backpack can spit out a [[medium clue scroll]] when it is fed bananas. This is a 1 in 256 chance and is a requirement for obtaining the [[master quest cape]]. |
||
| + | |music = |
||
| − | * {{Universal quest reward}} |
||
| ⚫ | |||
| ⚫ | |||
| ⚫ | |||
| ⚫ | |||
| ⚫ | |||
| ⚫ | |||
| ⚫ | |||
| ⚫ | |||
| ⚫ | |||
| + | }} |
||
| − | == |
+ | ==Achievements== |
| + | * {{Achievement|Clue's in the Monkey Drool|10|Receive the medium clue scroll from a monkey in your backpack.}} |
||
| ⚫ | |||
| + | * {{Achievement|Daero Take This Experience|10|Claim the XP reward from Daero following Monkey Madness.}} |
||
| ⚫ | |||
| ⚫ | |||
| ⚫ | |||
| ⚫ | |||
| ⚫ | |||
| ⚫ | |||
| ⚫ | |||
| ⚫ | |||
==Required for completing== |
==Required for completing== |
||
Completion of Monkey Madness is required for the following: |
Completion of Monkey Madness is required for the following: |
||
| − | *[[Recipe for Disaster/Freeing King Awowogei]] |
+ | * [[Recipe for Disaster/Freeing King Awowogei]] |
| − | *[[Ardougne Tasks]]: |
+ | * [[Ardougne Tasks]]: |
| − | **'''[[Ardougne Tasks#Hard tasks|Hard]]:''' "Get Your Stinking Hands Off Me" (completed during quest) |
+ | ** '''[[Ardougne Tasks#Hard tasks|Hard]]:''' "Get Your Stinking Hands Off Me" (completed during quest) |
| − | *[[Desert Tasks]]: |
+ | * [[Desert Tasks]]: |
| − | **'''[[Desert Tasks#Elite tasks|Elite]]:''' "Sun Shade" |
+ | ** '''[[Desert Tasks#Elite tasks|Elite]]:''' "Sun Shade" |
==Transcript== |
==Transcript== |
||
| Line 253: | Line 267: | ||
==Trivia== |
==Trivia== |
||
| − | *When you pass through the gate into the monkey village with the rescued monkey in your backpack, it says, "In the jungle, the mighty jungle.." A reference to |
+ | * When you pass through the gate into the monkey village with the rescued monkey in your backpack, it says, "In the jungle, the mighty jungle.." A reference to {{wp|The Lion Sleeps Tonight}} by {{wp|The Tokens}}. |
| + | * If you use [[Bonzara]] to escape, he will say, "It looks like you're trying to escape. Would you like some help?", which could reference {{wp|Office Assistant|Clippy}}, the animated Microsoft Office Assistant. |
||
| − | *If you speak to [[Zeke]] in [[Zeke's Superior Scimitars|his shop]] in [[Al Kharid]] after the quest and ask him, "Can you sell me a Dragon Scimitar?" he will say, "You're going to be a monkey's uncle before you will ever hold a dragon scimitar!", your character will respond with "Hmmm, funny you should say that...", referencing the portion of the quest with the [[monkey child]]. Also, the child's real uncle can be found upstairs in his house. |
+ | * If you speak to [[Zeke]] in [[Zeke's Superior Scimitars|his shop]] in [[Al Kharid]] after the quest and ask him, "Can you sell me a Dragon Scimitar?" he will say, "You're going to be a monkey's uncle before you will ever hold a dragon scimitar!", your character will respond with "Hmmm, funny you should say that...", referencing the portion of the quest with the [[monkey child]]. Also, the child's real uncle can be found upstairs in his house. |
| − | *Upon the completion of this quest, one's [[Adventurer's Log]] will read: "During a mission to Ape Atoll I uncovered a plot against humankind. With the help of the 10th Squad, I’ve put an end to Glough’s scheme." |
+ | * Upon the completion of this quest, one's [[Adventurer's Log]] will read: "During a mission to Ape Atoll I uncovered a plot against humankind. With the help of the 10th Squad, I’ve put an end to Glough’s scheme." |
| − | *After creating the monkey greegree, you can buy a new talisman from the general store (1,000 coins) and return it to the monkey child. It will say: "Thank you uncle. I love you!" |
+ | * After creating the monkey greegree, you can buy a new talisman from the general store (1,000 coins) and return it to the monkey child. It will say: "Thank you uncle. I love you!" |
{{Listen|align=right|filename=Monkey Madness chapter jingle.ogg|title=The jingle that plays when a chapter starts.|desc=}} |
{{Listen|align=right|filename=Monkey Madness chapter jingle.ogg|title=The jingle that plays when a chapter starts.|desc=}} |
||
| − | *This is the only quest that progresses in 'chapters'. The chapter's openings are in the style of {{wp|Henry Fielding}} and {{wp|Charles Dickens}}. |
+ | * This is the only quest that progresses in 'chapters'. The chapter's openings are in the style of {{wp|Henry Fielding}} and {{wp|Charles Dickens}}. |
| − | *This quest may be a reference to Monkey Island, a series of LucasArts adventure games. |
+ | * This quest may be a reference to {{wp|Monkey Island (series)|Monkey Island}}, a series of LucasArts adventure games. In the games, the gameplay is also divided into several chapters and involves the hero journeying to an island of monkeys. The dialogue boxes separating the chapters are also in a manner reminiscent of that game. |
| − | *When offering the alliance to King Awowogei, his advisor says "never trust a northern monkey", a reference to the North, South divide in England. The Northerners are referred to as the Northern Monkeys whereas the Southerners are the Southern Fairies. |
+ | * When offering the alliance to King Awowogei, his advisor says "never trust a northern monkey", a reference to the North, South divide in England. The Northerners are referred to as the Northern Monkeys whereas the Southerners are the Southern Fairies. |
| + | * The monkey will occasionally have a nightmare about [[The Shaikahan]], a lion-like creature featured in the quest [[Tai Bwo Wannai Trio]]. |
||
{{Monkey Madness}} |
{{Monkey Madness}} |
||
| − | {{Gnome |
+ | {{Gnome quest series}} |
{{Monkey quest series}} |
{{Monkey quest series}} |
||
[[de:Total Banane]] |
[[de:Total Banane]] |
||
| Line 270: | Line 286: | ||
[[nl:Monkey Madness]] |
[[nl:Monkey Madness]] |
||
[[fi:Monkey Madness]] |
[[fi:Monkey Madness]] |
||
| ⚫ | |||
| − | [[Category:Wikia Game Guides quests]] |
||
Revision as of 12:12, 8 June 2019
| |||||||||||||||||||||||||
| Also called | MM | ||||||||||||||||||||||||
|---|---|---|---|---|---|---|---|---|---|---|---|---|---|---|---|---|---|---|---|---|---|---|---|---|---|
| Release date | 6 December 2004 (Update) | ||||||||||||||||||||||||
| Members | Yes | ||||||||||||||||||||||||
| Voice Over | No | ||||||||||||||||||||||||
| Official difficulty | Master | ||||||||||||||||||||||||
| Quest series | Gnome Monkey | ||||||||||||||||||||||||
| Age | Fifth Age | ||||||||||||||||||||||||
| |||||||||||||||||||||||||
Monkey Madness is a quest in the Gnome quest series and the sequel to The Grand Tree. It involves helping Narnode Shareen once again by tracking down the missing 10th Squad. The majority of the quest is set on Ape Atoll, an island inhabited by civilised but unfriendly and high-level monkeys.
Official description
The King of the Northern Gnomes, Narnode Shareen, is once again in need of your help. He recently decided to send an envoy of his Royal Guard, the 10th squad, to oversee the decommissioning of the Gnome owned ship-building facilities on the eastern coast of Karamja.
It has been quite some time since the 10th squad were dispatched and they have been deemed missing in action. It will be up to you, should you decide to help, to find out what fate befell the 10th squad and if possible, track them down.
If only it were so simple. Sinister forces have begun to spread through the Gnome hierarchy and threaten to unleash an unknown terror upon the world. Far across the land, the fires of vengeance are being stoked once again. Can you unravel the mystery behind the deception? Can you separate the truth from the lies? Can you decide for yourself what is real and what is not?
Walkthrough
| Start point | |||
|---|---|---|---|
| Member requirement | |||
| Official difficulty | |||
| Official length | Very Long | ||
| Requirements | Skill requirements are not boostable unless marked with a [B] for boostable.
Recommended:
| ||
| Items required | Items from the tool belt are not listed unless they do not work or are not automatically added.
| ||
| Recommended |
| ||
| Enemies to defeat |
|
The 10th squad

Starting the quest.
To begin, speak to King Narnode Shareen in his abode in the Tree Gnome Stronghold. He tells you that since Glough's plans were foiled, he has appointed a new Head Tree Guardian, namely Daero. Although everything fares well, he is worried about the 10th Squad, an elite Royal Guard envoy that he had sent to Karamja to decommission Glough's shipbuilding activities. Unfortunately, he hasn't heard back from them.
Agree to investigate, and you will be handed a gnome royal seal, allowing you uninhibited access to the shipyard.
The tree guardians
Ascend the tree to the top and take the glider to Karamja (Gandius). On the island, head north along the coast to reach the shipyard and try to enter through the gate. A shipyard worker will stop you, but quickly withdraws once you show him the royal seal. Now, speak with G.L.O. Caranock, the gnome that resides in the building in the southern area of the shipyard - he doesn't provide any useful information but is seemingly acting very suspicious.
Return to King Narnode Shareen and tell him about the journey. He writes up some orders that you must convey to Daero. Daero can be found on the first floor of the Grand Tree at the eastern side, near Blurberry's Bar. Show him the king's orders, and he'll tell you that he has been appointed the lead in a reconnaissance mission to investigate the 10th Squad's whereabouts and to communicate with Sergeant Garkor, the squad leader.
Daero needs to chart a course for the unexplored region far south of Karamja - the most probable location for finding the squad - for the human who played a major role in ousting Glough and foiling his plans.
Being the head tree guardian, Daero cannot leave the mainland and therefore wants you to get acquainted with Flight Commander Waydar. Since the location of his colleague is confidential, he requests you be blindfolded before he can take you to the meet.
Re-initialisation
You are taken to an underground military hangar, previously planned to be used as one of the launch sites for Glough, for his domination plan. Here, you meet up with Waydar, who explains to Daero that the squad's standard gliders must have been blown away by the tropical weather, whereas he would be using a superior, refined version in hope of locating them. Unfortunately, Glough has set up a mechanism in the facility which shuts down the power periodically, and it must be re-initialised to deploy these military gliders.
You can leave the hangar at any time using the teleportation device at the hangar's south end.

Speak to Daero and begin the puzzle by clicking on the panel in the south-eastern region of the hangar, in front of the long pipe. Your objective is to rearrange the scrambled tiles to create a complete picture. To complete the puzzle, you are provided with two choices:
- You can solve the puzzle yourself; for help, see the puzzle box guide.
- The middle and bottom tile on the left-most column look similar, but the latter has a darker shade of blue and the cloud is positioned slightly lower. Also, avoid logging out or teleporting as the puzzle will reset.
- Alternatively, you can pay 200,000 coins to Glough as a bribe (he is located in the tree house south-east of the Grand Tree). This option leaves the puzzle with only a single piece out of place. After paying him, talk to Daero on the first floor of the Grand Tree, in Blurberry's Pub, to transport back to Waydar.
Regardless of whether you solved the puzzle yourself or paid Glough to do it, you're now ready to fly south. First speak to Daero, and then to Waydar - he reminds you to stock up on food and anti-poison before leaving.
There may be a bug where items in your inventory will disappear after the puzzle is solved; to solve this - just log out and back in and your items will re-appear.
Welcome to the jungle
While you are in human form, every creature on Ape Atoll will be aggressive.
The wrecked gliders.
When you are ready, Waydar will fly you to Crash Island, where you meet with a member of the 10th Squad, Lumdo. He tells you that the strong winds blew their lightweight gliders onto this island. While falling, Sergeant Garkor noticed some land nearby and gathered his battalion to sail there in recently made boats, leaving Lumdo to guard the gliders.
If you ask him to take you to the land, he refuses, stating that he is under command from the sergeant to stay. Relay the situation to Waydar, who'll pull rank and order Lumdo to take you onto the island, while he would watch the gliders.

Caranock speaks with the foreman.
Speak to Waydar to travel west onto the island. A cutscene ensues, showing the shipyard Foreman speaking with Caranock. The foreman is worried about the recent events at the shipyard, and Caranock repeatedly reassures him that he is working on a fix for the shipyard, while Glough has left a few agents in the gnome force to deal with the situation.
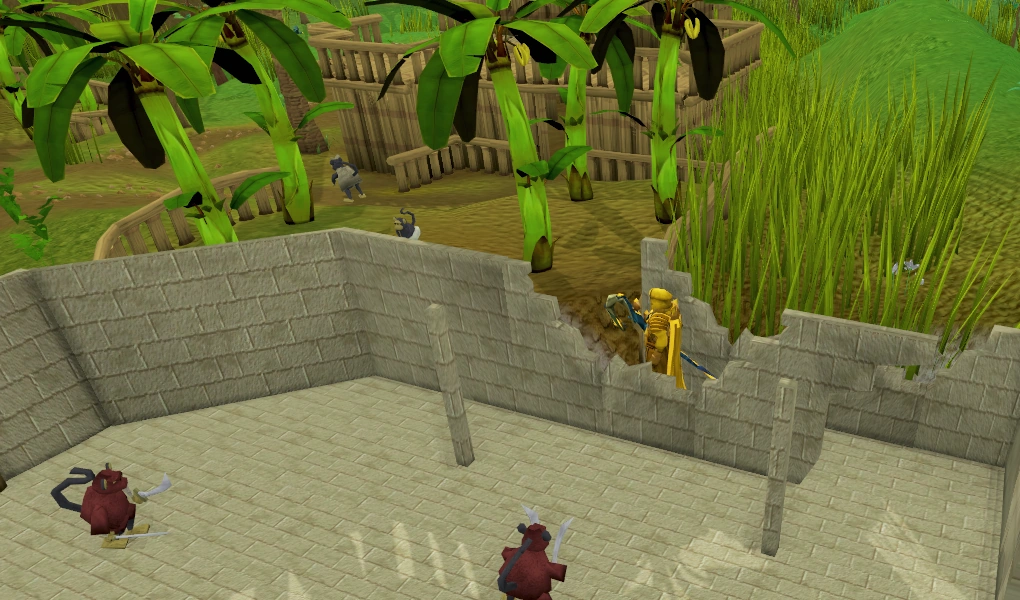
On the island, travel north from the landing point until you reach an impassable ridge and follow it west. Be wary of aggressive level 14 jungle snakes, level 24 scorpions, and level 88 jungle spiders, all of whom are poisonous and use ranged attacks. You should consider activating Protect from Missiles if you are a lower level, as it will reduce incoming damage.
Before entering the narrow valley, activate the Protect from Missiles prayer if you have not already done so to prevent getting hit for a great deal of damage from multiple volleys of arrows. The arrows may also poison you. Regardless of whether you activated the prayer or not, you will be knocked out unconscious.
The A-Team
You awake in a prison cell, closely guarded by gorillas, namely Trefaji and Aberab. The nearby cells hold a few members of the 10th Squad - Lumo, Bunkdo and Carado. Speak to Lumo, who'll tell you that they've had no luck in their attempts at escape but that you might have better luck in lock-picking the gate.
Your aim is to unlock the prison door and escape the jail. If you come within two squares of the gorillas' range, even if you are inside the cell, you will be punched back and dealt up to 20% of your current life points as typeless damage, so be very attentive.

The lock should be picked at this moment, when the guard is facing away.
The gorillas patrol their route through the corridor twice, before switching. Take the time to observe their pattern. As soon as the patrolling gorilla turns to walk back up the path towards the other gorilla, pick the lock and run behind him. Be careful not to run ahead of him as he moves slowly. As soon as he is in the guard room to the north-west, run out of the jail and hide in the tall grass along the northern wall of the jail.
Speaking to a monkey, with the exception of Hafuba, will have you thrown back into jail. Find Karam, the 10th Squad's High Assassin, in the jungle grass just east of the prison (he appears in other places on the island, but you will not be able to talk to him elsewhere). He isn't very informative, but he lets you know that he is there if you need any help.
Location of Garkor
Stay in the grass and travel south against the western wall of the Temple of Marimbo. The archer monkeys do not shoot at players hiding in the grass, however, there is an open stretch of ground at the south-western corner of the temple, so Protect from Missiles must be switched on past the temple archway. Go east along the wall of the temple and around the monkey palace to the south to meet up with Sergeant Garkor, the 10th Squad leader.
Speaking to Garkor, the leader of the 10th Squad.
When you speak to Garkor about your mission, he tells you that he's been in contact with Narnode and was, in fact, the one vital for getting you on the job. After landing on the monkey colony, Garkor has been secretly eavesdropping in on the conversations of King Awowogei, the self-proclaimed leader of the island.
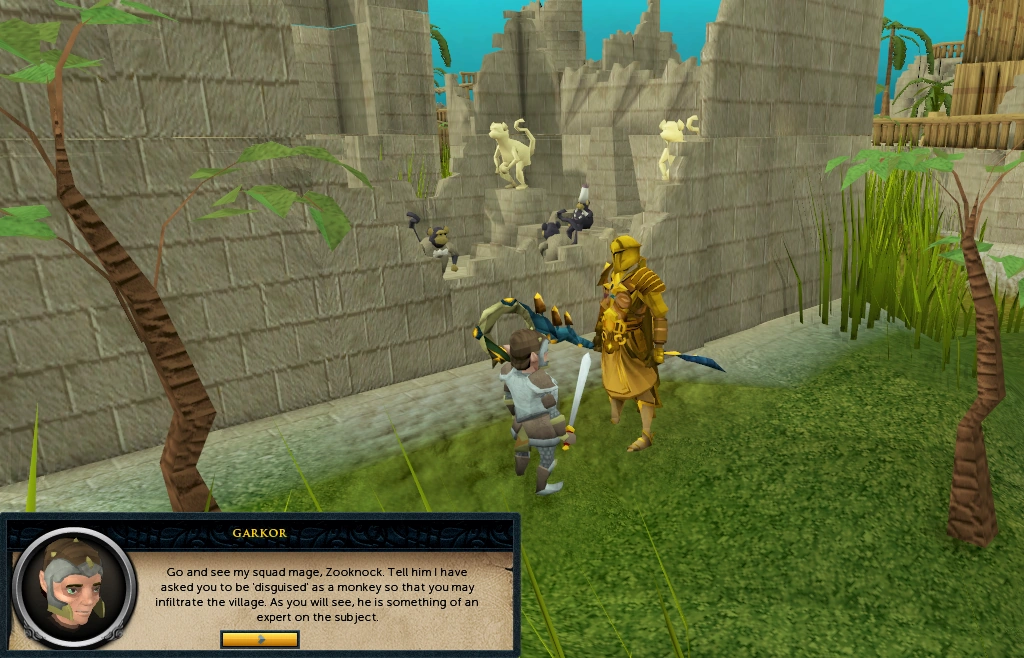
To eliminate any casualties, he needs an insider working with the monkeys. Garkor says his squad mages and sappers are currently working underground and his head mage, Zooknock, would be able to help you better mingle with the locals.
There is no need to immediately go to Zooknock. Instead, it is strongly recommended to obtain the items needed for the monkeyspeak amulet before you first visit Zooknock. The monkey greegree ingredients can not be obtained prior to talking to Zooknock.
The monkeyspeak amulet
To create the monkeyspeak amulet, you require some monkey dentures, a m'amulet mould and a gold bar. For the dentures and mould, you must head to the U-shaped building in the southern side of the colony. It is east of the general store and west of the mini summoning obelisk. It is recommended that you enter using the southern door of the building.
The location of the crate that holds the monkey dentures.
When inside, ensure that you stay on the dark brown ground at the perimeter of the room, otherwise the nearby sleeping monkey guard will catch you and summon his comrades to send you back to jail. If you are having difficulty differentiating between the light and dark ground, the minimum graphics setting presents a much better contrast.
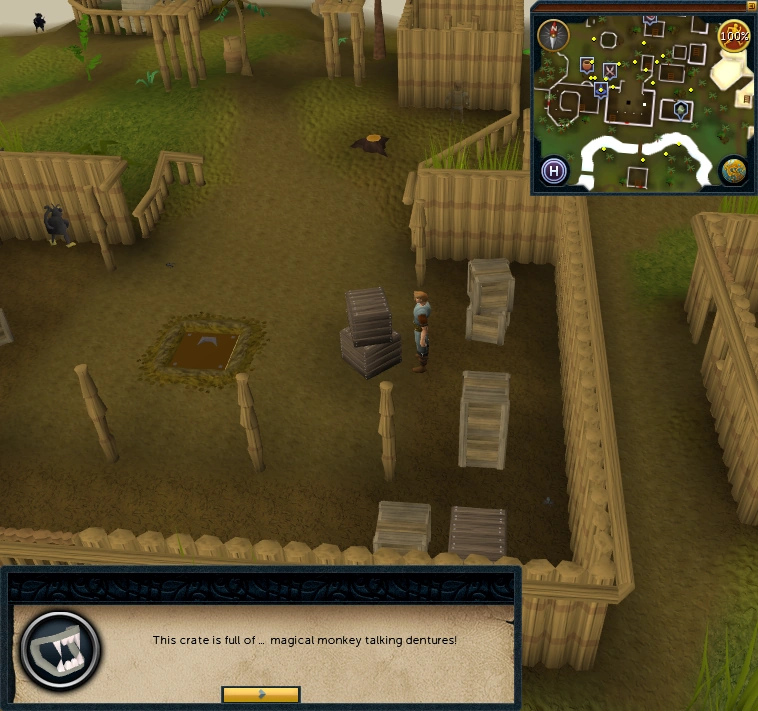
Staying on the darkened ground, search the set of stacked crates on the light brown ground for some monkey dentures.
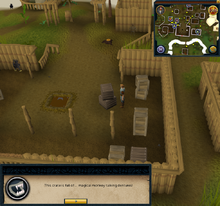
Next, search the south-easternmost crate to crawl down into the basement - you may fall and take up to 3250 damage. Look through the crates in the north-west part of the basement to find one that is full of m'amulet moulds.
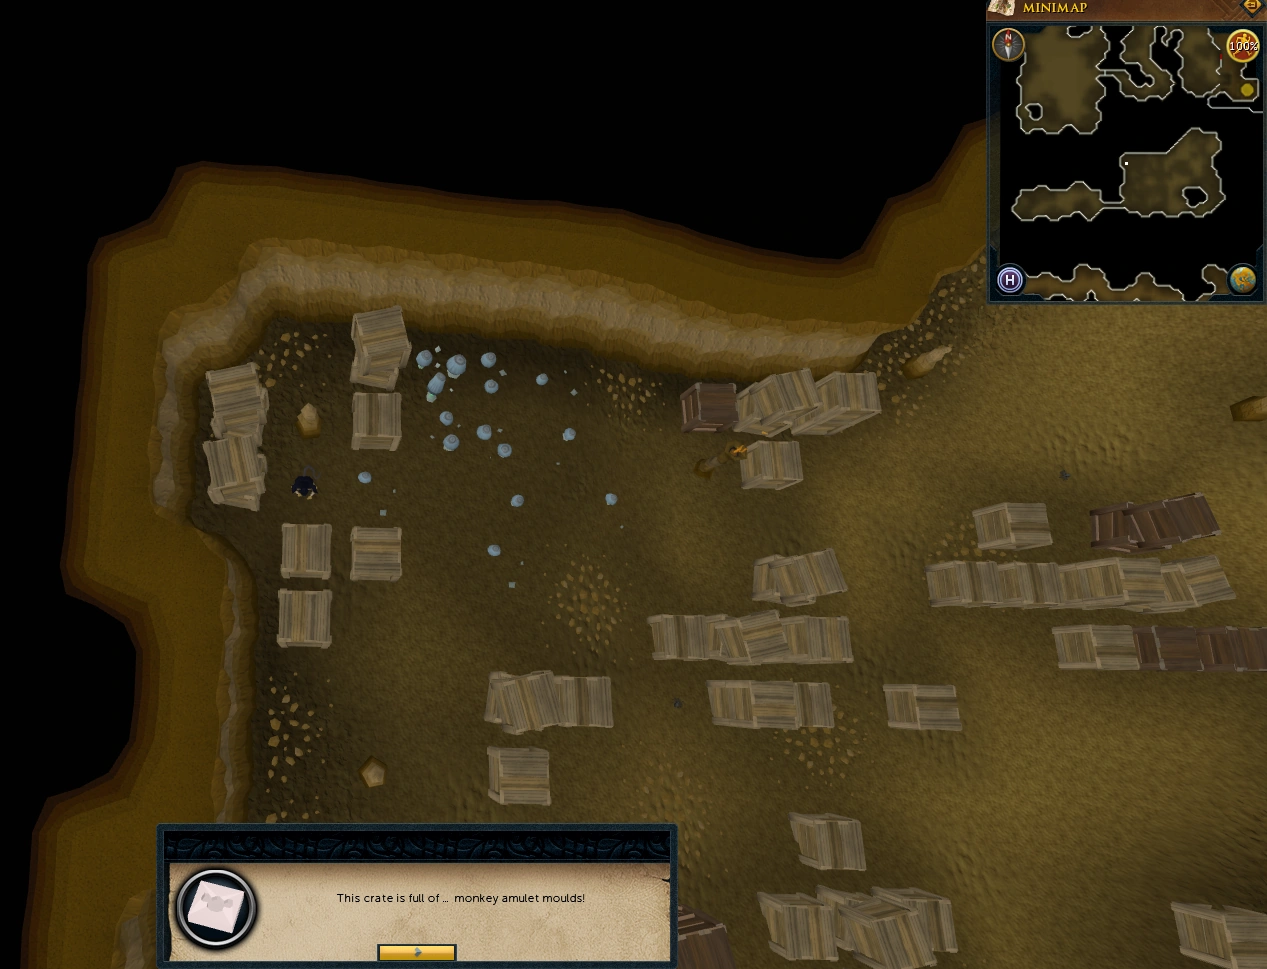

The location of the crate that holds the monkey amulet moulds.
Take one, then teleport out, or go back up the ladder next to where you fell. Be warned that if you do go back up the way you came, then you will arrive directly in sight of the monkey guard upstairs and be thrown back into jail. This can be avoided if you can quickly exit through the southern door and make your way into the tall grass. If you did not bring resources (anti-poison, food, etc) or need to restock, now is the time to bank and get more items.
With the amulet ingredients in your inventory, head to Zooknock.
Zooknock
Zooknock can be found in the dungeon located in the southern part of Ape Atoll. To exit the city, climb the ladder on the scaffolding just south of Garkor and jump down. Be wary of a monkey wandering the graveyard around the ladder: He can call the monkey guards to send you back to into prison. It is also possible to teleport out and come back to the island by speaking to Daero.
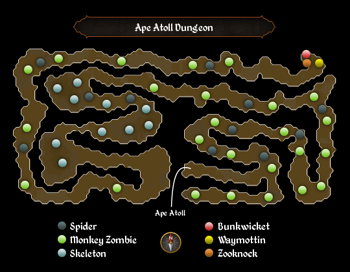
Once you're back in the jungle region, head straight west and go down the ladder into the dungeon. To reach the gnome, you must navigate through the dungeon, passing the monsters, traps and falling rocks. Activating Protect from Melee will significantly reduce the amount of damage taken while travelling through the dungeon. If you have level 30 Magic, you can use the Surge ability to get across traps without taking damage.
Speak to Zooknock at the end of the dungeon and he'll tell you about their story after arriving on the heavily guarded island. Tell him that you are there on Garkor's suggestion of having an insider, and he explains that since humans are more closely linked to monkeys than gnomes, you are the perfect candidate for the mission.
To complete the transformation, he needs objects into which he can store the magical power required to communicate with the monkeys as well as maintain the monkey form - he suggests getting a talisman for the disguise and an amulet for communicating with the monkeys. Zooknock provides you with a list of items that are needed to create the required objects.
Use the mould, the dentures, and a gold bar on Zooknock. He tells you that he has enchanted the gold with the power from the dentures, and you must smith it into an amulet only at a location that is sacred to the monkeys, otherwise the effect will soon wear off; he returns the m'amulet mould and also gives you an enchanted bar.

Making the amulet with the Temple of Marimbo dungeon fire pits.
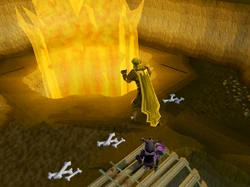
Return to the monkey colony and travel east towards the temple. With Protect from Melee on, enter the temple and climb down the trapdoor along the eastern wall of the temple. If it is blocked by the ape guards, simply climb a ladder where there are very few guards, and back down the one leading right next to the trapdoor. The guards in the temple will attack you if you get too close, however they will not send you to jail.
In the basement are two flaming pits and lots of zombie monkeys, so do not turn off protect from melee. Use the enchanted bar with either pit to create an unstrung amulet. If you do not have the m'amulet mould in your inventory, you will get the message "You do not have anything suitable for smithing an enchanted bar". Use a ball of wool on it to complete the monkeyspeak amulet. While the amulet does give you the ability to talk to monkeys, talking to them (except for the monkey child) without a disguise will result in you being thrown into monkey jail.
The monkey greegree

Players should enter the garden as soon as the aunt begins to move.
Return to Ape Atoll to be placed in the jail cell; escape another time. Under the safety of the jungle grass, travel a short distance west to the banana garden. Wait for the monkey's aunt to leave through the southern entrance and quickly go into the garden through the corridor at its north-east corner. When she is returning through the western gate, run back into the corridor to avoid being detected by the aunt. If you fail this step, you'll be ambushed by ninja monkeys and sent back to jail (though you will get to keep the bananas that you took from the trees); if she does spot you, just climb up the stairs and wait for about five seconds.
Equip the monkeyspeak amulet and speak to the monkey child in the garden. You must talk to him twice, before telling him that you are his uncle. The child, still at an innocent age, agrees with you and tells you that his aunt has promised to gift him a toy, if he can manage to get 20 bananas for her.
Offer to retrieve the bananas for him and pick some from the trees. You only need to obtain 5 bananas for the child, as he cannot yet count. Hide in the corridor as many times as required, and finally hand over the bananas to the monkey in exchange for a monkey talisman.

G.L.O. Caranock speaks with Waydar.
You must now return to the dungeon again and give Zooknock the regular monkey bones (or corpse) and the talisman.
In the event that you bring the wrong bones, you will still receive a type of greegree but it will not be the one you need to progress with the quest. You'll know that you had the wrong bones if Zooknock gives you anything other than a monkey greegree. The greegree will still work as a disguise on the island, and you can use it to buy another talisman from Tutab's Magical Market for Zooknock to make you the proper greegree. Ninja monkey greegree, Zombie monkey greegree, or Gorilla greegree will not work for this quest.
He will enchant the talisman into a monkey greegree, allowing you to transform into a monkey and blend inside the colony. Unfortunately, Zooknock was not able to completely infuse his magic and therefore the greegree has a limited working range, only working on Ape Atoll, and the wielder is unable to use weapons in the disguised form.
A cutscene ensues, in which Caranock and Waydar are seen having a conversation in the island's banana plantation. Having been part of a conspiracy all along, Waydar informs Caranock of the current situation. Caranock tells him that they need to finish Glough's mission and that he has hatched a plan to do just so. He wants to execute the entire 10th Squad and blame their deaths on the Karamjan humans, forcing Narnode to act recklessly out of anger and maybe even invade the human kingdoms.
The monkey alliance
A player changing into a Zombie Monkey
Return to the monkey colony with the amulet and greegree equipped. In the Karamjan monkey form, you are free to roam around unhindered, which means you will not be approached or attacked by any of the locals and the entrance guards, although you may still be damaged by traps, poison, or the Ape Atoll Agility Course.
You can pick bananas from the trees by the child to restore your health without eating your inventory food.
Head to the south-east part of the colony and speak to Garkor. Impressed with your outfit, he wants you to seek an audience with Awowogei by pretending to be a Karamjan envoy, here to seek an alliance with him. Try to enter the throne room, but you'll be stopped by an Elder Guard, who informs you that only the Captain of the Monkey Guard, or people authorised by him, are allowed to speak to the king.

Giving King Awowogei a monkey from Ardougne Zoo

Kruk's location
The guard points you in the direction of the Captain, named Kruk. To get to him, head west to beyond the town gate and climb to the vantage point of the hill from its south-west entrance. Next, climb the ladder and walk across the bridge and down the other side. Speak to Kruk there and request him to allow you to speak to the king. He assesses you and agrees to solicit a meeting between you and Awowogei.
Inside the throne room, speak to the monkey king and play an envoy's part. When you tell him that the Karamjan monkeys would like to serve under his rule, Awowogei decides to test your mettle. He agrees to sign a pact if you can use your resourcefulness to rescue a monkey from the Ardougne Zoo and bring it to him.
Divided we fall
Head to the Ardougne Zoo any way you can (make sure to either unequip your greegree, or keep a free inventory space before teleporting, otherwise you will lose your greegree and you will need to obtain another one). Enter the zoo and wield the greegree again. You must use the regular monkey greegree, not the ninja monkey greegree. Try talking to the Monkey Minder near the northern entrance, and he'll catch you and put you inside with the other monkeys. Speak to any one of the monkeys and convince them to jump into your inventory. Now, unequip the greegree and speak to the minder to be let out of the enclosure.
Do not teleport with the monkey in the inventory or he will run off. Using teleportation channels such as spirit trees and the fairy rings will also cause the monkey to disappear. Since the monkey cannot be banked, your only option is to walk or run to the Grand Tree and talk to Daero to return to Ape Atoll.

Caranock, Waydar and King Awowogei.
Equip the greegree and head back to King Awowogei. When you speak to him, the monkey is automatically freed from the inventory and he applauds you on a job well done, although he still needs some time to consider your proposal.
Exit the throne room and speak to Garkor. He grimly tells you that your efforts might have gone in vain, since his comrades in the atoll dungeon - Waymottin and Bunkwicket - have just overheard a conversation between Waydar, Caranock and Awowogei. The gnomes have convinced Awowogei to get rid of the 10th Squad; in exchange for his services, Caranock agrees to let Awowogei keep the "pet" that will be sent to him as an aid.
United we stand
The arena where the player teleports to fight the Jungle demon. The player, the gnomes, and the demon appear on the outer bridges.
Speak to Garkor again. He tells you that he has consulted with Zooknock and the both of them have come up with a solution to the dilemma. Since the conspirators plan to teleport in the entire 10th Squad, Garkor reckons that this must be possible due to the sigils that are exclusive to the members. To get around Glough's magic, Garkor has had one of his sappers create a copy of the 10th squad sigil for you, to reinforce their squad for whatever trap they are being led in.
Rubbing the sigil will teleport you to the final battle, so do not rub it until you are ready.
The foe that you must defeat to save the 10th Squad is a level 70 jungle demon, having 15,000 life points but a fairly low defence. It uses magic attacks if you are out of range and both magic and melee when within two squares of it. It does not have any particular weakness to a combat style.
Players with combat stats of 70+ need not bring food or potions, you will be able to kill the demon very easily.
Some points to consider before rubbing the sigil are:
- The sigil will teleport you to the battle 5 seconds after activating it, and you do not need to be in Ape Atoll to use it.
- Begin the battle with Protect from Magic active to considerably reduce the damage output of the demon.
- If you run out of food during the fight, climb down a trapdoor at the edge of the arena and pick some of the bananas there. You can then climb back up and the demon will not have regenerated.
- If you die, your gravestone will appear west of Marim on Ape Atoll.
")
")
")
Bonzara teleporting a player.
Once the Demon is dead, talk to Garkor, who tells you to relay the news to King Narnode. To leave the arena, speak to Zooknock to be teleported to the Ape Atoll jungle. If you decline his offer, Zooknock will leave and your only means of exiting would be by speaking to Bonzara inside the gorilla statue, at the centre of the arena; Bonzara too will teleport you into the Ape Atoll jungle.
Speak to King Narnode in the Grand Tree to finish the quest. Congratulations, quest complete!
For additional rewards, speak to Daero after the quest to receive experience from the 10th Squad Training Programme. You may now choose to distribute the experience in either one of the given sets, which are Defence and Attack, and Strength and Constitution - the first chosen set will give you 35,000 experience in each skill, while giving 20,000 experience in each of the skills in the second set.
Rewards
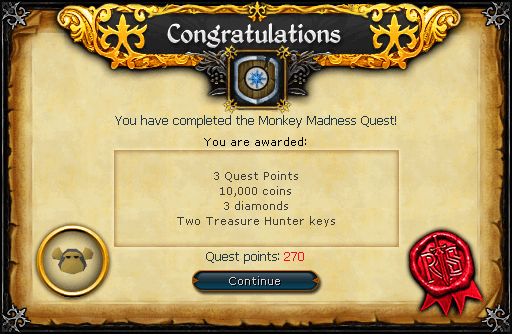
- 3 quest points
- By speaking to King Narnode and Daero after the quest, you can obtain a total of 110,000 experience, with the choice to focus 35,000 experience each in your chosen pair between either Strength and Constitution or Attack and Defence, and 20,000 experience each in the other pair.
- 10,000 coins
- 3 cut diamonds
- Access to Ape Atoll
- The ability to use the Ape Atoll Agility Course
- The ability to wield the dragon scimitar
- The ability to create more monkey greegrees to transform into different versions of the primates. You must bring the bones of the type of desired monkey, and a monkey talisman, to Zooknock in his tunnel.
- The monkey in your backpack can spit out a medium clue scroll when it is fed bananas. This is a 1 in 256 chance and is a requirement for obtaining the master quest cape.
- 2 Treasure Hunter keys and 2 Hearts of Ice
- Music unlocked
Achievements
- Clue's in the Monkey Drool (
 10) - Receive the medium clue scroll from a monkey in your backpack.
 - Daero Take This Experience ( 10) - Claim the XP reward from Daero following Monkey Madness.
Required for completing
Completion of Monkey Madness is required for the following:
- Recipe for Disaster/Freeing King Awowogei
- Ardougne Tasks:
- Hard: "Get Your Stinking Hands Off Me" (completed during quest)
- Desert Tasks:
- Elite: "Sun Shade"
Transcript
Trivia
- When you pass through the gate into the monkey village with the rescued monkey in your backpack, it says, "In the jungle, the mighty jungle.." A reference to The Lion Sleeps Tonight by The Tokens.
- If you use Bonzara to escape, he will say, "It looks like you're trying to escape. Would you like some help?", which could reference Clippy, the animated Microsoft Office Assistant.
- If you speak to Zeke in his shop in Al Kharid after the quest and ask him, "Can you sell me a Dragon Scimitar?" he will say, "You're going to be a monkey's uncle before you will ever hold a dragon scimitar!", your character will respond with "Hmmm, funny you should say that...", referencing the portion of the quest with the monkey child. Also, the child's real uncle can be found upstairs in his house.
- Upon the completion of this quest, one's Adventurer's Log will read: "During a mission to Ape Atoll I uncovered a plot against humankind. With the help of the 10th Squad, I’ve put an end to Glough’s scheme."
- After creating the monkey greegree, you can buy a new talisman from the general store (1,000 coins) and return it to the monkey child. It will say: "Thank you uncle. I love you!"
- This is the only quest that progresses in 'chapters'. The chapter's openings are in the style of Henry Fielding and Charles Dickens.
- This quest may be a reference to Monkey Island, a series of LucasArts adventure games. In the games, the gameplay is also divided into several chapters and involves the hero journeying to an island of monkeys. The dialogue boxes separating the chapters are also in a manner reminiscent of that game.
- When offering the alliance to King Awowogei, his advisor says "never trust a northern monkey", a reference to the North, South divide in England. The Northerners are referred to as the Northern Monkeys whereas the Southerners are the Southern Fairies.
- The monkey will occasionally have a nightmare about The Shaikahan, a lion-like creature featured in the quest Tai Bwo Wannai Trio.
Monkey Madness | |
|---|---|
| Part 3 of the Gnome quest series • Part 1 of the Monkey quest series | |
| NPCs | |
| Enemies |
|
| Items |
|
| Locations |
|
| Music |
|
| Miscellaneous |
|
| Main series | |
| Related |
|
|