QBot (Message Wall | contribs) m (Template deleted per RfD) |
No edit summary |
||
| Line 31: | Line 31: | ||
** Preferably the dagger, since it has the same high prayer bonus as dragon mace, but with lower weight |
** Preferably the dagger, since it has the same high prayer bonus as dragon mace, but with lower weight |
||
** Or simply the player's strongest melee weapon, such as an [[Abyssal Whip]] or [[Dragon Scimitar]] |
** Or simply the player's strongest melee weapon, such as an [[Abyssal Whip]] or [[Dragon Scimitar]] |
||
| − | ** [[Enhanced excalibur]] is very useful as it's special can super boosts defence and heals 200. |
+ | ** [[Enhanced excalibur]] is very useful as it's special can use super boosts defence and heals 200. |
|kills = None (but Level 73 [[Shadow]]s are a constant annoyance) |
|kills = None (but Level 73 [[Shadow]]s are a constant annoyance) |
||
}} |
}} |
||
| Line 317: | Line 317: | ||
{{Plague Series}} |
{{Plague Series}} |
||
| − | |||
| − | |||
[[Category:Quests]] |
[[Category:Quests]] |
||
Revision as of 22:49, 14 July 2010
Details
| Start point | |
|---|---|
| Member requirement | |
| Official difficulty | Unknown edit |
| Official length | Very Long |
| Requirements | Skill requirements are not boostable unless marked with a [B] for boostable. |
| Items required | Items from the tool belt are not listed unless they do not work or are not automatically added.
Recommended:
|
| Enemies to defeat | None (but Level 73 Shadows are a constant annoyance) |
Mourning's Ends Part II continues the storyline begun in the Plague City quest. This quest is rated master-level by the Game Guide. This quest is often described as being annoying by the players who have completed this quest, particularly for a difficult agility obstacle which must be crossed twice. Therefore it's a good idea for players to keep their weight as low as possible, although there is no benefit to having a weight less than 0 kg versus 0 kg.
As soon as players begin the quest, they can get Dark beasts as a Slayer task.
Walkthrough
Starting Out
You must now speak with Arianwyn in Lletya prior to beginning the quest. You must then speak with to the Head Mourner to officially begin the quest. He is found in West Ardougne.
After starting, put on your full mourner clothes and remove all of your other worn items. Make sure that you have a chisel with you. Bring your elven teleport crystal, lots of food and an emergency one-click teleport, but leave one to three inventory spaces open (you will pick up one item before combat and two after). Go to the basement of the Mourner HQ in West Ardougne and talk to the Head Mourner.
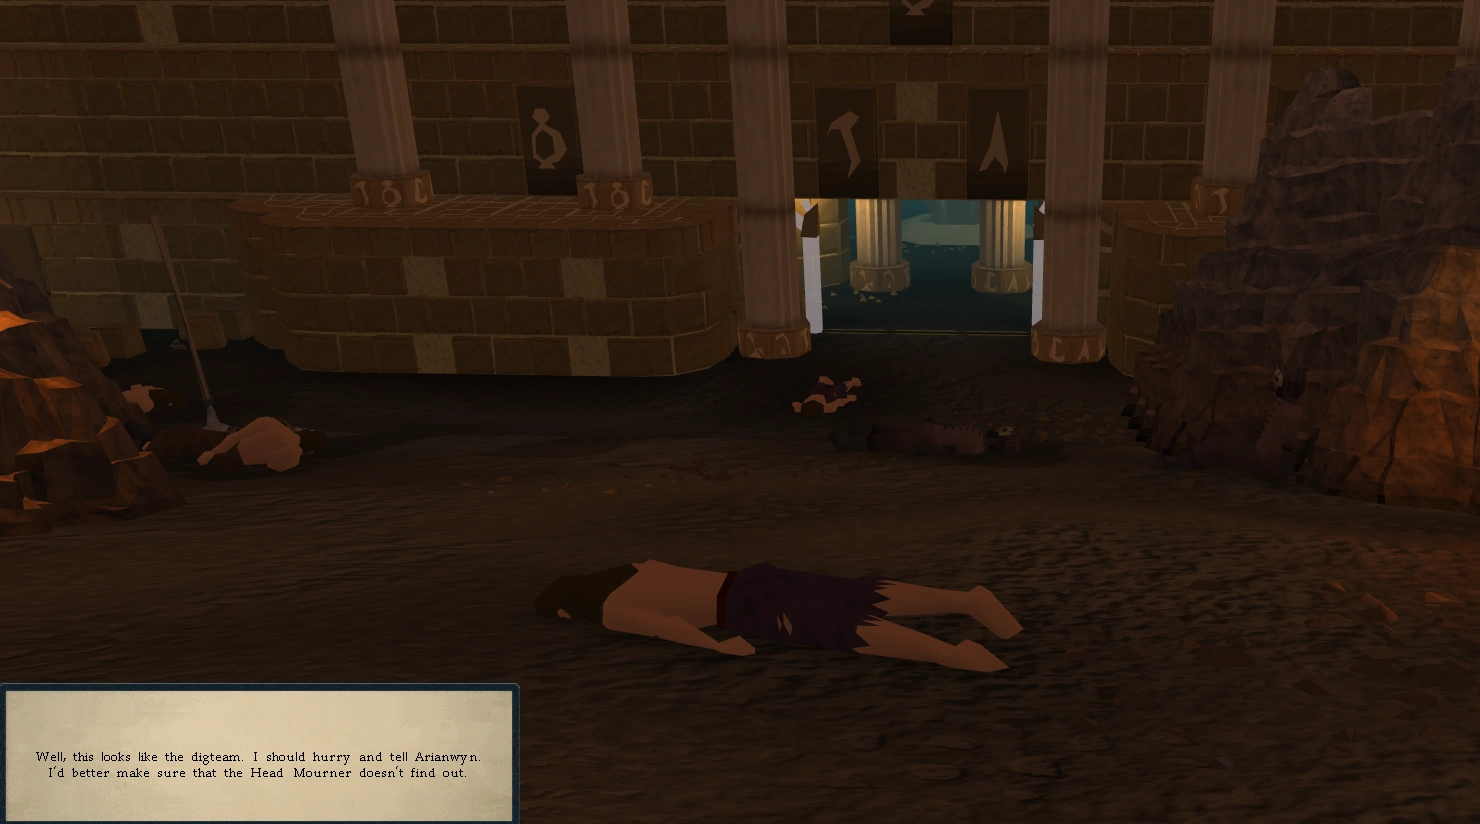
He will give you a new key to the nearby tunnels that they dug to the Temple of Light. He will ask you to find the digging team, a group of slaves and Mourners who have high enough slayer skills to defeat the beasts in the area. Go into the tunnel; head west then south. You will see level 182 Dark beasts. They require level 90 Slayer to kill, can hit up to 170 with melee attacks, and aggressively guard a rune rock. Run past them, and the tunnel will turn west. As you reach the temple entrance, you'll see a cut scene. Search the corpses of the digging team to get Edern's journal and a colour wheel. Read the journal.
Return to Arianwyn to learn about a blackened crystal in the Temple of Light. Go to where you found the digging team. You'll see level 73 Shadows all over the place. They only have 150LP, but they can hit very accurately with melee, doing up to 130. They're very annoying, so it would be a good idea to use the Protect from melee prayer. At times, it is more effective to fight Shadows than to attempt escape. A fast-hitting weapon such as a Dragon scimitar or Dragon Dagger (for its light weight and special) may come in handy throughout the quest when faced with only one or two Shadows.
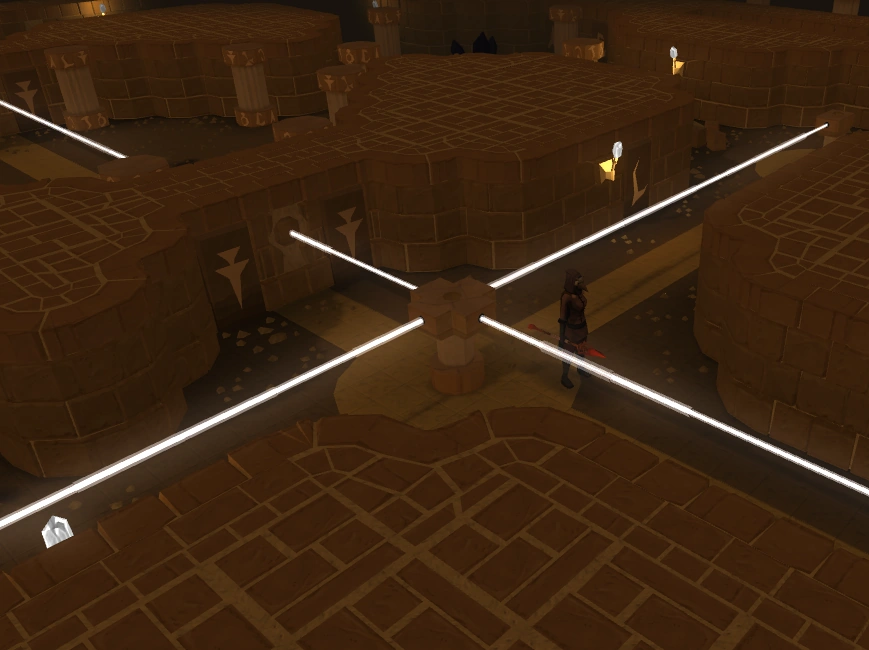
A map of the temple of light.
To get to the blackened crystal from the entrance of the temple, go west. Climb up the stairs. Then go as far south as you can go. Go up the ladder (it blends into the wall, so it may be a bit hard to spot. Look carefully!). Then go north and down the stairs. Go up the next set of stairs and walk east, then south to the crystal. Use a chisel on it to break off a piece and head back to Arianwyn.
He will summon Eluned, who will talk with him about the crystal. Next, use the blackened crystal on Eluned and she will enchant it and turn it into a newly made crystal. Talk to her again to get the newly made crystal back and Eluned will tell you to talk with Arianwyn as she departs. Now show the crystal you received from Eluned to Arianwyn, and then put it in your bank, as you don't need it right now.
Warning: From here on, all the Temple of Light items (except the black/newly made crystal) cannot be banked, as they result in the following message: File:Magicbank.png. Towards the end of the quest, players eventually need 18 free inventory slots to hold all the items.
Go back to the Temple of Light with lots of high healing food and/or couple or more prayer potions, depending on your prayer level (and a rope if you aren't planning on coming back out to restock before you do the Cyan door-if you plan on doing all of the doors without banking, make sure you also have your death talisman/items required to give to the dwarf at the death altar). Go up the stairs, then go east to the crystal collector. Pull the lever and collect the yellow crystal and 4 hand mirrors inside. You need to unlock the blue door with a yellow beam of light and, as luck would have it, the pillar next to the crystal collector has a beam of light flowing from it. (Note: when following the directions in any of the sections below until you complete the quest it can be very important to remember which level you are on ... for example sometimes you will be directed to the "bottom floor" do not forget there are 3 levels and you may therefore have to go down 2)
Helpful tip: If you can summon a Spirit Terrorbird familiar, do so, and bring about 30 Tireless Run scrolls (consider Summoning potion as well). Unlike equipping "other non-mourner items", familiars seem to be exempt, and you can pass through the mourners' headquarters with it following you. Use its Tireless Run scroll to supplement your run energy, throughout the following steps. This area is not multi-combat, so it can't fight for you, but it can carry your prayer-bonus armour. Once you get to the temple, you can trade out potions & food for the armour, without discarding your mourner gear; thereby saving you from gathering it again, later. This also allows you 5 open inventory spaces to gather the 4 mirrors and yellow crystal. Also, using the Explorer's Ring can restore 150% run energy in three uses. You can also take a dip in the Salt-Water-pool at Oo'glog after As a First Resort.... as well.
Blue door
- Put a mirror in the pillar giving out the light, and reflect the light North.
- Walk north to the next pillar. Add a mirror and reflect the light West.
- Go west, add a mirror, and reflect the light South.
- Go south to the next pillar. Use your yellow crystal on it to dye the light yellow.
- Go south and put a mirror in the pillar. Reflect the light East.
- This part is VERY HARD, and nearly impossible for players with 55 or less Agility. Fortunately you should be above that level from completing Regicide. The official RuneScape QuestHelp advises to have 60 or higher before you attempt this. You must climb across several stone handholds which can be failed, and the failure rate is very high. Falling will hit 50 life points damage on you, and take you to the level below which is full of shadows. Go back up the stairs and try again until you make it. It helps when you have full run energy when trying the handholds. If you brought any boosts such as Summer pies, this would be a good time to use them. You can enter the crystal rotation menu (but don't touch the rotate button) to wait for 100 percent energy. Having a low weight has been observed to help, so it may be good idea to drop your mourner clothes (they are very heavy) near the hand-holds and pick them up after passing, or bring a spotted/spottier cape, Penance gloves and boots of lightness in your inventory (assuming you have them), and wear them before attempting the agility shortcuts. Summer pies are very useful because they heal high, restore run energy and boost Agility by +5.
- Pass through the blue door and open the chest. You will get 2 more mirrors and a cyan crystal.
- If you fall you should be able to get back and pick up your mourners clothes in time as it takes less than 30 seconds to make your way back, you will need them further on in the quest.
Magenta door
Go back to the crystal collector and pull the lever. Collect all of the items (8 total).
- Go west and put a mirror in the pillar. Reflect the light north.
- Walk north to the next pillar. Add a mirror and reflect the light west.
- Go west to the next pillar and use the yellow crystal on it to dye the light yellow.
- Go west to the next pillar. Add a mirror and reflect the light north.
- Go north to the next pillar. Add a mirror and reflect the light east.
- Go east to the next pillar and add the cyan crystal. This will dye the yellow light green.
- Go east and pass through the magenta door. Open the chest to get more mirrors.
(Note: using the crystals in reverse order also works.)
Cyan door
Go back to the crystal collector and pull the lever. Collect all of the items (10 total).
- Go west and put a mirror in the pillar. Reflect the light north.
- Walk north to the next pillar. Add a mirror and reflect the light down.
- Go downstairs to the bottom floor. If you did the above step correctly, you should see a little beam of light coming into the pillar north of the stairs. Put a mirror in it and reflect the light west.
- Walk west to the next pillar and reflect the light north (through a hole in the wall, a cave and another hole in the wall).
- Go around to the pillar north of the one you just put a mirror in. Use a mirror on it and reflect the light up. If done correctly, you should see a little beam of light flowing up.
- Go back upstairs to the middle floor and find the pillar with a little beam of light flowing up. Put the yellow crystal in that pillar to dye the light yellow.
- There is a ladder to the north of this pillar. Go up the ladder to the top floor. Put a mirror in the pillar and reflect the light west. It should pass through a pillar that has a purple crystal in it. The yellow light beam and the blue pigment in the purple crystal create a red beam of light.
- Go back down the ladder and go south. When you reach the south wall, go up the ladder. Then go as far north as you can, as far west as you can, and all the way to the north-west corner. Put a mirror in this pillar and reflect the light south.
- Follow the beam to the south-west corner and add a mirror. Reflect the light down (remember, there's a big difference between south and down!).
- Return to the ladder that brought you to this floor. Descend the ladder and travel a few steps west and a few steps north to a circular, dead-end room where you may enter by climbing over a low wall. Climb over the low wall and enter the circular room, where you will see a hole in the floor with a rock directly beside it. Use your rope on the rock, and climb down. Go southwest, Passing through the door to where you may open the chest to get a blue crystal.
Yellow door
If you are low on supplies (food, pots) teleport to Ardougne and replenish your supplies. Now go back to the temple, past the dark beasts, and up the stairs. You will not be able to collect your items, but you will not need to at this point.
- Go to the pillar where you put the yellow crystal in during the last step (north side of the middle floor). Remove the yellow crystal, and replace it with the blue crystal. You should now see a blue light going up. The mirror you placed above this pillar during the last step will reflect the light west, like before. However, this time, a blue light will be going west.
Reflecting the westbound beam downwards
- Start to run south. When you reach the south wall, go up the ladder. Then go as far north as you can, as far west as you can, and all the way to the north-west corner. Rotate the mirror in this pillar to reflect the light down. (You can do this here by ensuring the mirror is vertical and pointing north and south... the mirror, not the beam.)
- Go to the bottom floor. In the north-west corner, pass through the yellow door, rotate the mirror south and pass through the door, Go south then east, then go open the chest to get 2 more mirrors and the first fractured crystal.
Magenta and yellow doors
You now need to open two doors, a new magenta door and a new yellow door, using the fractured crystal, go back to the crystal collector, pull the lever and collect all of the items (14 total).
- Open the blue door again. Follow the above steps to open it (yellow crystal for the blue door). Cross the handholds again and once inside, use the blue crystal on the pillar, then exit in the same manner you entered (returning by handholds). Once you have crossed the handholds retrieve the mirror from that pillar, and then walk north to retrieve the yellow crystal. Do not collect by using the crystal collector. Using the crystal collector would collect the blue crystal just placed.
- From where you retrieved the yellow crystal, Go north the next pillar, rotate the mirror to reflect the light up.
- Walk to the south end of the level, climb up the ladder, and go north to the crossroads then around to the next pillar north. Add a mirror and reflect the light south.
- Make your way south to the next pillar. Add your fractured crystal to split the beam into four parts. You will use one of these to open the magenta door and one to open the yellow door.
Magenta door
- From the fractured crystal, go west to the next pillar. Add a mirror and reflect the light down.
- Go down to the bottom floor and find the pillar with a little beam of light coming out (head south, then west from the stairs). You will see that a green crystal has dyed the light green. Add a mirror and reflect the light south.
- Go south, add a mirror, and reflect the light east. This will unlock the magenta door. If you go through however, you'll find that there's still a yellow door between you and the chest.
Yellow door
- From the fractured crystal (top floor), follow the beam of light south. Add a mirror and reflect the light east.
- Go east to the south-east corner. Add a mirror and reflect the light down.
- Go to the south-east corner of the bottom floor. Pass through the magenta door, then add a mirror to the pillar inside. Reflect the blue light north and pass through the door.
- Open the chest to get 3 more mirrors and the second fractured crystal.
Cyan and black doors
You now need to open two doors: A new cyan door and a huge black door, using everything you have (18 items). Go back to the crystal collector and pull the lever. Collect all of your items.
- Go west and put a mirror in the pillar. Reflect the light north.
- Go north to the next pillar, add a mirror, and reflect the light down.
- Go to the bottom floor. Go north and add a mirror to the pillar with light coming out. Reflect the light west.
- Go west to the next pillar and add a fractured crystal. If it doesn't work, take it out and use the other one.
- Go south to the next pillar and add another fractured crystal to split the beam.
- You now need to get a red beam, a blue beam, and a green beam of light pointed at the column in the final room. This will make a new clear beam that you can use to enter the black door.
Green beam
- From the second fractured crystal, walk west, add a mirror, and reflect the light up. This will make it go through the green crystal.
- Go to the top floor using the south ladder on the middle floor. Directly North of the ladder is a pillar (not the one a step away from the ladder), go to the pillar just West of the northern pillar (above the pillar with the green crystal), add a mirror, and reflect it west.
- The light will then reflect off of a mirror already in the final column and go down. It will now be in the final room pointed at the final pillar.
Blue beam
- From the second fractured crystal, walk east. Add a mirror to this pillar and reflect the light up.
- Go to the top floor. Find the pillar with a little beam of light coming up and add a mirror. It should be directly south of the black crystal. Reflect the light west.
- Follow the beam of light to the next pillar. Add a mirror and reflect the light north.
- Follow the beam of light to the next pillar and add a mirror. Reflect the light west.
- Go west to the next pillar. Add the blue crystal to dye the beam blue.
- The blue beam will then reflect down off of a mirror already in the next column. It will now be in the final room, pointed at the final pillar.
Red beam
- From the first fractured crystal, walk north. Add a mirror and reflect the light up.
- Go to the middle floor and find the pillar with the beam of light coming up. Add the yellow crystal to dye the light yellow.
- Climb up the ladder (next to the pillar with the yellow crystal, not the south ladder) to the top floor. Add a mirror to the pillar and reflect the light west. It will go through a purple crystal, where the blue and yellow will cancel each other out, leaving you with a red beam.
- Go back to the middle floor. Go to the south end, climb up the ladder, and make your way to the north-west corner. Add a mirror and reflect the light south.
- Go south to the next pillar. Add a mirror and reflect the light east.
- Make your way east to the pillar by itself (it has a mirror fused in it) to see the light reflect down to the final pillar in the final room, pointing at the cyan door.
- Go down the stairs in the middle of the top floor, then go down the next set of stairs. Go through the cyan door. Turn the mirror towards the final pillar to merge it with the other two beams. It will be pointed at the black door.
- Pass through the black door.
- Remember to turn the beam back to the cyan door, otherwise the altar will only be able to reachable via the Underground Pass, or by re-doing the entire maze. If you encounter this problem after the quest, consider using the abyss to reach the death altar.
The culmination of all your efforts.
The Death altar
Death talisman
- You can skip this whole section if you have already bought/received a Death talisman or have an Omni-talisman.
It is possible to buy a Death talisman from the Grand Exchange for 932 coins, saving the player a lot of time. This is highly recommended as it will most likely cost less than the needed items.
After you go through the final door, talk to the dwarf Thorgel. He will give you an item list that contains a long list of items. If you give him ALL the items on the list he will give the player a death talisman in exchange. The items on the list (50 in total) are as follows:
Note: It is possible to take all items in one load using a pack yak. Otherwise, two trips will be required.
You can give these items in more than one load. If you teleport out, make sure you turn the mirror towards the cyan door. Otherwise, you'll lock yourself out and you'll have to go through the Underground Pass and enter the tunnel near the dwarf camp or redo the final puzzle. The entry at the dwarf camp is most easily reached from the Lletya village, which is fairly close to the elf land side of the underground pass. Doing the underground pass in reverse to get to the dwarf camp is a lot easier.
The ruins and the altar
Use your death talisman on the mysterious ruins, then use the newly made crystal that Arianwyn repaired for you on the Death Altar. Use this glowing crystal on the large black crystal on the third floor of the temple. This will stop people from entering the temple for another thousand years! Go back to Arianwyn for your reward. You will have a cyan crystal left over unless you left it in a pillar since it is un-bankable you will have to destroy it.
Reward
- 2 quest points
- 20,000
 Experience
 - A crystal trinket (allows you access to the Temple of Light)
- A Death talisman, and the ability to craft death runes (you'll get full access to the death altar from the Abyss as well)
- Access to Dark Beasts (quest completion not required)
Music
Music tracks unlocked:
Tips and Tricks
- Although in general shadows cannot start attacking you when you are rotating the mirror, sometimes they do. If they do not, use this to your advantage. This is not a way to escape combat already underway, but if you are not currently being attacked or pursued you can opt to rotate the mirror because sometimes this will give you immunity from attack until you stop, allowing you to take a bit of a breather and figure out what to do next. Obviously, you could turn off prayer before doing this to save points, but remember to turn it back on as soon as you stop.
- When trying to return to Thorgel, using the Underground Pass is helpful. Teleport to Lletya and then make your way to the cave. From there climb down the well, and go through the big doors. Then you can either walk south to the stairs down to the dwarf camp where Klank is, or you can take a fall from crossing the narrow bridges. Falling makes you lose around 140-220 lifepoints, but you can always talk to Kamen for food, if you can risk lowering your agility for a while. Once in the dwarf camp, there are stairs on the south wall leading down to Thorgel and the entrance to the death altar.
- If you have completed As a First Resort... quest, you can use the saltwater pool to save energy potions.
- If you completed the quest, the Adventurer's Log will read: "I managed to get access to the Temple of Light, where I reactivated the temple's defences after solving a giant puzzle involving light."
- Full Guthan's can be helpful for regaining some lost lifepoints by killing shadows within the temple, but is not recommended due to the cost and weight.
- When talking to Thorgel about why he would need the Door Key and you refuse he says "Pretty please with a Blood talisman on top?!". This may have been a hint into the now released Blood Talisman.
- It is fine to log out, or restock on supplies, during this quest. All the crystals and mirrors will be in the same place you left them in.
- Attempting to teleport to the alter using a Death altar teleport aquired from the Great Orb Project minigame will result in a message saying "A strange power blocks your teleport" and therefore can not be used to gain easy access to the altar.
Template:Featured article
| Main series |
|
| Related quests |
|
| Quest recollector |
|