(→Walkthrough: Glacor does not to be killed) |
|||
| Line 40: | Line 40: | ||
*[[Spade]] |
*[[Spade]] |
||
*[[Catspeak amulet (e)]] ([[Cramulet]] does not work to locate Bob) |
*[[Catspeak amulet (e)]] ([[Cramulet]] does not work to locate Bob) |
||
| − | |kills= |
+ | |kills=*[[General Khazard]] (level 250) |
| − | *[[General Khazard]] (level 250) |
||
*2 [[Ice Titan|Ice Titans]] (level 275) |
*2 [[Ice Titan|Ice Titans]] (level 275) |
||
*2 [[Ice Demon|Ice Demons]] (level 300)}} |
*2 [[Ice Demon|Ice Demons]] (level 300)}} |
||
Revision as of 08:26, 15 September 2011
| File:Ritual of the Mahjarrat.jpg | |||||||||||||||||||||||||
| Release date | 14 September 2011 (Update) | ||||||||||||||||||||||||
|---|---|---|---|---|---|---|---|---|---|---|---|---|---|---|---|---|---|---|---|---|---|---|---|---|---|
| Members | Yes | ||||||||||||||||||||||||
| Voice Over | Unknown edit | ||||||||||||||||||||||||
| Official difficulty | Grandmaster | ||||||||||||||||||||||||
| Quest series | Mahjarrat quest series | ||||||||||||||||||||||||
| Age | Fifth Age | ||||||||||||||||||||||||
| |||||||||||||||||||||||||
Ritual of the Mahjarrat (sometimes referred to as simply ROTM) is the fourth Grandmaster quest, released on 14 September 2011.
Official description
| “ | They signal their arrival with a devastating shriek, and leave nothing but ash, flame and destruction in their wake. All tremble in fear as they approach, and the ground rumbles in sympathy.
Word of an attack on the isle of Mos Le'Harmless has reached the ears of Sir Tiffy Cashien. Should you choose to accept his request, you will be sent to aid Sir Tendeth who has come across a great threat to the world; one far greater than the pirates he was originally sent to investigate. Do you have the stomach to investigate this new threat, and see it through to the end? Or will you leave the world to its doom while you cower in fear? |
” |
Walkthrough
| Start point | |||
|---|---|---|---|
| Member requirement | |||
| Official difficulty | |||
| Official length | Extremely long (3 - 5+ hours) | ||
| Requirements | Skill requirements are not boostable unless marked with a [B] for boostable.
| ||
| Items required | Items from the tool belt are not listed unless they do not work or are not automatically added.
| ||
| Enemies to defeat |
|
Starting Out
- Items to bring: None.
- Recommended items: None.
Speak to Sir Tiffy Cashien in Falador Park. Select the "Ritual of the Mahjarrat" option and ask if there are any new missions or anything you can help with. Sir Tiffy will comment that you have good timing and tell you that he has an operative on Mos Le'Harmless, who is gathering information on attacks on human settlements, and who has been asking for assistance. He tells you to go to The Other Inn and ask for Sir Tendeth, who is undercover and dressed like a pirate. Finish talking to Sir Tiffy, and when you say you'll "get right on it", you'll be given an offer to be teleported to Mos Le'Harmless. If you don't accept the offer to be teleported now you cannot request it from Sir Tiffy later.
Go to Mos Le'Harmless and find Sir Tendeth. He will be in the larger of the two pubs, dressed like a pirate wielding a dagger. You'll ask if the pirates are planning to attack cities, and Tendeth will assure you that pirates are only a threat to other ships. He will tell you that what he has been investigating is a threat to everything, up to and including fortified cities. You will be warned that Mos Le'Harmless jungle is about to become harder to get around and will remain that way until the conclusion of this part of the quest. If you say you wish to continue, a screech will be heard as well as ominous music.
The screen will start shaking and a cutscene will show flashes of fire outside the inn. When it clears, some of the pirates outside will be lying injured on the ground. Speak to Sir Tendeth again and he will tell you to look outside to see if anyone saw anything, while he calms his nerves.
Reports from the pirates as to what happened will vary. The injured pirate to the south will tell you that something threw a fireball at him, but he didn't see what did it. The injured pirate to the north will have no information. Other pirates will say they saw things like giant fire-breathing albatrosses, bony dragons that stood like men and could speak, enormous vultures and giant bats.
Into the Jungle
- Items needed: None.
- Recommended items: Food, weapons and armour for defending against level 70 Jungle horrors that attack with melee, an Anti-dragon shield or other protection against Dragonfire, and a Falador teleport. (A bank is available.)
After speaking with various pirates, the information you acquire will suggest that the attackers flew into the jungle. You'll need to take weapons and armour with you into the jungle, as it is a multi-combat area populated by aggressive Jungle horrors. Sir Tendeth suggests you take a look out of the gate to see what is happening out there. He will join you as you leave, but a fireball will hit and kill him before you can go anywhere.
You'll duck for cover on the west side a tropical tree, and decide to run using the trees as cover to head east to where the fireball came from. Follow the charred ground and burnt vegetation as a guide. If you remain in the open for too long you will be hit by a fireball and returned to inside the town gates with some heavy damage taken. Make sure to rest on the west side of trees. Some trees have jungle plants next to them that block movement. Be careful to avoid trying to move to the west side of a tree if such a plant is there as you will stop in the open and likely be hit by a fireball. The fireballs are dragonfire so wielding an Anti-dragon fire shield will lower the damage to around 150 life points. It is recommended to turn off auto-retaliate, as it can pull you out of cover, potentially causing death. You will not respawn on Mos Le'Harmless if you die.
If you attempt to use 'rum' to reach Trouble Brewing, you will be prevented from doing so, and will receive the message: An unknown power seems to prevent you from drinking this item, as tasty as it seems.
It is possible to hide behind the deposit box and go from there to the tree directly east of the corner of the stockade which will trigger the cutscene.

The Dragonkin
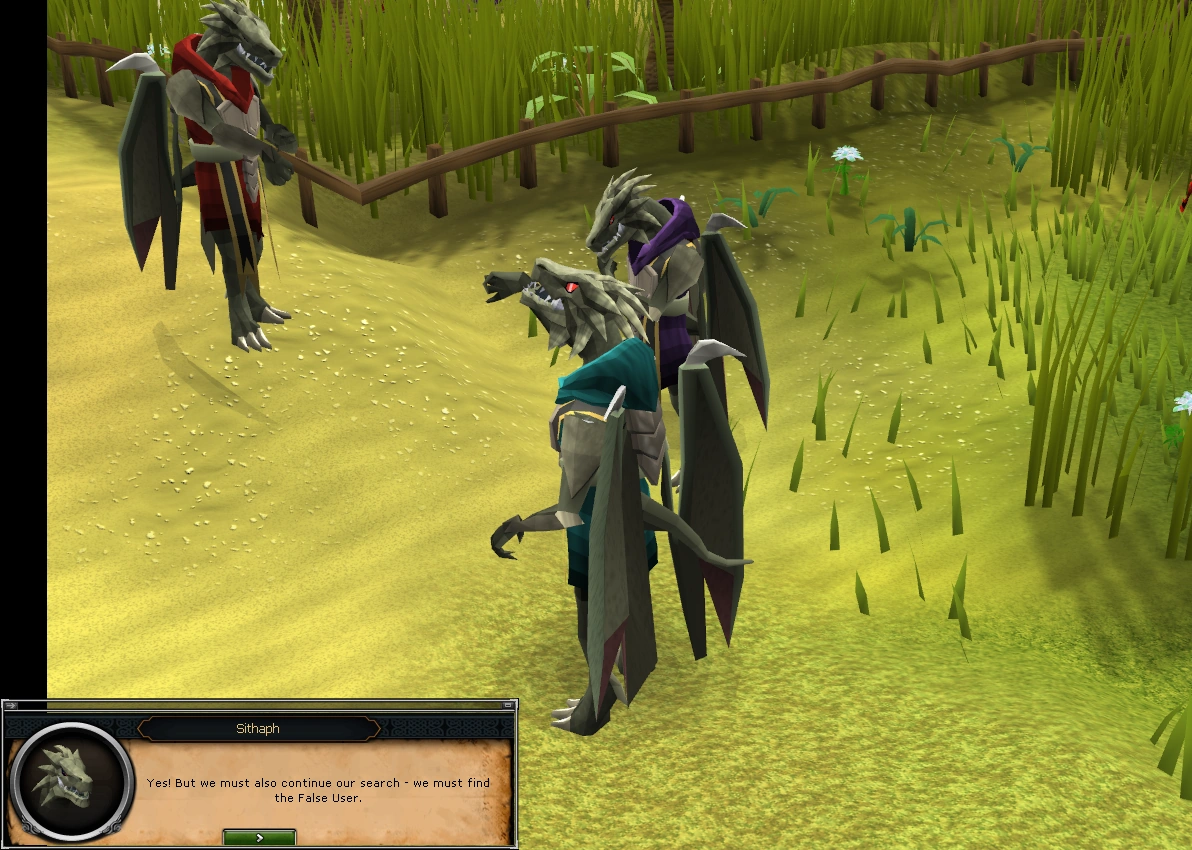
Once you reach the far edge of Trouble Brewing, in the eastern trees just north-east of the building, you will activate a cutscene. Sithaph, Strisath and Sakirth will be discussing how destruction eases "the rage" and say that it is still building, and that someone must be using "it". They decide to attack a larger settlement and that they must continue their search for the "False User". They fly off, and you say you must report back to Sir Tiffy.
Temple Knight Archives
- Items needed: Catspeak amulet (e).
- Recommended items: None.
(If you have a Cramulet you CANNOT get a catspeak from sphinx. You have to dismantle your cramulet then go to Burthorpe and talk to Hild to get it enchanted at the cost of 5 death runes.)
Return to Falador Park and speak to Sir Tiffy. Tell him what you saw. He will take you to the Temple Knight archives where you will meet Lady Table. Lady Table will produce a dossier on the Dragonkin. She says it's mostly compiled of 'sightings' reports, similar to those on the 'Reprehensible Snowgre'. A note from Robert the Strong will be found in the dossier, saying that the "stonetoucher" must take the collar from his reincarnation and use it to get to Kethsi and as a puzzle key once they get there.

Inside the Temple Knight Archives.
Tell Lady Table and Sir Tiffy that Robert reincarnated as a cat named Bob, and that you've researched this for an earlier adventure. Also tell them that you think you're the stonetoucher, because of what happened during your previous mission for them. Lady Table tells you to go find Bob and get his collar. Exit the archive via the door to the east; Sir Tiffy will teleport you back to Falador. Next, use the tracking systems on your catspeak amulet (e) to locate Bob and acquire his collar. To use the amulet, right-click on it and select Open, then click on the whiskers to move the arrow around until the amulet's eyes light up, then head in that direction. Once you find Bob, ask for his collar. (You may also ask Neite tto find out more about his attacks and history.)
Kethsi
- Items needed: Bob's collar, Spade (can be acquired in the area), pickaxe (can be acquired in the area), at least eight empty spaces
- Recommended items: Food, in case of failing obstacles, Surefooted Aura
You must now use the fairy ring travel system to get to the destroyed realm of Kethsi. The code you must dial (found on the reverse side of Bob's collar) is D-I-R followed by A-K-S.
Once at Kethsi, you will begin exploring with the aim of finding out the motives behind the Dragonkin attack. In order to do this, you must collect the four Tetrahedrons found scattered around the isle of Kethsi, which together form the crest of the overwhelmingly powerful Dragonkin.
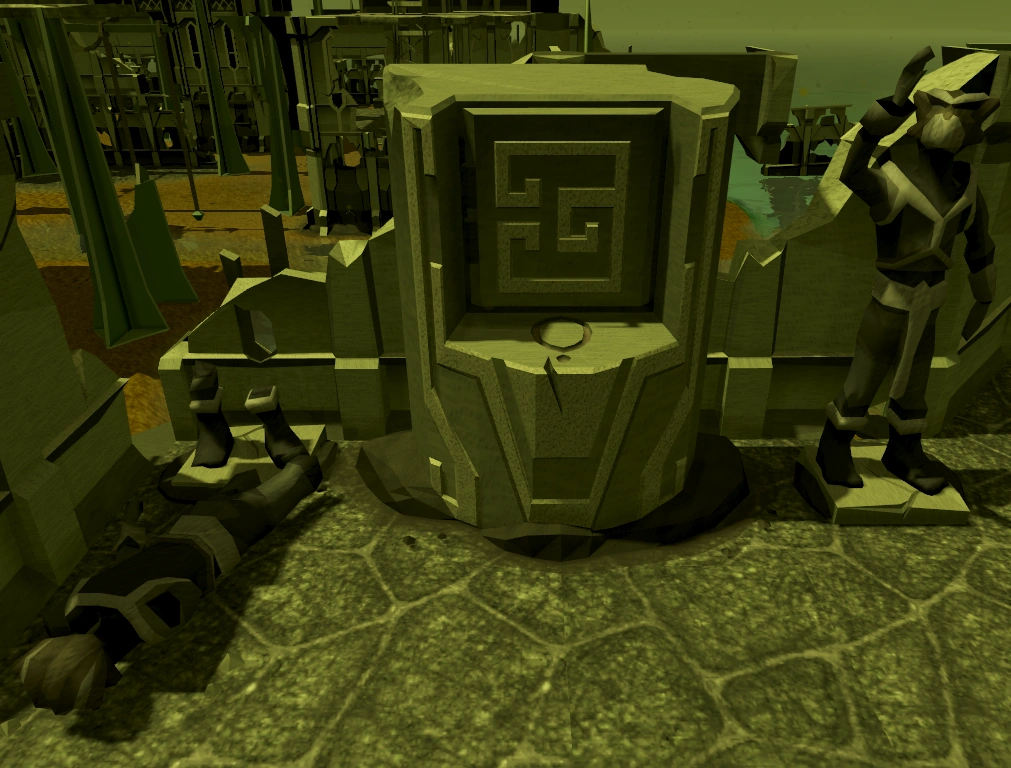
The mysterious pattern puzzle on Kethsi.
Tetrahedron 4
Once you arrive at Kethsi, head north and begin by searching the rubble in the centre of the island which should then give you the item, Tetrahedron 4. Next, go up the ramp nearby onto the second floor of the destroyed building. Now, use Bob's collar on the wall design.
Fitting the Collar
You will need to position Bob's collar correctly into the pattern of the wall design order to open a concealed compartment. This is done by positioning the collar vertically, with the "Bob" side face up, in between the centre-right and far right piece.
Once the collar is in this position, you must rotate it until it slots into place.
The solution to the collar puzzle (the collar must now be flipped).
You will then receive five items. Two notes (Note to Robert the Strong and Note to You), Tetrahedron 1, A statue arm and Robert's necklace.
Tetrahedron 3
Use the statue arm you acquired from the hidden compartment on the statue, found across the Agility shortcut on the same floor as the wall design. A plank will then appear. Cross this plank and then go down the ladder infront of you. Head east and up the wall jump shortcut, which you can run up. Once up, climb the wall to the west, followed by taking the swing-pole to the north. Walk-across the beam in front of you, jump over the south gap and go down the southern ladder twice. Now, squeeze through the pipe to the east of you. Grab the nearby pickaxe and then mine the rocks. Climb-up the wall close by and run across the walls to the west. Climb across the handholds then go down the ladder. Go east, search the rubble to find Tetrahedon 3 and a Strange device.
Tetrahedron 2
After getting Tetrahedron 3, go back up the ladder twice and then jump to the floor to the south. Slide-down the roof to the south and then go south to walk across the plank. Now search the nearby rubble to find the final piece of the Tetrahedron puzzle, Tetrahedron 2.
fafb
Summary
| Tetrahedron | Location |
|---|---|
| 1 | Acquired from the puzzle when using Bob's collar on the wall design. |
| 2 | On a small island far West, south of the stairwell and across the plank. |
| 3 | Found in the far North-West corner of Kethsi across the handholds, down the ladder, then East. |
| 4 | Located in a pile of rubble in the centre of the first island of Kethsi. |
After you've found all 4 tetrahedrons, go down the stairs on the far west side of the map. Once down, use all your tetrahedrons on the "indentations" to receive a code of 4 letters. Check your quest journal for your code. You will have to roam the plane of Kethsi and use the strange device to check your current coordinates. Once you have found your spot, dig there with a spade, and you'll find a Kethsian key. Go back to the dungeon of Kethsi. Go through the southern door and search and southeast bookcase for a scroll. Read the scroll to learn a new spell. Search the bookcase west of it and read the journal.
Coordinates start in the bottom left corner at AAAA, the first two are North, South, the second two are East, West. Use below images as helpful waypoints.
| Co-ordinate | Location | Co-ordinate | Location |
|---|---|---|---|
| EAFB | EAFB | EAEE | File:Kethsi EAEE.png |
| FCGC | FCGC | GGBH | GGBH |
| GAGA | File:Gaga.jpg | FACA | File:FACA.png |
| FGEH | FGEH | EHAC | EHAC |
Making plans in Falador
Return to Falador and report to Sir Tiffy (make sure the notes and journal/book are in your inventory). After you've shown him the diary go to the Falador Castle and head to the east. Talk to Akrisae there. Ali the Wise will show up and contribute additional information. The group decides to try to get some of the Mahjarrat themselves to help in thwarting Lucien, and you volunteer to investigate the ritual site first. Akrisae gives you 4 Teleorbs, to try to teleport the Stone of Jas away during the ritual. Ali the Wise gives you Arrav's Heart, which you will use during the ritual to try to break Zemouregal's control of Arrav during the ritual.
Before investigating the ritual site, head to the Digsite and talk to Azzanadra in the Senntisten Temple. Ask him about the quest. You will get 4 beacons for use at the ritual site.
Preparing the Ritual Site
- Items needed: Ring of visibility, Rope.
- Recommended items: Super energy potions.
Head to Ghorrock, the site on which the Ritual of Rejuvenation will take place. It is recommended to bring Antifire potions or an Anti-dragon shield. For full protection from the dragons, use both potion and shield and pray Protect from Melee or Deflect Melee.
Although it is fairly isolated, there are several ways to travel to the fortress:
- Use the Arctic Bear familiar to teleport to the Snowy (Trollweiss) Hunter Area, and then walk west and take the canoe. This is a quick and safe route and lands you right where your grave would appear should you die.
- Use the Ardougne/Edgeville teleport lever (or walk) to high level wilderness. From here run all the way west past the agility course.
- Ice Plateau Teleport (Lunar Spellbook).
- Ghorrock Teleport (Ancient Spellbook).
- Teleport to the Trollweis Hunter Area using the fairy ring system (code DKS), then walk north and then west to the canoe, which will take you to Ghorrock Fortress.
After arriving at Ghorrock, go into the fortress's dungeons. Climb up the stairs, run east and climb down the stairs. Climb up the wall and run north and jump down again. Enter the trapdoor and head southwest until you find a heat globe. Take this and return to the front gate of the fortress. Across from the gate is a fallen pillar; jump over it. You are in a safe area from the dragons. Go though the opening in the southern wall of cliffs. You will enter a large, snowy plateau; welcome to the ritual site.
Avoid the undead Broavs that wander the plain. If you come too close to one, a wizard will appear and teleport you to a cell in the building in the south-west of the plain, which is Zemouregal's castle. You must search the bed for a chisel and spade and lift up the tiles to the east of the cell. Dig out the tile and then exit the cell and building. When heading back to the plain, be aware there is one Armoured zombie on the south-east side of the castle.
For the north beacon, run west of the ice entrance at the north of the plateau. Place it in the closest tree. Run directly south, and place the second beacon in the tree southwest of the ritual stone. If this is done correctly, you should have a message saying the south beacon is opposite the northern beacon.
Place heart of Arrav in the rocks south of the ritual marker. (The site is several paces south of the marker and just a pace or two east.) If you cannot place the heart in a pile of rocks, you are at the wrong place.
The Eastern-westesrn beacons should be set up in a similar fashion to the north-south ones. Run up the west side of the plateau until finding a tree just north of a central line; run straight east and put the other beacon in the other tree. You should have a message saying the eastern beacon is directly opposite the western beacon.
Go to the north-west corner of the plateau and look for an 'overhanging tree' (it's the tree that cannot be chopped down). Use a rope on it to create a rope climb from the beach to the plateau. This will be used for your allies to climb to the ritual. (From this time, you can also now use the rope yourself to get between the canoe landing site and the plateau without having to go by the dragons around Ghorrock.
Talk to Movario in the southeast corner of the plateau. Be careful not to get caught by the Broavs. From here, go to Zemouregal's castle and kill a zombie outside for main entrance code key and the decoder strips.
Read the code key; it will have four letters, for example like 'AIBF'. Click on the main entrance door. You need to translate the letters into a numeric code that opens the door. Move the first decoder strip (numbered 1) on top of the first letter on the left; the slot in the strip will reveal a number. This is the first number of the code. Repeat for the second, third, and fourth strips and letters. For example, code AIBF is decoded as follows: Strip 1 goes over the A line, revealing a 6. Strip 2 goes over I, revealing 3. Strip 3 goes over B, revealing 0. Strip 4 goes over F, revealing 2. Input the code 6302 into the dials in the center of the door to open it. (It might help to memorize the positions of each gap so it is easier later on to open the other doors.)
Go through the door into the main room on the ground floor and search the crate there for the storeroom code key. Read this code and use it to open the storeroom door to the west. In the north part of the storeroom, search the crates there to get reliquary code key and the heart magic notes.
Go up the east staircase and use the new code strip to enter the reliquary. Once inside, smash the black stone in the south of the room. (You must read the notes you obtained when you acquired the third sets of codes. The black stone is the 'black prism' the notes speak of.)
Go back down the stairs and, if you wish (it may not be necessary), climb the stairs to the west. Zemouregal and Sharathteerk are in a locked room on this floor. Examine both of them in turn and you will overhear them discussing their plans: their zombie army is full strength and Arrav is in position.
Talk to Moravio again to learn that he senses the Stone of Jas is nearby, hidden somewhere. Then, wearing the Ring of visibility, run west along the south side to find an invisible shadow pedestal. Put the heat globe on the pedestal. A nearby patch of ice melts, revealing a entrance in the southern rock wall of the plateau.
If you try to put heat globe on the shadow pedestal and it says "That could be a good idea, but you've got other things to do first.", it means that the beacons are not aligned properly. If you are completely sure the beacons are in their correct alignment, talk to Movario to the east of the shadow pedestal, and he will place the heat globe in the pedestal.
You can go through the entrance, where you can find and touch the Stone of Jas. However, if you are not fully prepared for the upcoming fight, return to a bank and prepare before entering!
The Ritual
Prepare yourself for the final fight.
Set-ups
| Equipment set-ups |
|---|
Melee
The equipment used should simply be the best armour you have, preferably Barrows or Dragon, although Elite void is also an option. An amulet of fury or glory is also recommended, unless opting to wear the medallion. Bring a dragon full helmet or a Helm of Neitiznot, dragon boots, the highest possible gloves from the Culinaromancer's chest (or dragon gauntlets from Fist of Guthix), and a good cape, such as a fire cape, cape of achievement, or soul wars cape. Boost potions are unnecessary, as your stats will receive a large boost during all of the following battles. |
Ranged (75+ recommended)
Once again, wear your best armour, preferably Black dragonhide armour, Blessed dragonhide armour, Karil's armour or Armadyl armour, along with an amulet, cape and pair of boots with good defence bonuses, as described in the melee set-up above. With the appropriate ranged level, this approach could possibly be much easier than the melee method. Boost potions are unnecessary, as your stats will receive a large boost during all of the following battles. |
Magic
The preferable choice of armour is something with high magical bonuses, such as Ahrim's robes set, Mystical robes or Infinity robes. The gloves however should be ones from the Culinaromancer's chest for the defence bonuses. Boost potions are unnecessary, as your stats will receive a large boost during all of the following battles. |
TIP: After every wave of monster killed. You are allowed to teleport out of the battle once the cutscenes have finished. Your progress will be saved.
First battle: General Khazard
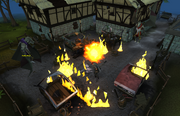
A safe spot is available for rest and healing.
When you touch the Stone of Jas, a short cutscene plays that shows Commander Zilyana being struck down by K'ril Tsutsaroth during a battle between Saradomist and Zamorakian forces at Annakarl in the year 3100 of the Third Age. Saradomin himself rescues her and takes her to the Fist of Guthix arena, where the Stone of Jas lies, and heals her. He explains that the Stone of Jas is the Eye of Saradomin, and that Zamorak returned from his banishment and started a war in order to claim it.
An alarm will sound and you will be teleported outside, where Sir Tiffy is waiting along with Akrisae, Ali the Wise, and a battalion of White Knights. You will head for the ritual site, but be intercepted by General Khazard and his group of minions. He will reveal that Ali the Wise is actually the Mahjharrat Wahisietel, and then attack. Your job is to help Sir Tiffy defeat General Khazard while the rest of the group deals with his followers. General Khazard uses a long-range Magic attack, which can be blocked with Protect from Magic or Deflect Magic, and will occasionally summon Bouncer, who will constantly inflict small amounts of damage on you. You cannot attack Bouncer, so when Khazard summons him, lure him over to Wahisietel, who will kill him for you. Note that during this fight, your combat stats will receive a large boost.
Second battle: Lucien's Ice Titans


Trap the Ice Titans here (Far Southeast) and run back and forth to avoid Lucien's Attacks.
Once General Khazard is defeated, another cutscene will play wherein he teleports away and you proceed to the ritual site. Finding it strangely deserted, Wahisietel senses a nearby Mahjarrat; he steps forward and calls for General Khazard to reveal himself. Instead, Lucien appears. After taunting your group, he summons four enhanced ice titans; Sir Tiffy calls Idria via commorb and requests reinforcements. The immediate arrival of a support group of Guardians of Armadyl signals the beginning of the first battle against Lucien's forces.
Two of the enhanced ice titans will head for you. Turn on Protect from Melee or Deflect Melee and attack them. The titans have high hitpoints, but protection prayers fully block their melee attack. However, they also have a special attack that encases you in ice. If you do not break free of the ice as quickly as you can by clicking elsewhere to run away, the ice will shatter and deal significant damage. As the titans are large creatures, try to position them such that only one is attacking you at a time, in order to reduce the number of special attacks used against you. The titans are especially weak to the attacks of combat familiars.
Throughout the battle, Lucien will duel Wahisietel, although he will regularly cast a spell at you. If it hits the ground where you are standing, a pillar of darkness shoots up that deals several hits of 100+ damage each. When you see a skull wreathed in black flame flying towards you, move at least two squares away from where you're standing and continue attacking the ice titans. Note that if an ice titan freezes you before you can evade Lucien's spell, you may be hit for massive damage, so make sure your health is up! An easy way of avoiding both being frozen and being hit by Lucien's attacks (or all attacks in general) refer to the picture on the right.
Third battle: Lucien's Ice Demons
After Lucien's enhanced ice titans are defeated, he will summon twenty level 300 ice demons. Things look bleak until the Mahjarrat Sliske suddenly appears and summons the Barrows brothers to aid in the fight. Another battle begins, in which two of the ice demons attack you. The ice demons use Magic and Ranged attacks, the Magic attack being stronger, and can cause icicles to grow on the ground, which will block your movement. You can, however, attack an icicle to break it. Lucien will continue to cast his spell at you during this fight, so it is very important to keep moving to avoid being surrounded by icicles when Lucien's spell hits. It takes two "icicle attacks" from the demons to create enough to completely surround you, which should not happen as long as you move around a bit.
The Beginning of the Ritual
Once the ice demons are killed, Lucien will grow tired of your attempts to stop him, and turn to a more important subject: the Ritual of Rejuvenation. At this point, multiple Mahjarrat will teleport to the ritual site, including Enakhra, who believes that her rival Akthanakos, who also appears, should be sacrificed in the Ritual. More Mahjarrat, including Zemouregal, Azzanadra, and General Khazard, will appear and argue over who will be sacrificed. Hazeel will also appear for players who chose to revive him during Hazeel Cult. Lucien decrees that as the most powerful Mahjarrat, he alone will decide who is sacrificed, and he pulls the frozen Jhallan from the cavern beneath, choosing him as the sacrifice.
Fourth battle: Armoured Zombies and Arrav
Wahisietel protests, claiming that Lucien must be the sacrifice due to the threat he presents. While Wahisietel attacks Lucien again, Sliske summons the Barrows brothers for the second time; Zemouregal counters by calling his gargoyle minion Sharathteerk, who will summon four powerful armoured zombies. Help the Barrows brothers defeat the armoured zombies, who will not attack you back. (Keep an eye out for Lucien's spell.) Zemouregal will then order Sharathteerk to summon Arrav, who engages all six Barrows brothers at once. Your job is to attack Arrav, while evading Lucien's dark magic as before, until he turns his attention to you, then lure him over to the rocks to the south, where you planted his heart. Once he comes close enough to it, Arrav will break Zemouregal's control over him. Move around and watch as the hero of Varrock viciously turns on his former master.
Zemouregal will plead to Lucien, who ignores the calls for aid. Stung by the apparent betrayal, Zemouregal calls for everyone present to attack Lucien. Azzanadra tells you that the southern beacon has broken, and tells you to fix it, which will enable him to call upon the power of Zaros and end the battle. Lucien retaliates by summoning a level 475 glacor to stop you. Turn on Protect from Ranged or Protect from Magic and gather the four pieces while avoiding the glacor. Assemble them by clicking on one piece in your inventory, then place the beacon back into the tree. At that point, Lucien calls for the fighting to stop, and proceeds with the ritual.
The Ritual, the Stone of Jas, and the Dragonkin
Lucien performs the Ritual of Rejuvenation, sacrificing Jhallan's life in order to renew every other Mahjarrat. As each Mahjarrat is rejuvenated, his or her appearance changes to more resemble a human. Azzanadra strikes Lucien with the power of Zaros in two massively damaging attacks, which Lucien shrugs off. In response, he summons the Stone of Jas and touches it, amplifying his power even further. However, before he can use it, two dragonkin arrive and proclaim Lucien to be the False User, whom they will destroy. As an example of their power, one of the dragonkin incinerates Idria, who is attempting to negotiate an alliance with the dragonkin against Lucien. The dragonkin explain that while others such as Lucien may draw power from the Stone of Jas, their power is the Stone of Jas, and its misuse enrages them. Lucien attacks the dragonkin, but they quickly overpower him and stab him through the chest, killing him. Most of the Mahjarrat present teleport away to safety, and the dragonkin leave.
")
")
")
")
Finishing up
Sliske is impressed by your skill and tries to convert you into a Barrows brother, but Akrisae jumps in the way, saving you. Sliske quickly teleports away. After a quick chat, Ali teleports away as well. Tiffy summons a Druid who performs a mathematical spell placing the stone deep underground in an unknown place. You then all teleport away together back to Falador.

However, you quickly enter a burnt down version of Draynor where all the deceased heroes (such as Duradel and Hazelmere, Lucien and Idria) are all there and get killed. The Dragonkin kill off the Druid, after an interesting short chase scene, and then Tiffy. They let you go, telling you this is a vision of the future. You return to Falador, and Tiffy doesn't recollect the dream as you do. Quest complete!
After the quest Edgeville appears to have been attacked by the Dragonkin, just as they stated in the vision.
Rewards
- 3 Quest Points
- 110,000 Agility XP
- 40,000 Crafting XP
- 40,000 Mining XP
- Three 80,000 XP lamps (only available for skills level 72 and higher)
- Ability to fight a new Barrows brother (Akrisae the Doomed) and gain new Barrows equipment
- Access to the bane ore mine
- Ability to fletch bane arrows and bane bolts
- Access to the Lunar spell Tune Bane Ore
- The ability to gain combat bonuses in certain areas. By entering the room the stone of Jas had been kept you are granted combat bonuses in the wilderness and troll areas. There bonus is lost when you leave these areas.
- Access to glacors
- The ability to craft Armadyl runes from a ground Armadyl shard
- The ability to create an Armadyl Battlestaff to enhance the power of the Storm of Armadyl spell
- After the quest you can return to the ritual site and speak to Arrav near the entrance; you will gain 3,000 bonus Prayer XP
Music Unlocked
- Strength of Saradomin (if not already unlocked)
- Return of Lucien
Gallery
")
")
")
")
")
")
")
")
")
Trivia
- On the first day of the quest's release, the reward portion on the quest help said "A fireball set the rewards alight. Come back tomorrow when we've put out the fire."
- It was originally believed that 78 Woodcutting, 83 Fletching and 65 Dungeoneering would be requirements for this quest but it was confirmed that this was false. Paul Gower stated that they were probably for a different quest[1].
- There was a leak on Facebook on 8 June 2011 that this quest would be released July that year, which was removed quickly after it appeared. After this, Mod Mark confirmed this was not true, and should not have been added to Facebook at all.
- When General Khazard summons Bouncer, Wahisietel will kill it while saying "Your dog can't help you now!", a play on words from when Kal'ger the Warmonger yells "Your god can't help you now!"
- The Mahjarrat does 9001 damage to Lucien which is reference to the internet meme "Over 9000". This internet meme came from the show Dragon Ball Z.
References
- ^ Paul. "Development of the Mahjarrat." 24 June 2011. Developer Blogs Forums.
| Mysteries of the Mahjarrat |
| ||||
| Rise of Lucien |
| ||||
| Return of Zaros |
| ||||
| Arrav |
| ||||
| Sliske |
| ||||
| Related quests |
| ||||
| Related miniquests |
| ||||
| Lores and Histories |
| ||||
| Quest recollector |
| ||||