No edit summary Tag: sourceedit |
Tag: sourceedit |
||
| Line 97: | Line 97: | ||
The ''Fuzzy Select Tool'' ([[File:GIMP - Fuzzy Select Tool icon.png]], '''U''') and ''Select by Color Tool'' ([[File:GIMP - Select by Color Tool icon.png]], '''Shift + O''') tools can be used to add [[RuneScape:Editing/Image transparency#Inventory icon images transparency|transparency easily]] to inventory icons. |
The ''Fuzzy Select Tool'' ([[File:GIMP - Fuzzy Select Tool icon.png]], '''U''') and ''Select by Color Tool'' ([[File:GIMP - Select by Color Tool icon.png]], '''Shift + O''') tools can be used to add [[RuneScape:Editing/Image transparency#Inventory icon images transparency|transparency easily]] to inventory icons. |
||
| + | |||
| + | ===Color picker=== |
||
| + | The ''Color Picker Tool'' ([[File:GIMP - Color Picker Tool icon.png]], '''O''') can be used to select a colour from an image. Useful for selecting a colour for reconstructing [[RuneScape:Editing/Image transparency#Particles - hard method|particle transparency]]. |
||
===Rotate=== |
===Rotate=== |
||
The ''Rotate Tool'' ([[File:GIMP - Rotate Tool icon.png]], '''Shift + R''') can be useful for correcting images that have been taken at an unnatural angle to a more neutral position - use the slider to rotate the image. |
The ''Rotate Tool'' ([[File:GIMP - Rotate Tool icon.png]], '''Shift + R''') can be useful for correcting images that have been taken at an unnatural angle to a more neutral position - use the slider to rotate the image. |
||
| + | |||
| + | ===Paintbrush=== |
||
| + | The ''Paintbrush Tool'' ([[File:GIMP - Paintbrush Tool icon.png]], '''P''') can be used for drawing onto an image. This is not generally used, except in editing [[RuneScape:Editing/Image transparency#Particles - hard method|particle transparency]]. |
||
===Eraser=== |
===Eraser=== |
||
Revision as of 11:17, 31 December 2016
To effectively edit images on the wiki you will need a decent image editing program. For more advanced edits, such as adding transparency to images, you will need a program that has layer capabilities. You can use any program that is capable of doing so to edit images for the wiki; however more basic programs such as MS Paint will not be effective.
Many wiki editors use GIMP for image editing. GIMP is straight forward to learn how to use and can be downloaded for free here. The rest of this guide will cover how to use some of GIMP's basic functions and tools.
Menus

File
You can open an image you want to edit using the Open option or the shortcut Ctrl + O. You can also right click on the file and select "Edit with GIMP".
Use the Save option (Ctrl + S) or Save As (Shift + Ctrl + S) to save in a GIMP native format (.xcf).
Use the Overwrite/Export button (Ctrl + E) or Export As button (Shift + Ctrl + E) to save in regular file extensions (e.g. .png/.jpg).
Edit
| Icon | Function | Shortcut |
|---|---|---|
| Undo | Ctrl + Z | |
| Redo | Ctrl + Y | |
| Cut | Ctrl + X | |
| Copy | Ctrl + C | |
| Paste | Ctrl + V |
Image
The Transform options can be used to flip and rotate images. You may occasionally need to use the Flip Horizontally function to change left facing chatheads to look towards the text in an article.
When you are looking with layers you may need to increase the canvas size. Use Fit Canvas to Layers to resize your image to fit with its layers or the Canvas Size... option to adjust the size manually.
Autocrop Image removes all the unused space around the image. This should be done after adding transparency to images.
You may also need to Merge Visible Layers when working on an image with layers. This compresses all visible layers into a single layer, in the order that the layers appear.
Layer
Many of the functions available here can be accessed more easily by opening the Layers, Channels, Paths, Undo... window.
Under the Transparency options you can "Add Alpha Channel", which is necessary when adding transparency, or send Color to Alpha, which can be used to add translucency.
Crop to Selection can be used after having made a selection to crop an image.
Colors
Color Balance, Hue-Saturation, or Colorize can all be used to adjust the colour of a selection - this is used when reconstructing translucent areas.
Tools
Contains many tools which can be more easily accessed using the Toolbox - Tool Options window.
Windows
Can be used to open windows with the Recently Closed Docks option. Toolbox - Fonts, Tool Options is useful for general image editing and Layers, Channels, Paths, Undo... is useful when working with layers e.g. when adding particle translucency .
Layers - Gradients
The Layers window is useful for keeping track of what you're doing when working on an image with layers e.g. when adding translucency. You can open this window using the Windows menu if you have closed it.
All layers are shown in this window. The image's layers are viewed in the order they appear in the window: layers at the top of the window are shown at the foreground of the image. You can the layers' order by dragging layers up or down
The eye icon changes visibility of layers.
")
")
")
Right-clicking on a layer allows you to access several functions:
- New Layer... creates a new layer which you can choose the size and fill colour for.
- Merge down merges the active layer with the next visible layer
- Delete Layer
- Layer Boundary Size... can be used to increase the size of a layer without scaling the image without changing the size of the content of that layer.
- Layer to Image Size can be used to increased the size of a layer to match the size of the image.
- Merge Visible Layers merges all layers which are currently visible.
Toolbox - Tool Options
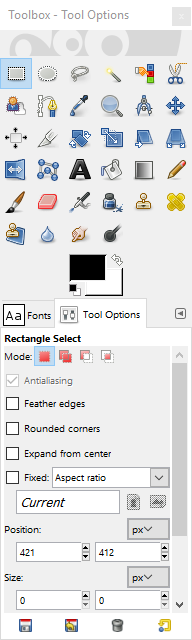
The Toolbox window allows you to chose different tools for image editing and adjust their options. You can open this window using the Windows menu if you have closed it.
Selection tools
The Rectangle Select Tool (![]() ) and Ellipse Select Tool (
) and Ellipse Select Tool (![]() ) can be used to make a selection in these shapes. Can be used to make a selection for cropping, if you have not applied transparency. The tools can also be chosen by pressing R or E on your keyboard.
) can be used to make a selection in these shapes. Can be used to make a selection for cropping, if you have not applied transparency. The tools can also be chosen by pressing R or E on your keyboard.
The Free Select Tool (![]() , F) is used to hand draw selections when adding transparency and translucency to images.
, F) is used to hand draw selections when adding transparency and translucency to images.
The Fuzzy Select Tool (![]() , U) and Select by Color Tool (
, U) and Select by Color Tool (![]() , Shift + O) tools can be used to add transparency easily to inventory icons.
, Shift + O) tools can be used to add transparency easily to inventory icons.
Color picker
The Color Picker Tool (![]() , O) can be used to select a colour from an image. Useful for selecting a colour for reconstructing particle transparency.
, O) can be used to select a colour from an image. Useful for selecting a colour for reconstructing particle transparency.
Rotate
The Rotate Tool (![]() , Shift + R) can be useful for correcting images that have been taken at an unnatural angle to a more neutral position - use the slider to rotate the image.
, Shift + R) can be useful for correcting images that have been taken at an unnatural angle to a more neutral position - use the slider to rotate the image.
Paintbrush
The Paintbrush Tool (![]() , P) can be used for drawing onto an image. This is not generally used, except in editing particle transparency.
, P) can be used for drawing onto an image. This is not generally used, except in editing particle transparency.
Eraser
The Eraser Tool (![]() , Shift + E) can be used rub out parts of an image - this is not generally useful for editing images for the wiki, except in adding translucency.
, Shift + E) can be used rub out parts of an image - this is not generally useful for editing images for the wiki, except in adding translucency.
Blur
The Blur/Sharpen Tool (![]() , Shift + U) is used to tidy up after adding translucency.
, Shift + U) is used to tidy up after adding translucency.
It can also be used to create a blurred effect of images of content which has feathered edges, e.g. leaves on trees and feathers, rather than the usual sharps edges. To do this set the Tool Options to a small size brush (~7) with a high blur rate (~30).
See also
<navbox?>