Solak, the Grove Guardian is a level 7000 boss that can be fought in a team of 2 or up to 7. In order to access the duo instance, players must use the "duo" option from Merethiel. The fight has many mechanics, which all teammates should be well-versed in.
The Fight
Equipment
Solak can be poisoned, so it is recommended to use weapon poison++ and cinderbane gloves. Players who enter Solak's mind in the final phase can bring Achto armour as a switch to increase the time they can survive inside. A Caroming switch is also highly useful as it will help to draw the aggression of Ererthdor's manifestations quicker.
Because hit chance on Solak exceeds 100% when using a tier 90 or above weapon, overloads, and prayers, the Runic accuracy aura, Brawler aura, and Sharpshooter auras are of little use. If the Mahjarrat aura, Berserker aura, Reckless aura, and Maniacal auras cannot be used, others such as Inspiration and Dark Magic should be used instead.
Any combat style can be used as Solak is equally weak to all styles and his low defence will ensure substantial damage can be done. At least one player should use standard magic spells for Vulnerability. However, melee is not recommended for players entering Solak's mind on phase 4 as it will make dealing with the manifestations significantly more difficult.
Overall
Solak uses a melee auto attack on the base tank that splits into ranged auto attacks sent towards the rest of the team. Unlike Nex: Angel of Death and Vorago, Solak's melee attack is single-target and is not AoE. Solak can use a special type of damage: blight damage, which many of his special attacks deal. It is similar to soft typeless damage in that the only way to reduce/block this source of damage is through defensive abilities, Shield Dome, and other damage reducing methods. Unlike soft typeless damage, however, Resonance can heal from blight damage in full. Becoming damaged by blight can apply a blight debuff that increases damage taken by 1% per stack.
Solak can perform deadly blight bursts on random non-tank players at certain points in the fight. This deals blight damage, has AoE properties, and is indicated by a second bar filling up beneath the targeted player's adrenaline bar, so players afflicted with them should move away from other teammates before the bar fills. This does not put blight stacks on the affected targets, however.
There are soft caps set in place at certain life point thresholds to prevent players from skipping phases. If the team deals too much damage, Solak gains a massive damage reduction buff that is only lifted when the phase has been properly completed.
During the first three phases, players advance by completely emptying the secondary bar. Conversely, for the final phase, the depletion of the secondary bar causes the entire team to be instantly killed.
Players can battle Solak in a team of two, or up to seven. In a team of two, Solak's mechanics change accordingly.
Merethiel assists players throughout the fight as both a supportive combatant and a key figure in certain phases and mechanics.
Phase 1: Initiation

Green spore bomb
Special attack order:
- 2 autoattacks
- Green spore bombs and damage bar
- 3 autoattacks
- 8 Volatile roots spawned
- 14 autoattacks
- Root attack
- 7 autoattacks
- Blight bomb
- 7 autoattacks
- Blight bomb
- 3 autoattacks
- Arms attackable
- Legs attackable
- Blight afflicted core
- 7 autoattacks
- Repeat from 1 until core depleted
| Duo | 7-man | Effect when reached | |
|---|---|---|---|
| Solak | 2,250,000 | 6,000,000 | All damage taken capped; replaces all special attacks with Lockdown mechanic |
| Volatile rootling | 20,000 | 80,000 | Prevents a blightbound lasher from spawning |
| Blightbound lasher | 50,000 | ? | N/A |
| Solak's arms | 60,000 | 120,000 | Legs become attackable |
| Solak's legs | 50,000 | 100,000 | Spawns blight afflicted core |
| Blight afflicted core | 250,000 | 1,000,000 | Ends phase |
The fight is started when a player interacts with Solak. Solak is aggressive towards the player who initiated the fight.
Solak begins with 2 autoattacks before yelling "I will replenish the earth with your bones", generating 6 (2 in duo) green spore bombs that land in several random areas of the arena. If a bomb is not stood on, all players receive ~5500 blight damage and are applied 5 blight stacks - to prevent this, players must stand in the green circles on the ground. After the spore bombs have either been absorbed or detonated, a timer bar appears under players' adrenaline bars; after this fills, every player takes 8000 (3500 in duo) soft typeless damage that increases with the distance players stand from each other. This hit is not AoE, so players can safely stand next to each other to reduce the damage taken.
Solak then spawns eight volatile rootlings around the sides of the arena with 80,000 health each (20,000 in duo). If ignored, they turn into blightbound lashers that deal extremely high and rapid ranged damage, so it is essential to kill them. The timer to convert to lashers is slowed when tagged, so all roots should be tagged.

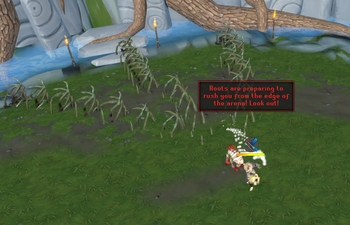
Roots can travel across the map and hit all players to reach you
14 autoattacks after spawning the rootlings, Solak targets two players with a root special attack. Solak will yell "The roots below bend to my will!"; a yellow pointer arrow indicating the direction the roots will come from and a popup text box showing the number of ticks left before the attack hits appears on the targeted players' screens. After this reaches 0, large roots burst forth from the ground and travel towards the targeted players, stunning every player caught in their path, dealing up to 2500 blight damage per tick, and applying 2 blight stacks per hit.
The targeted players should Surge towards the pointer arrow, which is always on the edge of the arena, activate Anticipate, and Bladed Dive away from the roots once their timer reaches 1 tick.
After the root attack, Solak uses two blight bombs on two non-tank players. After the first bomb detonates, Solak's attack speed increases significantly.
Continue damaging Solak until he begins the Lockdown mechanic by going to the centre of the arena and burying his arms into the ground, at which point he stops attacking. His arms then become attackable, each with 120,000 life points (60,000 in duo). After depleting their health pools, his legs become vulnerable, each with 100,000 life points (50,000 in duo). Both have timer bars which show how much time is left to disable them. If the timer runs out before they are disabled, Solak deals massive blight damage to everyone, summons several blightbound lashers, and resumes attacking players. If this occurs, he uses several autoattacks before repeating the Lockdown again.
Once his legs are disabled, Solak spawns a blight afflicted core. Its health is shown in the second bar of this phase and must be destroyed to advance to the next phase. After about 18 seconds, the core returns to Solak, and he repeats his attack pattern until the core is cleansed. During the repeated rotations, the blight bomb is only used once instead of twice.
If Solak's life points reach 2,250,000 during the phase, all damage dealt to him is significantly reduced and each special attack he would use is replaced by Lockdown.
Phase 2: Corruption
Special attack order (duo):
- Anima eruptions and storm
- Yellow anima bombs
- 12 autoattacks
- Blight rain (Nature's Blessing dome 1)
- 7 autoattacks
- Binding crush
- 4 autoattacks
- Blight rain (Nature's Blessing dome 2)
- 7 autoattacks
- Purple Tornado
- 7 autoattacks
- Root Arrow
- 4 autoattacks
- Blight bomb
- 3 autoattacks
- Root arrow
- 4 autoattacks
- Blight rain (Nature's Blessing dome 3)
- Restart from anima bombs if not at 0% corruption
| Duo | 7-man | Effect when reached | |
|---|---|---|---|
| Solak | 1,200,000 | 3,200,000 | All damage taken capped |
| Solak (before eruptions are destroyed) | 2,100,000 | ? | All damage taken capped |
| Anima eruption | 33,333 | 100,000 | Sends players to anima storm; final eruption lifts damage cap |
| Anima storm | ? | ? | Stops dealing blight damage |
The second bar now starts at 100%. The next phase begins when it lowers to 0%; special attacks used in this phase gradually reduce the bar and damaging him increases the speed at which it reduces.
As soon as this phase starts, Solak applies five blight stacks to each player in the arena. If the player already had more than 5 stacks, they are reduced to 5. To remove the blight stacks, interact with Merethiel, who generates a green circle of light that removes all blight stacks from players standing in it. Merethiel takes some time to recharge, so do not constantly interact with her to remove stacks.
Four anima eruptions appear in the corners of the arena, powering a blighted anima storm above the arena. While it is active, it intermittently drops blight blasts that hits all players for 1000-2000 blight damage and apply a blight stack. This storm must be dispelled: to do so, players must attack and destroy the anima eruptions, which then creates a blue circle that teleports each player standing in it above the arena and within reach of the anima storm, which must be rapidly clicked on to damage it. A message will be received when the storm has been dispelled. All four anima eruptions must be sealed, even if the storm has already been dispelled, because Solak gains a damage cap until the final eruption is destroyed
If the player's blight stacks go above 10, they heal the storm instead of damaging it. The players that go up must ensure stacks stay below 10 if going above the arena. The damage dealt to the storm is equal to (10 - blight stacks)*1000.
Each player can only siphon from the storm for a short duration before landing in the middle of the arena. Immediately use Reflect and run as players will be damaged and have blight stacks applied from the blight patch underneath the storm. This patch of blight enlarges as the storm remains active and gradually dissipates when the storm has been dispelled. It is recommended to pray melee upon dropping back down as Solak will target a random player when all have returned. If the anima storm has not been dispelled after all four eruptions are destroyed, then the intermittent blight explosions continue into the phase for a duration directly proportional to the amount of health the storm has remaining.
Once this is achieved, Solak shouts "Rip the earth open! Spill the blood of life!", bombarding the area with anima bombs that deal heavy soft typeless damage if struck by one. The bombs slowly rise up from the ground before landing back down, dealing damage in a 3x3 area. The damage from each bomb starts out low but increases as they continue to spawn. Defensive abilities can reduce this damage. Standing at the stair case at the north part of the arena avoids most bomb spawns.
As the last bombs begin to drop, a yellow dome appears on the northern side. Click on it to obtain the "Nature's Blessing" ability - this is used against an upcoming attack and can be activated by clicking the "Extra action" button on the player's interface. When Solak yells "The power of the grove in its purest form. Let it rain down upon you", activate "Nature's Blessing" a few seconds after he yells this - a blight barrage converges on all players, dealing massive damage and applying blight stacks. The shield protects players under it from most of the blight damage, reducing it to approximately 3000 damage per hit; otherwise, it can deal upwards of 8000 damage per hit. It is still necessary to use defensive abilities such as Reflect, Debilitate or Barricade to reduce the damage further. This attack drains a significant amount of corruption from Solak.
After the barrage, Solak then targets a random player by yelling "I'll crush you like the bug you are". The targeted player should quickly use Anticipation or Freedom as roots will stun them and bring them to Solak who then attempts to slam them with his arm, killing them instantly if they do not escape. Any player standing near where Solak slammed his arm down takes 3000 melee damage. One player must then climb up Solak's arm and all other players must deal as much damage to Solak as possible. If the team fails to deal enough damage in time, the climber is instantly killed. The climber is able to attack Solak while climbing. The climber's persistent abilities are cancelled upon climbing up Solak's arm. If successful, the climber will "deal a deadly blow to Solak", draining some corruption from the bar. Solak will then grab them and attack them with a "crushing blow" after this, which deals a very high melee hit (over 6000 damage). The player should use Devotion or Resonance to block this attack.
After 4 auto attacks, Solak uses the blight barrage attack a second time - Nature's Blessing should be used again.
After the second barrage, Solak surrounds himself with a purple blight tornado animation and spins rapidly, launching heavy hitting blight attacks at every player that deal massive damage. Nature's Blessing does not reduce damage from this attack, so Resonance, Barricade, and optionally Intercept are required to survive against this ability. This also lowers Solak's corruption bar but applies several blight debuffs, so all players should go to Merethiel after the attack ends to cleanse their debuff stacks.
Most teams should aim to end the phase after the tornado special attack.
After the tornado, Solak targets three non-tank players with a deadly blight bomb and the base tank with a root arrow. The root arrow is signalled by Solak pounding the ground and yelling "Frail creatures! It's time to die!". A few seconds after this roots will sprout up at the base tank's position forming an arrow shape. All other players should stand away from the tank, who can avoid the attack with Surge or simply by running away from where they stood. In a team of 7, three random non-tank player are targeted with a blight bomb that will explode for area of effect damage. It is affected by defensive abilities, and once the three bombs have exploded, a line of roots similar to the ones from phase 1 will form between the three targeted people binding them in a triangular formation. For this reason, the three targeted players should move in the direction opposite from Solak and the rest of the team, stand apart, and Resonance or Reflect the bomb and Anticipate or Freedom the root bind.
Solak then uses a third blight barrage that must be reduced by the Nature's Blessing dome.
If Solak's corruption bar has still not been emptied at this point, the rotation restarts at the anima bomb special attack ("Rip the earth open! Spill the blood of life!"). Once the bar is empty, the next phase begins.
Phase 3: Manifestation
Special attack order:
- 2 autoattacks
- Blight bomb
- 3 autoattacks
- Stun and blight bleed
- Open mind
- Repeat until all green sigils converted or Erethdor is killed
| Duo | 7-man | Effect when reached | |
|---|---|---|---|
| Solak | 300,000 | 800,000 | All damage taken capped |
| Erethdor | 250,000 | 500,000 | Ends phase early; weakens p4 manifestations |
Once Solak's energy from the previous phase is completely empty, phase 3 begins. Merethiel casts a spell, generating eight green circles around the arena. Solak must be led to these circles to charge them and remove the corruption. During this time, he intermittently shouts "Give me the life you so tightly cling to!", stunning all players briefly and applying a blight bleed that quickly increases in damage and applies blight stacks. The bleed can be stopped by stunning Solak; a message similar to Yakamaru's appears when someone stuns him. Blight bombs with a fairly wide AoE can occasionally fall upon the green sigils, dealing 2000 blight damage.
He also uses the deadly blight bomb on non tank players, which can be healed from with Resonance. This attack comes before Solak's stun, so Anticipation should be used when the bar is halfway full before using Resonance.
When a circle has been filled with corruption, Merethiel can send players into Solak's mind via the Extra Action button to battle Erethdor, who uses Ranged abilities. Players cannot battle Erethdor for too long as they will be expelled from his mind after a short duration. Food does not heal the player while inside Solak's mind, so players should have high life points before entering Solak's mind. If Erethdor is defeated, the next phase automatically begins. Otherwise, all eight circles will need to be filled with corruption.
Lower Solak's health to the minimum before phasing; this makes the next phase significantly easier. If not already using a steel titan, players should dismiss their current familiar and summon it for the final phase.
Phase 4: Erethdor's Last Stand
| Duo | 7-man | Effect when reached | |
|---|---|---|---|
| Solak | 300,000 | 800,000 | Ends fight |
| Solak's consciousness | 100,000 | If killed, all players are instantly killed | |
| Manifestations of Erethdor | 25,000 | N/A | |
Solak becomes conflicted due to Erethdor's waning hold over him and stops attacking players. The second health bar now has 100,000 life points - this is the health of Solak's conscience, and if it decreases to 0, all players are instantly killed. A sign of life will revive the player, but they will be instantly killed again shortly after unless Solak's body is defeated. To end the phase and the fight, Solak's life points in the outside world must be reduced to 0.
In his mind, multiple Manifestations of Erethdor will spawn and attempt to regain control over Solak by destroying his conscience. One spawns for every 15,000 life points Solak's body loses and attacks his conscience with blight damage that increases the longer they remain alive, and they can quickly destroy Solak's conscience if left alone. If Erethdor was defeated in the previous phase, his manifestations deal less damage.
One player must enter Solak's mind with the extra action button and draw their aggression away from Solak's conscience by attacking them. The manifestations deal magic damage against players, so Deflect Magic and Reflect, Devotion, and Barricade are essential for surviving against them. Solak's conscience can be healed by rapidly clicking on it, which heals 1500 per click while damaging the player for the same amount. Barricade will block this damage however, so healing should only be done while under its effects. Like in the previous phase, food cannot heal while in Solak's mind, so if players need to heal, they must leave his mind before doing so.
In duos, the manifestations can be safely killed - however, in a group, killing them is unfeasible, as doing so causes them to appear in the real world and attack players there.
While one player is in Solak's mind drawing their attention, those in the physical world must attack Solak's body. Solak no longer uses autoattacks in this phase but can still charge a blight attack that can potentially deal over 9000 damage, which is indicated when he shouts "THIS ENDS NOW." It is strongly recommended to use the Vulnerability spell, Onslaught, steel titans, portents of restoration, Soul Split and the Lunar Spell Disruption Shield to fend off the blight attacks.
The battle will end once the team successfully reduces Solak's health to 0 in the physical world. From there they may claim their rewards directly from Solak or from Merethiel outside the arena. If players die after Solak is freed, or die but do not make it to Death's office before freeing him, they are automatically resurrected by the power of the Lost Grove.