(...) |
(→Trivia) Tags: Visual edit apiedit |
||
| (23 intermediate revisions by 15 users not shown) | |||
| Line 1: | Line 1: | ||
| − | {{ |
+ | {{Otheruses|the Dungeoneering boss|other uses|Stomp (disambiguation)}} |
| − | {{Infobox Monster |
+ | {{Infobox Monster new |
| + | |version1=Level 7|version2=Level 25|version3=Level 35|version4=Level 44|version5=Level 54|version6=Level 63|version7=Level 82 |
||
|name = Stomp |
|name = Stomp |
||
| − | |image = [[File:Stomp-Dungeoneering.png| |
+ | |image = [[File:Stomp-Dungeoneering.png|300px]] |
|release = [[12 April]] [[2010]] |
|release = [[12 April]] [[2010]] |
||
|update = Dungeoneering Skill! |
|update = Dungeoneering Skill! |
||
| − | |level = See table |
||
| − | |LP = See table |
||
| − | |slaylvl = No |
||
|members = No |
|members = No |
||
| ⚫ | |||
|aggressive = Yes |
|aggressive = Yes |
||
|poisonous = No |
|poisonous = No |
||
| + | |level1=7|level2=25|level3=35|level4=44|level5=54|level6=63|level7=82 |
||
| − | |immune to poison = Yes |
||
| + | |experience1=|experience2=|experience3=|experience4=|experience5=|experience6=|experience7= |
||
| ⚫ | |||
| + | |lifepoints1=2500|lifepoints2=9000|lifepoints3=12500|lifepoints4=16000|lifepoints5=19500|lifepoints6=22500|lifepoints7=29500 |
||
| − | |max hit = Varies |
||
| + | |immune_to_poison = Yes |
||
| ⚫ | |||
| + | |immune_to_stun = |
||
| + | |immune_to_deflect = |
||
| + | |immune_to_drain = |
||
| ⚫ | |||
| ⚫ | |||
| + | |max_melee1=|max_melee2=|max_melee3=|max_melee4=|max_melee5=|max_melee6=|max_melee7= |
||
| + | |max_ranged1=|max_ranged2=|max_ranged3=|max_ranged4=|max_ranged5=|max_ranged6=|max_ranged7= |
||
| + | |max_magic1=|max_magic2=|max_magic3=|max_magic4=|max_magic5=|max_magic6=|max_magic7= |
||
| + | |max_spec1=|max_spec2=|max_spec3=|max_spec4=|max_spec5=|max_spec6=|max_spec7= |
||
|weakness = Nothing |
|weakness = Nothing |
||
| + | |armour1=|armour2=|armour3=|armour4=|armour5=|armour6=|armour7= |
||
| − | |always drops = Nothing |
||
| + | |acc_melee1=|acc_melee2=|acc_melee3=|acc_melee4=|acc_melee5=|acc_melee6=|acc_melee7= |
||
| ⚫ | |||
| + | |acc_ranged1=|acc_ranged2=|acc_ranged3=|acc_ranged4=|acc_ranged5=|acc_ranged6=|acc_ranged7= |
||
| − | |||
| + | |acc_magic1=|acc_magic2=|acc_magic3=|acc_magic4=|acc_magic5=|acc_magic6=|acc_magic7= |
||
| + | |attack1=|attack2=|attack3=|attack4=|attack5=|attack6=|attack7= |
||
| + | |ranged1=|ranged2=|ranged3=|ranged4=|ranged5=|ranged6=|ranged7= |
||
| + | |magic1=|magic2=|magic3=|magic4=|magic5=|magic6=|magic7= |
||
| + | |defence1=|defence2=|defence3=|defence4=|defence5=|defence6=|defence7= |
||
| + | |aff_weakness = |
||
| + | |aff_melee = |
||
| + | |aff_ranged = |
||
| + | |aff_magic = |
||
| ⚫ | |||
[[File:Stomp icon.png|left]] |
[[File:Stomp icon.png|left]] |
||
| − | '''Stomp''' is a boss encountered in [[Daemonheim]] requiring level 35 [[Dungeoneering]]. He can be found on floors 18 through 29. |
+ | '''Stomp''' is a boss encountered in [[Daemonheim]] requiring level 35 [[Dungeoneering]]. He can be found on floors 18 through 29. |
| − | ==Levels== |
||
| − | {|class="wikitable" |
||
| − | !Level |
||
| − | !Life points |
||
| − | |- |
||
| − | |7 |
||
| − | |2500 |
||
| − | |- |
||
| − | |63 |
||
| − | |22500 |
||
| ⚫ | |||
| − | |||
| − | ==Fighting Stomp== |
||
| − | [[File:Green power crystal.png|left]] |
||
| − | Stomp is an immobile boss fought in three stages. |
||
| + | A [[behemoth]], Stomp is so large that only his head can fit through the portal connecting the Behemoth's original location to Daemonheim (according to the [[Behemoth notes]]). Because of this, whoever brought Stomp into the dungeons set up a system by which the portal can be closed on its neck (decapitating it) should the need ever arise. |
||
| ⚫ | Stomp uses |
||
| + | ==The fight== |
||
[[File:Blue power crystal detail.png|left|100px]] |
[[File:Blue power crystal detail.png|left|100px]] |
||
| + | Stomp is an immobile boss fought in three stages. The goal is to close the portal by placing [[power crystal]]s three times on both lodestones next to Stomp. |
||
| ⚫ | Stomp uses 5 attacks, but initially uses only two. At any time during the fight, it can use a single-targeted melee attack and a multi-targeted ranged attack that throws small rocks at all players and also breaks debris left around the room. After the first stage, a single-targeted magic attack that consists of a glowing yellow orb fired out from its mouth is added to the mix. After the second stage, Stomp can use its most damaging move: a slow, single-targeted ranged attack that hits the player for 25% of their maximum life points, regardless of the player's armour (for example, a player with 8,500 [[life points]] would take 2,125 damage). The damage can be reduced with the [[Protect from Missiles]] or avoided completely by running at least two squares away from the target location of the attack (the original position of the player). Although single-targeted, other players can take damage from this attack when it hits if they stand next to the player who was initially targeted. |
||
| ⚫ | Each time a third of its health is taken down, it will become invincible for a short time and cause debris and two [[power crystal]]s to fall from the ceiling. |
||
| + | |||
| − | [[File:Red power crystal detail.png|50px|left]] |
||
| + | |||
| − | Often, debris will fall in such a way that players cannot reach both crystals and both lodestones, potentially making this a tedious fight despite the relative weakness of the boss. Although the debris can be mined, it can take some time to do so. Furthermore, if there is a lot of debris in the way, players may not even be able to mine through it in time before Stomp heals. An easy way around this is to not activate the lodestones immediately, and instead keep hold of the crystals until Stomp repeats the phase. |
||
| ⚫ | Each time a third of its health is taken down, it will become invincible for a short time and cause debris and two [[power crystal]]s to fall from the ceiling. When debris falls, the shadows on the floor indicate where it lands. It is recommended that players avoid standing on the shadows, as they will take damage equal to 25% of their maximum life points when the debris falls. Pick up the [[Power crystals|crystals]] on the floor and place them on the lodestones. The crystals fall before the debris, so it is possible to pick one up and activate a lodestone before all of the debris falls. Once the debris has fallen, it will block movement but it can be removed with a pickaxe if needed. If falling debris hit a player, it will not appear on the ground. The crystals must be picked up and placed on the lodestones on either side of Stomp within about 15 seconds, or it will heal itself to the previous stage (i.e. if it was brought down to 1/3 of its total life points, it will heal back to 2/3 of its total life points) and that stage will start over again. |
||
| + | |||
| + | There are three colours of lodestones; blue, green and red. Each colour will appear at a different phase; thus, players need not keep crystals from previous phases. |
||
==Strategy== |
==Strategy== |
||
| Line 49: | Line 57: | ||
[[File:Stomp invincible.png|thumb|Stomp rains debris from the ceiling and becomes invincible.]] |
[[File:Stomp invincible.png|thumb|Stomp rains debris from the ceiling and becomes invincible.]] |
||
[[File:Stomp death.gif|right|frame|Stomp's head is severed and it dies.]] |
[[File:Stomp death.gif|right|frame|Stomp's head is severed and it dies.]] |
||
| ⚫ | Fallen debris often blocks progress by either blocking the lodestones or the power crystals. This can be very frustrating if it happens multiple times. An easy way around this is to pick up the crystals the first time that Stomp's life points are lowered, and place them after they are reduced for a second time. The debris can be mined and destroyed, but due to the time it takes to mine the debris, it is still recommended to use this strategy if there is a large amount of debris on the ground. |
||
| − | Stomp's first phase is relatively simple, and may be defeated in any way deemed fit. In the second phase Stomp uses magic, so players may want to prepare their defences against it, such as [[protect from magic]] or ranged armour. Players need not change offensive styles during any of the phases, however. Any ranged ammunition fired at Stomp '''cannot''' be picked back up. During the third and final phase, Stomp will use an avoidable ranged attack that deals a fixed amount of damage depending on your maximum lifepoints, so consider switching instead to attack-boosting prayers such as [[Piety]] or [[Eagle Eye]] to finish it off. |
||
| − | |||
| − | When Stomp begins to charge up, the shadows on the floor indicate where debris will land. It is recommended that players avoid standing on the shadows, as they will take damage when the debris falls. Pick up the [[Power crystals|crystals]] on the floor and place them on the lodestones. The crystals fall before the debris, so it is possible to pick one up and activate a lodestone before all of the debris falls. There are 3 colours of lodestones; blue, green and red. Each colour will appear at a different phase; thus, players need not keep crystals from previous phases. |
||
| − | |||
| ⚫ | Fallen debris often blocks progress by either blocking the lodestones or the power crystals. This can be very frustrating if it happens multiple times. An easy way around this is to pick up the crystals the first time that Stomp's |
||
On complexity 1, it is possible to skip putting in the last, or sometimes second-last set of crystals. When the crystals have been put into place and the team is waiting for Stomp to become attackable again, it is possible for everyone in the group to attack at the same time, and if the damage is high enough they will kill Stomp and skip the remaining phases. |
On complexity 1, it is possible to skip putting in the last, or sometimes second-last set of crystals. When the crystals have been put into place and the team is waiting for Stomp to become attackable again, it is possible for everyone in the group to attack at the same time, and if the damage is high enough they will kill Stomp and skip the remaining phases. |
||
| + | {{clear|left}} |
||
==Drops== |
==Drops== |
||
{{DropsTableHead}} |
{{DropsTableHead}} |
||
{{DropsLine|Name=Protoleather coif|Quantity=1|Rarity=Random|gemw=no}} |
{{DropsLine|Name=Protoleather coif|Quantity=1|Rarity=Random|gemw=no}} |
||
| ⚫ | |||
| ⚫ | |||
| ⚫ | |||
| ⚫ | |||
| ⚫ | |||
| ⚫ | |||
| ⚫ | |||
| ⚫ | |||
| ⚫ | |||
| ⚫ | |||
{{DropsLine|Name=Protoleather shield|Quantity=1|Rarity=Random|gemw=no}} |
{{DropsLine|Name=Protoleather shield|Quantity=1|Rarity=Random|gemw=no}} |
||
| ⚫ | |||
{{DropsLine|Name=Subleather shield|Quantity=1|Rarity=Random|gemw=no}} |
{{DropsLine|Name=Subleather shield|Quantity=1|Rarity=Random|gemw=no}} |
||
| ⚫ | |||
{{DropsLine|Name=Paraleather shield|Quantity=1|Rarity=Random|gemw=no}} |
{{DropsLine|Name=Paraleather shield|Quantity=1|Rarity=Random|gemw=no}} |
||
| ⚫ | |||
{{DropsLine|Name=Archleather shield|Quantity=1|Rarity=Random|gemw=no}} |
{{DropsLine|Name=Archleather shield|Quantity=1|Rarity=Random|gemw=no}} |
||
| ⚫ | |||
{{DropsLine|Name=Dromoleather shield|Quantity=1|Rarity=Random|gemw=no}} |
{{DropsLine|Name=Dromoleather shield|Quantity=1|Rarity=Random|gemw=no}} |
||
| ⚫ | |||
{{DropsLine|Name=Spinoleather shield|Quantity=1|Rarity=Random|gemw=no}} |
{{DropsLine|Name=Spinoleather shield|Quantity=1|Rarity=Random|gemw=no}} |
||
| ⚫ | |||
{{DropsLine|Name=Gallileather shield|Quantity=1|Rarity=Random|gemw=no}} |
{{DropsLine|Name=Gallileather shield|Quantity=1|Rarity=Random|gemw=no}} |
||
| ⚫ | |||
{{DropsLine|Name=Stegoleather shield|Quantity=1|Rarity=Random|gemw=no}} |
{{DropsLine|Name=Stegoleather shield|Quantity=1|Rarity=Random|gemw=no}} |
||
| ⚫ | |||
{{DropsLine|Name=Megaleather shield|Quantity=1|Rarity=Random|gemw=no}} |
{{DropsLine|Name=Megaleather shield|Quantity=1|Rarity=Random|gemw=no}} |
||
| ⚫ | |||
{{DropsLine|Name=Tyrannoleather shield|Quantity=1|Rarity=Random|gemw=no}} |
{{DropsLine|Name=Tyrannoleather shield|Quantity=1|Rarity=Random|gemw=no}} |
||
| ⚫ | |||
{{DropsLine|Name=Sagittarian shield|Quantity=1|Rarity=Random|gemw=no}} |
{{DropsLine|Name=Sagittarian shield|Quantity=1|Rarity=Random|gemw=no}} |
||
| ⚫ | |||
{{DropsLine|Name=Behemoth notes (part 3)|Quantity=1|Rarity=Common|gemw=no|Image=Behemoth notes.png}} |
{{DropsLine|Name=Behemoth notes (part 3)|Quantity=1|Rarity=Common|gemw=no|Image=Behemoth notes.png}} |
||
| ⚫ | |||
{{DropsTableBottom}} |
{{DropsTableBottom}} |
||
==Trivia== |
==Trivia== |
||
| − | *Stomp is the only Behemoth boss who cannot use the "stomp" attack. |
+ | * Stomp is the only Behemoth boss who cannot use the "stomp" attack, as his body does not appear. |
| ⚫ | * Prior to an update allowing players to mine the rocks, Stomp was considered an annoying boss because debris could fall in front of the lodestones, preventing players from using it until the rocks collapsed by themselves. If debris had fallen in front of the ladder, players would be unable to end the dungeon as the rocks collapse while Stomp is on the field. |
||
| − | *In general, Stomp is one of the easiest bosses to escape via the boss door because the time in which Stomp is invincible is more than 10 seconds. |
||
| + | * The shadows the falling debris cast have the examine text of "Heads up!" |
||
| ⚫ | *Prior to an update allowing players to mine the rocks, Stomp was considered an annoying boss because debris could fall in front of the lodestones, preventing players from using it until the rocks collapsed by themselves. If debris had fallen in front of the ladder, players would be unable to end the dungeon as the rocks collapse while Stomp is on the field. |
||
| ⚫ | * It used to be possible to kill Stomp early in its last charging state with the effect of a [[blood necklace]], the former passive effect of the [[hailstorm dagger]], by the [[Retribution]] or [[Wrath]] prayer and curse, or with the Blazer Ring of kinship class activated. This has since been fixed and Stomp is now invincible in all charging states. |
||
| − | *The falling debris casts shadows. Examining them produces the text, 'Heads up!!' |
||
| ⚫ | |||
| ⚫ | |||
| + | |||
| ⚫ | |||
| − | *It is possible to kill Stomp with [[Retribution]] or [[Wrath]] during its last charging state, by getting hit by debris with less than 25% life points whilst standing next to Stomp. However, it is not possible to bypass the other charging states with these prayers. |
||
| − | *It is possible for two players who have a crystal each to activate the same lodestone at the same time; however, this will leave the other lodestone inactive and Stomp will still heal itself. |
||
{{Dungeoneeringbosses}} |
{{Dungeoneeringbosses}} |
||
[[nl:Stomp (monster)]] |
[[nl:Stomp (monster)]] |
||
[[fi:Stomp (hirviö)]] |
[[fi:Stomp (hirviö)]] |
||
[[pt:Pisador]] |
[[pt:Pisador]] |
||
| − | [[Category: |
+ | [[Category:Free-to-play bosses]] |
Latest revision as of 05:52, 27 June 2017
 | ||||||||||||||||||
| Release | 12 April 2010 (Update) | |||||||||||||||||
|---|---|---|---|---|---|---|---|---|---|---|---|---|---|---|---|---|---|---|
| Members | No | |||||||||||||||||
| Examine | ||||||||||||||||||
| The name isn't just for show. | ||||||||||||||||||
| Combat info | ||||||||||||||||||
| Level | LP | |||||||||||||||||
| 7 | 2,500 | ? (edit) | ? (edit) | |||||||||||||||
| Equipment XP (2H/MH & Armour/OH) | ||||||||||||||||||
| ? (edit) | ||||||||||||||||||
| Aggressive | Poisonous | |||||||||||||||||
| Offensive | ||||||||||||||||||
| Max hit | ||||||||||||||||||
| ? (edit) | ? (edit) | ? (edit) | ? (edit) | |||||||||||||||
| Style | Speed | |||||||||||||||||
6 ticks (3.6s) | ||||||||||||||||||
| Combat levels | ||||||||||||||||||
| ||||||||||||||||||
| Defensive | ||||||||||||||||||
| Armour | Weakness | |||||||||||||||||
| ? (edit) | ? (edit) | |||||||||||||||||
| Affinities | ||||||||||||||||||
| - | ? (edit) | ? (edit) | ? (edit) | |||||||||||||||
| Immunities | ||||||||||||||||||
| ? (edit) | ? (edit) | ? (edit) | ||||||||||||||||
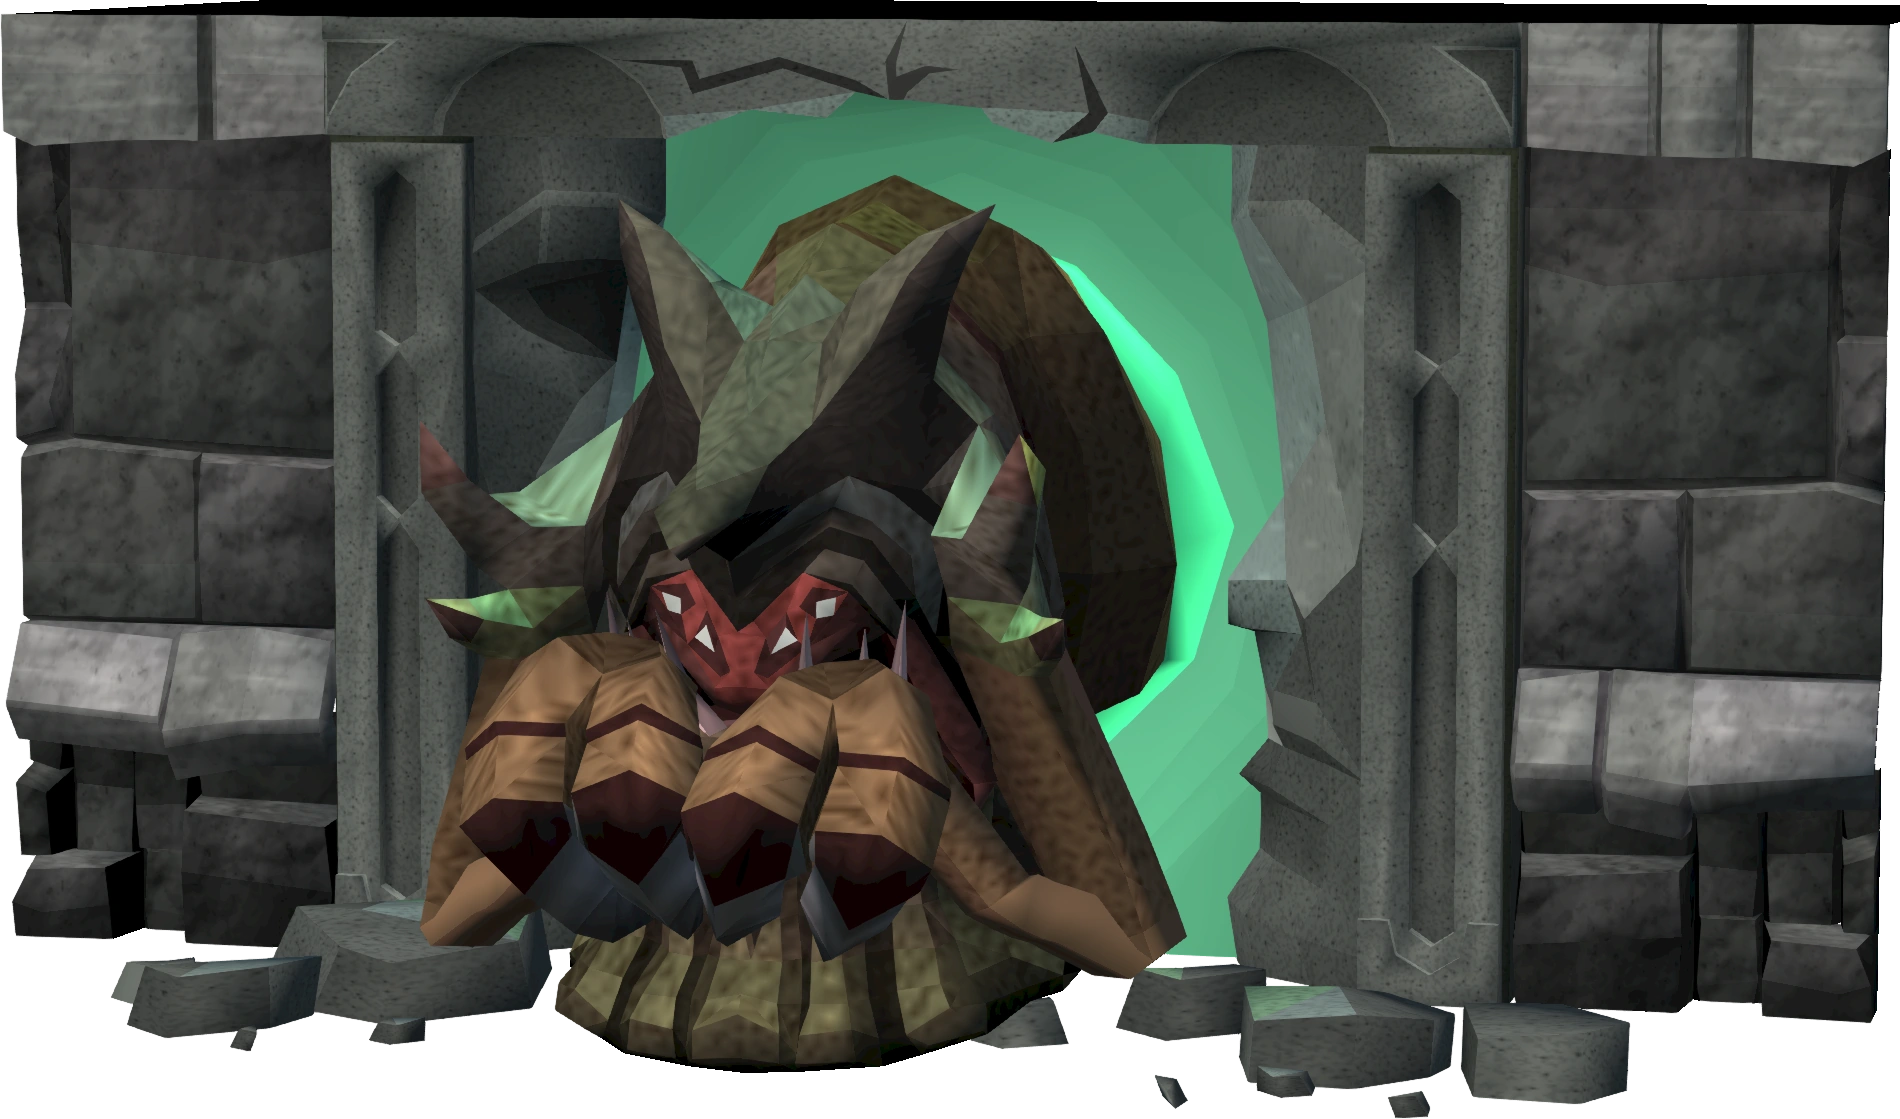
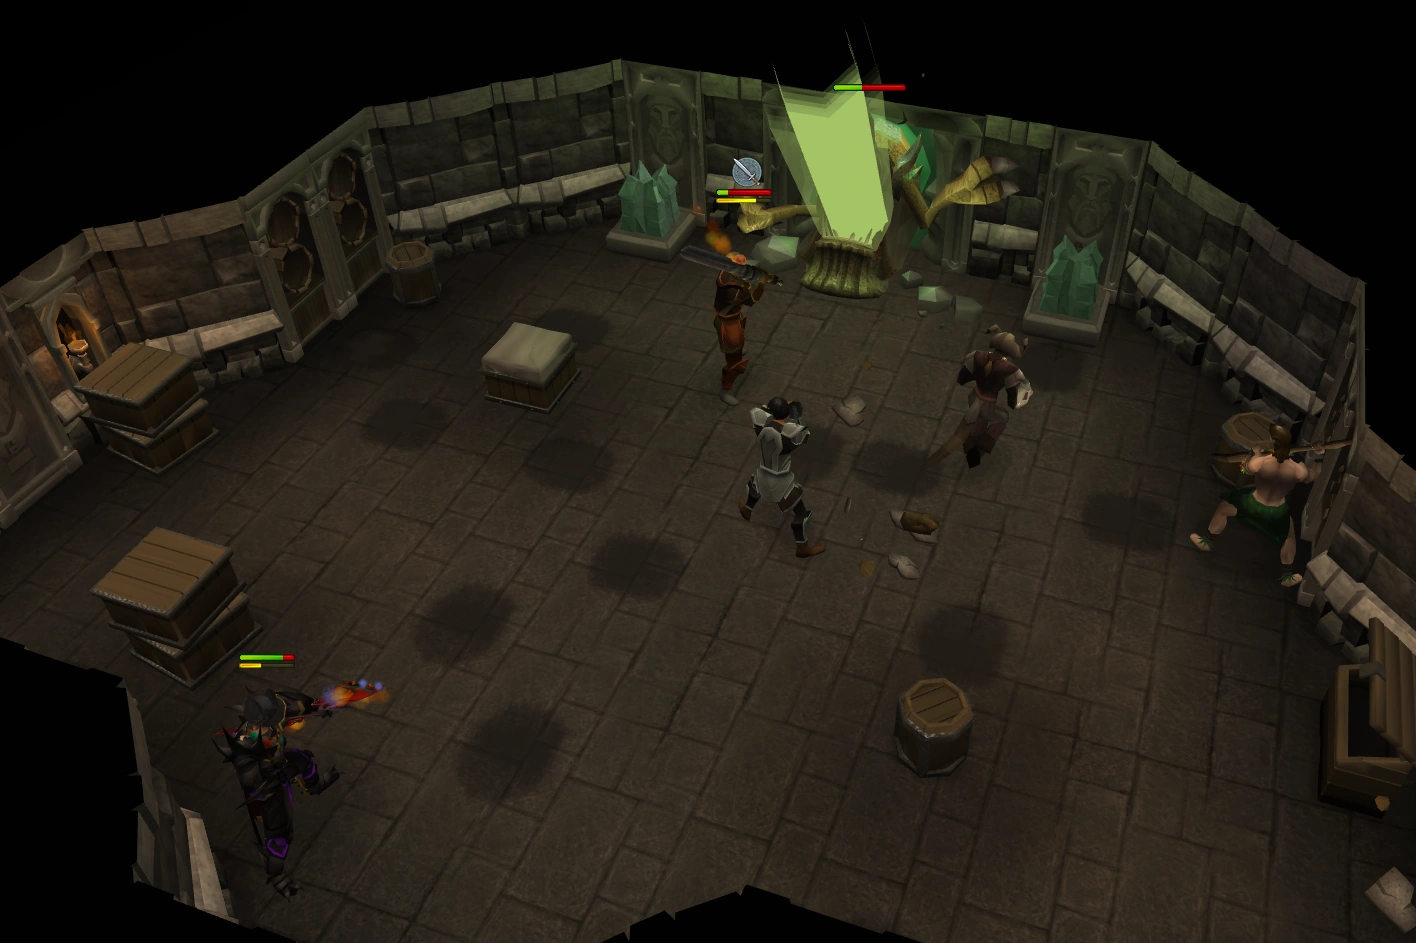
Stomp is a boss encountered in Daemonheim requiring level 35 Dungeoneering. He can be found on floors 18 through 29.
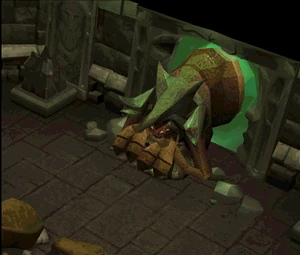
A behemoth, Stomp is so large that only his head can fit through the portal connecting the Behemoth's original location to Daemonheim (according to the Behemoth notes). Because of this, whoever brought Stomp into the dungeons set up a system by which the portal can be closed on its neck (decapitating it) should the need ever arise.
The fight
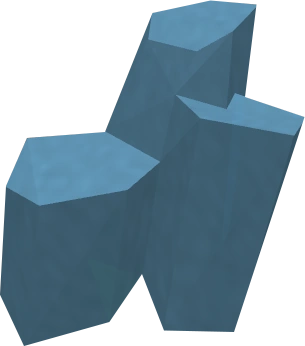
Stomp is an immobile boss fought in three stages. The goal is to close the portal by placing power crystals three times on both lodestones next to Stomp.
Stomp uses 5 attacks, but initially uses only two. At any time during the fight, it can use a single-targeted melee attack and a multi-targeted ranged attack that throws small rocks at all players and also breaks debris left around the room. After the first stage, a single-targeted magic attack that consists of a glowing yellow orb fired out from its mouth is added to the mix. After the second stage, Stomp can use its most damaging move: a slow, single-targeted ranged attack that hits the player for 25% of their maximum life points, regardless of the player's armour (for example, a player with 8,500 life points would take 2,125 damage). The damage can be reduced with the Protect from Missiles or avoided completely by running at least two squares away from the target location of the attack (the original position of the player). Although single-targeted, other players can take damage from this attack when it hits if they stand next to the player who was initially targeted.
Each time a third of its health is taken down, it will become invincible for a short time and cause debris and two power crystals to fall from the ceiling. When debris falls, the shadows on the floor indicate where it lands. It is recommended that players avoid standing on the shadows, as they will take damage equal to 25% of their maximum life points when the debris falls. Pick up the crystals on the floor and place them on the lodestones. The crystals fall before the debris, so it is possible to pick one up and activate a lodestone before all of the debris falls. Once the debris has fallen, it will block movement but it can be removed with a pickaxe if needed. If falling debris hit a player, it will not appear on the ground. The crystals must be picked up and placed on the lodestones on either side of Stomp within about 15 seconds, or it will heal itself to the previous stage (i.e. if it was brought down to 1/3 of its total life points, it will heal back to 2/3 of its total life points) and that stage will start over again.
There are three colours of lodestones; blue, green and red. Each colour will appear at a different phase; thus, players need not keep crystals from previous phases.
Strategy
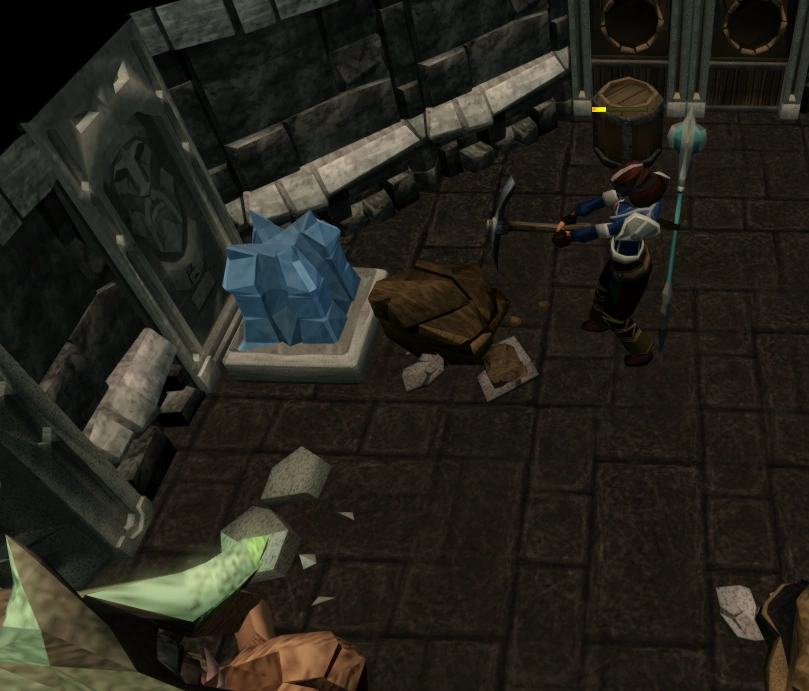
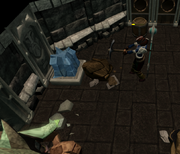
A player can mine the rocks blocking the lodestone.

Stomp rains debris from the ceiling and becomes invincible.
Stomp's head is severed and it dies.
Fallen debris often blocks progress by either blocking the lodestones or the power crystals. This can be very frustrating if it happens multiple times. An easy way around this is to pick up the crystals the first time that Stomp's life points are lowered, and place them after they are reduced for a second time. The debris can be mined and destroyed, but due to the time it takes to mine the debris, it is still recommended to use this strategy if there is a large amount of debris on the ground.
On complexity 1, it is possible to skip putting in the last, or sometimes second-last set of crystals. When the crystals have been put into place and the team is waiting for Stomp to become attackable again, it is possible for everyone in the group to attack at the same time, and if the damage is high enough they will kill Stomp and skip the remaining phases.
Drops
| Item | Quantity | Rarity | GE price | |
|---|---|---|---|---|
| Protoleather coif | 1 | Random | Not sold | |
| Protoleather shield | 1 | Random | Not sold | |
| Subleather coif | 1 | Random | Not sold | |
| Subleather shield | 1 | Random | Not sold | |
| Paraleather coif | 1 | Random | Not sold | |
| Paraleather shield | 1 | Random | Not sold | |
| Archleather coif | 1 | Random | Not sold | |
| Archleather shield | 1 | Random | Not sold | |
| Dromoleather coif | 1 | Random | Not sold | |
| Dromoleather shield | 1 | Random | Not sold | |
| Spinoleather coif | 1 | Random | Not sold | |
| Spinoleather shield | 1 | Random | Not sold | |
| Gallileather coif | 1 | Random | Not sold | |
| Gallileather shield | 1 | Random | Not sold | |
| Stegoleather coif | 1 | Random | Not sold | |
| Stegoleather shield | 1 | Random | Not sold | |
| Megaleather coif | 1 | Random | Not sold | |
| Megaleather shield | 1 | Random | Not sold | |
| Tyrannoleather coif | 1 | Random | Not sold | |
| Tyrannoleather shield | 1 | Random | Not sold | |
| Sagittarian coif | 1 | Random | Not sold | |
| Sagittarian shield | 1 | Random | Not sold | |
| Behemoth notes (part 3) | 1 | Common | Not sold | |
| Mysterious chronicle | 1 | Common | Not sold |
Trivia
- Stomp is the only Behemoth boss who cannot use the "stomp" attack, as his body does not appear.
- Prior to an update allowing players to mine the rocks, Stomp was considered an annoying boss because debris could fall in front of the lodestones, preventing players from using it until the rocks collapsed by themselves. If debris had fallen in front of the ladder, players would be unable to end the dungeon as the rocks collapse while Stomp is on the field.
- The shadows the falling debris cast have the examine text of "Heads up!"
- It used to be possible to kill Stomp early in its last charging state with the effect of a blood necklace, the former passive effect of the hailstorm dagger, by the Retribution or Wrath prayer and curse, or with the Blazer Ring of kinship class activated. This has since been fixed and Stomp is now invincible in all charging states.
- This is one of the boss rooms where the exit to the next floor is not opposite the boss door, a trait shared with Necrolord, World-gorger Shukarhazh, and Kal'Ger the Warmonger.