(Removed the redundant information I previously added, as I add it to the quest details template instead. (4 free inventory spaces), see full guide for the change.) Tags: Visual edit apiedit |
m (+) |
||
| (15 intermediate revisions by 11 users not shown) | |||
| Line 51: | Line 51: | ||
====Room 5==== |
====Room 5==== |
||
[[File:TFC room 5 solution.png|thumb|135px|right|Room 5 puzzle solution]] |
[[File:TFC room 5 solution.png|thumb|135px|right|Room 5 puzzle solution]] |
||
| − | * |
+ | * Using the bowls of red and yellow powder by the entrance, complete the puzzle. |
| + | ** Light the inside yellow flames first. |
||
* Immediately after the puzzle, dodge 2 fire walls by standing in the open gaps. |
* Immediately after the puzzle, dodge 2 fire walls by standing in the open gaps. |
||
* Proceed to the next room north. |
* Proceed to the next room north. |
||
| Line 73: | Line 74: | ||
| Jump back to the center and push the switch immediately south of you. |
| Jump back to the center and push the switch immediately south of you. |
||
|- |
|- |
||
| − | | Head to the north-west corner and light the fire pit. Watch out for the falling rocks. |
+ | | Head to the north-west corner and light the fire pit, press the switch just south. Watch out for the falling rocks. |
|- |
|- |
||
| Finally enter the tunnel in the north-east corner. |
| Finally enter the tunnel in the north-east corner. |
||
| Line 84: | Line 85: | ||
|2 Yes, he's a terrible, hateful god. |
|2 Yes, he's a terrible, hateful god. |
||
}} |
}} |
||
| − | * ''Tie-up firemaker'' on the Column, selecting [[Sera]]. {{ |
+ | * ''Tie-up firemaker'' on the Column, selecting [[Sera]]. {{Chat options |
| + | |5 More options |
||
| + | |1 Sera |
||
| + | |1 Yes! |
||
| + | }} |
||
* Light the fire again and proceed to the next room east. |
* Light the fire again and proceed to the next room east. |
||
{{clear}} |
{{clear}} |
||
| Line 96: | Line 101: | ||
====Room 9==== |
====Room 9==== |
||
| − | * Avoiding being damaged by the fire balls. You can ''light'' the oil pool lines as a barricade. |
+ | * Avoiding being damaged by the fire balls. You can ''light'' the oil pool lines as a barricade. You must last all the waves which is approximately 10 minutes. |
** If you stay in the north-west corner and immediately light the oil pools as soon as they're ready you should stay safe. |
** If you stay in the north-west corner and immediately light the oil pools as soon as they're ready you should stay safe. |
||
* Proceed to the next room north. |
* Proceed to the next room north. |
||
| Line 103: | Line 108: | ||
====Room 10==== |
====Room 10==== |
||
* Light the fire and grab the journal. |
* Light the fire and grab the journal. |
||
| − | * Tie up Twig again {{ |
+ | * Tie up Twig again {{Chat options |
| + | |2 Twig |
||
| + | |1 Yes! |
||
| + | }} and light the fire. |
||
* Proceed to the next room east. |
* Proceed to the next room east. |
||
{{clear}} |
{{clear}} |
||
| Line 112: | Line 120: | ||
* Light the fire pit. |
* Light the fire pit. |
||
* ''Take-torch'' from the fire pit and continue down the path. When there are tendrils of darkness, ward them off by left-clicking on them at the edge of your screen. |
* ''Take-torch'' from the fire pit and continue down the path. When there are tendrils of darkness, ward them off by left-clicking on them at the edge of your screen. |
||
| + | ** Tendrils may hide behind your interface if you have panels on the edges of your screen. |
||
* Proceed to the next room at the end of the path. |
* Proceed to the next room at the end of the path. |
||
{{clear}} |
{{clear}} |
||
| Line 117: | Line 126: | ||
====Room 12==== |
====Room 12==== |
||
* Light the fire and take the journal. |
* Light the fire and take the journal. |
||
| − | * ''Tie-up'' [[Emmett]] {{ |
+ | * ''Tie-up'' [[Emmett]] {{Chat options |
| + | |3 Emmett |
||
| + | |1 Yes! |
||
| + | }} and light the fire. |
||
* Proceed to the next room east. |
* Proceed to the next room east. |
||
===Face-off with Char=== |
===Face-off with Char=== |
||
| + | * During this fight, you must fight Char with Magic or Ranged. |
||
| − | During the fight, you should keep a distance from Char at all times. The amount of damage you deal is determined by the amount of flames you have lit (maximum of 100 damage allowed to be dealt to her per flame). As you fight her, keep lighting flames. Keeping at least 5-10 fires lit will ensure adequate damage against Char. A good strategy to make many fires is by putting your pitch can on your action bar, lighting flames while running around. |
||
| + | * Teleport out and prepare for the battle. |
||
| − | The higher your life points, the higher Char's max hit is. Some time in the fight, she will summon flame walls which you can avoid by maneuvering through the gaps in the walls. While she is enraged (glowing), she is invincible for a brief period time in which case is an opportune time to light more flames. |
||
| + | ** Carry an inventory full of food (such as [[sharks]] or [[rocktails]]). |
||
| ⚫ | |||
| + | ** Carry a range or mage weapon. |
||
| + | ** Do not bring any armour as it has no effect during this battle. |
||
| + | * Teleport back to Eagle's Peak and run south to the entrance of the cave. |
||
| ⚫ | |||
| + | |2 That's a good idea. |
||
| + | |Any |
||
| + | }} |
||
* Climb down the steps to enter Char's lair. |
* Climb down the steps to enter Char's lair. |
||
* Talk to Char to engage the fight. |
* Talk to Char to engage the fight. |
||
| + | ** During the fight, you should keep a distance from Char at all times. |
||
| − | * After defeating her, finish the dialogue. {{Chat option|2 How do we get out?}} |
||
| + | ** The amount of damage you deal is determined by the amount of flames you have lit (100 damage per active flame). |
||
| + | ** As you fight her, keep lighting flames. |
||
| + | |||
| + | '''A simple strategy to defeat Char follows:''' |
||
| + | # Run around the edges of the arena lighting flames as fast as you can. |
||
| + | # When you have 10 active flames, run some distance from Char and attack her a few times, dealing 1,000-5,000 damage in total. |
||
| + | # Repeat steps 1-2 until she is defeated. |
||
| + | # Remember to avoid the firewalls by maneuvering through the gaps, or you'll be hit for 1,000-4,000 damage. |
||
| + | # While Char is glowing she is invincible, so focus on lighting flames during this period. |
||
| + | |||
| + | * After the battle ends, talk to Char. {{Chat options |
||
| + | |2 How do we get out? |
||
| + | }} |
||
| + | ** There may be a glitch where you can not finish the dialogue, in that case leave the cave through the southern tunnel and come back in. |
||
===Finishing up=== |
===Finishing up=== |
||
* Exit through the tunnel to the north. |
* Exit through the tunnel to the north. |
||
* Quest complete! |
* Quest complete! |
||
| + | |||
| + | ==Rewards== |
||
| + | {{Quest rewards page|The Firemaker's Curse}} |
||
{{The Firemaker's Curse}} |
{{The Firemaker's Curse}} |
||
| − | {{DEFAULTSORT |
+ | {{DEFAULTSORT:Firemaker's Curse/Quick guide, The}} |
[[Category:The Firemaker's Curse| ]] |
[[Category:The Firemaker's Curse| ]] |
||
Latest revision as of 08:25, 11 May 2018
Walkthrough
| Start point | |
|---|---|
| Member requirement | |
| Official difficulty | |
| Official length | Very Long |
| Requirements | Skill requirements are not boostable unless marked with a [B] for boostable.
|
| Items required | Items from the tool belt are not listed unless they do not work or are not automatically added.
|
| Recommended |
|
| Enemies to defeat |
|
Getting started
- Talk to Phoenix south of Eagles' Peak. (
 ••••)
••••)
The Cave System
Room 1


Room 1 puzzle solution
- Talk to Flint for a pitch can. ( )
- Use the pitch can to light fires by right-clicking make-fire-here to complete the arrow on the ground.
Room 2
- Light the fire pit.
- Take the Firemaking journal on the rock. ( )
- Light the fire again. ( •)
- Enter the tunnel on the east side of the room.
Room 3


Room 3 puzzle solution
- Complete the pattern which is in the shape of a falling boulder.
- Avoid falling boulders. Pick-up rocks one at a time, placing them on the rock pile to the east.
- Climb up the rock pile.
Room 4
- Light the fire pit.
- Take the journal. ( ••)
- Tie-up firemaker on the Column, selecting Twig. ( •)
- Light the fire pit again.
- Enter the tunnel to the east.
Room 5

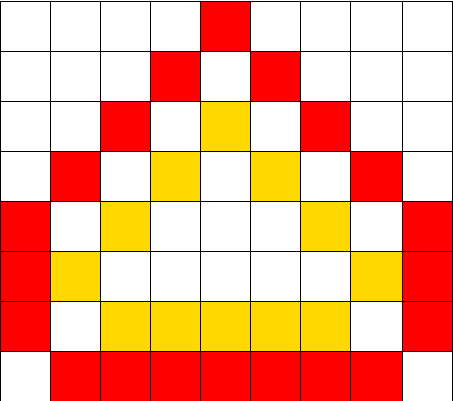
Room 5 puzzle solution
- Using the bowls of red and yellow powder by the entrance, complete the puzzle.
- Light the inside yellow flames first.
- Immediately after the puzzle, dodge 2 fire walls by standing in the open gaps.
- Proceed to the next room north.
Room 6
- Complete the puzzle:
Go west, light the fire pit. Push nearby column switch. Go far east, light the fire pit. Push nearby column switch. Go back west and north to the center and jump the pillar east of you. Push the nearby column switch. Jump the ledge just south-east of you, jump the next ledge east. Light the fire pit. North of you is the flame switch - loop around by going back west then east and push it. Head west, light the fire pit then push the switch. Jump back to the center and push the switch immediately south of you. Head to the north-west corner and light the fire pit, press the switch just south. Watch out for the falling rocks. Finally enter the tunnel in the north-east corner.
Room 7
- Light the fire and pick up the journal. ( •)
- Tie-up firemaker on the Column, selecting Sera. ( ••)
- Light the fire again and proceed to the next room east.
Room 8

Room 8 puzzle solution
- Complete the puzzle.
- Immediately after the puzzle, dodge 4 fire walls by standing in the open gaps.
- Proceed to the next room north.
Room 9
- Avoiding being damaged by the fire balls. You can light the oil pool lines as a barricade. You must last all the waves which is approximately 10 minutes.
- If you stay in the north-west corner and immediately light the oil pools as soon as they're ready you should stay safe.
- Proceed to the next room north.
Room 10
- Light the fire and grab the journal.
- Tie up Twig again ( •) and light the fire.
- Proceed to the next room east.
Room 11


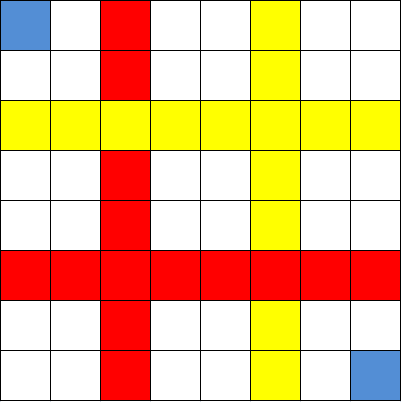
Room 11 puzzle solution
- Complete the puzzle, lighting the inside blue flames first.
- Light the fire pit.
- Take-torch from the fire pit and continue down the path. When there are tendrils of darkness, ward them off by left-clicking on them at the edge of your screen.
- Tendrils may hide behind your interface if you have panels on the edges of your screen.
- Proceed to the next room at the end of the path.
Room 12
- Light the fire and take the journal.
- Tie-up Emmett ( •) and light the fire.
- Proceed to the next room east.
Face-off with Char
- During this fight, you must fight Char with Magic or Ranged.
- Teleport out and prepare for the battle.
- Teleport back to Eagle's Peak and run south to the entrance of the cave.
- Take the journal. ( •)
- Climb down the steps to enter Char's lair.
- Talk to Char to engage the fight.
- During the fight, you should keep a distance from Char at all times.
- The amount of damage you deal is determined by the amount of flames you have lit (100 damage per active flame).
- As you fight her, keep lighting flames.
A simple strategy to defeat Char follows:
- Run around the edges of the arena lighting flames as fast as you can.
- When you have 10 active flames, run some distance from Char and attack her a few times, dealing 1,000-5,000 damage in total.
- Repeat steps 1-2 until she is defeated.
- Remember to avoid the firewalls by maneuvering through the gaps, or you'll be hit for 1,000-4,000 damage.
- While Char is glowing she is invincible, so focus on lighting flames during this period.
- After the battle ends, talk to Char. ( )
- There may be a glitch where you can not finish the dialogue, in that case leave the cave through the southern tunnel and come back in.
Finishing up
- Exit through the tunnel to the north.
- Quest complete!
Rewards
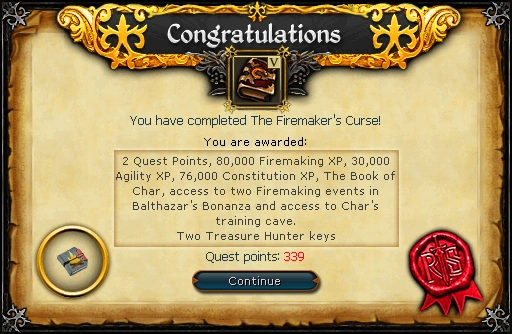
- 2 quest points
- 80,000 experience
- 30,000 experience
- 76,000 experience
- The Book of Char: When activated in the off-hand slot, it causes fiery orbs to spin around the player, spontaneously igniting any log the player walks/runs over.
- Access to two new events and a new Firemaker's costume in Balthazar Beauregard's Big Top Bonanza.
- Access to Char's training cave.
- Ability to collect the four fire creatures (Warming Flame, Twisted Firestarter, Glowing Ember, and Searing Flame) (with 91 Firemaking) flying in the room as a pet. You can only have one in your possession at a time, although you can store all four in the menagerie of your player-owned house.
- 2 Treasure Hunter keys and 2 Hearts of Ice
- Music unlocked
| Related to the Return of Zaros quest series | |||||||
| NPCs | |||||||
| Enemies |
| ||||||
| Items |
| ||||||
| Rewards |
| ||||||
| Music |
| ||||||
| Miscellaneous |
| ||||||