ɘ (Message Wall | contribs) m (-cat) Tag: apiedit |
m (→Achievement) |
||
| (35 intermediate revisions by 27 users not shown) | |||
| Line 1: | Line 1: | ||
| − | {{ |
+ | {{External|os=Lair of Tarn Razorlor}} |
| + | {{Otheruses|the miniquest|the location|Tarn's Lair}} |
||
{{Infobox miniquest |
{{Infobox miniquest |
||
|series = None |
|series = None |
||
| Line 7: | Line 8: | ||
|developer = |
|developer = |
||
}} |
}} |
||
| + | '''The Lair of Tarn Razorlor''' is a miniquest where the player's objective is to kill [[Tarn Razorlor]] and retrieve his [[Tarn's diary|diary]]. Using his diary on a [[salve amulet]] will enchant it, increasing its bonuses from 15% to 20% more damage against the undead. |
||
| − | |||
| − | ==Details== |
||
| − | This miniquest is to kill [[Tarn Razorlor]] and retrieve his diary. Using his diary on a [[salve amulet]] will enchant it increasing its attack and strength bonuses by 5%. If you have completed [[Smoking Kills]] you can use the [[ring of slaying]] to completely avoid this entire miniquest and teleport straight to the diary. |
||
| − | |||
| − | ==Quests and requirements== |
||
| − | ===Skills=== |
||
| − | * Requires Level 40 {{Skill clickpic|Slayer}} ('''Cannot be boosted''') to begin the fight with [[Tarn Razorlor]]. |
||
| − | |||
| − | ===Equipment=== |
||
| − | * Requires the [[salve amulet]] to enter. |
||
| − | * 100 coins required each time you use the banker [[Odovacar]] (optional). |
||
| − | |||
| ⚫ | |||
| − | ===Armour=== |
||
| − | * '''Melee:''' This is an ideal place to use any high power armour such as [[Barrows equipment|Barrows]] or [[Bandos armour|Bandos]], though basic rune or granite will work fine. |
||
| − | * '''Ranged:''' Use [[black dragonhide armour]] for its high range bonus and moderate defence bonus if ranging. |
||
| − | * '''Magic:''' [[Barrows - ahrim's set|Ahrim's robes]] are preferred for mage, although [[batwing robes]] are an effective and inexpensive alternative. |
||
| − | |||
| − | ===Weapons=== |
||
| − | * '''Melee:''' While Tarn is no longer weak to melee as of the [[Evolution of Combat]], it can still be used to kill him with moderate success. A level 60 or better weapon should be used. The attack style of the weapon does not matter, as all will hit equally, though a slashing weapon can help take care of the slash-weak [[terror dog]]s that will attack you. |
||
| − | * '''Ranged:''' There are no safe spots to hide in to avoid being hit. The room is large so it is possible to reduce incoming damage by positioning so that only one thing is attacking at a time. He shouldn't take too long to kill using a [[crystal bow]] or a [[black salamander]]. [[Sagaie]]s are also fairly effective against his second form which is weak to thrown. |
||
| − | * '''Magic:''' Tactically speaking, magic is the most effective approach as Tarn is weak to [[Air spells]] in his first form. At least [[Air Wave]] is recommended, with a level 60 or better weapon. |
||
| − | |||
| − | ===Consumables=== |
||
| − | * '''Food:''' The journey to Tarn is probably harder than the fight itself. There are many traps and skeletons between the last bank spot and Tarn. A full inventory of [[monkfish]] (or equivalent) or better should work for anyone doing this miniquest. |
||
| − | * '''Potions: '''There are no special potions required for this fight however a [[super set]] or a [[combat potion]] would help. If you're planning on using prayer during the fight two to four [[prayer potion]]s would be required as prayer is constantly drained during the final battle. |
||
| − | * '''Other:''' Some form of teleportation is recommended. After Tarn Razorlor is killed four [[terror dog]]s will enter the room making it difficult to leave and the only way out is the route taken to get there. A healing [[familiar]] like a [[bunyip]] can also be of use. |
||
==Walkthrough== |
==Walkthrough== |
||
| + | {{Quest details |
||
| − | ''Go to [[Tarns Lair Map]] for a map of the route.'' |
||
| + | |start = Speak to the [[Zealot]] at the mines in Morytania |
||
| + | |difficulty = None |
||
| + | |length = Medium |
||
| + | |members = Yes |
||
| + | |requirements = |
||
| + | {{Questreq|Haunted Mine}} |
||
| + | {{Skillreq|Slayer|40}} to begin the fight with Tarn Razorlor (cannot be boosted) |
||
| + | |items = |
||
| + | * [[Salve amulet]] |
||
| ⚫ | |||
| + | * Armour and weapons |
||
| + | * Food and potions |
||
| + | |kills = [[Tarn Razorlor]] (level 79) |
||
| + | }} |
||
| ⚫ | |||
| − | [[File:Lair_of_Tarn_Razorlor.png|thumb|Enemies and traps throughout]] |
||
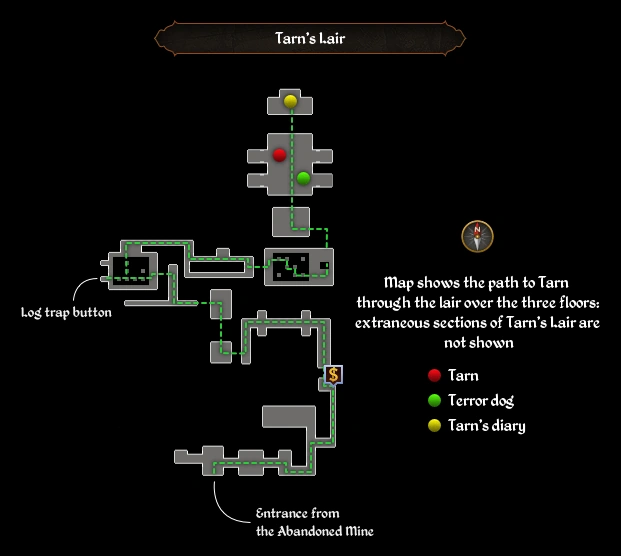
| + | [[File:Tarn's Lair map.png|thumb|A map of Tarn's Lair, with the route highlighted in green]] |
||
| + | The [[ring of slaying]] can teleport you directly to Tarn's lair, if you've unlocked it. |
||
| + | The entrance to Tarn's Lair is at the northern end of the ground level of the [[Abandoned Mine]]. |
||
| − | ===Starting off=== |
||
| − | The easiest way to get to Tarn is to teleport to Tarn's Lair via slayer ring. This will bring you directly outside of the room with Tarn. Upon entering the room, a cutscene will appear showing mutant tarn and two terror dogs. |
||
| − | [[File:Tarn Disarming Switch.png|thumb|150cpx|The disarming switch for the log trap.]] |
||
| − | * |
+ | * [[Drakan's medallion]] will teleport players to [[Burgh de Rott]], where a shortcut over a fence to the west leads to the mine. |
| + | * Taking the shortcut under the [[Hair of the Dog]] tavern in [[Canifis]] and travelling on the [[Swamp Boat]] brings players close to [[Mort'ton]]. |
||
| − | * Once inside the mine, level 1, go north to the end of the path. |
||
| + | For a guide to the correct path through the dungeon, see [[Tarn's Lair#Route]]. |
||
| − | ===Reaching the bank=== |
||
| − | The banker is to the northeast. To get there: |
||
| − | * When entering the lair, go east past the floor traps and attacking monsters to the end of the passage. |
||
| − | * Follow the path heading north ('''disarm''' the two wall traps by "searching" them, the southern one being attached to the western wall, the north one being attached to the eastern wall) the banker carrying a huge backpack at the end of the hall in a little room. |
||
| − | * It costs 100 [[coins]] each time to use the bank. Some of the undead in the lair drop coins. |
||
| − | * This is the last place to restock or heal prior to moving to Tarn Razorlor (though there are a few safe places to rest along the way). |
||
| − | === |
+ | ===Fighting Tarn Razorlor=== |
| − | [[File:Tarn |
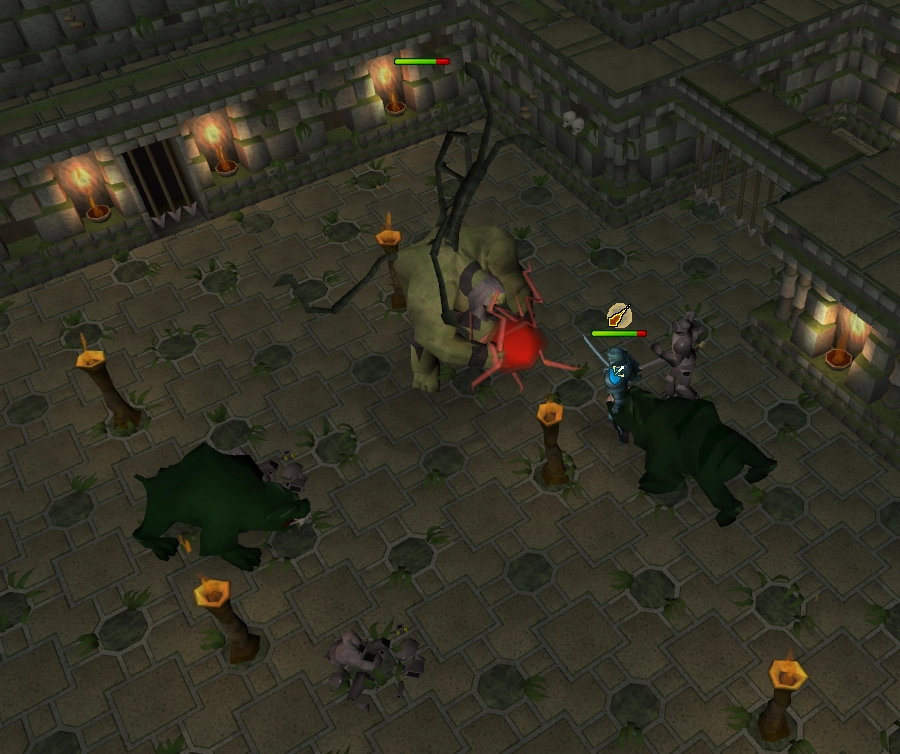
+ | [[File:Fighting Tarn.png|thumb|Fighting mutant Tarn]] |
| − | [[File:Tarn |
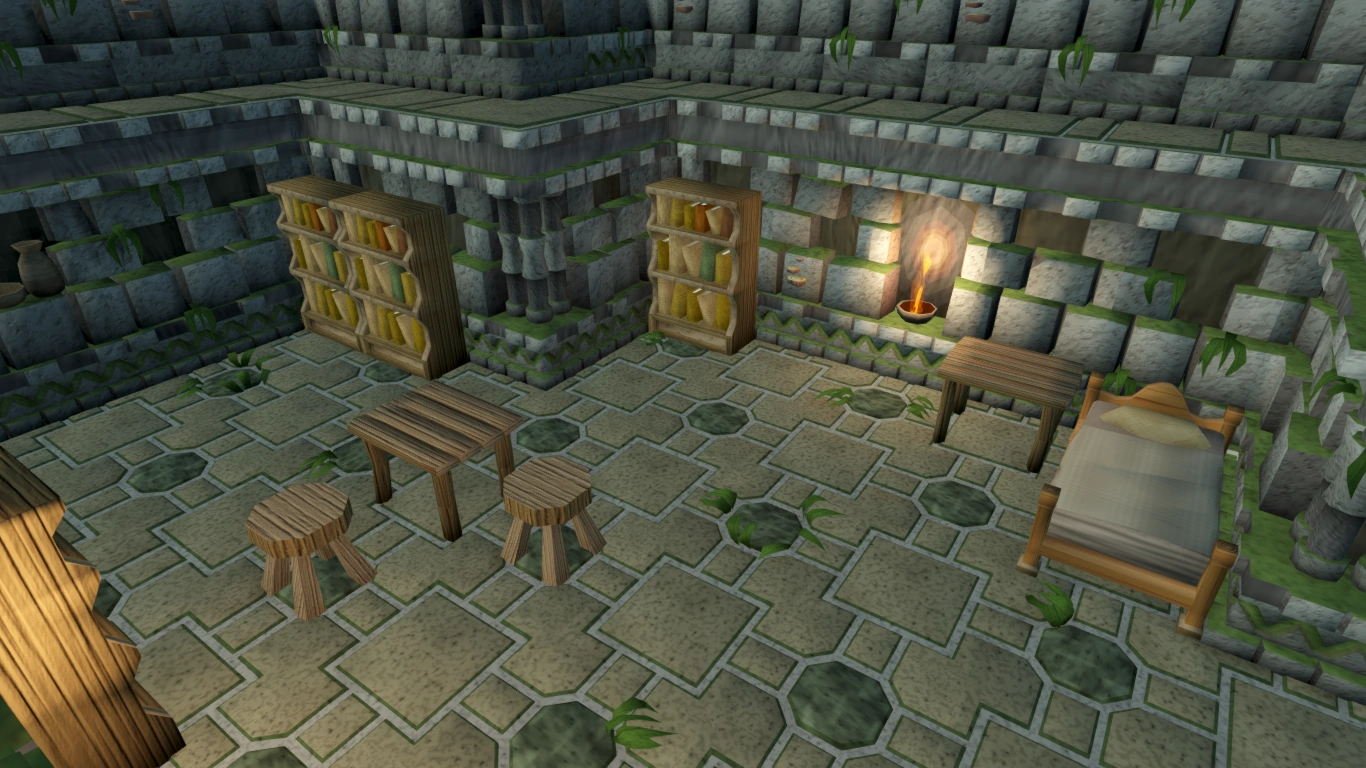
+ | [[File:Tarn's bedroom.png|thumb|Tarn's bedroom, with his diary on a table]] |
| ⚫ | |||
| − | There are many traps and two ways to deal with them; slowly disarm each trap, or ignore the traps and take the damage. |
||
| − | * The route that you need to follow is D-S-T-U on the [[Tarns Lair Map]]. |
||
| − | * Starting at the Bank go north through Doorway D |
||
| − | * Follow the U shaped hall to the end and take the west doorway, this will be Doorway S (total of six traps in this room) |
||
| − | * You will now be in a square room with a single giant skeleton in it, go into the square room to the north and take the passageway to the west, this is Doorway T (no traps in the southern room, three floor traps in the northern room) |
||
| − | * You will now be in a hallway that looks like an inverted T, take the passage to the north and go through the opening on the west side. (no traps in the first part of the hall but the north hall has two; first one on the west wall, second one on the east wall) |
||
| − | * This puts you in room with a bunch of pillars that you must jump on. Make your way to the west side of the room using the southern pillars and deactivate the log swing trap by searching the floor. Sometimes the trap will not deactivate when you search it, you should click the floor again and if the trap has been deactivated texts will appear saying "The flagstone has already been pressed down. You'll need to wait until it reactivates" Then it will be safe to cross. The log swing trap will reset in 10 to 15 seconds so you must move quickly. Use the second row of pillars from the west to go north. |
||
| − | * Follow the path to the east (wall trap on the south and then north walls) and you will end up in a room with a big hole in the centre. The walls will shoot out from time to time and knock you into the hole if you are standing there. Time your moves to avoid being knocked into the hole. Take the passageway on the east wall. (total of four areas that will knock you to the lower area) |
||
| − | * This is another room of pillars you have to jump on to get across, it does a zigzag across the room from the northwest to the southeast. You will be attacked by two level 94 [[skeleton mage]]s as you are crossing this room. They will start attacking you when you reach the second pillar. It is recommended to turn on [[Protect from Magic]] prayer and ignore them. Hurry across and go down the stairs, this is Doorway U. Once on the bottom floor the passageway to the north leads to Tarn's chamber. |
||
| ⚫ | Tarn can attack with both melee and magic, but attacks solely with melee if approached. Since the terror dogs can only use melee, [[Protect from Melee]] or [[Deflect Melee]] is strongly recommended, but Prayer is drained constantly, so bring [[Prayer potion]]s. Tarn is weak to [[Air spells]] in his first form. |
||
| − | ===Preparations=== |
||
| − | [[File:Tarn Cutscene.png|thumb|150cpx|Tarn looks angry...]] |
||
| − | * Make sure you check your health, prayer (if you're going to use it) and have your equipment in order to start the fight, as once you enter there will be little time for any preparations. Note: wearing the salve amulet is not compulsory to start or end this fight. |
||
| − | * At least 2 [[prayer potions]] and/or 15 pieces of food ([[monkfish]] or better) left is recommended prior to entering Tarn's room. |
||
| ⚫ | |||
| − | ===Strategies=== |
||
| ⚫ | |||
| − | * Tarn is weak to [[Air spells]] in his first form, and [[thrown weapons]] in his second. The terror dogs in the arena are weak to slash, but can be ignored. |
||
| ⚫ | |||
| − | * Prayer is drained constantly, regardless of the use of prayers. Make sure you keep an eye on it. |
||
| − | * During the fight with Tarn Razorlor you can maneuver the terror dogs behind Tarn allowing you to only be attacked by Tarn himself therefore eliminating the terror dogs from the fight completely. |
||
| ⚫ | |||
| ⚫ | |||
| − | [[File:Fighting Tarn.png|thumb|Fighting mutant Tarn.]] |
||
| ⚫ | |||
| − | * As soon as the cut scene ends turn on Protect from Melee and attack Tarn, who is level 114 combat. |
||
| − | * After his first form is defeated, he will turn into a ghost, but this form is easier to defeat. |
||
| − | * As soon as Tarn is defeated, a room will open up. |
||
| ⚫ | |||
| − | * If you poison him in mutant form, the poison will carry over to his ghost form. |
||
==Rewards== |
==Rewards== |
||
| − | [[File:Tarn's bedroom.png|250cpx|right|thumb|The reward! Besides the 5,000 [[Slayer]] exp.]] |
||
* {{Skill XP|Slayer|5000}} |
* {{Skill XP|Slayer|5000}} |
||
* [[Tarn's diary]] |
* [[Tarn's diary]] |
||
| − | * [[Salve amulet (e)]] |
+ | * [[Salve amulet (e)]], which gives 20% accuracy and damage bonuses across all combat styles against the [[undead]] |
| + | |||
| − | * Morytania hard task completed. |
||
| + | ==Achievement== |
||
| + | * {{Achievement|Tell-Tale Tarn|15|Find out about Tarn Razorlor's secrets.}} |
||
| − | ==Music== |
+ | ==Music unlocked== |
* [[Undead Dungeon]] |
* [[Undead Dungeon]] |
||
| Line 102: | Line 64: | ||
==Trivia== |
==Trivia== |
||
| ⚫ | * If players had bought or learned to make a [[ring of slaying]], they used to be able to teleport into Tarn's Lair and fight him directly without having to go through the whole dungeon. As part of the [[15 September]] [[2010]] update this ability was temporarily removed, forcing players to journey through the entire dungeon. It was reinstated in a later update prior to [[8 December]] [[2010]], before finally being removed again on [[28 November]] [[2011]]. As of [[8 January]] [[2017]] you can teleport directly to Tarn after completion of [[Haunted Mine]]. |
||
| − | *With the release of Tarn Razorlor and his lair, all skeletons, ghosts, zombies and most undead creatures had a graphics makeover. |
||
| − | *There was previously a bug that prevented players from reaching Tarn's Chamber without the use of a slayer ring, this was caused by the fact that if a player attempts to jump to a pillar required to cross into the chamber they receive a message "I can't reach that!". Jagex had made a temporary solution to the problem by placing a portal between the two pillars. '''The bug has been fixed.''' |
||
| − | *Some players have reported that if your familiar starts fighting one of the [[Animated Steel Armour]], whilst you are fighting one of the Terror dogs, then you cannot attack the animated armour after the Terror dog is dead, as it will give the message "Someone else is fighting that." |
||
| ⚫ | * |
||
| − | *There is a destroy option with the diary, and it can be easily re-obtained through a bookcase in a [[POH|Player-owned House]]. |
||
| − | *Tarn was originally one of the only monsters to have visible fingers. |
||
| − | *Killing Tarn is a task in the hard tasks of the Morytania task set. |
||
| + | {{Haunted Mine}} |
||
{{Miniquests}} |
{{Miniquests}} |
||
| ⚫ | |||
[[nl:The Lair of Tarn Razorlor]] |
[[nl:The Lair of Tarn Razorlor]] |
||
| ⚫ | |||
[[Category:Quest locations]] |
[[Category:Quest locations]] |
||
| − | [[Category:Wikia Game Guides quests]] |
||
Latest revision as of 18:30, 27 May 2018
| Release date | 22 January 2007 (Update) |
|---|---|
| Members | Yes |
| Quest series | None |
| Developer(s) | Unknown edit |
| Age | Fifth Age |
The Lair of Tarn Razorlor is a miniquest where the player's objective is to kill Tarn Razorlor and retrieve his diary. Using his diary on a salve amulet will enchant it, increasing its bonuses from 15% to 20% more damage against the undead.
Walkthrough
| Start point | |||
|---|---|---|---|
| Member requirement | |||
| Official difficulty | None | ||
| Official length | Medium | ||
| Requirements | Skill requirements are not boostable unless marked with a [B] for boostable.
| ||
| Items required | Items from the tool belt are not listed unless they do not work or are not automatically added.
Recommended items:
| ||
| Enemies to defeat | Tarn Razorlor (level 79) |
Getting to Tarn Razorlor

A map of Tarn's Lair, with the route highlighted in green
The ring of slaying can teleport you directly to Tarn's lair, if you've unlocked it.
The entrance to Tarn's Lair is at the northern end of the ground level of the Abandoned Mine.
- Drakan's medallion will teleport players to Burgh de Rott, where a shortcut over a fence to the west leads to the mine.
- Taking the shortcut under the Hair of the Dog tavern in Canifis and travelling on the Swamp Boat brings players close to Mort'ton.
For a guide to the correct path through the dungeon, see Tarn's Lair#Route.
Fighting Tarn Razorlor
Fighting mutant Tarn

Tarn's bedroom, with his diary on a table
Upon entering the room with Tarn, a cutscene of Tarn transforming into a green mutant with lashing tentacles and unleashing two level 65 terror dogs plays. After this cutscene, the fight will begin. Animated steel armour will also attack if moved near them.
Tarn can attack with both melee and magic, but attacks solely with melee if approached. Since the terror dogs can only use melee, Protect from Melee or Deflect Melee is strongly recommended, but Prayer is drained constantly, so bring Prayer potions. Tarn is weak to Air spells in his first form.
After his first form is defeated, he will turn into a ghost, and is now weak to thrown weapons. Tarn Razorlor is the only monster required to be killed, so ignoring the minions and turning off Auto Retaliate is recommended.
As soon as Tarn is defeated, a room will open up. Tarn's diary is in this next room on a table. Use the diary with a salve amulet to create a salve amulet (e). This completes the miniquest.
Rewards
- 5,000
 experience
 - Tarn's diary
- Salve amulet (e), which gives 20% accuracy and damage bonuses across all combat styles against the undead
Achievement
- Tell-Tale Tarn ( 15) - Find out about Tarn Razorlor's secrets.
Music unlocked
Transcript
Trivia
- If players had bought or learned to make a ring of slaying, they used to be able to teleport into Tarn's Lair and fight him directly without having to go through the whole dungeon. As part of the 15 September 2010 update this ability was temporarily removed, forcing players to journey through the entire dungeon. It was reinstated in a later update prior to 8 December 2010, before finally being removed again on 28 November 2011. As of 8 January 2017 you can teleport directly to Tarn after completion of Haunted Mine.
| Related to the Myreque quest series | |
| NPCs | |
| Enemies |
|
| Items |
|
| Rewards |
|
| Locations |
|
| Music |
|
| Miscellaneous |
|