(Added solution picture, removed capital letters for compass points) Tag: rte-source |
Tag: Visual edit |
||
| (48 intermediate revisions by 30 users not shown) | |||
| Line 5: | Line 5: | ||
===Getting started=== |
===Getting started=== |
||
| + | {{Needed|3 free inventory spaces}} |
||
| − | *Talk to [[Korasi]] in [[Falador Park]]. |
+ | * Talk to [[Korasi]] in [[Falador Park]]. {{Chat options |
| − | *Take the mission. |
||
| + | |Accept |
||
| + | }} |
||
===Infiltration=== |
===Infiltration=== |
||
| + | {{Needed|5 free inventory spaces, and bugged black armour|recommended = Food, armour, and a melee weapon}} |
||
| − | *Go to the [[Black Knights' Fortress]] |
+ | * Go to the [[Black Knights' Fortress]] north-west of the [[Edgeville Monastery]] (with 5 free inventory spaces). |
| − | *Equip the bugged [[Black armour]] and enter. |
+ | * Equip the bugged [[Black armour]] and enter. |
| − | *Commander Colby will yell at you and teleport you. |
+ | * Commander Colby will yell at you and teleport you. |
| + | * When you get to the storage room your helmet will be taken. At this point you can't use the Black Knights' Fortress to return to the storage area. If you leave the room at any point you will have to go through [[Taverley Dungeon]] and enter the double doors in the [[Black Knights' Base]] which is south from the conquest map table in the middle of the floor. |
||
====Room 1==== |
====Room 1==== |
||
| − | *Talk to [[Captain Gilroy]]. |
+ | * Talk to [[Captain Gilroy]]. |
| + | * Attempt to take an item from any crate. |
||
| − | *Search a crate. |
||
| − | *After talking with Gilroy, take |
+ | * After talking with Gilroy, take a block out from each of the five crates. |
| + | * Speak to Gilroy. {{Chat options |
||
| − | *Use two at a time on Gilroy. He will tell which one is lighter and which one is heavier. The correct order of blocks must be found out from lightest to heaviest. |
||
| − | + | |3 I think I've got it, sir. |
|
| + | }} |
||
| − | *Give him the blocks in the |
+ | * Give him the blocks in the indicated order. {{Chat options |
| ⚫ | |||
| + | |3 actually weigh 4 |
||
| ⚫ | |||
| + | |1 are of weight 2 |
||
| + | |5 should be labeled 6 |
||
| + | |2 really weigh 3 |
||
| + | |4 need to be marked 5 |
||
| + | }} |
||
| ⚫ | |||
| ⚫ | |||
====Room 2==== |
====Room 2==== |
||
| − | *Kill the enemies in the room and pick up the |
+ | * Kill the enemies in the room and pick up the [[security block]]s that are dropped. |
| − | *Talk to Gilroy. |
+ | * Talk to Gilroy. {{Chat options |
| + | |2 What do we do now? |
||
| − | *Exit the room and head northwest to a forge. |
||
| + | }} |
||
| − | *Search the crate in the southwest corner of the forge room. |
||
| − | * |
+ | * Exit the room north and head north-west to a [[tiny forge]]. |
| − | *Search |
+ | * Search the crate in the south-west corner of the forge room for a [[limestone brick]]. |
| + | * Head directly east to the jail and search the crate for a piece of [[hard leather]]. |
||
| − | *Return to the forge and repair it. |
||
| + | * Search a crate in the kitchen for some [[logs]], just north of the jail. |
||
| ⚫ | |||
| − | * |
+ | * Return to the forge and repair it. |
| ⚫ | |||
| ⚫ | |||
| + | * Light the forge and put the broken block in it. |
||
| ⚫ | |||
| ⚫ | |||
| ⚫ | |||
====Room 3==== |
====Room 3==== |
||
| − | *Click on the control panel on the |
+ | * Click on the control panel on the western wall. {{Chat options |
| − | + | |2 Search the panels for magical traps. |
|
| + | }} |
||
| − | *Open the panel. |
+ | * Open the panel. |
| − | *Drag the tiles into the panels so that a horizontal line is going across all three panels, while filling the empty spaces. Press |
+ | * Drag the tiles into the panels so that a horizontal line is going across all three panels, while filling the empty spaces. Press confirm once completed. |
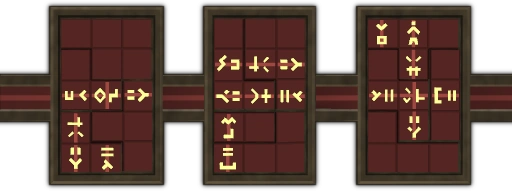
| − | [[File:Control panels.png|center|frame|A possible solution |
+ | [[File:Control panels (The Void Stares Back).png|center|frame|A possible solution]] |
| − | *Proceed to the next room. |
+ | * Proceed to the next room. |
===A Little Game=== |
===A Little Game=== |
||
| + | * Reveal yourself and explain the danger to [[Lord Daquarius]]. Accept the allegiance. {{Chat options |
||
| ⚫ | |||
| + | |1 Yes, sir. |
||
| ⚫ | |||
| + | |3 Explain the danger in calm, logical terms. |
||
| − | *Enter the portal. |
||
| + | |1 Okay, I'll do it. |
||
| ⚫ | |||
| + | }} |
||
| − | **'''Note:''' |
||
| ⚫ | |||
| ⚫ | |||
| ⚫ | |||
| ⚫ | |||
| + | |1 I'm ready. |
||
| ⚫ | |||
| + | }} |
||
| ⚫ | |||
| + | * Enter the portal and watch the cutscene. {{Chat options |
||
| ⚫ | |||
| + | |1 You bet! |
||
| ⚫ | |||
| + | }} |
||
| ⚫ | |||
| ⚫ | |||
| ⚫ | |||
| ⚫ | |||
| ⚫ | |||
| ⚫ | |||
| ⚫ | |||
| ⚫ | |||
| ⚫ | |||
===The Pest Queen=== |
===The Pest Queen=== |
||
| − | *Sacrifice either Korasi or [[Jessika]]. |
+ | * Sacrifice either Korasi or [[Jessika]]. |
| + | * Speak to [[Valluta]] before stocking for the fight or Sir Tiffy won't teleport you back. |
||
| − | *Make all necessary preparations to fight the [[Pest Queen]]. |
+ | * Make all necessary preparations to fight the [[Pest Queen]]. |
| − | ** |
+ | ** [[Korasi's sword]] will be the primary weapon during the fight and its [[Special attack]]s will be used a lot. |
| − | *Kill the Pest Queen. |
+ | * Kill the Pest Queen. |
| ⚫ | |||
| + | ** Use the special attack "Disrupt" to stun the Pest Queen when she raises her head and starts shaking for several seconds. |
||
| + | ** Kill the spawning [[Elite defiler]]s to defend [[Void Knight archer]]s. |
||
| ⚫ | |||
===Finishing up=== |
===Finishing up=== |
||
| − | *Talk to Korasi or Jessika. |
+ | * Talk to Korasi or Jessika. |
| − | *Decide who to let deal with [[Wizard Grayzag]]. |
+ | * Decide who to let deal with [[Wizard Grayzag]]. {{Chat options |
| + | |Any |
||
| ⚫ | |||
| + | }} |
||
| ⚫ | |||
| ⚫ | |||
| + | |||
| + | ==Rewards== |
||
| + | {{Quest rewards page|The Void Stares Back}} |
||
| + | |||
| + | {{The Void Stares Back}} |
||
| ⚫ | |||
[[Category:The Void Stares Back| ]] |
[[Category:The Void Stares Back| ]] |
||
Latest revision as of 23:43, 14 August 2018
Walkthrough
| Start point | |||
|---|---|---|---|
| Member requirement | |||
| Official difficulty | |||
| Official length | Long | ||
| Requirements | Skill requirements are not boostable unless marked with a [B] for boostable.
| ||
| Items required | Items from the tool belt are not listed unless they do not work or are not automatically added.
All items can be obtained during the quest.
| ||
| Recommended |
| ||
| Enemies to defeat |
|
Getting started
Items needed: 3 free inventory spaces
- Talk to Korasi in Falador Park. (
 )
)
Infiltration
Items needed: 5 free inventory spaces, and bugged black armour
Items recommended: Food, armour, and a melee weapon
Items recommended: Food, armour, and a melee weapon
- Go to the Black Knights' Fortress north-west of the Edgeville Monastery (with 5 free inventory spaces).
- Equip the bugged Black armour and enter.
- Commander Colby will yell at you and teleport you.
- When you get to the storage room your helmet will be taken. At this point you can't use the Black Knights' Fortress to return to the storage area. If you leave the room at any point you will have to go through Taverley Dungeon and enter the double doors in the Black Knights' Base which is south from the conquest map table in the middle of the floor.
Room 1
- Talk to Captain Gilroy.
- Attempt to take an item from any crate.
- After talking with Gilroy, take a block out from each of the five crates.
- Speak to Gilroy. ( )
- Give him the blocks in the indicated order. ( ••••)
- Balance the scale on the wall to the south, arrange the weights to make 15 on each side. (3-5-3-4 and 2-2-5-6)
- Proceed to the next room.
Room 2
- Kill the enemies in the room and pick up the security blocks that are dropped.
- Talk to Gilroy. ( )
- Exit the room north and head north-west to a tiny forge.
- Search the crate in the south-west corner of the forge room for a limestone brick.
- Head directly east to the jail and search the crate for a piece of hard leather.
- Search a crate in the kitchen for some logs, just north of the jail.
- Return to the forge and repair it.
- Fuel the forge with the logs.
- Light the forge and put the broken block in it.
- Go back to the room with Gilroy and place the blocks in the western wall.
- Proceed to the next room.
Room 3
- Click on the control panel on the western wall. ( )
- Open the panel.
- Drag the tiles into the panels so that a horizontal line is going across all three panels, while filling the empty spaces. Press confirm once completed.
.png)
- Proceed to the next room.
A Little Game
- Reveal yourself and explain the danger to Lord Daquarius. Accept the allegiance. ( ••)
- Talk to Korasi.
- Talk to Commodore Tyr. ( )
- Enter the portal and watch the cutscene. ( )
- A game of modified conquest must be played and won.
- Spinners are very powerful but do not heal like in Pest Control.
- Ravagers have the movement range of Scouts and the damage rate of a Knight.
- Shifters are less of a threat than other units and can be tanked if need be.
- Torchers are similar to Mages.
- Defilers are similar to Archers.
- Splatters will explode and deal 100 life points of damage to any adjacent unit that is within 1 square.
- Win the game and proceed to the next room.
The Pest Queen
- Sacrifice either Korasi or Jessika.
- Speak to Valluta before stocking for the fight or Sir Tiffy won't teleport you back.
- Make all necessary preparations to fight the Pest Queen.
- Korasi's sword will be the primary weapon during the fight and its Special attacks will be used a lot.
- Kill the Pest Queen.
- Use the special attack "Disrupt" to stun the Pest Queen when she raises her head and starts shaking for several seconds.
- Kill the spawning Elite defilers to defend Void Knight archers.
- More in-depth strategies can be found here.
Finishing up
- Talk to Korasi or Jessika.
- Decide who to let deal with Wizard Grayzag. ( )
- Quest complete!
Rewards
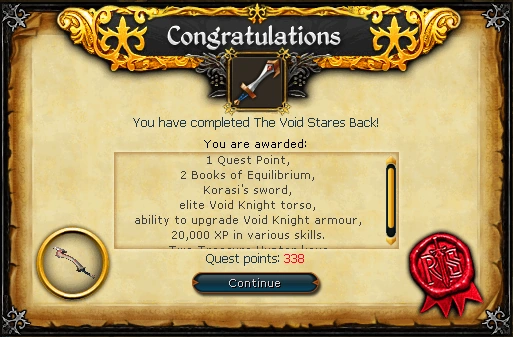
- 1 quest point
- 20,000 experience
- 20,000 experience
- 20,000 experience
- 20,000 experience
- 20,000 experience
- 20,000 experience
- 2 Book of Equilibrium (can be stored in bank) - 50,000 experience each in any combat skill level 75 or higher (except Constitution)
- Korasi's sword and the ability to use Jessika's sword
- Elite void knight top. Its colour will depend on how you answered several psychological questions/decisions in the void quests. Examining it will reveal its type: white for Guardian, grey for Justiciar, and black for Executioner, and it can be changed by talking to Commander Tyr and paying 100,000 coins.
- The ability to upgrade your Void Knight armour for its elite version at the cost of 100 Void Knight commendation points.
- 2 Treasure Hunter keys and 2 Hearts of Ice
- Music unlocked
- In Security
- Precarious Void
- Mystery Revealed
- Give it Your Pest Shot
- The Void Stares Back
- Who Are We To Judge?
| Part 3 of the Void Knight quest series | |||||||
| NPCs |
| ||||||
| Enemies |
| ||||||
| Items |
| ||||||
| Rewards |
| ||||||
| Locations |
| ||||||
| Music |
| ||||||
| Miscellaneous |
| ||||||