m (→Map: Swapped image) |
|||
| Line 685: | Line 685: | ||
|702 |
|702 |
||
|<center>[[TzTok-Jad]]</center> |
|<center>[[TzTok-Jad]]</center> |
||
| − | <center>[[File: |
+ | <center>[[File:TzTok Jad.png|200px]]</center> |
|2550 |
|2550 |
||
|[[File:Attack-icon.png]] Melee, [[File:Magic-icon.png]] Magic, [[File:Ranged-icon.png]] Ranged |
|[[File:Attack-icon.png]] Melee, [[File:Magic-icon.png]] Magic, [[File:Ranged-icon.png]] Ranged |
||
Revision as of 01:16, 14 May 2012
The TzHaar Fight Cave is the second hardest minigame in RuneScape. It terms of difficulty, it is only surpassed by its sequel, the Fight Kiln. To win this minigame, the player will need to have high combat skills and powerful equipment.
The general approach to the Fight Cave is by using Ranged. This will allow the player to trap monsters and attack them from a distance. Using Ranged gives by far the largest chance of success. Using only melee is a lot harder and one will get hit a lot. A combination of Ranged and Guthan's equipment can be very strong. Using Magic is only recommended if one uses Ganodermic armour in combination with a Polypore staff or Storm of Armadyl.
Playing this activity until the end takes a considerable amount of time and resources, requiring usually 2 to 3 hours of continuous playing and a considerable number of potions. The time taken to complete the waves can be an annoyance for high-levelled players that consistently fail to activate the correct protection prayer in the final wave. At 90+ Ranged it can take as little as just over an hour to get to TzTok-Jad; however it is advised the player makes sure they can play straight for at least three hours. Logging out between waves can be done, but is risky. A good internet connection is also very helpful, as lag in the Fight Cave at the wrong moment can be deadly. Playing on a low-populated world with very low ping (<65) decreases the chance of lag.
Recommended skills
For the Fight Cave, there are no skill requirements. It is, however, strongly recommended that the player has at least the following stats before attempting the Fight Cave. Recommended stats may vary according to the method of combat chosen.
| Ranged-only method | Ranged and Guthan's method | Pure method | Melee Method | Magic Method | Tank Method | |
|---|---|---|---|---|---|---|
| 75 | 75 | 80 | N/a | N/A | ||
| 75 | 75 | 80 | 85+ | 85 | ||
| 60 | 60 | 43 | 75+ | 77 | ||
| 70 | 70 | <20 | 90+ | 85 | ||
| N/A | 70 | N/A | 90+ | N/A | ||
| N/A | 70 | N/A | 90+ | N/A | ||
| N/A | N/A | N/A | 94 | 85+ |
Special Note* - If you decide to go with melee, 94 magic is advised but not needed.
Choosing your weapon
![]() Rune crossbow
Rune crossbow
The rune crossbow is a powerful and very cheap Ranged weapon. It is the strongest tradeable and non-degrading crossbow, requiring a Ranged level of 61 to use. It fires semi-slow but can hit high and is quite accurate. It fires bolts - for the Fight Cave, about 1500 adamant bolts or broad-tipped bolts are recommended. For the final fight against TzTok-Jad, diamond bolts (e) are great, since they have a special effect that negates a large portion of the opponent's Ranged defence. Furthermore, one can wield something in the shield slot when using this weapon, and the bolts can be picked up and reused, making this weapon a good choice. The Chaotic Crossbow is an alternative for people with 80 Ranged, 80 Dungeoneering, and 200k Dungeoneering tokens. It is much more accurate, meaning you can get through the Fight Caves faster.
![]() Karil's crossbow
Karil's crossbow
For players with 70 Ranged or higher, Karil's crossbow is an option. It has a Ranged attack bonus almost as high as the rune crossbow. However, this weapon fires much faster - just as fast as a shortbow would hit. This weapon fires bolt racks instead of bolts. One's max hit will be lower when using this crossbow than if one would have used a rune crossbow, but it can still inflict the most damage per second of any non-PvP Ranged weapon. Downsides to using this weapon are that it is two-handed and it is expensive to use, so if one does not have much money, the rune crossbow may be better to use.
![]() Crystal bow
Crystal bow
Another Ranged weapon requiring 70 Ranged to use, and 50 Agility as well, is the crystal bow. This bow degrades when used. When fully charged, it has a Ranged attack bonus surpassing that of the rune crossbow. It is also faster, attacking with the speed of a longsword. It would be wise to take two fully charged bows into the Fight Cave. Every 250 shots, the crystal bow currently wielded will degrade, decreasing its stats. After 2500 shots are fired, the bow will revert to a crystal seed. If one fires 200 - 240 shots and then swaps to the second bow, the second will degrade and the first one will still have the maximum stats. The player should switch back to the first bow, after another 200 - 240 shots, use the degraded bow to take in the next degradation, and repeat these steps. The price of using this weapon varies greatly, since the more bows the player has recharged, the lower the price. This means this weapon will cost between 360 and 72 coins per shot.
![]() Guthan's warspear
Guthan's warspear
If the player chooses to use Guthan's equipment, they must take this weapon as well as the pieces of Guthan's armour (the helm, platebody and chainskirt) for the set effect, Infestation, to activate. Successful attacks will have a chance of healing the player for the amount of damage they did. This can be very helpful as it will conserve a lot of potions. The warspear is, however, a melee weapon so one must come out of their safespot and run towards the monsters to use it. It is also two-handed, so no shield can be wielded alongside the spear. When one starts the Fight Cave with a full inventory and both a weapon and a shield equipped, the warspear can't be used until an inventory spot is freed up. The use of Guthan's warspear will actually take up 4 inventory spots, since the other pieces of Guthan's are also needed. Note that the set effect will only randomly activate, so one should not rely on restoring health with Guthan's when they have very few life points left.
![]() Saradomin godsword
Saradomin godsword
Higher levelled, wealthy players may find that the Saradomin godsword is a useful secondary weapon to bring into the caves. Level 75 Attack is needed to use the weapon. Its special attack, Healing Blade, will restore half the amount of damage they did to their life points and 1/4 to their Prayer points, decreasing the amount of potions needed. The special attack drains 50% of the special attack energy. Despite some of the lower levelled creatures having only 100 or 200 life points, players can still heal the equivalent to what they would have hit, should the given monster have had more health. Players will be able to use the special attack once per wave after roughly wave 20. The godsword should be used for its special attack only - for normal killing, the player should use a Ranged weapon. One good tactic is to kill the strong monsters first, and save a Tz-Kek for last to use the special attack on. Other godswords are, to a lesser extent, also useful in the Fight Cave.
File:Enhanced excalibur.png Enhanced Excalibur
For players who have completed the hard Seers' Village Tasks, and can't afford a Saradomin godsword, the Enhanced Excalibur is a great secondary weapon to take. Its special attack, Sanctuary, heals the player for 40 life points every 2 seconds, for 10 seconds in total; this means the special attack heals 200 life points. It uses up 100% of the special attack energy. In addition, the special attack will give a 15% boost in Defence. The special attack will not restore Prayer points like the Saradomin godsword, the godsword can heal more life points and only uses up 50% of the special attack energy - but it is guaranteed the Enhanced Excalibur will heal the player and the Defence boost could come in handy as well. If players have completed the Elite Seers' Village Tasks, they can upgrade their sword again; this final upgrade will improve its special attack so it heals 400 life points over 20 seconds.
![]() Dragon halberd
Dragon halberd
Only for players who have completed the Regicide quest: the Dragon halberd can be a cheap yet effective 'last resort' weapon for players who don't want to use Ranged and don't have a lot of money to spend. It is a melee weapon that can strike from two squares away, out of range of the monsters' melee attacks. The halberd has a special attack, Sweep, that drains 30% of one's special attack energy. This attack can strike multiple opponents in multi-combat areas if they are lined up properly next to each other. Against large monsters, this special attack will hit twice. For some players, this could be a strong weapon; it may, however, be difficult to use - for example, if one runs a little bit too close to a Ket-Zek they could get hit by their melee attacks and quickly die.
![]() Polypore staff
Polypore staff
For players who have 80 magic, a Polypore staff is useful for completing all waves and can even be used to kill Jad. The staff's inherent spell is powerful and inexpensive. For maximum effectiveness, the player should bring magic-boosting equipment, like the arcane stream necklace, and magic-boosting items, like the Vecna skull. It is possible to complete the entire Fight Caves with around 1000 charges, but to be on the safe side, the staff should be completely charged. A slight disadvantage of the polypore staff is its low attack distance.
File:Zaryte Bow.pngZaryte Bow
The Zaryte bow offers the same bonuses and firing speed as using a chaotic crossbow with runite bolts, uses no ammo, and has the same firing distance of the Crystal bow. The zaryte bow can be advantageous to those who do not have a chaotic crossbow, or who would prefer a longer firing distance which helps when safespotting. The firing distance is especially useful at higher waves where large amounts of monsters, a low firing distance, and one bad move could result in accidently running out of your safespot and dying. The zaryte bow is also much cheaper to maintain alternative to the chaotic crossbow as it only costs 33 coins (or 16.6 coins with 99 smithing on an Armour repair stand) per shot, whereas to obtain the same bonuses with a chaotic crossbow would cost 166.7 coins per shot plus the cost of runite bolts. Downsides to the Zaryte bow would be the 8,816,585 price tag, along the fact that it cannot be used with a shield. All in all, the Zaryte bow is one of the best choices for the Fight Caves to those who can afford it.
Ranged-only method
The simplest method to use is the Ranged-only method. The Ranged-only setup involves using only Ranged all the way through to the end. This is, perhaps, harder than using Guthan's equipment as well as Ranged, as more food and potions are required, and more damage is taken. However, it isn't very difficult to make it to the end using only Ranged, and it is a good alternative to people who don't want to use Guthan's. As the player will be taking more damage, it is highly recommended they maximise their Defence bonus (especially against slash and Ranged, to help defend against Tok-Xil and Yt-HurKot), as well as their Prayer and Ranged attack stats.
Pros
- This method is cheap and simple
- No inventory slots will be occupied by armour pieces
Cons
- As you will require more potions to restore your LP, this method is usually harder than using Guthan's
Recommended equipment
Note: The higher your defense level, the less you need protective gear like veracs helm or plateskirt.
| Slot | Item (most effective → least effective) | ||||
|---|---|---|---|---|---|
| Full slayer helm1 | Verac's helm or Torag's helm | Armadyl helmet | Helm of neitiznot | N/A | |
| Amulet of fury | Amulet of ranging | Demon horn necklace or split dragontooth necklace or god stole | Amulet of glory | N/A | |
| Ava's device or Completionist cape | Soul Wars cape | Fire cape | Trimmed skillcape | N/A | |
| Pernix body | Armadyl chestplate | Karil's top | Black d'hide body | N/A | |
| Pernix chaps | Armadyl chainskirt | Karil's skirt | Bandos tassets or Torag's platelegs | N/A | |
| Broad-tipped bolts and/or Diamond bolts (e) (for Jad) | Runite bolts | Bolt racks | Adamant bolts | N/A | |
| TokKul-Zo (Charged) | Archer's ring (i) | Onyx ring (i) | Archer's ring | N/A | |
| Reverence | Sharpshooter | Aegis | Vampyrism | N/A | |
1 Only if assigned the TzHaar Fight Caves monsters by Kuradal.
Recommended inventory
- 1 Ranging flask (6)
- 6-10 Saradomin brew flask (6)
- Fill rest of slots with Super restore flask (6)
- Purple sweets (stackable food, heals 10-30 LP) or Biscuits
- Falador shield
- Enhanced Excalibur also helps a lot
- 250 Diamond bolts (e) (when ranging TzTok-Jad)
- Dreadnips
If you find you don't need to heal often, for example you use an enhanced Excalibur, consider the cheaper inventory of 6 Saradomin brew flasks, 4 Super restore flasks, 1 Ranging potion, and for the rest of your inventory, Prayer potion flasks. This will radically save money, and each trip may cost a third or less of your initial funding.
Guthan's method
Many players use Guthan's armour in the early waves as it helps conserve food, and it also has reasonable defence. Guthan's armour will at random, during some of your attacks, heal you for the amount of damage you deal. Players would normally use Guthan's until the Yt-MejKots appear, in which the player would then switch to their Ranged setup. However, they could still heal on monsters in later waves to replenish their health when needed. Ideal monsters to heal on are Tz-Kek (level 22), and Tok-Xil. In the later waves with Ket-Zek attacking you, you should run though the Tok-Xil to trap the Yt-MejKots while meleeing the Tok-Xil. Yt-MejKots are also ideal to heal on if you are using a safe spot: this is done by hiding in the safe spot, hitting Yt-Mejkot and running back to the safe spot. It should be noted that when you run back to your safe spot you should wait until its LP bar goes away so it will not attack you.
Pros
- Guthan's equipment will heal you when meleeing, so fewer saradomin brew flasks/food/other healing will be needed
- Using Guthan's and Ranged is usually easier than using Ranged alone
Cons
- Some inventory slots will be occupied by armour pieces (however, the amount of LP restored by Guthan's more than makes up for the few potions lost)
- Changing armours can be difficult for inexperienced players
Recommended equipment
- Aura: Reverence/Greater Reverence/Master Reverence/Vampyrism/Penance/Inspiration/Aegis(for the last few waves)
- Guthan's helm/Proselyte sallet/Armadyl Helm/Full Slayer Helm(while on a slayer task from Kuradal)
- Amulet of fury / Demon horn necklace / Split dragontooth necklace / God stole / Twisted bird skull necklace / Holy symbol / Unholy symbol / Amulet of glory
- Guthan's platebody/Armadyl chestplate/Proselyte hauberk/Black d'hide body
- Guthan's chainskirt/Verac's plateskirt/Proselyte cuisse/Armadyl chainskirt
- Guthan's warspear/Rune Crossbow/Crystal Bow/Karil's crossbow
- Ava's alerter / Ava's accumulator / Ava's attractor / Fire Cape / Obsidian cape / Skillcape / Legends cape
- Adamant bolts or Broad-tipped bolts / Diamond bolts (e) / Bolt racks / Nothing (if using crystal bow)
- Regen Bracelet / Karamja gloves 4 / Gloves (barrows) / Black spiky vambs
- Ranger boots / Snakeskin boots / Dragon boots/Bandos boots/Glaiven boots/Steadfast boots
- Archers ring / Explorer's ring (optional) / Berserker ring/ blessed clay ring
Recommended inventory
- Black d'hide body / Karil's leathertop / Armadyl chestplate
- Guthan's helm (if using some other helm)
- Black d'hide chaps / Karil's leatherskirt / Armadyl chainskirt / Verac's skirt (optional)
- Rune crossbow / Karil's crossbow / 2 Crystal bows /Chaotic crossbow
- Falador shield 3 / Toktz-ket-xil / Granite shield / Dragonfire shield / Elysian spirit shield (optional, and only if using Rune/Chaotic crossbow)
- 1 Ranging potion (4)
- 3-6 Saradomin brew flask (6)
- 1-2 Super restore flask (6)
- 4-6 Prayer renewal flask (6)
- Fill remaining inventory spots with Prayer potion (4) (If your Prayer level is below 84, otherwise replace with Super restore potions (4))
Tank Method
By taking advantage of the high range bonus of the Magic Longbow (sighted), a player can equip chest and leg protection that offer very high Defence bonuses. This will allow players to have a range bonus close to that of a Rune Crossbow, but be able to tank most hits from Tok-Xil. In addition, if one does not feel up to luring healers at the boss fight, the added defence will allow them to simply stand there and tank them.
Note that a Dungeoneering level of 45 (In practical terms, 49) is required to equip a sighted Magic Longbow.
Pros
- Reduced consumption of Prayer/Super Restore potions and Saradomin Brew flasks
- Offers a range bonus superior to that of using Void Knight Armour, a Dragonfire shield, and a Rune Crossbow but far greater defence bonuses.
Cons
- Appropriate gear can be very expensive
- Lower Ranged Strength due to forced use of Arrows instead of crossbow bolts. (However, if your Defence, Prayer, and Ranged levels are high enough, it is possible to keep a Rune Crossbow, Dragonhide body, and appropriate ammunition in your inventory).
Recommended equipment
- Aura: Reverence
- Guthan's Helm / Torag's Helm / Helm of Neitiznot
- Amulet of Fury / Amulet of Ranging / Amulet of Glory
- Bandos Chestplate / Guthan's Platebody / Torag's Platebody / Dharok's Platebody / Dragon Platebody / Dragon Chainbody / Proselyte Hauberk / Black D'Hide Body
- Bandos Tassets / Dharok's Platelegs / Guthan's Chainskirt / Verac's Plateskirt
- Magic Longbow (sighted) or Zaryte Bow
- Ava's Alerter / Ava's Accumulator / Ava's Attractor / Fire Cape / Soul wars cape / Obsidian cape
- Rune arrows or None (Zaryte Bow)
- Regen Bracelet / Karamja Gloves 4 / Barrows Gloves / Dragon gauntlets / Black Spiky Vambraces
- Glaiven Boots / Ranger's Boots / Snakeskin Boots / Dragon Boots / Bandos Boots
- Archer's Ring / Explorer's Ring
Recommended inventory
- Armadyl Chestplate / Black D'hide Body
- Chaotic Crossbow / Rune Crossbow
- Elysian Spirit Shield / Sacred Clay Shield / Dragonfire shield / Toktz-ket-xil
- Diamond bolts (e) / Runite bolts / Broad-Tipped Bolts / Adamant Bolts
- 1 Prayer renewal flask (6)
- 1-2 Ranging Potion (4)
- 7-9 Saradomin brew flask (6)
- 14-16 Super restore flask (6)
Jad Melee Method
Some Players choose to fight Jad using melee. To do this players have to have protect from melee on and switch to protect from range/magic depending on what Jad uses, and then immediately switch back to protect from melee, because his melee attack is too quick, and if he doesn't use melee you just switch again. It is advised to have 90+ Melee stats along with 90+ Constitution when attempting this method. 95+ Prayer is a bonus but it is not needed. 96+ Herblore (for Overloads) is a great advantage and will greatly speed up kills.
Jad Melee/Slayer task gear set up
Template:Thumb
- Aura: Greater Reverence > Reverence
- Headgear: Full slayer helmet (only if on a slayer task) > Torva Helm > Helm of neitiznot > Berserker helm
- Neck: Amulet of fury > Amulet of glory > Amulet of strength
- Body: Pernix body > torva platebody > Bandos chestplate > Anything with good prayer bonus
- Legs: torva platelegs > Bandos tassets > Anything with prayer bonus
- Weapon: Chaotic longsword/Chaotic rapier > Abyssal whip
- Ring: Tokkul-Zo > Berserker ring (i) > Berserker Ring > Warrior ring (i) > Warrior Ring
- Spec Weapon: Dragon claws > Armadyl godsword > Bandos godsword > Dragon dagger
- Gloves: RFD Gloves (Only Barrows or Dragon ) > Regen Bracelet > Karamja gloves 4 > Black spiky vambs
- Boots: Steadfast > Dragon boots > Bandos boots
- Offhand: Divine/Elysian Spirit Shield > Dragonfire shield > Dragon defender* > Rune defender > Toktz-ket-xil
- Cape: Completionist/max cape > Fire cape > Soul wars cape > Ardy cape 4* > Skill Cape
Another strategy used when meleeing is casting the vengeance spell. This is only recommended for higher level players. You attack Jad the same way as normal (using rapier first hit, claw spec x2, back to rapier) but after the claw specs you cast your vengeance spell. When Jad goes to switch from Magic to Melee/Range he will end up killing himself or knocking himself down to under 200 lp. When doing this method it is advised you have 90+ Constitution and keep your life points above 800 at all times.
Dragon Defender* - Dragon Defender should not be used as a primary shield. It is a great second choice item to switch too for the easier monsters (faster kills/higher hits/SS healing).
Ardougne Cape 4* - Ardougne Cape 4 can be a better option than Soul wars cape depending on what weapon you are using. If using a Rapier, it is highly advised using the ardy 3/4 over a soul wars cape due to the higher 'stab' rating.
If you are using overloads you should drink one before entering the caves, thus allowing you to reheal yourself without draining any of your supplies. When you enter the cave you will still have the bonuses of the overload and it will restore any LP that you have lost when it runs out.
Pure method
This method is meant for pures only. Regular players should use one of the above methods instead.
If you are a pure and you have a Defence level of 20 or below, playing this activity is very hard and expensive, but not impossible. You will probably have to invest at least one million coins. It is recommended to study the Fight Cave and many guides before attempting. You will be hit very hard by the level 90s. When the healers appear in the last wave, it is recommended to use the Steel Skin prayer to aid your low Defence against them for a short period of time.
Pros
- For this method, no high Defence level is required
Cons
- This method is very expensive and hard
Recommended equipment
- Any Mitre (Zamorak, Guthix,Saradomin,Zaros, Bandos, or Armadyl)
- Monk's robe (top)/ God robe top
- Black d'hide chaps
- Rock climbing boots / Ranger boots
- Rune crossbow
- Amulet of fury / Amulet of glory
- 1000-2000 Diamond bolts (e)/ Broad bolts
- Ava's attractor / Ava's accumulator
- Archer's ring or Archer's ring (i)/ Onyx ring(i)
- Regen bracelet
- God Book
Recommended inventory
- 10 Saradomin brew flask (6)
- 200+ Purple sweets/Biscuits
- 17 Super restore flask (6)
- 1 or 2 Ranging Potion (4)
Polypore and Ganodermic method
If you have 90+ magic and defence and 91+ herblore, this is a recommended setup because it is quicker than the other methods. For this method you will need a Polypore staff with at least 1700 charges and full ganodermic armour. With 99 magic and good equipment, only 800-900 charges are needed.
Because of the high magic defence and magic soaking bonuses of ganodermic armour, this setup allows the player to tank Jad's magic attacks while keeping Protect from Ranged on at all times. With an eagle-eye kiteshield, the player can attain over 60% magic soak, reducing the damage of Jad's magic attack to the high 400s as well as making it less accurate. For players who are still concerned about Jad's magic attack, prayer switching with Protect from Ranged as the priority is recommended. Since Jad's maximum magic hit is greatly reduced, making mistakes is not as fatal.
Pros:
- Faster waves
- Casts are cheap
- Very high melee and magic defence
- Very high magic soaking
Cons:
- Gear is somewhat expensive
- Low attack distance of staff (using the long distance setting will allow attacking the monster behind the nearest, e.g. killing a lvl 90 ranger behind a lvl 360 while protecting magic)
- Vulnerable to ranged attacks
Recommended equipment
- Head: Slayer helm (if on Slayer task) > Ganodermic visor
- Body: Ganodermic poncho
- Legs: Ganodermic leggings
- Weapon: Polypore staff
- Shield: Eagle-eye kiteshield (for soaking) > Arcane Spirit Shield (for accuracy) > Farseer Kiteshield> Sacred clay shield (magic) > Mage book > Illuminated Unholy book > Illuminated Ancient book > Tome of Frost
- Boots: Ragefire boots > Infinity boots
- Amulet: Arcane Stream Necklace > Amulet of Fury > Amulet of Glory
- Gloves: Spellcaster gloves > Barrows gloves > Regen bracelet
- Cape: Soul Wars cape > God capes > Skillcape
- Ring: TokKul-Zo > Seer's ring (i) > Onyx ring (i) >Dragonstone ring (i) > Seer's ring > Explorer's ring > Beacon ring
- Aura: Reverence > Dark magic > Runic accuracy
Template:Thumb
Recommended inventory
- 4 Super prayer flask (6) > Prayer flask (6)
- 2 Prayer renewal flask (6)
- 2 Overload flask (6) > Extreme defence flask (6) > Super defence flask (6)
- 8 Super restore flask (6)
- 11 Saradomin brew flask (6)
- 1 Extreme magic flask (6) > Magic flask (6)
Map
A labelled map of the Fight Cave.
With the new map set-up, the mini map is a little more straight-edged. regardless, there are still many safespots that can be used. Lava pools scattered around the cave can be used for safespots from melee creatures, but note that ranged and magic can be shot over the pool.
On the south side of the western rock, there is a small alcove where one can hide from all monsters that do not spawn in the southwestern spawn area. This can be done by walking west along the south wall and then walking north after passing a rocky outcrop. This safe area will draw all monsters (that did not spawn nearby) behind the pillar at the end of the southwestern peninsula.
It can also be noted that there are no spawn points (correct if wrong) in the northeast side of the cave, just as before. This can be used to one's advantage, but one must recognize that there is a lava pool to the west which can be shot over by ranged and mage creatures.
In the Fight Cave, you will probably be using safespots. There are two bodies of rock in the Fight Cave that can help you in the center west and northeast.
-THIS INFORMATION IS NO LONGER ACCURATE- THE MAP HAS BEEN UPDATED, AND THE ITALY ROCK IS GONE. HOWEVER, MULTIPLE SIMILAR SAFESPOTS HAVE BEEN ADDED TO COMPENSATE. THEY FUNCTION THE EXACT SAME. BEFORE MAKING A SERIOUS ATTEMPT, FAMILIARIZE YOURSELF WITH THE NEW SETUP!
A good safespot in the Cave is located in the center west of the cave. If you stand in the blue dot on the map, monsters spawning in 3 of the 5 monster spawn points will become trapped on the opposite side of the rock, and one monster spawn will be stuck just round the corner. However, there will be 1 monster spawn due south of you. If monsters are too far away, walk east; they will be lured to you.
Occasionally, monsters may spawn south of there, so they won't be trapped. If the monster is ranged or mage and is attacking you from just round the corner, you can run around the opposite side of the rock, although it may be easier and quicker to just kill the monster, while praying against its attacks.
Monsters In this activity, players must battle past waves of six types of monsters ranging from level 22 up to level 360, before facing the final boss, TzTok-Jad. Each of these monsters require a different tactic by the player, though, due to the structure of the activity, most of them are best fought from a distance. The monsters generally have high Attack and Strength, along with a special ability, but low life points and Defence. This means they will hit hard and often, but can be killed quite easily.
The monsters appear in waves, 63 in total. Here is a detailed breakdown. The monsters are referred to by their combat levels.
| Wave | Combat levels |
|---|---|
| 1 | 22 |
| 2 | 22, 22 |
| 3 | 45 |
| 4 | 45, 22 |
| 5 | 45, 22, 22 |
| 6 | 45, 45 |
| 7 | 90 |
| 8 | 90, 22 |
| 9 | 90, 22, 22 |
| 10 | 90, 45 |
| 11 | 90, 45, 22 |
| 12 | 90, 45, 22, 22 |
| 13 | 90, 45, 45 |
| 14 | 90, 90 |
| 15 | 180 |
| 16 | 180, 22 |
| 17 | 180, 22, 22 |
| 18 | 180, 45 |
| 19 | 180, 45, 22 |
| 20 | 180, 45, 22, 22 |
| 21 | 180, 45, 45 |
| 22 | 180, 90 |
| 23 | 180, 90, 22 |
| 24 | 180, 90, 22, 22 |
| 25 | 180, 90, 45 |
| 26 | 180, 90, 45, 22 |
| 27 | 180, 90, 45, 22, 22 |
| 28 | 180, 90, 45, 45 |
| 29 | 180, 90, 90 |
| 30 | 180, 180 |
|
From this point onwards, use Protect from Magic or Deflect Magic against the Ket-Zeks Only attempt to activate the reverence aura starting from this wave | |
| 31 | 360 |
| 32 | 360, 22 |
| 33 | 360, 22, 22 |
| 34 | 360, 45 |
| 35 | 360, 45, 22 |
| 36 | 360, 45, 22, 22 |
| 37 | 360, 45, 45 |
| 38 | 360, 90 |
| 39 | 360, 90, 22 |
| 40 | 360, 90, 22, 22 |
| 41 | 360, 90, 45 |
| 42 | 360, 90, 45, 22 |
| 43 | 360, 90, 45, 22, 22 |
| 44 | 360, 90, 45, 45 |
| 45 | 360, 90, 90 |
| 46 | 360, 180 |
| 47 | 360, 180, 22 |
| 48 | 360, 180, 22, 22 |
| 49 | 360, 180, 45 |
| 50 | 360, 180, 45, 22 |
| 51 | 360, 180, 45, 22, 22 |
| 52 | 360, 180, 45, 45 |
| Here it will start to get hard | |
| 53 | 360, 180, 90 |
| 54 | 360, 180, 90, 22 |
| 55 | 360, 180, 90, 22, 22 |
| 56 | 360, 180, 90, 45 |
| 57 | 360, 180, 90, 45, 22 |
| 58 | 360, 180, 90, 45, 22, 22 |
| 59 | 360, 180, 90, 45, 45 |
| 60 | 360, 180, 90, 90 |
| 61 | 360, 180, 180 |
| 62 |
360, 360 - Before you kill the second level 360, drink potions to restore your LP and Prayer. Turn Protect from Magic or Deflect Magic on immediately after the second level 360 is dead. |
| 63 | 702, (108, 108, 108, 108) |
- Due to a new update you can no longer log out right before facing Jad; instead you will get a message saying "There's no point in logging out."
- The four level 108 healers will appear when Jad is at half health. If they healed TzTok-Jad back to full health and are then killed, they will respawn; otherwise not. They don't have to be killed to complete the Fight Cave.
Note: After a hidden update, the attacking sound of Jad is switched. When the player hear a huge sound, it is ranged attack instead of magic. Therefore, players should pray to magic as soon as they face Jad, as this attack is much quieter than before.
The progression can be summarized as follows: if a wave has two of the same monster, the next wave will replace those monsters with one monster of the next higher level; e.g.: "22, 22" becomes "45", "90, 90" becomes "180", and so on. If all monsters have different levels, another Tz-Kih (22) appears. The running total of monsters is: 48 Tz-Kih (22), 40 Tz-Kek (45) [80 Tz-Kek (22)], 36 Tok-Xil (90), 34 Yt-MejKot (180), 33 Ket-Zek(360), 1 TzTok-Jad (702), 4 Yt-HurKot (108).
The order in which you should kill the monsters is:
- Tz-Kih (level 22)
- Tok-Xil (level 90)
- Ket-Zek (level 360)
- Yt-MejKot (level 180)
- Tz-Kek (level 45 and 22)
Note: If there are monsters in the wave that were able to get trapped behind a rock, it is best to stay behind that rock and defeat the monsters you can access from there, before moving onto the monsters who are trapped, thus minimising the number of monsters you have to worry about at one time. {C}The monsters are in order of appearance by wave number:
| First Wave | Level | Name | Life points | Attack style | Max hit (approx.) | Notes |
|---|---|---|---|---|---|---|
| 1 | 22 | 100 | 40 | Despite its low combat level, this monster is usually the player's first priority to kill, unless it is trapped behind an object or other monster. Drains | ||
| 3 | 45 | 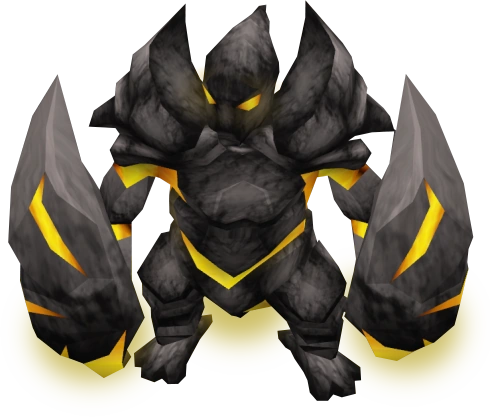 |
200 | 75 | A small melee fighter. Inflicts 10 LP of recoil damage when hit by any melee attack. The least dangerous monster in the cave, so this should be a player's lowest priority to kill. Can't hit very high and is not accurate. When it dies, two level 22 Tz-Keks take its place. | |
| 3 | 22 |  |
100 | 40 | Two of these appear when a level 45 Tz-Kek is killed; they do not have the recoil effect. | |
| 7 | 90 | 400 | 130 | An accurate Ranged fighter that can deal devastating damage. The player's second priority to kill unless the Tz-Kih is trapped behind an object or monster. Praying against these in the early waves is advised. Later on, Prayer must be used against the Ket-Zek's Magic attacks instead, so these should be killed soon. When unable to pray against Ranged attacks, the player could walk up to melee range to attack this monster since its melee attacks are weaker. The Ranged and melee attacks of this monster look similar. | ||
| 15 | 180 |  |
800 | 280 | A slow melee fighter; the player's fourth priority to kill. Can easily be trapped behind a rock or a Ket-Zek, and is not much of a threat when trapped; if it does hit the player, though, it can hit high. This monster can heal itself and other monsters when attacking. | |
| 31 | 360 | 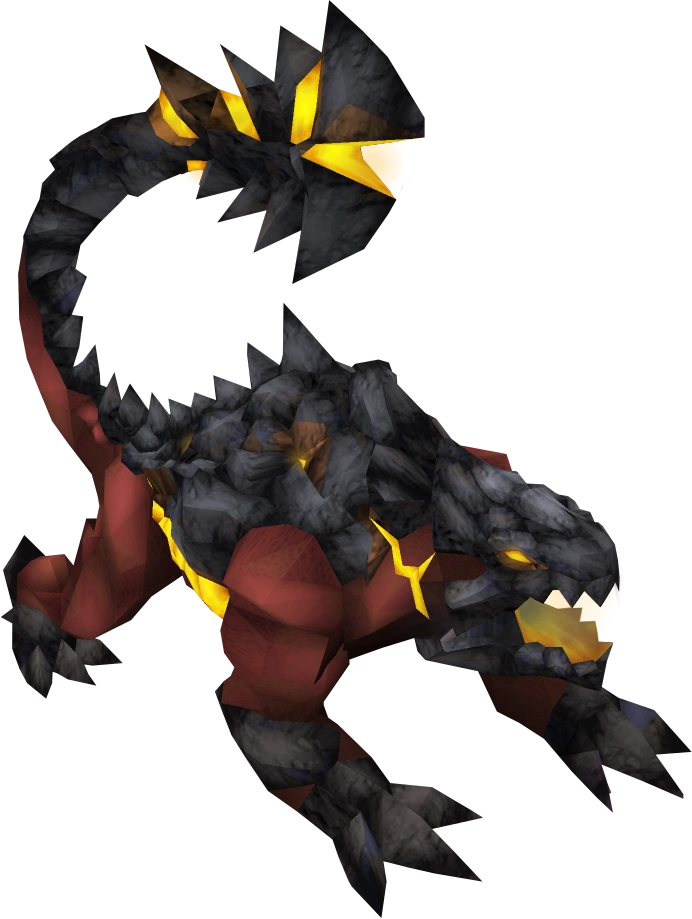 |
1600 | 540 | A very large and dangerous monster - the player's third priority to kill. Whenever one is alive, the player must pray against its Magic attacks. Can kill a player in a few hits if it gets the chance. Use safespots combined with Prayer to fully block their damage. When in melee range, it will use both Magic and melee attacks. These can be used in the later waves to block the Yt-MejKots. | |
| 63 | 702 | 2550 | 970 | The final boss of the Fight Cave. Uses Ranged, Magic and melee attacks. Has one of the highest max hits of any monster in RuneScape. Almost impossible to kill without using the correct prayers. See text for more details. | ||
| 63 | 108 |  |
600 | 140 | Four of them appear when TzTok-Jad is at half health to heal it; these must be killed or distracted. They can heal each other or themselves when in melee range like their cousin the Yt-MejKot. If they heal TzTok-Jad back to full health before killed, they will spawn again. |
Ganodermic + Polypore + Armadyl Battlestaff Method
Requirements:
Ritual of the Mahjarrat
85 Defence (99 for tanking purposes)
85 Magic (99 highly recommended)
Equipment:
| Slot | Item (most effective → least effective) | ||||
|---|---|---|---|---|---|
| Full slayer helm1 | Ganodermic Visor | N/A | N/A | N/A | |
| Arcane Stream Necklace | Amulet of Fury | Amulet of Glory | Amulet of Magic | N/A | |
| God Cape | Soul Wars cape | N/A | N/A | N/A | |
| Ganodermic Poncho | Virtus robe top | Akrisae's robe top | Ahrim's robe top | N/A | |
| Ganodermic Leggings | Virtus robe bottom | Akrisae's robe bottom | Ahrim's robe bottom | N/A | |
| Broad-tipped bolts and/or Diamond bolts (e) | Runite bolts | Bolt racks | Adamant bolts | N/A | |
| TokKul-Zo (Charged) | N/A | N/A | N/A | N/A | |
1Only if assigned the TzHaar Fight Caves monsters by Kuradal.
Inventory:
Your inventory should be: Armadyl Battlestaff, Vecna Skull (Or Overload, or Extreme Magic), 8 Saradomin Brew Flasks, 4 Super Restore flasks 6 Prayer potions, or Prayer Renewal flasks (With Greater Reverance Aura equipped, this could be handy), 500-1000 Armadyl Runes (FOR JAD ONLY) and the rest should be Rocktail.
- Note: If you're uncomfortable with this set-up, you may use your own. But, this is reccomended.**
Method:
Upon entering the caves, you should have the Polypore staff equipped. Enter with prayer fully charged (use Fally shield for example). Drink a prayer renewal dose when you are down to 6-700 prayer (you don't really need to use prayer until wave 31). You would fight through the normal 62 waves as you would using any other method, praying Magic at wave 31+ until after 62 (you may want to pray range occasionally from wave 11). At wave 62, after killing the first 360, equip Armadyl Battlestaff, and turn on auto-cast for Storm of Armadyl. Use an overload or drink a sip of extreme magic and heal up. After you fight off the last Ket-Zek, make sure pray Range is on, as Jad will immediately hit through your 0% Range Absorbtion bonus. (Having normal prayers make this a lot easier, as the leech prayers don't affect TzTok-Jad as much anymore.) When Jad arrives, stay calm. If he spawns right next to you, run to the other side of the ragged rock where he can't hit you so that you remain in control of the fight. Make sure you pray restore when you can, and at least have 500 prayer points all the time. When he smashes the ground and bright lights appear, that would be his Range attack. When he lifts his body, and his chest glows, that's his Magic attack. Always prayer switch, as his Magic can still hit fairly high, around 466-888 damage (If you're lucky). When using Storm of Armadyl, it's possible to 10-hit Jad. Storm of Armadyl makes you attack at a 6/10 speed (roughly 2.1 seconds) due to the Armadyl Battlestaff. If you hit consecutively enough, it's possible to outhit the healers, and not have to worry about them. It's advisable to focus on prayer switching, and not the healers. If you die, try again. This method DOES work. It's been tested multiple times by many players.
- Note: Jad's attack's have been changed, and Jad will still hit before it shows the animation hitting you (Calculation damage is calculated before actual hit), so be fast.
TzTok-Jad
TzTok-Jad is the final monster encountered in the Fight Cave. Examining it yields the discouraging message "This is going to hurt...". It is the fifth highest level monster in all of RuneScape that players can fight with conventional methods (succeeded by Nex, Corporeal beast, Har'Aken, and TokHaar-Jad). Defeating TzTok-Jad requires a huge amount of persistence and determination, as TzTok-Jad is rarely defeated in the first few tries by even the best RuneScape players.
General information
In order for one to reach TzTok-Jad, one must first fight 62 progressively tougher waves of monsters. The current wave that the player is on is shown at the beginning of each wave. TzTok-Jad himself is a level 702, huge, four-legged behemoth and uses all three sides of the combat triangle - Magic, Ranged and melee. TzTok-Jad will attack with melee only when the player is adjacent to him. When the player is in melee range, TzTok-Jad will use Magic and Ranged attacks as well. If the player attacks from a distance - which is strongly recommended - TzTok-Jad will alternate between Magic and Ranged attacks. During the fight, the player should have auto retaliate on and focus on switching to the correct protection prayer in time. Even when the Yt-HurKots appear or the player gets hit, switching prayers is the most important thing to do.
It is also possible to use the Ancient Curses from The Temple at Senntisten to protect from his attacks. The Deflect Curses are very useful, as they work and drain the same way the normal protection prayers do, (the Curses can also be used against Yt-MejKot, Ket-Zek and Tok-Xil) and have a chance of dealing some helpful damage to the enemies attacking (up to 97 on TzTok-Jad, since its maximum hit is 970). It is widely believed that the Deflect Curses deal 10% of damage of what the enemy would have caused. The disadvantage is you need at least 68 prayer (if using range) or 71 (if using melee for TzTok-Jad). Note that it is no longer possible to kill TzTok-Jad only using deflect curses.
Attacks

TzTok-Jad's Magic and Ranged attacks.
Survival depends on watching TzTok-Jad's movements - an emote precedes the attack, telling the player which prayer to use.
- Melee: TzTok-Jad slams his fist into the player. This is the fastest attack, but if the player stays at a distance, they should not encounter it.
- Magic: Tztok-Jad will rear up, standing up straight and will begin to breath fire after about half a second. You can hear him inhale/growl loudly while rearing up and before he actually attacks, so listen for it. Protect from magic needs to be activated while he's rearing up, as after he begins to breath fire it will be too late, and you will be hit. This attack looks almost identical to his original magic attack, and veteran players should be able to identify it easily.
- Ranged: TzTok-Jad slams his front legs onto the ground, and large cracks appear in the floor at his feet - the player must turn on their prayer now. Next, a boulder will fall down on the player. TzTok-Jad usually opens the fight with a Ranged attack, so pray against missiles as soon as you defeat the second level 360 in the wave before Jad. Note that sometimes TzTok-Jad will still start with a Magic attack; in this case, change prayers when you see the Magic attack emote.
Although somewhat slow, all of these attacks can deal enough damage in a single blow to kill even the most powerful of players if not guarded by use of the correct protection prayer. TzTok-Jad has a maximum hit of 980 with melee and 970 with magic and ranged and hits very accurately.
Healers
When TzTok-Jad is down to half health, he will summon four Yt-HurKots (level 108 melee fighters with 600 LP and tiny in comparison) which will heal him, effectively causing him to regenerate endlessly until they are dealt with. In order to stop them from healing, they need to be hit once so they turn their attention to the player. The Yt-HurKots' melee attacks hit up to 140, so the player could kill them, but if one has a decent Defence level and good equipment, they should not be extremely dangerous - one should always watch their health, though. Alternatively, when all of the Yt-HurKots are attacking the player, run through TzTok-Jad and they will become trapped behind him. This is not advised unless the player is experienced. If they healed TzTok-Jad back to full health and are then killed, they will respawn; otherwise not.
A recent update sometimes causes a glitch, when the player manages to get the attention of all the healers, they will still heal Jad if they are close enough. After each is hit, lure them to a safe spot (pillar provides many safe squares) and keep them a distance from jad, as long as you dont see the swirling healing effect on jad, you can safely kill the healers and carry on with jad.
Notes:
- When the Yt-HurKots appear, before attacking them with a Ranged weapon to distract them, the player is advised to set the attack style to long range. Otherwise they may walk too close to TzTok-Jad and get hit by his melee attack.
- If the player gets hit by TzTok-Jad, they should not panic or consume a large amount of food or potions in one go. Stay calm and focused. Heal once every time he attacks while prioritizing praying first.
- You will need to get the attention of all the healers, its most likely that even if you leave one healing him, by the time it takes you to kill the other three healers jad will be at full health.
No prayer switching strategy
It is entirely possible, given the player's has high enough stats and equipment, to kill TzTok-Jad without switching prayers.
This will likely result in a few failed attempts, as he can sometimes hit faster than one can drink brews, however it's a fairly effective way to gain a fire cape for those who do not trust their internet connection or switching ability enough to defeat him.
Suggested minimum levels for this method are mid 90s in magic and defence, along with 95+ hitpoints and overloads. Suggested minimum equipment for this would be Ganodermic armour and an Armadyl Battlestaff. If one cannot afford an Armadyl Battlestaff, using a Polypore Staff is recommended.
By wearing the best magic gear one can afford and praying against range, one can generally keep up with healing Jad's magic attacks. Be aware that he can hit a pair of 500s together in quick succession, and that this seems to happen most often when the healers are healing him.
Keep your hitpoints high with brews, never let them drop below 800. Attack Jad with Storm of Armadyl - he should die quite quickly.
Using ancient curses for this method is incredibly effective, allowing you to sap Jad's magic and defence levels as well as rebounding some range damage to him. Watch his attacks carefully, so you can anticipate when you may need to heal.
If using this method, it really pays to go all-out on equipment (fury, barrows gloves, TokKul-Zo). A Jad slayer task coupled with a Full Slayer Helmet is extremely effective and saves inventory space - allowing one to use melee and range during the waves, then magic on Jad with minimial equipment.
Miscellaneous information
Players with close to maxed combat stats, and 88+ Herblore in addition, can use a combination of Ranged and melee. They should have dragonhide and some sort of high level melee armour. Jad will be meleed with extreme potions, which is where the 88 Herblore comes in. The goal is to kill Jad before the healers arrive, which can be quite difficult. It can take many tries to get this right, and should only be attempted by those who are willing to die and incur the cost of death. Done correctly with extremes/overloads the entire Fight Cave can be cleared in less than 45 minutes, making this an excellent method for high level slayers on tasks for Tzhaar fight cave creatures.
Another method for high levelled players is to use full Proselyte, a Soul Wars cape (from Nomad's Requiem), a God Stole, and a Dragon Halberd to complete the waves. The benefit to this method is that the gear has extremely high prayer bonus (+36 with a Slayer helm, +39 with a Helm of Neitiznot) which allows the player to use fewer prayer potions. With 90+ attack and strength, and extreme attack and strength potion flasks, this method can be used to complete the caves as quickly as with traditional range-based methods.
While not a method in of itself, players with a high Magic level may wish to bring runes for a multi-targeted Blood spell, as this can speed up the caves considerably while providing additional healing. It takes some practice to learn to hit many monsters at the same time, because when cast on a multi-square monster, the spell only hits creatures adjacent to the monster's southwest-most corner square.
Players who have plenty of time on their hands could bring full penance and rest. This restores both life points and Prayer, but takes quite a long time. This is best used in conjunction with Ranged.
Dreadnips can speed up kills during the later waves.
One of the recommended options if a player has access to Dreadnips is to use them in the Fight Cave. They do not count as familiars and can help speed up kills.
Those who have completed the Elite Karamja Tasks may be resurrected on the spot once per day if they die in the Fight Cave.
Logging out
It is possible to log out and save one's progress in the Fight Cave. In order to do this, the player should click the logout button once. The game will register that the player wants to log out, and two red messages in the chat box telling the player they will be logged out as soon as the current wave ends. The player should now kill all the monsters in the current wave, after which they will be automatically logged out. When they next log in, they will start on the next wave.
If the player clicks the logout button twice, or avoids all combat for 10 seconds while there are still monsters alive and then logs out, their progress will be saved but, they will have to start from the beginning of the wave they logged out on.
The wave will not start immediately, however - the player will find themselves in a conversation in which the creature who waits at the entrance to the caves is telling them to get ready to fight for their life, just the same as when they first entered the caves. The wave will not begin, nor will monsters spawn, until this message disappears as a result of the player doing something. This gives the player time to go into the prayer tab and activate the necessary prayer, and quickly run from the centre of the room (which is where the player will be upon login) to their safe spot if need be, before the monsters spawn. This is usually not too dangerous, although it is somewhat risky, so it is always better to stay logged in while in the caves unless absolutely necessary.
Using function keys
Surviving TzTok-Jad's attacks depends on watching his movements. He warns the player before attacking with magic and ranged attacks. By listening for certain sounds and watching his forelegs prior to his attack, they can switch to the appropriate protection prayer and avoid severe damage. Between these attacks the player must switch as quickly as possible otherwise they could experience hits up to 970s. One way to do this a little quicker is to use the keys "F1" (inventory) and "F3" (prayer); if one wastes even less than a second, the results could be fatal. Using the f keys to switch between interfaces can be done on a PC, some linux, and mac computers. However, in order to use this feature on a mac you must first press the function (fn) key on the keyboard simultaneously with the F1 and F3 keys which may take more time. This can be changed, however through System preferences --> Keyboard --> Check the box "Use all F1, F2 etc. keys as Standard function keys" to use the function keys by simply clicking them once, rather than having to use the 'fn' key.
Restoring health
A player resting in between waves.
For players who wish to save their high-healing foods for later fights may choose to find a safespot and wait until their life points heal. This is very time consuming, but casting a Lunar Dream spell, having a bracelet of regeneration equipped or Rapid Heal/Rapid Renewal turned on or simply Resting will speed up the healing process. An Enhanced excalibur is very helpful here, it can heal 200 life points (400 after Seers elite tasks) and boosts your defence level every 5 minutes. Higher level players may also find the Saradomin godsword to be useful, as both prayer and life points can be recovered.
At 92 Prayer, the Soul Split curse can also be used against the lower levelled monsters to gain more life points - 20% of the damage the player does will go to their health when this prayer is active. Using melee in combination with Soul Split works well, as the player will be dealing a lot of damage quickly. However, Soul Split is an overhead prayer, meaning the player will not be able to use a deflect curse while using Soul Split. The player should therefore use Deflect Magic instead whenever a 360 is alive, and use Ranged to attack them. Players could also Prayer flash using Soul Split and Turmoil.