m (→Monsters: eoc) |
m (→Monsters list: eoc) |
||
| Line 611: | Line 611: | ||
|- |
|- |
||
|7 |
|7 |
||
| − | | |
+ | |126 |
|<center>[[Tok-Xil]]</center> |
|<center>[[Tok-Xil]]</center> |
||
<center>[[File:Tok xil.png|175px|Tok xil]]</center> |
<center>[[File:Tok xil.png|175px|Tok xil]]</center> |
||
Revision as of 08:26, 24 November 2012
Template:Beta
The TzHaar Fight Cave is a minigame in RuneScape released on 4 October 2005. It involves single-handedly fighting off many waves of TzHaar creatures, ending in a boss fight against one of the strongest monsters on RuneScape: TzTok-Jad, with a combat level of 702. Players will be rewarded with Tokkul for playing this minigame, and if they manage to defeat TzTok-Jad, they will be rewarded with the fire cape - the fourth strongest cape in the game after TokHaar-Kal, Max cape and the Completionist cape. Completing the entire TzHaar Fight Cave gives about 67,000 experience in combat skills. This is a safe minigame, as you will keep all your items if you die. However, you will not keep the ammo, food, and potions already used when you die, so doing the fight caves is not cost free.
Up until the release date of this minigame, the Kalphite Queen (level 333) was the most powerful creature in RuneScape. The introduction of the TzHaar Fight Cave introduced 2 higher-level monsters: TzTok-Jad (level 702) and Ket-Zek (level 360). The Kalphite Queen is widely regarded as more difficult to defeat than the level 360 Ket-Zek. TzTok-Jad was, for a long time, the strongest monster in the game. After 3 years, the Corporeal Beast (level 785) was released in the members quest, Summer's End, which was considered the hardest boss. And in January 2011 Nex was released, with a combat level of 1001. In May of 2012, the current most powerful enemy, the Queen Black Dragon, was released, with a combat level of 2100. Despite this, Jad remained for a long time the strongest boss in terms of offensive power, and held the record for the highest max hit of any monster outside of special attacks for years. In February 2012 the Fight Kiln minigame was released, which introduced a stronger version of Jad: the level 780 TokHaar-Jad, with a max hit of over 1000.
Playing this minigame until the end takes a considerable amount of time and resources; it can take anywhere from thirty minutes (with very strong gear and experience) to two and a half hours of continuous playing and a considerable number of potions depending on levels, supplies, and method. At 70-80 range, it can take from 90–120 minutes to complete; at 90+ Ranged it can take as little as just over an hour to get to TzTok-Jad; at 99 attack and strength, with the use of Overloads, turmoil and chaotic weaponry meleeing or the Storm of Armadyl the entire way, it can take 35–50 minutes to complete. Players are not allowed to bring Familiars. Logging out between waves can be done, but is risky. A good Internet connection is also very helpful, as lag in the Fight Cave at the wrong moment can be deadly. Playing on a world with a low ping value and playing on a low-populated world decrease the chance of lag.
Location
The Fight Cave is located in TzHaar City, deep under the ground of Karamja. First of all, the player has to travel to Karamja. There are a few ways to do this:
- Travel by ship from Port Sarim or Ardougne - this will cost 30 coins, unless the player brings a ring of charos (a), or if the player has received the karamja gloves (then it will be 15 coins).
- Teleport with a charged Amulet of Glory to Karamja.
- Teleport to one's Player-Owned House in Brimhaven.
- Use the fairy rings (code BLP) to teleport directly to TzHaar city.
- Use the Fight Caves option on the TokKul-Zo ring.
- Teleport with Karamja gloves, then pay 10 coins to travel by cart.
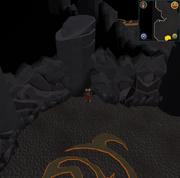
If using one of the first three options the player then has to make their way to Karamja volcano, east of Brimhaven and west of Musa Point. There are two dungeon entrances at the top of the volcano, the large entrance at the center of the lava lake leads to theTzHaar City. Once inside walk north and then turn west just before you reach the small summoning obelisk, look for the bank and minigame symbol on the minimap. This is the entrance to the Fight Caves.
More than one unit may spawn on the same spot, sometimes creating a safespot for some of the monsters.
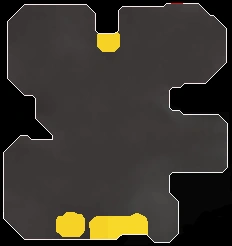
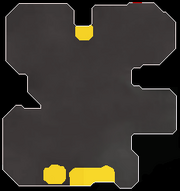
Map
The Fight Cave is a large cave that has three 'rocks' that can be used as
A map of the Fight Cave
safe spots: Boot Rock (west), Lava Rock (north), Bottle Rock (east) and the corner of the lava pool to the south east which can trap even the small ones from the right angle. None of the safe spots work for small monsters, usually the tactic is to lure the monsters to a sharp corner. The entrance is located in the northeastern corner of the cave. Many pools of lava are located near the walls. The monsters spawn in specific locations on the map. Known locations are the centres of each corner-pocket, as well as some in the central area.
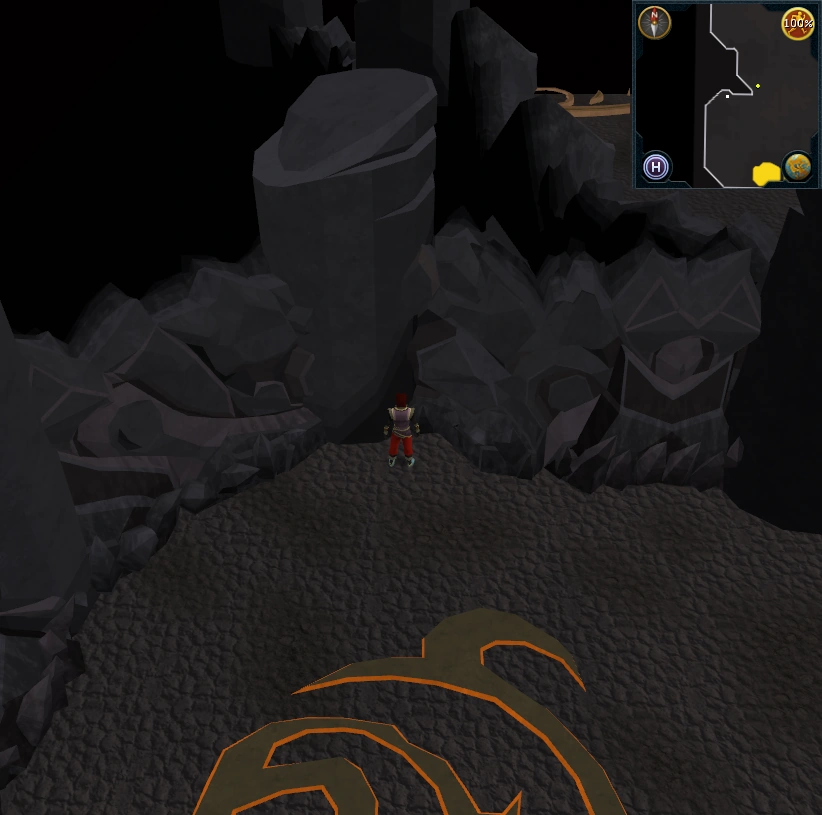
Monsters are easily trapped with this spot.
The rock outcrop to the west is excellent for trapping monsters. If the player stands at the two-square wide depression on the south side of the rock, only monsters from the south could attack them. This is also good for luring TzTok-Jad closer.
Monsters
In this minigame, players must battle past waves of six types of monsters ranging from level 22 up to level 360, before facing the final boss, TzTok-Jad. Each of these monsters require a different tactic by the player, though, due to the structure of the minigame, most of them are best fought from a distance. The monsters generally have high Attack and Strength, along with a special ability, but low life points and Defence. This means they will hit hard and often, but can be killed quite easily.
Monsters in the Fight Cave can be seen as representing powers of two minus one: each wave, monsters will spawn whose place values sum to the wave number, with the Tz-Kih(22) being worth 1, the Tz-Kek(45) 3, the Tok-Xil(90) 7, the Yt-MejKot(180) 15, the Ket-Zek(360) 31, and finally, the Tz-Tok Jad(702) 63. However, waves in the Fight Cave prefer to spawn high-level creatures (e.g. wave 31 spawns one Ket-Zek instead of 31 Tz-Kihs). For example, consider wave 47 as having 47 points: a Ket-Zek with a point value of 31 spawns, because that is the highest creature whose point value can fit in 47; then, of the remaining 16 point, a Yt-Mejkot with a value of 15 spawns, and a Tz-Kih spawns with the remaining 1 point. Thus wave 47 consists of one Ket-Zek, one Yt-MejKot, and one Tz-Kih. The final wave of the Fight Caves is wave 63, in which one Tz-Tok Jad, with a value of 63, spawns.
Also notice that the combat levels of monsters doubles from one type to the next: a Tz-Kih is level 22: a Tz-Kek is level 45 because 22*2 is 44, which is rounded up to 45. The Tok-Xil is level 45*2 = 90, the Yt-MejKot is level 90*2 = 180, and the Ket-Zek is level 180*2 = 360; the Tz-Tok Jad should be level 360*2 = 720, but because the hitpoint limit was 255 (2550) when TzTok-Jad was introduced, he could not have 3200LP. Therefore his combat level is not 720 (double of Ket-Zek, 360), but only 702.
| Monster | Level | Number |
|---|---|---|
| Tz-Kih | 122 | 48 |
| Tz-Kek | 124 | 40 |
| Tok-Xil | 126 | 36 |
| Yt-MejKot | 128 | 34 |
| Ket-Zek | ? | 33 |
| TzTok-Jad | ? | 1 |
| Yt-HurKot | ? | 4 |
| Total Creatures: | 192 (196 with healers) | |
| Wave | Monsters | Advised overhead prayer (Curses) |
|---|---|---|
| 1 | -1 Tz-Kih(22) | |
| 2 | -2 Tz-Kih(22) | |
| 3 | -1 Tz-Kek(45) | |
| 4 |
-1 Tz-Kek(45) -1 Tz-Kih(22) | |
| 5 |
-1 Tz-Kek(45) -2 Tz-Kih(22) | |
| 6 | -2 Tz-Kek(45) | |
| 7 | -1 Tok-Xil(90) | File:Soul split.gif > File:Deflect missiles.gif |
| 8 |
-1 Tok-Xil(90) -1 Tz-Kih(22) |
File:Soul split.gif > File:Deflect missiles.gif |
| 9 |
-1 Tok-Xil(90) -2 Tz-Kih(22) |
File:Soul split.gif > File:Deflect missiles.gif |
| 10 |
-1 Tok-Xil(90) -1 Tz-Kek(45) |
File:Soul split.gif > File:Deflect missiles.gif |
| 11 |
-1 Tok-Xil(90) -1 Tz-Kek(45) -1 Tz-Kih(22) |
File:Soul split.gif > File:Deflect missiles.gif |
| 12 |
-1 Tok-Xil(90) -1 Tz-Kek(45) -2 Tz-Kih(22) |
File:Soul split.gif > File:Deflect missiles.gif |
| 13 |
-1 Tok-Xil(90) -2 Tz-Kek(45) |
File:Soul split.gif > File:Deflect missiles.gif |
| 14 | -2 Tok-Xil(90) | File:Soul split.gif > File:Deflect missiles.gif |
| 15 | -1 Yt-Mejkot(180) | |
| 16 |
-1 Yt-Mejkot(180) -1 Tz-Kih(22) | |
| 17 |
-1 Yt-Mejkot(180) -2 Tz-Kih (22) | |
| 18 |
-1 Yt-Mejkot(180) -1 Tz-Kek(45) | |
| 19 |
-1 Yt-Mejkot(180) -1 Tz-Kek(45) -1 Tz-Kih(22) | |
| 20 |
-1 Yt-Mejkot(180) -1 Tz-Kek(45) -2 Tz-Kih(22) | |
| 21 |
-1 Yt-Mejkot(180) -2 Tz-Kek(45) | |
| 22 |
-1 Yt-Mejkot(180) -1 Tok-Xil(90) |
File:Deflect missiles.gif > File:Soul split.gif |
| 23 |
-1 Yt-Mejkot(180) -1 Tok-Xil(90) -1 Tz-Kih(22) |
File:Deflect missiles.gif > File:Soul split.gif |
| 24 |
-1 Yt-Mejkot(180) -1 Tok-Xil(90) -2 Tz-Kih(22) |
File:Deflect missiles.gif > File:Soul split.gif |
| 25 |
-1 Yt-Mejkot(180) -1 Tok-Xil(90) -1 Tz-Kek(45) |
File:Deflect missiles.gif > File:Soul split.gif |
| 26 |
-1 Yt-Mejkot(180) -1 Tok-Xil(90) -1 Tz-Kek(45) -1 Tz-Kih(22) |
File:Deflect missiles.gif > File:Soul split.gif |
| 27 |
-1 Yt-Mejkot(180) -1 Tok-Xil(90) -1 Tz-Kek(45) -2 Tz-Kih(22) |
File:Deflect missiles.gif > File:Soul split.gif |
| 28 |
-1 Yt-Mejkot(180) -1 Tok-Xil(90) -2 Tz-Kek(45) |
File:Deflect missiles.gif > File:Soul split.gif |
| 29 |
-1 Yt-Mejkot(180) -2 Tok-Xil(90) |
File:Deflect missiles.gif > File:Soul split.gif |
| 30 | -2 Yt-Mejkot(180) | File:Soul split.gif > File:Deflect melee.gif |
| 31 | -1 Ket-Zek(360) | File:Deflect magic.gif > File:Soul split.gif |
| 32 |
1 Ket-Zek(360) -1 Tz-Kih(22) |
File:Deflect magic.gif > File:Soul split.gif |
| 33 |
-1 Ket-Zek(360) -2 Tz-Kih(22) |
File:Deflect magic.gif > File:Soul split.gif |
| 34 |
-1 Ket-Zek(360) -1 Tz-Kek(45) |
File:Deflect magic.gif > File:Soul split.gif |
| 35 |
-1 Ket-Zek(360) -1 Tz-Kek(45) -1 Tz-Kih(22) |
File:Deflect magic.gif > File:Soul split.gif |
| 36 |
-1 Ket-Zek(360) -1 Tz-Kek(45) -2 Tz-Kih(22) |
File:Deflect magic.gif > File:Soul split.gif |
| 37 |
-1 Ket-Zek(360) -2 Tz-Kek(45) |
File:Deflect magic.gif > File:Soul split.gif |
| 38 |
-1 Ket-Zek(360) -1 Tok-Xil(90) |
File:Deflect magic.gif > File:Deflect missiles.gif OR File:Soul split.gif |
| 39 |
-1 Ket-Zek(360) -1 Tok-Xil(90) -1 Tz-Kih(22) |
File:Deflect magic.gif > File:Deflect missiles.gif OR File:Soul split.gif |
| 40 |
-1 Ket-Zek(360) -1 Tok-Xil(90) -2 Tz-Kih(22) |
File:Deflect magic.gif > File:Deflect missiles.gif OR File:Soul split.gif |
| 41 |
-1 Ket-Zek(360) -1 Tok-Xil(90) -1 Tz-Kek(45) |
File:Deflect magic.gif > File:Deflect missiles.gif OR File:Soul split.gif |
| 42 |
-1 Ket-Zek(360) -1 Tok-Xil(90) -1 Tz-Kek(45) -1 Tz-Kih(22) |
File:Deflect magic.gif > File:Deflect missiles.gif OR File:Soul split.gif |
| 43 |
-1 Ket-Zek(360) -1 Tok-Xil(90) -1 Tz-Kek(45) -2 Tz-Kih(22) |
File:Deflect magic.gif > File:Deflect missiles.gif OR File:Soul split.gif |
| 44 |
-1 Ket-Zek(360) -1 Tok-Xil(90) -2 Tz-Kek(45) |
File:Deflect magic.gif > File:Deflect missiles.gif OR File:Soul split.gif |
| 45 |
-1 Ket-Zek(360) -2 Tok-Xil(90) |
File:Deflect magic.gif > File:Deflect missiles.gif OR File:Soul split.gif |
| 46 |
-1 Ket-Zek(360) -1 Yt-Mejkot(180) |
File:Deflect magic.gif > File:Soul split.gif |
| 47 |
-1 Ket-Zek(360) -1 Yt-Mejkot(180) -1 Tz-Kih(22) |
File:Deflect magic.gif > File:Soul split.gif |
| 48 |
-1 Ket-Zek(360) -1 Yt-Mejkot(180) -2 Tz-Kih(22) |
File:Deflect magic.gif > File:Soul split.gif |
| 49 |
-1 Ket-Zek(360) -1 Yt-Mejkot(180) -1 Tz-Kek(45) |
File:Deflect magic.gif > File:Soul split.gif |
| 50 |
-1 Ket-Zek(360) -1 Yt-Mejkot(180) -1 Tz-Kek(45) -1 Tz-Kih(22) |
File:Deflect magic.gif > File:Soul split.gif |
| 51 |
-1 Ket-Zek(360) -1 Yt-Mejkot(180) -1 Tz-Kek(45) -2 Tz-Kih(22) |
File:Deflect magic.gif > File:Soul split.gif |
| 52 |
-1 Ket-Zek(360) -1 Yt-Mejkot(180) -2 Tz-Kek(45) |
File:Deflect magic.gif > File:Soul split.gif |
| 53 |
-1 Ket-Zek(360) -1 Yt-Mejkot(180) -1 Tok-Xil(90) |
File:Deflect magic.gif > File:Deflect missiles.gif |
| 54 |
-1 Ket-Zek(360) -1 Yt-Mejkot(180) -1 Tok-Xil(90) -1 Tz-Kih(22) |
File:Deflect magic.gif > File:Deflect missiles.gif |
| 55 |
-1 Ket-Zek(360) -1 Yt-Mejkot(180) -1 Tok-Xil(90) -2 Tz-Kih(22) |
File:Deflect magic.gif > File:Deflect missiles.gif |
| 56 |
-1 Ket-Zek(360) -1 Yt-Mejkot(180) -1 Tok-Xil(90) -1 Tz-Kek(45) |
File:Deflect magic.gif > File:Deflect missiles.gif |
| 57 |
-1 Ket-Zek(360) -1 Yt-Mejkot(180) -1 Tok-Xil(90) -1 Tz-Kek(45) -1 Tz-Kih(22) |
File:Deflect magic.gif > File:Deflect missiles.gif |
| 58 |
-1 Ket-Zek(360) -1 Yt-Mejkot(180) -1 Tok-Xil(90) -1 Tz-Kek(45) -2 Tz-Kih(22) |
File:Deflect magic.gif > File:Deflect missiles.gif |
| 59 |
-1-Ket-Zek(360) -1 Yt-Mejkot(180) -1 Tok-Xil(90) -2 Tz-Kek(45) |
File:Deflect magic.gif > File:Deflect missiles.gif |
| 60 |
-1 Ket-Zek(360) -1 Yt-Mejkot(180) -2 Tok-Xil(90) |
File:Deflect magic.gif > File:Deflect missiles.gif |
| 61 |
-1 Ket-Zek(360) -2 Yt-Mejkot(180) |
File:Deflect magic.gif > File:Deflect melee.gif |
| 62 | -2 Ket-Zek(360) | File:Deflect magic.gif |
| 63 |
-1 Tz-Tok Jad(702) -4 Yt-HurKot(108) |
The monsters are in order of appearance by wave number:
Monsters list
| First Wave | Level | Name | Life points | Attack style | Max hit (approx.) | Notes |
|---|---|---|---|---|---|---|
| 1 | 122 | 100 | 44 | Despite its low combat level, this monster is usually the player's first priority to kill, unless it is trapped behind an object or other monster. Drains | ||
| 3 | 124 | 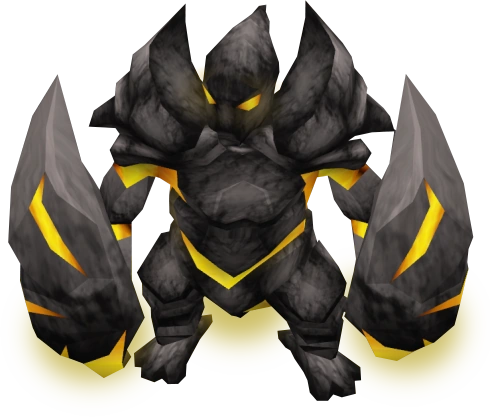 |
200 | 74 | A small melee fighter. Inflicts 10 LP of recoil damage when damaged by any melee attack. The least dangerous monster in the cave, so this should be a player's lowest priority to kill. Can't hit very high and is not accurate. When it dies, two level 124 Tz-Keks take its place. | |
| 3 | 124 | 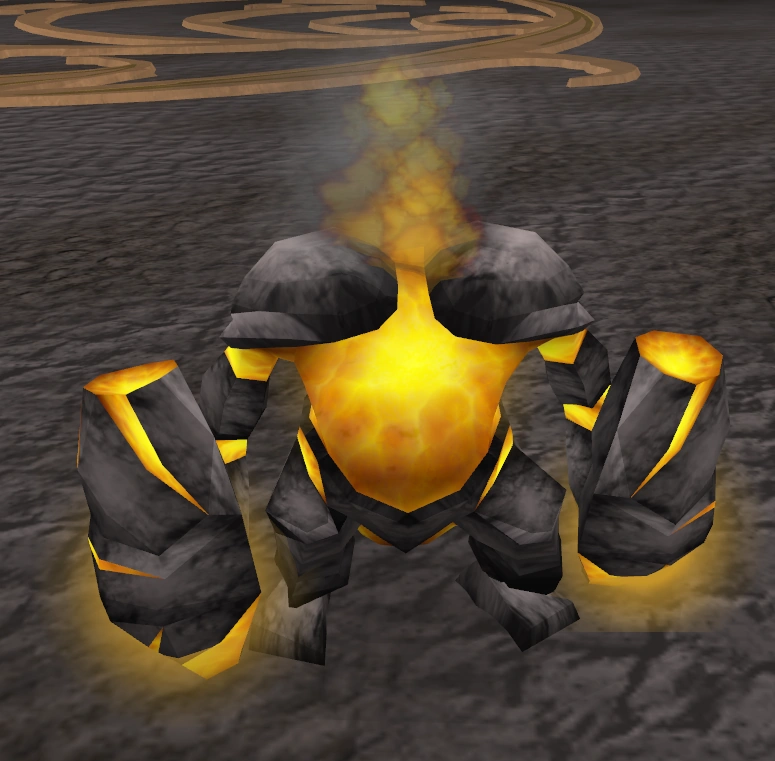 |
100 | 44 | Two of these appear when a level 124 Tz-Kek is killed; they do not have the recoil effect. | |
| 7 | 126 | 400 | 134 | An accurate Ranged fighter that can deal devastating damage. The player's second priority to kill unless the Tz-Kih is trapped behind an object or monster. Praying against these in the early waves is advised. Later on, Prayer must be used against the Ket-Zek's Magic attacks instead, so these should be killed quickly before the Ket-Zeks. When unable to pray against Ranged attacks, the player could walk up to melee range to attack this monster since its melee attacks are weaker. | ||
| 15 | 128 | 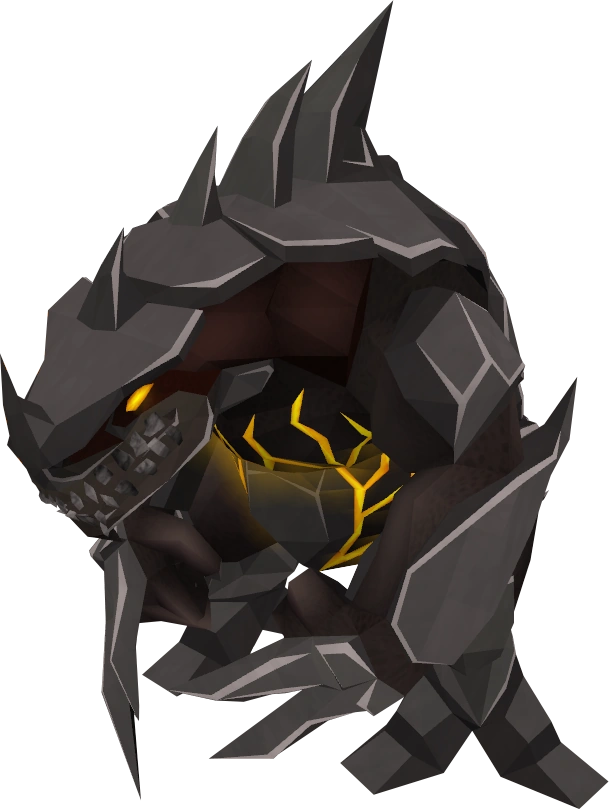 |
800 | 305 | A slow melee fighter; the player's fourth priority to kill. Can easily be trapped behind a rock or a Ket-Zek, and is not much of a threat when trapped; if it does hit the player, though, it can hit high. This monster can heal itself and other monsters when attacking. | |
| 31 | 130 | 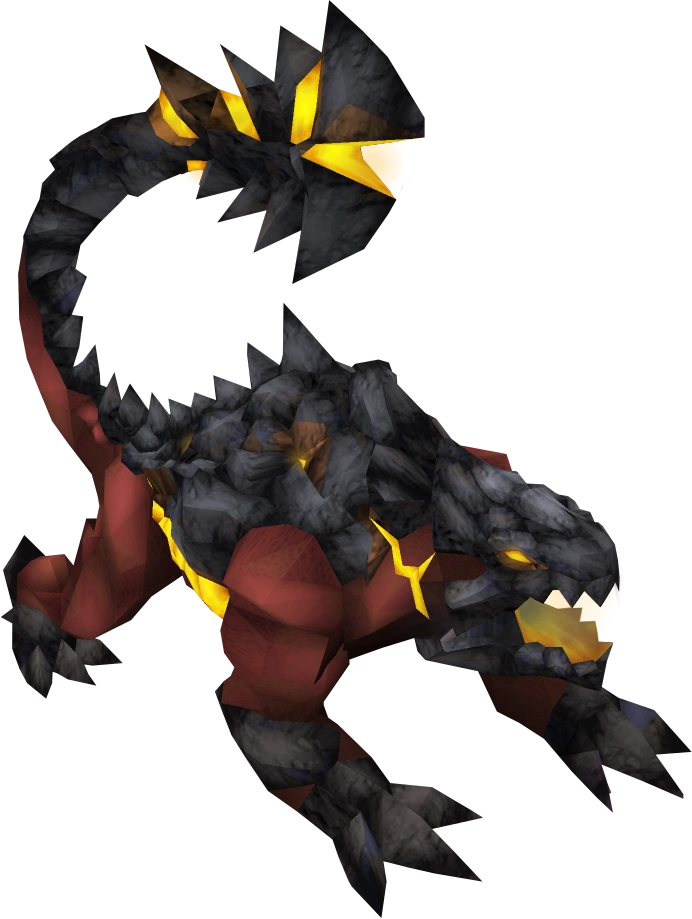 |
1600 | 540 | A very large and dangerous monster - the player's third priority to kill. Whenever one is alive, the player must pray against its Magic attacks. Can kill a player in a few hits if it gets the chance. Use safespots combined with Prayer to fully block their damage. When in melee range, it will use both Magic and melee attacks. These can be used in the later waves to block the Yt-MejKots. Note: Prayer switching is extremely tedious and highly discouraged against these monsters, as it is impossible to determine what attack they will use until the damage has been calculated. | |
| 63 | 702 | 2550 |
980 (Melee) 970 (Ranged or Magic) |
The final boss of the Fight Cave. Uses Ranged, Magic and melee attacks. Has one of the highest max hits of any monster in RuneScape. Almost impossible to kill without using the correct prayers. See text for more details. | ||
| 63 | 108 | 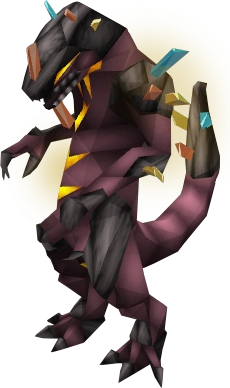 |
600 | 140 | Four of them appear when TzTok-Jad is at half health to heal it; these must be killed or distracted. They can heal each other or themselves when in melee range like their cousin the Yt-MejKot . If they heal TzTok-Jad back to full health before being killed, they will spawn again. |
Recommended priority: Tz-Kih (22) > Tok-Xil (90) > Ket-Zek (360) > Yt-MejKot (180) > Tz-Kek (45)
TzTok-Jad
TzTok-Jad is the final monster encountered in the Fight Cave. Examining it yields the discouraging message "This is going to hurt...". It is the sixth highest level monster in all of RuneScape that players can fight with conventional methods (succeeded by TokHaar-Jad, Har'Aken, the Corporeal beast, Nex and the Queen Black Dragon). Defeating TzTok-Jad requires a huge amount of persistence and determination, as TzTok-Jad is rarely defeated in the first few tries by even the best RuneScape players.
General information
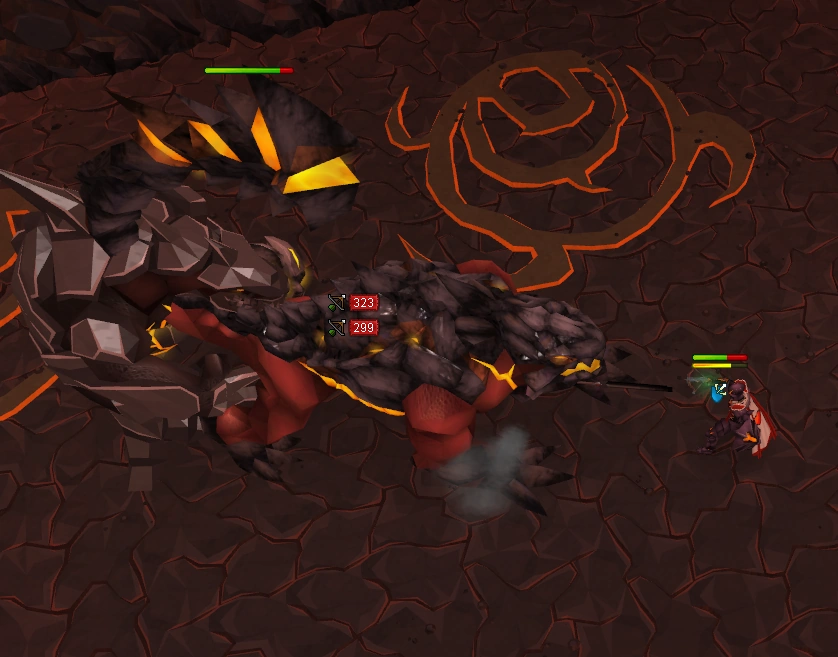
In order for one to reach TzTok-Jad, one must first endure 62 waves of fighting progressively tougher monsters. The current wave that the player is on is shown at the beginning of each wave. TzTok-Jad himself is a level 702, huge, four-legged behemoth and uses all three sides of the combat triangle - magic, ranged and melee. TzTok-Jad will not attack with melee unless the player is adjacent to him. There is no setup animation for TzTok-Jad's melee attack, unless you are already using protect from melee when he starts his attack, you will not have time to switch prayers for it. When the player is in melee range, TzTok-Jad will still use Magic and Ranged attacks as well. If the player attacks from a distance - which is strongly recommended for inexperienced players - TzTok-Jad will alternate between Magic and Ranged attacks.
Attacks
Survival depends on watching TzTok-Jad's movements - an emote precedes the attack, telling the player which prayer to use.
- Melee: TzTok-Jad quickly slams his fist into the player. This is the fastest attack, but if the player stays at a distance, they should not encounter it. If you are engaging in melee combat, protect from melee should always be on at all times unless prompted to switch by his Magic and Ranged animations.
- Magic: TzTok-Jad breathes fire shortly and lowers/bows his head before raising his front feet and emitting a fireball - the player must turn on their prayer now. Then, the spell will be fired at the player. Once the ball is in the air, it's too late. If you weren't praying magic, you will be hit. Before an update which occurred on 25 May 2011, the same sound as the Retribution prayer being turned on would be played before the attack is launched, which made it easier to identify it. This sound could be heard regardless of your proximity to TzTok-Jad. Since the update, neither TzTok-Jad nor Ket-Zek (Level 360) has a sound to accompany their Magic attacks. This has made it more difficult for players to determine which attack he is using when he spawns. Recommendation is to pray ranged defence, as this is his most common attack when he spawns, and to have auto-retaliate activated so that you can find him quickly to watch for his next attack.
- Ranged: TzTok-Jad slams down his front legs onto the ground, and large cracks will appear in the floor at his feet - the player must turn on their prayer now. Though, by the time you hear the sound, it's already too late. If you weren't praying ranged, you will be hit. (Which is why you need to pray ranged at the start) Next, a boulder will fall down on the player, which cannot be avoided by moving. Occasionally he will breathe fire at the start of this attack as well, it is unknown if this is intentional or not.
Although somewhat slow, all of these attacks can deal enough damage in a single blow to kill even the most powerful of players if not guarded against via using the correct protection prayer, as TzTok-Jad has a maximum hit of 970 and hits very accurately. If you have vengeance spells, you can take advantage of his extremely high hits by allowing him to hit you once, (provided your life points are above 970, so you have a 100% chance of surviving a hit.) and rebounding very high hits back at him, usually in the high 700's. It is strongly recommended to bring either Saradomin Brews and Super Restores or Rocktails to heal above you maximum Life Points the wave right before Jad, in case things might go wrong.
Healers
When TzTok-Jad is down to half health, he will summon four Yt-HurKots (level 108 melee fighters with 600 LP and tiny in comparison) which will heal him, effectively causing him to regenerate endlessly until they are dealt with. Therefore, in order to stop them from healing, they need to be killed, one by one, so they don't heal each other, but don't forget about the TzTok-Jad waiting to kill you. If you kill them after TzTok-Jad has been healed to full health, when you get him down to half health, the Yt-HurKots will respawn again. However, if you manage to kill all 4 of the Yt-HurKots before they bring Jad up to full health, they will NOT respawn when a player brings TzTok-Jad down to half health again. The Yt-HurKots' melee attacks hit up to 140.
TzHaar slayer task
Since the release of Kuradal, players may now receive Tzhaar creatures as Slayer tasks. Upon receiving the assignment, Kuradal will offer a player the option to upgrade the task to "280 volcanic creatures of the Tzhaar Fight Caves." Defeating TzTok-Jad on this special assignment will give a bonus of 25,000 Slayer experience, the largest amount of experience to be gained from any monster. Additionally, going through the whole Fight Cave on this alternative task may yield up to 37,000 Slayer experience. This consists of all waves up to 63, including killing eight Yt-HurKots (two waves) and TzTok-Jad himself. It is highly advised to get a full slayer helmet or a focus sight before attempting this task with range. With the boosts from these helmets, effective players with high combat stats can complete the caves in well under an hour, yielding relatively high experience per hour.
The Slayer experience breakdown of a Tzhaar Fight Caves task is:
If a player fails/chooses not to complete the fight cave (successfully defeat TzTok-Jad), he/she can start the fight caves over to fight lesser creatures to complete the task. The task will end when the player reaches 280 kills. Afterwards, the player can continue progressing through the Fight Caves, but they will no longer receive Slayer xp or the bonuses from the full slayer helmet or the focus sight.
Rewards

A close up of the Fire Cape.
If you are successful in completing all the waves and defeating TzTok-Jad, you will be rewarded with 16,064 Tokkul and the much-coveted and non-tradeable fire cape. This cape has an animated "lava" pattern. The animation shows lava flowing downwards continually.
The Fire Cape is widely considered one of the best capes in RuneScape. It provides ample protection (+11 in all defence bonuses) and strength bonus (+4) only equalled or surpassed by the Max cape, Completionist cape, and TokHaar-Kal. Magicians and Rangers who seek for offensive stats might want to consider other items. Numerous other capes, such as trimmed skillcapes, Ardougne Cloaks, and most notably the Soul Wars Cape, provide higher Prayer bonus.
The Fire cape also gives the ability to obtain an Ice strykewyrm slayer task without using slayer reward points to purchase that ability, and doubles the damage of fire spells while slaying them. In addition, it adds 40 damage to all attacks against them. Ice strykewyrms are the only monster to drop the Staff of light.
Defeating TzTok-Jad subsequently after obtaining the Fire Cape awards the player with another Fire Cape and 16,064 Tokkul, allowing you to have more than one fire cape at a time. Any spare fire capes can also be sold to TzHaar-Mej-Jal for 8,000 Tokkul per cape.
If a player dies in the fight caves, they will still get Tokkul, but not as much as they would if they defeated TzTok-Jad. The further a player gets, the more Tokkul and if one dies at TzTok-Jad then they will only receive 8,800 Tokkul—about half the amount than if the player defeats TzTok-Jad.
As of 9 November 2009, defeating the Fight Cave and TzTok-Jad rewards the player with double Tokkul.
Trivia
- When the minigame was first released, you could not log out during the fight caves without giving up all of your progress. It is now possible to logout during the fight caves and pick up where you left off. When the logout button is clicked, the player will receive an option to logout immediately or at the end of the current wave. If they chose to logout immediately, the player will be required to re-do the wave they were on when trying to log out. Additionally, if a player clicks the logout button while fighting a monster, the player will appear to log out, but the "Connection Lost" screen will appear, and the player will find themselves back for the next level.
A player resting while enemies are still alive
- The fight caves can also be used as a place to recover for players killing Tzhaar monsters or Lesser Demons when their Prayer or Lifepoints are low. This is effective because it is faster to die in the caves than to go find a prayer altar.
- If you are low on potions, food or if there are only one or two monsters left to kill, trapping them on the other side of a rock can allow you to rest and regenerate health without using supplies. You could also utilize the (Elite) Enhanced Excalibur for healing in-between waves, and/or by casting the Dream Lunar Spell.
- It is possible to get roughly 90k Ranged experience by using the range only method while completing the Fight Caves. Note that this depends on how much the Jad heals and how much damage is dealt to the healers.
- If you finished "Death to the Dorgeshuun" you can see a room that looks like it could be from something like this.
- At RuneFest Mod Mark announced the as then un-named Fight Kiln minigame, which requires the sacrifice of one fire cape to enter which allows infinite tries at defeating the boss.
- When using Guthan's armour in the caves, the crush attack has more effect on the monsters you encounter.
- Potion flasks can give lower level players a higher chance at succeeding in the caves due to the larger amount of supplies they can carry.
- There is a glitch when the Tok-Xil stretches when healed by the Yt-Mejkot. This has not been fixed.