Tag: sourceedit |
(8x8 not 9x9 7:^]) Tag: sourceedit |
||
| Line 259: | Line 259: | ||
==The fight== |
==The fight== |
||
===Grid layout=== |
===Grid layout=== |
||
| − | The first four rooms of Vorago's fight are divided into an invisible 3x3 grid, each square being |
+ | The first four rooms of Vorago's fight are divided into an invisible 3x3 grid, each square being 8x8 spaces. Knowing the layout of this 3x3 grid is crucial to understanding and predicting Vorago's attacks. |
The grid squares determine where: |
The grid squares determine where: |
||
Revision as of 19:44, 26 August 2016
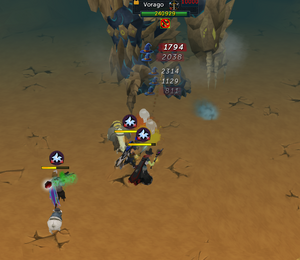
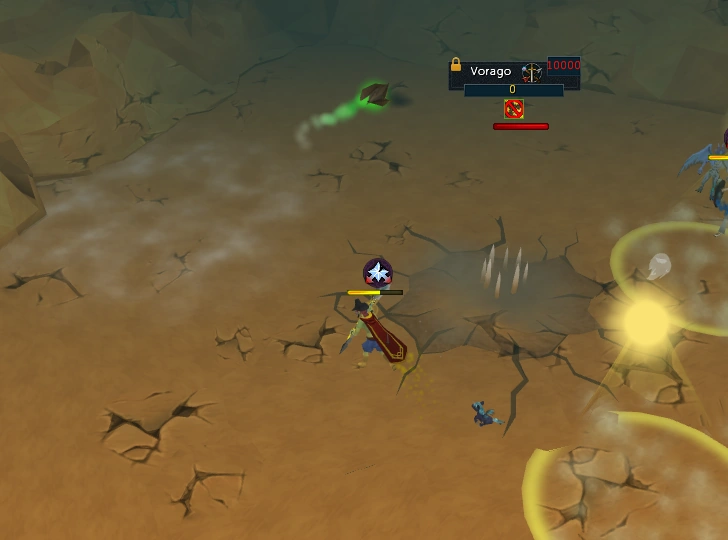
Vorago is a level 10,000 monster found in the Borehole north of Falador. He is fought in 5 phases, with the last 3 phases changing on a weekly basis.
This page covers a brief overview of Vorago and his mechanics. More in depth coverage of each role (including abilities, equipment, and supplies) are currently under construction.
Starting a fight
The borehole
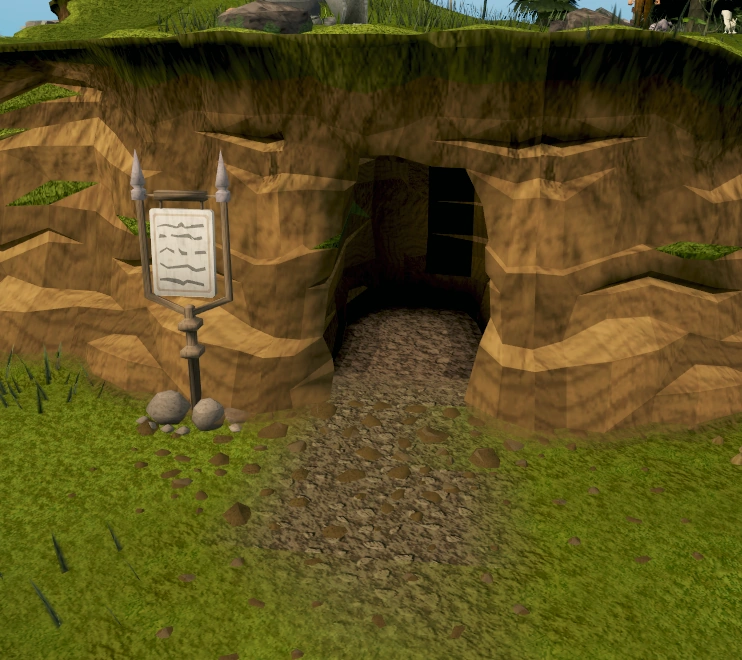
The entrance to the borehole
Vorago is located in the borehole, a cave situated north of Falador. The entrance is only short distance from the northern entrance to Falador. The entrance allows access to the Vorago's face (including an option to create an instance) and the graveyard. Anyone who dies while inside the fight will have their grave appear in the graveyard.
Entrance hit
Inside the borehole, Vorago will have his face up, and players can talk to or challenge him. Challenging Vorago and being able to enter a fight requires having talked to Vorago about his history at least once. A maximum of 50 players can fight Vorago at a time.
When challenged, all eligible players in the room will receive a message that someone has challenged Vorago, and are given a prompt to accept or decline the invitation. 20 seconds after the initial challenge, Vorago will deal 50,000 damage split evenly among all challengers. If any player dies from this hit (including triggering a sign of life, etc) then no one will proceed into the fight. The damage dealt is typeless and cancels all defence abilities; however, it can still be randomly reduced by warpriest armour, leviathan ring or any style defender.
Roles
- Main tank/Base
- The main tank is responsible for keeping Vorago's attention for most of the fight. They are also responsible for taking the first 2 smashes, moving Vorago to gravity fields, and walking Vorago if needed.
- Bomb tank
- The bomb tank is responsible for absorbing all damage from Vorago's magic attacks (blue bombs) and explosive bombs (red bombs). Generally, the bomb tank should also take the second set of smashes, and should keep Vorago's aggression for phase 3 on most weeks. Because bombs are launched to the farthest target, the bomb tank should be spaced away from the rest of the team.
- Jumper/Top lure
- The jumper is responsible for ascending the cliff side and retrieving the first piece of the maul of omens on phase 1. The jumper should generally also take the "Voke 5" role. This role is generally responsible for finishing Vorago with the maul.
- Voke 5
- The voke 5 is responsible for taking the fifth and final smash. This role is usually covered by the jumper.
- DPS/Attack
- Attackers are responsible for damaging Vorago without taking care of a special role; however, one or two attackers will need to cover the top lure and voke 5 roles.
- Green bomb tank
- The green bomb tank is an optional role for teams that prefer to speed up kills. The green bomb tank is responsible for taking 10,000 damage from the green bomb to skip the mechanic. This role only exists during green bomb week, and is only used during phase 4. This role should be covered by one of the attackers.
Full attack rotation
| Ceiling collapse |
| Scopulus |
| Vitalis |
| Green bomb |
| Team Split |
| The end |
| Next: 5 days (wrong?) |
Vorago's attacks change every week at Wednesday 00:00 UTC. The week's rotation changes all of phase 3, and parts of phases 4 and 5. This section covers the full rotation for each phase, for each week. In the chart below, "attack" refers to Vorago's basic attacks: launching a blue bomb, or performing his melee swipe.
Phase 1
- Phase ends when Vorago reaches 0 life points after obtaining the weapon piece
- Red bomb
- 4 attacks
- Repeat
- Weapon piece is obtained by jumping on Vorago at any time
Phase 2
- Phase ends when Vorago reaches 0 life points after obtaining the weapon piece
- Smashes
- 3 attacks
- Reflect and gravity field
- 3 attacks
- Red bomb
- 4 attacks
- Repeat
- After 4 gravity fields, the phase progresses to "Bring him down!"
- Weapon piece obtained by dealing enough damage during this time
- Afterwards, Vorago will continue his attack rotation
Phase 3
Phase 3 ends when Vorago reaches 0 life points. For Scopulus week, phase 3 ends when both Scopuli are killed.
| Ceiling collapse | Scopulus | Vitalis | Green bomb | TeamSplit | The End |
|---|---|---|---|---|---|
|
|
|
|
|
|
Phase 4
Phase 4 ends when Vorago reaches 0 life points after the weapon piece has been obtained. The weapon piece will be dislodged on the third waterfall attack.
| Ceiling collapse | Scopulus | Vitalis | Green bomb | TeamSplit | The End |
|---|---|---|---|---|---|
|
|
|
|
|
|
Phase 5
Phase 5 ends when Vorago has been pushed all the way east and is finished off with the Maul of Omens.
| Ceiling collapse | Scopulus | Vitalis | Green bomb | TeamSplit | The End |
|---|---|---|---|---|---|
|
|
|
|
|
|
The fight
Grid layout
The first four rooms of Vorago's fight are divided into an invisible 3x3 grid, each square being 8x8 spaces. Knowing the layout of this 3x3 grid is crucial to understanding and predicting Vorago's attacks.
The grid squares determine where:
- Vorago can jump
- gravity fields spawn
- rocks collapse
- scopuli spawn
- Vorago can launch the vitalis orb
- the green bomb lands
- teamsplit boxes are
- bombs are during the end
- waterfalls are
Basic attacks
- Melee attack
Vorago will perform a swipe that can hit everyone within 2 squares of his target plus anyone within melee distance of himself. He will only perform this attack if he is within melee distance of his current target.
- Blue bomb
Vorago will fire a blue bomb at his target. This attack deals magic damage to all players within 3 squares of the player it hits and acts as a normal magic attack, being affected by most abilities as expected. The damage from blue bombs is registered after the explosion animation starts. This makes it possible to counter the damage even with late reactions. It will also affect timing abilities for the bomb tank, requiring later casting than a normal attack would. The more players who are hit by the magic attack, the less damage it will deal per hit.
The blue bomb is normally incapable of missing. However, a sufficient armour rating may cause the bomb to create a blocked hit splat. Should this occur, a second hit splat, this time unavoidable, will immediately appear on the player instead, dealing lower damage compared to what the original hit would have done.
Vorago will focus on firing blue bombs to the person farthest away from him and within his attack range. In teams of 10 or fewer, Vorago will only fire one blue bomb at a time, and it will always be fired at the farthest target. In teams of 11 or more, Vorago will fire two blue bombs at a time, and will focus primarily on the farthest target. There is a chance that he will target a random player, with the chance scaling with the number of players.
- Red bomb
Vorago will fire a non-homing blue bomb and a red bomb at his target at the same time. The blue bomb is almost exactly the same as the normal attack; however, it will target the location of his target at the time that it was fired, meaning that damage can be avoided by running out of the blast radius. The blue bomb will always hit before the red bomb.
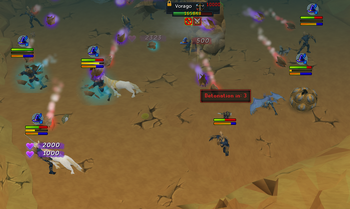
The red bomb will home in on the player, and deal typeless damage when it hits. The bomb has a base damage of 2000, and will increase by 1000 for every player within 4 squares of the player when hit, capping at 7000 damage. All players within 2 squares of the attack will also take the same typeless damage.
When a red bomb hits, it will drain 5% adrenaline to its main target and will also cancel most defensive abilities and put them on cooldown. The damage can be completely negated by barricade; however, barricade will be removed afterwards.
Abilities cancelled by red bombs:
- Devotion
- Resonance
- Reflect
- Barricade (hit will be blocked first)
- Immortality
- Debilitate
Vorago will focus on firing red bombs to the player farthest away from him; however there is always a chance that he will target a random player. His target will receive the warning Vorago has sent a bomb after you. Run! both on screen and in their chatbox.
- Smash
Vorago will smash his hands down on top of the target and inflict them with a bleed. The bleed uses the same icon as dismember, but behaves differently. It can hit for up to 1200 melee damage. It is affected by damage modifiers such as protection prayers, spirit shields and base damage reduction from defence levels, armour and shields. Every hit will remove defensive abilities.
The bleed can be cleared by using freedom, or by moving away from Vorago. Damage is reduced by 1/12 for every square you are away from Vorago, and is removed when it is under 50% (6 squares away). If the bleed is not removed and Vorago performs another smash on that player, they will receive an unblockable 6000 typeless damage hit. This typeless hit can be lowered by Sever, Weaken, and Enfeeble (but not Pulverise). Vorago will use the smash 5 times in a row, and these should be countered with the voke order described in Phase 2.
Smashes can be considered to be dealt in 2 sets of 2 and one lone smash. The second smash in each set (smashes 2 and 4) is performed quickly after the preceding smash. The first smash of the latter sets (smashes 3 and 5) are more spaced out from the one before it.
During phases 2, 3, and 4, Vorago will launch blue bombs between the second and third smashes. This attack is exactly the same as a normal blue bomb attack. It has no animation and does not affect the timing of the smashes.
During phase 5, Vorago's smash attacks behave slightly differently. Unlike before, he will only use the smash attack 3 times and can perform them on a target from afar. Freedom can still be used to clear the bleed; however, instead of distance from Vorago affecting the damage, your distance from your location when you received the bleed will be used. Because Vorago is immune to provoke on this phase, he will use the smash on a random target each time. If he hits a player who already has a bleed, they will be hit for 4500 damage instead of 6000.
- Reflect
Vorago will reflect all damage taken onto other players for 9.6 seconds. One player will be linked at once normally and, similarly to blue bombs, two players if team size is 11 or higher. The players who are linked to Vorago and will take reflected damage will receive the message Vorago channels incoming damage to you. Beware! both on screen and in their chat box. All other players will receive the message Vorago reflects incoming damage to surrounding foes! When the reflect ends, the players who were linked will receive the message Vorago releases his mental link on you. There will also be a green swirl animation. All other players will not receive the message, but can still determine it by the animation.
When Vorago begins his reflect attack, he will clear most damage-over-time effects he is afflicted with.
- Jump
At the end of every phase (except for the last), Vorago will jump in the air and land in one of the squares in the room. When he lands, players within a 11x11 area will take damage equal half their current hit points, to a minimum of 1500 damage if within Vorago. For every step away this damage is reduced to 1/2, 1/3, 1/4, 1/5, and 1/6 of the original amount respectively. The damage taken is delayed after being hit, so if you do get hit, running away or using Surge/Escape can help reduce or even negate damage if fast enough. Vorago's landing spot can be predicted by looking where he is facing before his next jump. A shadow will appear on the ground before he lands. Each jump damages the floor, breaking it on the third jump.
- Stomp
Vorago's stomp attack is dependent on his current target. Any player who walks under Vorago will take damage equal to 10% of their maximum health. However, if the player who gets stomped is Vorago's primary target, they will instead take damage equal to 50% of their remaining health and will be momentarily stunned. The stun can prevented against with Anticipation or Freedom, the latter being able to clear it as well.
Phase 1
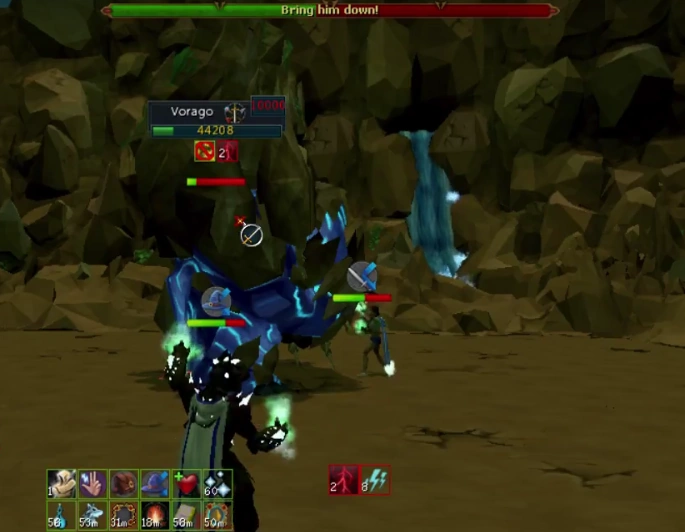
At the beginning of the fight, all players will drop down into the arena, and a few seconds later, Vorago will land in the centre of the room. Vorago's first attack will be firing a red bomb. He will remain in the centre of the room until someone has attempted to squeeze past the rock on the west side of the room. Once someone has, he will immediately focus his attention on them and attempt to move in to melee them. Until the ancient weapon piece (a) is obtained, if Vorago is damaged below 12,000 life points, he will heal back to 75,000. The phase ends when Vorago reaches 0 life points after the piece is obtained.
- Main tank
The main tank is responsible for luring Vorago so that the jumper can receive the first piece of the maul of omens. After the jumper has squeezed past the rocks, the main tank should immediately provoke Vorago and lead him north-west. This will keep the jumper far away enough to not receive any bombs until he is at the top of the cliff. After Vorago has been positioned by the jumper, the main tank should stand directly south of Vorago. When Vorago's life points are low enough, the main tank should provoke Vorago to ensure that he is facing away from the jumper.
- Bomb tank
The bomb tank is responsible for absorbing all the damage from Vorago's bombs, as normal. Phase 1 is usually considered the hardest phase for a bomb tank, due to the number of red bombs Vorago launches (1 every 4 attacks). Depending on the team, the bomb tank may stand close to Vorago at the start so that the jumper can receive the first red bomb.
- Jumper
Where to stand to properly lure Vorago
The jumper's role during this phase is to squeeze past the gap on the west side of the room, and ascend the cliff side to reach the jump spot. The jumper should make their way to the west side of the room as quickly as possible. The gap cannot be squeezed through until Vorago has entered the room, and it should be passed as soon as possible. It is likely that Vorago will launch a red bomb to the jumper, so they should have a shield equipped to heal life points with Resonance from the first blue bomb. This will counteract most of the damage from the red bomb.
The jumper should ascend the cliff as quickly as possible, and make their way to the jumper's voke location (pictured) and provoke Vorago. Only this exact location works for luring Vorago properly, so it is important to be in the correct spot. Once Vorago has been lured to this spot, the jumper can move to the jump location (the platform sticking out to the left of the player in the image) and begin attacking from there. When Vorago has been lowered to around 20,000 life points, the base tank should provoke him to allow the jumper to jump on him. At least 1 free inventory space will be needed to retrieve the weapon piece.
- Attacker
The only responsibility attackers will have during phase 1 is to attack Vorago. As soon as the phase starts, attackers should be standing north of Vorago (but not too far away, so that they do not receive a red bomb), and should follow him as he's lured, standing as close as possible without being in melee distance. The only damage that will be taken will be from random red bombs. If one is launched at you, position yourself away from your teammates to take as little damage as possible, but stand close enough so that the bomb tank still receives all other bombs.
Phase 2
Phase 2 is mostly time based. During this phase, Vorago will need to be brought down with 4 gravity fields to knock him off balance, then damage will need to be done to remove the second piece of the maul. The phase ends when Vorago has been lowered to 0 life points after the maul piece is received.
Smashes and vokes
The first attack that Vorago will perform is his smash sequence. Designated players use Provoke and Freedom, Escape or Surge to prevent Vorago from smashing the same target multiple times in a row for high bleed damage.
Whoever is taking smashes should be standing within melee distance of Vorago so that he does not move during his attacks. The most common ways to do this are standing on the same square as the person currently being targeted, or using an item on Vorago to move your character next to him.
If Freedom/Surge/Escape is used on the same tick as the bleed effect is applied, no damage will be taken.
- Vokes 1 and 2
Vorago's first smash should be on the base tank. He will perform the first smash immediately as he lands at the beginning of the phase. All subsequent smashes will begin 4 attacks after he launches a red bomb, and will begin with his current target.
As soon as the base tank receives the first bleed from the smash, they should cast Freedom to clear it. Note that the very first smash at the start of the phase will not come with an animation on Vorago's arms; the ground will still fissure, so count that as 1, and the first visible animation as 2. Shortly after, they will receive another, which should be cleared by being 7 squares away from Vorago. The most common method is using Surge or Escape.
Vorago will always launch a blue bomb after the second smash. It is a common tactic for the base tank to use resonance to heal from the bomb before returning to Vorago.
- Vokes 3 and 4
Vorago's third and fourth smashes are usually taken by the bomb tank. The only bombs launched during the smash sequence are after the second smash, so there is no risk taken by giving this role to a bomb tank.
Vorago's smash target is locked as soon as the animation hits, so he should be provoked as soon as the animation plays. The bleed effect will be cleared the same way that the base tank did it: freedom for the first, moving away for the second.
- Voke 5
Vorago's fifth and final smash is taken by an attacker, usually the same player who took the jumper role.
As with above, whoever is taking smashes should be standing within melee distance of Vorago so that he does not move during his attacks, and he should be provoked as soon as the animation plays. As there is only one bleed to clear, only freedom will need to be used. After it is cleared, stand back from Vorago to avoid melee attacks.
The base tank should be within melee distance of Vorago when he is applying the fifth bleed and should provoke him as soon as possible (like above) to regain his aggression.
Reflects and gravity fields
After his smash sequence, Vorago will perform 3 basic attacks and then link himself to a random player, reflecting all damage received onto his target. As soon as he fires his third attack, every player should stop attacking to avoid killing their teammate. This reflect lasts 9.6 seconds.
At the same time, a gravity field will spawn somewhere in the room. It should be interacted with by someone to destabilise Vorago. If the gravity field is not close enough to work (about 4 squares), it is the base tank's responsibility to walk towards it so that it can be fired.
During reflect, Vorago will perform 3 attacks before launching a red bomb. After he launches the red bomb, he will no longer focus on being within melee distance of his target, so he should be lured to the gravity field as quickly as possible. If Vorago was not moved at all after his mind link, he will no longer be reflecting damage as soon as he performs his third attack.
4 attacks after he launches a red bomb, he will begin the smash sequence again and repeat the rest of the attacks above. When 4 gravity fields have been fired at Vorago, the phase will progress to the next part.
If a gravity field is not used before the next one spawns, the previous one will despawn.
Bring him down!

The bring him down! part of phase 2
Once Vorago has been destabilised with 4 gravity fields, he will crouch down and all players will enter a first person view. During this time, players will receive 150 damage every 2 game ticks. There will be a bar at the top of the screen that will need to be filled by rapidly clicking on Vorago. If players fail to click enough, everyone will take 2000+ typeless damage.
Once the bar has been filled, Vorago will be left in a vulnerable state, and players will have 12 seconds to deal a variable amount damage to him to dislodge the second piece of the maul from his body. Damage dealt to Vorago for the purposes of dislodging the weapon piece has no effect on his life points, however bonus damage dealt by scrimshaws such as scrimshaw of cruelty and maniacal aura and its variants will still go through.
If too little damage is done, Vorago will fully heal himself, and the gravity field part of the phase will need to be repeated; however, this time, only 2 fields will need to be fired to destabilise him.
If enough damage is dealt, the weapon piece will land on the floor, and the phase can be finished by lowering Vorago to 0 life points.
Phase 3
Phase 3 changes entirely based on the week's rotation. There are 6 different special attacks that Vorago has, described below. Except for Scopulus week, phase 3 will end when Vorago has reached 0 life points. During Scopulus week, phase 3 will end when both scopuli are dead.
Except for the Scopulus, Vitalis, and Green bomb rotations, Vorago's attack sequence for phase 3 is:
- Weekly special
- 3 attacks
- Reflect
- 3 attacks
- Weekly special
- 3 attacks
- Red bomb
- 4 attacks
- Repeat
During Vitalis week, his rotation is almost the same, except the red bomb will be replaced with smashes:
- Vitalis orb
- 3 attacks
- Reflect
- 3 attacks
- Vitalis orb
- 3 attacks
- Smashes
- 3 attacks
- Repeat
During Green bomb week, his rotation is almost the same, except that there are 5 attacks after green bomb rather than 3. If the green bomb hits someone alone, Vorago will skip to the next mechanic:
- Green bomb
- 5 attacks
- Reflect
- 3 attacks
- Green bomb
- 5 attacks
- Smashes
- 3 attacks
- Repeat
During Scopulus week, Vorago will fire an endless stream of blue bombs the entire phase.
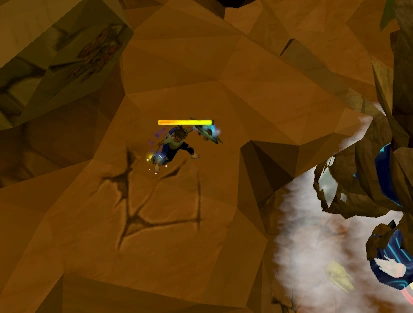
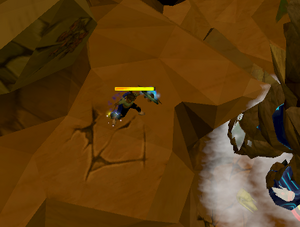
Ceiling collapse
Vorago mid jump, with the shadow of a falling rock in the centre of the room
During this week, Vorago's special attack will cause rocks to collapse from the ceiling. He will aim upwards and pick one of the 9 sections of the room. A shadow will appear where the rock will land, and 6 seconds later, that rock will land on that spot. All players in the 7x7 area of the rock will take damage. The rock deals 8,000 damage split evenly among every player hit. The debris can be cleared by players (right-click option), dealing 4,000 typeless damage. This damage can be fully negated with barricade, but not by other defensive abilities.
As the rock falls, Vorago will jump into the air and land in one of the unoccupied squares of the room. Players who are caught under Vorago or a rock will be pushed away. If someone is stuck deep within the rock, Vorago will teleport them next to him. However, it's still possible to get stuck in a rock and the only way to escape is by destroying it.
Teams should either focus on taking the damage together, or avoiding damage completely. While the latter is preferable, having everyone take damage will decrease the chances of 1 player taking a huge hit.
All rocks that are left from phase 3 will carry over to phase 4, landing in the same location and dealing 4,000 damage split among every player hit. If the rock in the centre carries over, it will be cleared by Vorago when he lands. The centre is also automatically cleared every time Vorago starts charging his waterfall attack in phase 4. Rocks in the corners should take priority in getting cleared, as they will block access to the waterfalls, leaving players susceptible to the blast damage.
Scopulus
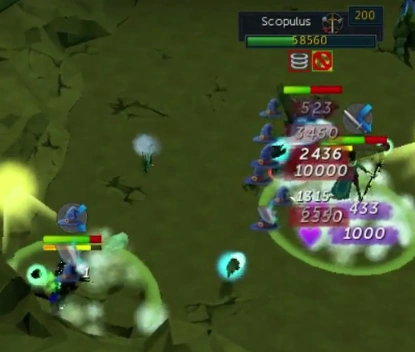
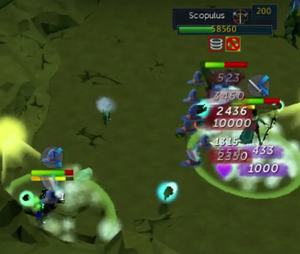
Players fighting the scopuli
Phase 3 during this week is unique. Instead of attacking Vorago, players must kill 2 summoned Scopuli. The scopuli always spawn in the south-west and south-east corners of the room. They have 150,000 life points, and they attack with powerful and accurate melee attacks that damage all players within the area of effect. Their melee attacks have a base maximum hit of 1,653; both accuracy and this maximum hit increase the closer together the two scopuli are, with the damage reaching a maximum of around 5,600. As such, it is recommended to keep them away from each other. As powerful as their attacks are, they are otherwise regular melee hits, meaning they can be negated partially or completely with prayers and defence abilities.
When one of the scopuli dies, the other will become enraged. This will heal him for 15,000 life points, maximise his damage and accuracy modifiers, increase the area of effect of his attacks, and double his attack speed.
To deal with the scopuli, the attackers should split up and take them down simultaneously while the bomb tanks stand in the corners, far from Vorago and the scopuli. It is pertinent to keep scopuli's attention on the attackers, as the damage from both bombs and the melee attacks would be too overwhelming for a bomb tank.
Some smaller teams may prefer to take one scopulus down before the other, completing ignoring one until the first is dead. The aggressiveness radius of the scopuli is small, so it is possible for one to be left alone to wander around. It is also just as possible for it to come to close and focus its attention on the team.
During this phase, Vorago will launch blue bombs constantly.
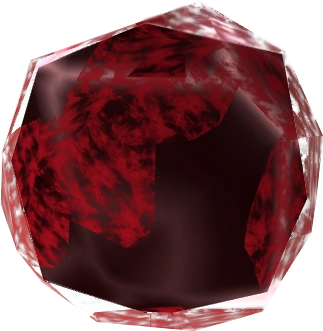
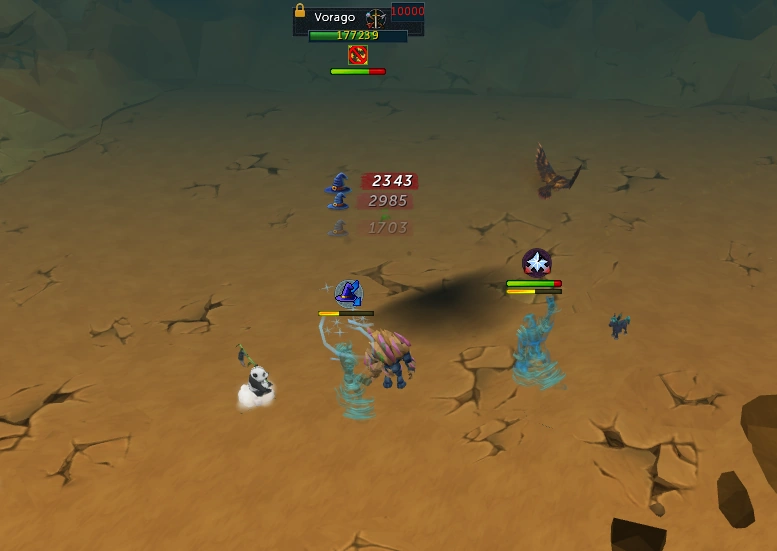
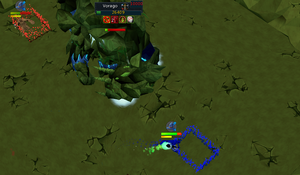
Vitalis

Vorago launches his vitalis orb
For this week, Vorago's special attack is to launch an orb that can summon 5 Vitali. The orb is sent to one of the squares in the room adjacent to Vorago. The orb will travel a variable number of squares and then explode. Players caught in the explosion will take 2,000 typeless damage. This damage can be reduced with any defensive ability (reflect, debilitate, anticipation, etc), pulverise or spirit shields. For every player that takes damage from the explosion, 1 vitalis will be prevented from spawning. If 5 players take damage, no vitali will spawn. Damage is only received for each vitalis prevented from spawning; e.g. if 6 players are caught in the explosion, only 5 will receive damage.
If Vorago has not been moved from the centre, he will always launch the orb into the north, north-east, or east corner. It is customary to have all players except the bomb tank stand north-east, and have them be prepared to move to the orb.
Vitalis week is the only rotation where Vorago will use his smash attack on phase 3, in place of a red bomb. It is recommended to stall the attack rotation during smashes by provoking Vorago across the room and walking him. This way he can be killed before the 3rd vitalis orb spawns. Another method is to completely ignore the 2nd vitalis orb and use Onslaught right after reflect ends with bomb tank taking the first bleeds.
- Vitali
.png)
Fast and dangerous!
Vitali are level 130 monsters with 20,000 life points. They attack with melee, hitting up to 1250 with an attack speed of 8 (once every 1.2 seconds). Vitali also act as a barrier; they cannot be walked through, and they cannot be attacked over. Their attack is a standard melee attack that can be defended against with abilities and prayers; however, because they act like a barrier, it is often best to prevent them from spawning altogether.
Green bomb
A green bomb flying away from the mist it leaves behind
Vorago's attack this week is launching a green bomb. This attack is extremely dangerous for uncoordinated teams; however, it is easily countered with cooperation.
Vorago will launch a green bomb to one of the 9 squares in the room. When it lands, it will create a mist in that area and then home in on a player. As far as counting goes, Vorago will perform his reflect attack after 5 auto attacks. If the green bomb is taken by 1 player for a 10,000 hit, it will skip his attacks to the next part of the rotation.
The mist created should be avoided, as it hits 300–600 damage every 3 seconds, draining 10% adrenaline and 20% run energy. The longer one stays in the mist, the higher the damage taken, up to a maximum of around 1000. There is no way to counter the mist, so it is best to avoid it.
- Green bombs
Green bombs target one player at a time, and switch to another after each hit. The first player it targets will receive the warning Vorago has sent a green bomb after you. in their chatbox, and a similar warning on screen: Vorago has sent a green bomb after you. Run!
On the first hit, the green bomb will deal 1000 damage to the original target and all adjacent players. It will then select a new target within 2 squares of that player and home in on them. Every hit from a green bomb drains 10% adrenaline and resets all defence abilities. The damage cannot be defended against in any way.
If the same green bomb hits the same player twice, it will hit 7000–9000 typeless damage, without any area damage. Even if this large hit is taken, it will pass to any nearby targets if it can. If there are no players within range of its target when it hits, it will deal exactly 10,000 damage and disappear immediately. This will deal 10000–11000 damage instead if that player has been targeted by a bomb before. When the green bomb explodes on a lone player, it will also progress Vorago's attack rotation.
Green bombs on phases 3 will bounce 5 times before disappearing, dealing damage on the first 4 bounces. On phase 4 and 5 the bomb will only bounce 4 times, damaging on the first 3 bounces. The final bounce will damage if the targeted player is alone, but otherwise it won't do any damage or adrenaline drain.
- The square method
A player running out of the square after receiving the first bounce from the green bomb
The most popular and reliable way to counter the green bomb is the square method. In this method, 4 players stand on the corners of a 3x3 square (pictured). The first player to get the bomb will take the first hit and then step away from the box. The green bomb will target one of the remaining 3 players and cannot target the first player again.
Whoever is targeted second will take the next hit, and again step outside of the box.
Two players are left; however, they will not move at all. The bomb will damage the third player for 1000 damage, and then it will damage the fourth. It will target the third player again for its fifth hit, but this hit will not deal any damage. If someone who is not part of the square receives the green bomb, they should run towards the square before they take the hit, and run out after it is passed.
If the bomb tank receives the green bomb, there are 3 options, depending on the team's decision. In teams of 5, one option involves the bomb tank running in to the square to pass it to one of the other players. If this is done, all players should protect from magic, as Vorago will still be firing blue bombs. The other option is to designate one player inside of the square to run to the bomb tank to receive the bomb after the first hit, and run back before the second hit. In teams of 6 or more that still use the square method, a player outside of the square should run to the bomb tank to receive the bomb, and then run back towards the square to pass it along.
- The circle method
In larger teams, the most popular way to deal with the green bomb is for everyone to form a circle around Vorago. The first player who gets the bomb will take the hit then move out of range of the next target. This is done until the bomb has done all 5 hits.
If the bomb tank gets the bomb, a player from the circle will need to retrieve it. This is usually done by the base tank.
TeamSplit

Vorago charges his team split attack
Vorago's TeamSplit attack is relatively simple. He will charge himself for an explosion, turning half of the players red and the other half green. During his charge, Vorago is immune to all attacks. When he begins his charge, players' defence abilities will be reset. Two box outlines will appear in the room—one red, one green—and players will need to be inside the outline that matches their colour when Vorago explodes. Anyone not inside the correct box will receive 8,000 typeless damage.
The ideal strategy is to have every player inside the appropriate square and take no damage from any of the TeamSplit attacks. There is ample time to reach any TeamSplit box from any part of the room; however, if it is not possible to make it inside the box in time, be sure to heal up to above 8,000 life points to survive the hit.
The TeamSplit boxes are easier to see (especially in phase 5) when Lighting detail is set to High and Bloom is On in the graphics settings.
The End

Vorago moving his arm to the next corner
Vorago's special attack during this week is a combination of handicapped damage dealing and survival; it also focuses on movement. During this attack, all players should focus on damaging Vorago, as he will not be attacking during this special.
Vorago will begin this attack by raising his arms and facing one of the corners in the room. You will have a few seconds to get to the corner he is facing, or you will begin suffocating when he slams his arms down. During this charge, Vorago is immune to damage. Suffocation damage starts at 100, and increases by 100 every 2 game ticks.
The first corner will not contain any bombs. The second corner will contain either red or blue bombs, and the next corner will contain the other type. The last corner will contain purple bombs. Every 3.6 seconds, Vorago will move his right arm to the next wall, covering 2 corners. During this time, you should make your way to the next corner. 4.8 seconds later, he will swiftly move his right arm to close off the corner he was just covering. Anyone still in that corner will be flung at the wall and take 2500 damage. Anyone who is not inside Vorago's arms should make their way to the next corner that he will focus. Vorago's left arm will not deal any damage when it slides over you to open the corner.
Each corner has a damage reduction multiplier based on the bomb it holds. The bombs inside the corner can be tagged to launch the bombs. Blue and red bombs will only launch to the player who tagged the bomb; purple bombs will launch to everyone. It is not recommended to tag red or blue bombs; however, it is recommended to tag the purple bomb shortly after its corner is sealed off. If a blue bomb is tagged, it will reset that player's defence abilities.
Blue bombs have an amount of charges equal to 70% of the team's size to a minimum of 5. Red bombs have 60% of that amount, so number of charges equal to 42% of the team's size to a minimum of 3. When tagged, they will consume one charge.
| Corner | Damage taken |
|---|---|
| Initial | 1 (full) |
| Blue bomb | 1/2 |
| Red bomb | 1/3 |
| Purple bomb | 1/4 |
- Purple bombs

Every bomb is launched at the end of the attack. Players should space themselves away from each other to prevent damaging their teammates.
Purple bombs turn the player into an explosive vitalis. When turned into a vitalis, you will receive a counter on your screen that counts down by 1 every game tick. You will also have a blue bar under your life points which slowly fills orange. When the counter reaches 0, the purple bomb will hit. These bombs deal 2000 typeless damage to all players within 2 squares of the main target, also draining 5% adrenaline to all affected players excluding the main target. Their damage can be fully negated by barricade, and, unlike red bombs, will not reset defence abilities.
- Launched bombs
To finish off the attack, Vorago will launch every remaining bomb to all players in the room. The most practical way to counter this is to use barricade when the detonation timer is at 10 seconds. If the purple bomb was tagged at the correct time, all damage from all bombs will be blocked by barricade. If the purple bombs are launched too late, then a red bomb will hit first, removing the effects of barricade.
When bombs are launched, they lose charges equal to the amount of players in the room. If there are leftover charges, additional waves of bombs will be launched, one bomb to each player, until there are no more charges left.
As far as counting attacks goes, Vorago uses his reflect three attacks after he gets up and launches all bombs.
Phase 4
Phase 4 is a time based phase that differs slightly week to week. For the most part, it is a survival phase. Phase 4 ends when Vorago has reached 0 life points after the weapon handle is obtained. The handle dislodges from Vorago after he performs his 3rd waterfall attack.
Except for Scopulus and The End weeks, Vorago's attack rotation for phase 4 is:
- Waterfall
- 3 attacks
- Stone clones
- 3 attacks or 20 seconds, whatever is longer. Generally 6–7 attacks are used.
- Weekly special
- 3 attacks
- Smashes
- 3 attacks
- Reflect
- 3 attacks
- Repeat
For Scopulus week, his attack rotation is
- Waterfall
- 3 attacks
- Stone clones
- 3 attacks or 20 seconds, whatever is longer. Generally 6–7 attacks are used.
- Red bomb
- 4 attacks
- Smashes
- 3 attacks
- Reflect
- 3 attacks
- Repeat
For The End week, his attack rotation is:
- Waterfall
- 3 attacks
- Stone clones
- 3 attacks or 20 seconds, whatever is longer. Generally 6–7 attacks are used.
- The End
- 3 attacks
- Red bomb
- 4 attacks
- Reflect
- 3 attacks
- Repeat
- Waterfall


Players safely behind the waterfall
Phase 4 will begin with Vorago's waterfall attack. He will charge up, and a waterfall will appear in one of the corners of the room. When Vorago begins charging, he will teleport to the centre of the room. The attack disrupts most defensive abilities. After 10.2 seconds, Vorago explodes, dealing 9000–10000 damage to all players who are not safely behind the waterfall.
If the phase somehow doesn't end after the 3rd waterfall, all waterfalls after that will be skipped straight to stone clones.
- Stone clones
Stone clones are mimics of players that fight for Vorago. They are level 138 with 10,000 life points and will spawn with the same style the original player was using. They use adrenaline just the way players do and have access to several of the same abilities. One clone will spawn for around every 7 players, up to a maximum of 8 at 49 players. A clone will not spawn for Vorago's current target, so it is customary for the bomb tank to provoke him to ensure they do not get a clone. When clones are summoned, Vorago will take reduced damage, 1/8 of the original hit for 20 seconds.
If Vorago is unable to spawn clones, he will skip to the next attack in the rotation.
Clones spawn with the name "Stone [Player name]". Players who get a clone will not receive a message, but they will see an arrow flashing over their clone. Clones should be killed as quickly as possible, and players who have already killed their clone should assist players in killing any remaining.
| Style | Weakness | Abilities |
|---|---|---|
Ceiling collapse
Vorago's special during this week will be collapsing a single rock from the ceiling in the same manner as he did in phase 3. 3 attacks after, he will perform his smash sequence and then lead into reflect.
Depending on the team, rocks landed on the sides of the room can be ignored. Rocks in the corners should always be cleared.
Scopulus
Vorago will not have a weekly special this week. Instead, he will launch a red bomb. 4 attacks later he will begin his smash sequence and then lead into reflect.
Vitalis
Vorago's special during this week will be firing another vitalis orb. It works exactly as it does in phase 3. If Vorago has not been moved, he will always fire it north, north-east, or east. 3 attacks after, he will perform his smash sequence and then lead into reflect.
Green bomb
Vorago's special this week will be launching a green bomb. It works exactly the same as it does in phase 3, although it will only hit 3 times rather than 4. 3 attacks after, he will perform his smash sequence and then lead into reflect.
- Green bomb tanking
If the green bomb is destroyed early, it will skip Vorago to the next part of his attack rotation (smashes). Some teams prefer to skip the mechanic and speed up this part of the kill, and thus they designate an attacker as the green bomb tank. The green bomb tank's responsibility is to take the 10,000 damage hit to skip the mechanic.
The green bomb tank should position themselves between the bomb tank and the rest of the team. When the green bomb is launched, the green bomb tank should heal to above 10,000 life points. Equipping a phoenix necklace will also instantly heal a significant amount after the hit and using transfigure can further heal 5000 more life points, reducing the total damage taken to around 2000 if combined with phoenix necklaces. If the bomb tank receives the green bomb, the green bomb tank should run towards them and stand with 1 space between them. Standing adjacent will deal 1000 damage, which should be avoided to not have to eat again. After receiving the bomb, run away from the bomb tank and all other players to take the 10,000 hit.
If someone who isn't the bomb tank receives the green bomb, they should run towards the green bomb tank. Again, standing with 1 space in between them to avoid an unnecessary 1000 damage. After the bomb is passed, run back and allow them to take the 10,000 hit. If the green bomb tank is targeted first, no passing will be needed, and the 10,000 hit can be taken immediately.
TeamSplit
Vorago's special during this week will be performing another TeamSplit. 3 attacks after, he will perform his smash sequence and then lead into reflect.
The end
Vorago's special during this week will be performing his The End attack again. It works almost exactly as it does in phase 3. The main difference is the damage reduction. Instead of changing for each corner, all damage during the attack will be cut to 1/3. 3 attacks after, he will fire a red bomb instead of his usual smash sequence. 4 attacks later he will use his reflect. Unlike phase 3, only a maximum of 5 purple bombs are launched at once.
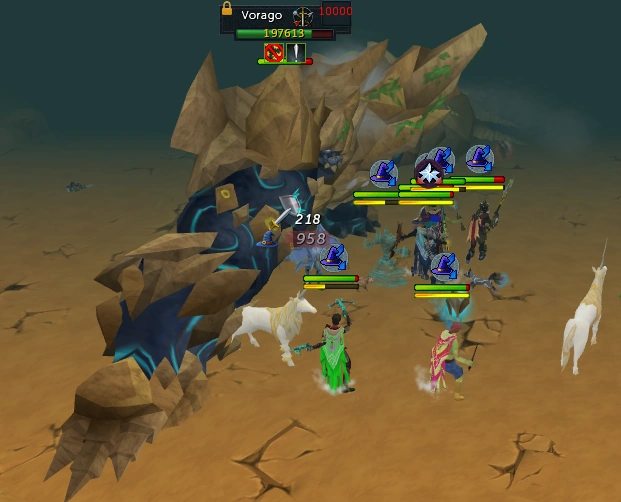
Phase 5

Players pushing Vorago in the final phase of the fight
The fifth and final phase of the fight is a test of pure strength against Vorago. This phase of the fight takes place in a much smaller room. Players begin on the west side of the room, and Vorago will begin in the middle.
The goal is to push Vorago to the east side of the path and finish him off with the maul of omens. All 3 pieces of the maul should be available at this point, and they should be combined to create the maul. If the maul isn't created, anyone holding any piece of it will take 100 typeless damage every 2 ticks.
As Vorago takes damage, he will get pushed east. Likewise, as he deals damage, he will push himself west. If Vorago manages to push the players all the way west, it will instantly kill all of them. If the players manage to push Vorago all the way east, they will be able to use the Maul of Omens to finish the fight. This is done by clicking on the maul while being close enough to him.
| Pushforward | |
|---|---|
| Does not increase | Does increase |
|
|
| Pushback | |
| Does not reduce | Does reduce |
| |
| Does not cause | Does cause |
|
|
Ceiling collapse/TeamSplit
Both Ceiling collapse and TeamSplit weeks have the same special, which is the teamsplit attack. There are only 2 spots each box can appear in on phase 5: on the west side of the path, and in the centre of the path. The latter location can only contain the boxes after Vorago has been pushed far enough east.
Damage taken from the TeamSplit attack has no affect on Vorago's push.
Scopulus/The end
Both Scopulus and The End weeks have the same special, which is the vitalis bomb attack. Vorago will turn players into explosive vitali and they will receive a random countdown timer with a number ranging from 10 to 40. When the timer reaches 0, they will explode, damaging themselves and players around them for 2000 typeless damage and −5% adrenaline.
The most common and reliable way to deal with this attack is for all players except for the bomb tank to stay on the southern edge until their timer is low. When there are 5 ticks left, run north and stay there until you explode, and run back south after you take the damage. Bomb tanks should stay where they are, as they are already spaced enough to avoid damaging other players.
A maximum of 5 bombs can launch. Reflect happens 5 attacks after vitalis bomb attack begins.
Damage taken from purple bombs will affect Vorago's push for all players who were not the main target.
Vitalis
During Vitalis week, Vorago's special will be launching a vitalis orb down the centre of the path. Every player, including the bomb tank, should take 2 steps back to ensure they are within the explosion radius. On phase 5, the orb can randomly spawn 2–4 vitali. Using resonance, debilitate or reflect can be used to counter the 2000 typeless damage. If any vitali spawn, they should be dealt with first.
If Vorago has pushed the team too far west, he will launch a red bomb instead of the vitalis orb.
Damage taken from vitali or the orb will affect Vorago's push.
Green bomb
During Green bomb week, Vorago's special will be launching a green bomb. The bomb will always land off the platform, so no mist will be created. During this phase, the bomb will only deal damage 3 times.
All damage from green bombs will affect Vorago's push.
- Run north method
Because of limited space, one popular method for dealing with the green bomb is to pass it player to player by having all attackers except for the base tank stand on the southern edge.
If an attacker gets the bomb, they will run north before being hit and pass it to the base tank. After the first bounce, the base tank will run south to pass it to another attacker, and run back north after he gets hit. From here on, taking another hit is safe, and whoever ran north can return south.
If the base tank gets the bomb, they should run south for the first hit and then run back north. Whoever the bomb targets second should run north after they get hit.
If the bomb tank gets the bomb, the base tank should step back to receive the bomb, and run south for the second hit. After the second hit, the base tank should run north. All attackers remain south when this happens.