(Updating the GE prices.) |
m (cleanup) |
||
| Line 1: | Line 1: | ||
| + | {{External|os|rsc=Witchaven dungeon}} |
||
| − | aaaaaaaaaaaaaaaaaaaaaaaaaaaaaaaaaaaaaaaaaaaaaaaaaaaaaaaaaaaaaaaaaaaaaaaaaa |
||
| + | [[File:Witchaven Dungeon map.png|thumb|link=Map:Witchaven Dungeon|A map of the dungeon. Click to view a larger version.]] |
||
| − | aaaaaaaaaaaaaaaaaaaaaaaaaaaaaa |
||
| + | [[File:Witchaven Dungeon entrance location.png|thumb|The dungeon's location on the world map]] |
||
| − | aaaaaaa |
||
| + | The '''Witchaven Dungeon''' is a dungeon in [[Witchaven]] which is used in a number of quests. The dungeon is home to a number of monsters, so it may be advisable to bring [[food]] if you are a lower level player. |
||
| − | aaaaaaaaaaaaaaaaaaaaaaaaaaaaaaaaa |
||
| + | |||
| − | aaaaaaaaaaaaaaaaaaaaaaaaaaaaaaaaaaaaaaaaaaaaaaaaaaaaaaaaaaaaaaaaaaaaaaaaaaaa |
||
| + | ==First section== |
||
| − | aaaaaaaaaaaaaaaaaaaaaaaaaaaaaaaaaaaaaaaaaaaa |
||
| + | [[File:Sea Slug Shrine.png|thumb|The entrance to the dungeon]] |
||
| − | aaaaaaaaaaaaaaaaaaaa |
||
| + | When you enter the dungeon you will come into a room containing aggressive level 35 [[hobgoblin]]s. To the north lies a section which leads into 3 rooms. The north and south rooms contain level 67 [[ogre]]s. The east room contains two [[hellhound]]s. |
||
| − | a |
||
| + | |||
| − | aaaaaaaaaaaaaaaaaaaaa |
||
| + | To the north and south of the hellhounds are two rooms with levers in and outside of them. In order to get into the room containing hellhounds, you'll have to solve a puzzle involving those levers. |
||
| − | aaaaaaaaaaaa |
||
| + | |||
| − | aaaaaaaaaaaaa |
||
| + | (If you logout while doing the puzzle you will have to start over.) |
||
| − | aaaaaaaaaaaaaaaaaaaaaaaaaaaa |
||
| + | # Head to the Northern lever located '''outside''' the room and pull it up. |
||
| − | aaaaaaaaaaaaaaaaaaaaaaaaaaaaaaaaaaaaaaaaaaaaaaaaaaaaaaaaaa |
||
| + | # Head to the Southern Lever, located '''inside''' the room and pull it up. |
||
| − | aaaaaaaaaaaaaaaaaaaaaaaaa |
||
| + | # Return to the Northern lever and pull the lever '''outside''' the room down. |
||
| − | aaaa |
||
| + | # '''Enter''' the Northern Room and push the lever in there up. |
||
| − | aaaaaaaaaaaaa |
||
| + | # Leave the room and pull the one '''outside''' the Northern Room up. |
||
| − | aaaaaaaaaaaaaaaaaaaaaaaaaaaaaaaaaaaaaaaaaaaaaaaa |
||
| + | # Go back to the Southern Room and pull the '''inside''' lever down. |
||
| − | aaaaaaaaaaaaaaaaaaaaaaaaaaaaaaaaaaaaaaaaaaaaaaaa |
||
| + | # Now you are free to enter the room with the hellhounds. |
||
| − | aaaaaaaaaaaaaaaaa |
||
| + | Note: You only have to do the puzzle once to gain access to the hellhounds. If you leave and come back much later you can simply walk into the room via the door and it will not be locked. |
||
| − | aaaaaaaaaaaaaaaaaaaaaaaaaaaaaaaaaaaaaaaaaaaaaaaaaaaaa |
||
| + | |||
| − | aaaaaaaaaaaaaaaaaaaaaaaaaaaaaaaaaaaaaaaaaaaaaaaaaaaaaaaaaaaaaaaaaaaaaaaaaaaaaaaaaaaaaaaaaaaaaaaaaaaaaaaaaaaaaaaaaaaaaaaaaaaaaaaaaaaaaaaaaaaaaaaaa |
||
| + | ==Second section== |
||
| − | aaaaaaaaaaaaaaaa |
||
| + | [[File:Slug menace wall.png|thumb|Secret wall leading to the second section]] |
||
| − | aaaaaaaaaaaaaaaaaaaaaaaaaaaaaaaaaaaaaaaaaaaaaaaaaaaaaaaaaaaaaaaaaaaaaaaaaaaaaaaa |
||
| + | The second section will be discovered during the [[Slug Menace]] quest. This part of the dungeon is filled with level 58 [[Giant lobster]]s. Players will also fight a level 74 [[Slug prince]] later in the quest near the end of the hall. There is also an [[agility shortcut]] which makes passage through the dungeon much quicker. Finally at the very end of the dungeon is the prison where [[Mother Mallum]] probably stayed through her years of imprisonment. Once you start [[Kennith's Concerns]] there will be a mine with two female villagers guarding it near the imposing doors. |
||
| − | aaaaaaaaaaaaaaaaaaaaaaaaaaaaaaaaaaaaaaaaa |
||
| + | |||
| − | aaaaaaaaaaaaaaaaaaaaaa |
||
| + | ==Third section== |
||
| − | aaaaaaaaaaaaaaaaaaaaaaaa |
||
| + | The third section of the dungeon is accessed during the [[Kennith's Concerns]] [[quest]]. There are a series of puzzle rooms which must be traversed. The room at the end has the NPCs [[Clive]] and [[Katherine]], and at the end of the quest, [[Kimberly]] as well. |
||
| − | aaaaaaaaaaaaaaaaaaaaaaaaaaaaaaaaaaaaaaaaaaaaaaaaaaaaaaaaaaaaaaaaaaaaaaaaaaaaaaaaaaaaaaaaaaaaaaaaaaaaaaaaaaaaaaaaaaaaaaaaaaaa |
||
| + | |||
| − | aaaaaaaaaaaaaaaaaaaaaaaaaaaaaaaa |
||
| + | ==Monsters== |
||
| − | aaaaaaaaaaaaaaaaaaaaaaaaaaaaaaaaaaaaaaaaaaaaaaaaaaaaaaaaaaaa |
||
| + | <gallery> |
||
| − | aaaaaaaaaaaaaaaaa |
||
| + | Hobgoblin.png|[[Hobgoblin]], level 28 |
||
| − | aaaaaaa |
||
| + | Ogre.png|[[Ogre]], level 67 |
||
| − | aaaaa |
||
| + | Hellhound.png|[[Hellhound]], level 92 |
||
| − | aaaaaaaaaaaaaaaaaaaaaaaaaaaaaaaaaaaaaaaaaaaaaaaaaaaaaaaaaaaaaaaaaaaaaaaaaaaaaaaaaaaaaaaaaaaaaaaaaaaaa |
||
| + | Giant lobster.png|[[Giant lobster]], level 40 |
||
| − | aaaaaaaaaaaa |
||
| + | Slug prince.png|[[Slug prince]], level 51, may only be fought once |
||
| − | aaaaaaaaaaaaaaaaaaaaaaaaaaaaaaaaaaaaaaaaaaaaaaaaaaaaaaaaaa |
||
| + | </gallery> |
||
| − | aaaaaaaaaaaaaaaaaaaaaaaaaa |
||
| + | |||
| − | aaa |
||
| + | ==Personalities== |
||
| − | aa |
||
| + | * [[Mother Mallum]] (only during [[Slug Menace]]) |
||
| − | aaaaaaaaaaaaaaaaaaaaaaaaaaaa |
||
| + | * [[Clive]] |
||
| − | aaaaaaaaaaaaaaaaaaaaaaaaaaaaaaaaaaaaaaaaaaaaaaaaaaaaaaaaaaaaaaaaaaaaaaaaaaaaa |
||
| + | * [[Katherine]] |
||
| − | aaaaaaaa |
||
| + | * [[Kimberly]] |
||
| − | aaaa |
||
| + | |||
| − | aaaaaaaaaaaaaaaaaaaaaaaaaaaaaaaaaaaaaaaaaaaaaaaaaaaaaaaaaaaaaaaaaaaaaaaaaaaaaaaaaaaaaaaaa |
||
| + | ==Music== |
||
| − | aaaaaaaa |
||
| + | * [[Escape (music track)|Escape]] |
||
| − | aaaaaaaaaaaaaaaaaaaaaa |
||
| + | * [[Slug a Bug Ball]] |
||
| − | aaaaaaaaaaaaaaaaaaaaaaaaaaaaaaaaaaaaaaaaaaaaaaaaaaaaaaaaaaaaaaaaaaaaaaaaaaaaaaaaaaaaaaaaaaa |
||
| + | * [[Creepy]] |
||
| − | aaaaaaaaaaaaaaaaaaaaaaaaaaaaaaaaaaa |
||
| + | |||
| − | aaaa |
||
| + | ==Quests== |
||
| − | aaaaaaaaaaaaaaaaaaaa |
||
| + | The following quests are involved with the dungeon: |
||
| − | aaaaaaaaaaaaaaaaaaaaaaaaa |
||
| + | * [[Family Crest]] |
||
| − | aaaaaaaaaaaaaaaaaaaaaaaaaaaaa |
||
| + | * [[Slug Menace]] |
||
| − | aaaaaaaaaaaaaaaaaaaaaaaaaaa |
||
| + | * [[Kennith's Concerns]] |
||
| − | aaaaaaaaaaaaaaaaaaaaaa |
||
| + | |||
| − | aaaaaaaaaaaaaaaaaaaaaaaaaaaaaaaaaaaaaaaaaaaaaaaaaaaaaaaaaaaaaaaaaaaaaaaaaaaaaaaaaaaaaaaaaaaaaaaaaaaaaaaaaa |
||
| + | {{Family Crest}} |
||
| − | aaaaaaaaaaaaaaaaaaaaaaaaaaaaaaaaaaaaaaaaaaaaaaaaaaaaaaaaaaaaaaaaaaaa |
||
| + | {{The Slug Menace}} |
||
| − | aaaaaaaaaaaaaaaaaaaaaaaaaaaaaaaaaa |
||
| + | {{Kennith's Concerns}} |
||
| − | aaaaaaaaaaaaaaaaaaaaaaaaaaaaaaaaaaa |
||
| + | {{Dungeons}} |
||
| − | aaaaaaaaaaaaaaaaaaaaaaaaaaaaaaaaaaaaaaaa |
||
| + | [[Category:Quest locations]] |
||
| − | a |
||
| − | aaaaaaaaaaaaaaaaaaaaaaaaaaaaaaaaaaaaaaaaaaaaaaaaaaaaaaaaaaaaaaaaaaaaaaaaaaaaaaaaaaaaaaaaaaaaaaaaaaaaaaaaaaaaaaaaaaaaaaaaaaaaa |
||
| − | aaaaaaaaaaaaaaaaaaaaaaaaaaaaaaaaaaaaaaaaaaaaaaaaaaaaaaaaaaaaaa |
||
| − | aaaaaaaaaaaaa |
||
| − | aaaaaaaaaaaaaaaaaaaaaaaaaaaaaaaaaaaaaaaaaaaaaaaaaaaaaaaaaaaaaaaaaaaaaaaaaaaaaaaaaaaaaaaaa |
||
| − | aaaaaaaaaaaaaaaaaaaaaaaaaaaaaaaaaaaaaa |
||
| − | aaaaaaaaaaaaa |
||
| − | aaaaaaaaaaaaaaaaaaaa |
||
| − | aaaaaaaaaaaaaaaaaaaaaaaaaaaaaaaaaaaaaaaaaaaaaaaaaaaa |
||
| − | aaaaaaaaaaaaaaaaaaaaaaaaaaaaaaaaaaaaaaaaaaaaaaaaa |
||
| − | aaaaa |
||
| − | aaaaaaaaaaaaaaaaaaaaaa |
||
| − | aaaaaaaaaaaaaaaaaaaaaaaaaaaaaaaaaaaaaaaaaaaaaaaaaaaaaaaaaaa |
||
| − | aaaaaaaaaaaaaaaaaaaaaaaaaa |
||
| − | aaaaaaaaaaaaaaaaaaaaaaaaaaaaaaaaaaaaaaaaaaaaa |
||
| − | aa |
||
| − | aaaaaaaaaaaa |
||
| − | aaaaaaaaaaaaa |
||
| − | aaaaaaaaaaaaaaaaaaaaaaaaaaaaaaaaaaaaaa |
||
| − | aaaaaaaaaaaaaaaaaaaaaaaaaaaaaaaaaaaaaaaaaaaa |
||
| − | aaaaaa |
||
| − | aaaaaaaaaaaaaaaaaaaaaaaaaaaaaaaaaaaaaaaaaaaaaaaaaaa |
||
| − | aaaaaaaaaaaaaaaaaaaaaaaaaaaaaaaaaaaaaaaaaaaaaaaaaaaaaaaaaaaaaaaaaaaaaaaaaaa |
||
| − | aaaaaaaaaaaaaaaaaaaaaaaaaaaaaaaaaaaaaa |
||
| − | aaaaaaaaaaaaa |
||
| − | aaaaaaaaaaaaaaaaa |
||
| − | aaaaaaaaaaaaaaaaa |
||
| − | aaaaaaaaaaaaaaaaaaaaaaaaaaaaaaaaaaaaaaaaaaaaaaaaaaaaaaaaaaaaaaaaaaaaaaaaaaaaaaaaaaaaaaaaaaaa |
||
| − | a |
||
| − | aaaaaaaaaaaaaaaaaaaaaaaaaaaaaaaaaaaaaaaaaaaaaaaaaaaaaaa |
||
| − | aaaaaaaaaaaaaaaaaaaaaaaaaaaaa |
||
Latest revision as of 12:36, 8 June 2019
A map of the dungeon. Click to view a larger version.

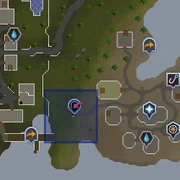
The dungeon's location on the world map
The Witchaven Dungeon is a dungeon in Witchaven which is used in a number of quests. The dungeon is home to a number of monsters, so it may be advisable to bring food if you are a lower level player.
First section

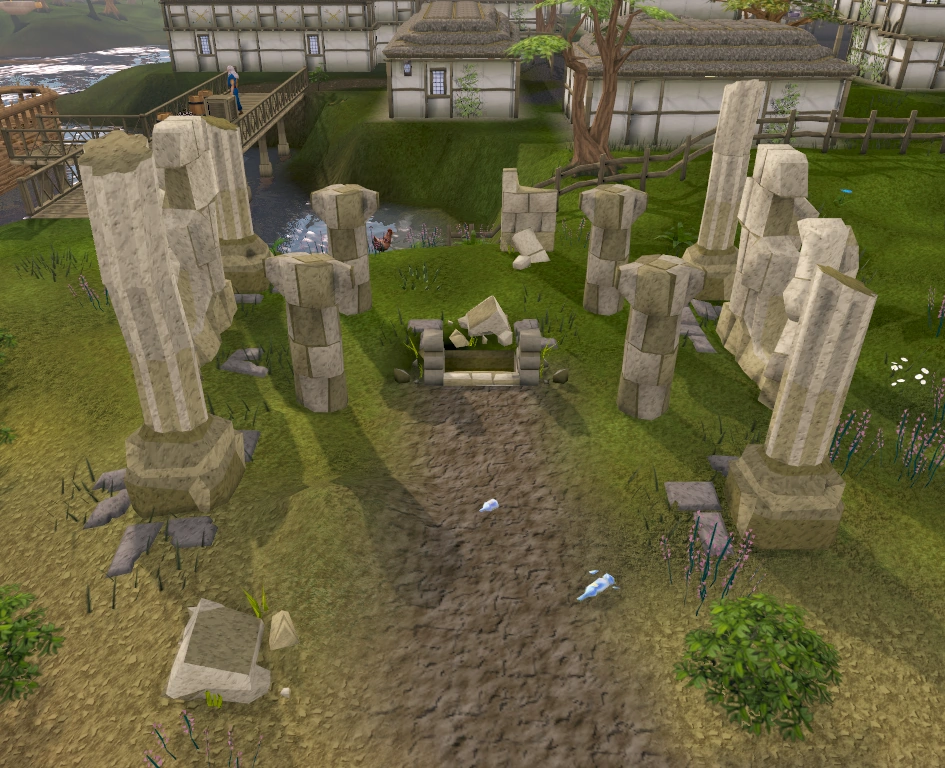
The entrance to the dungeon
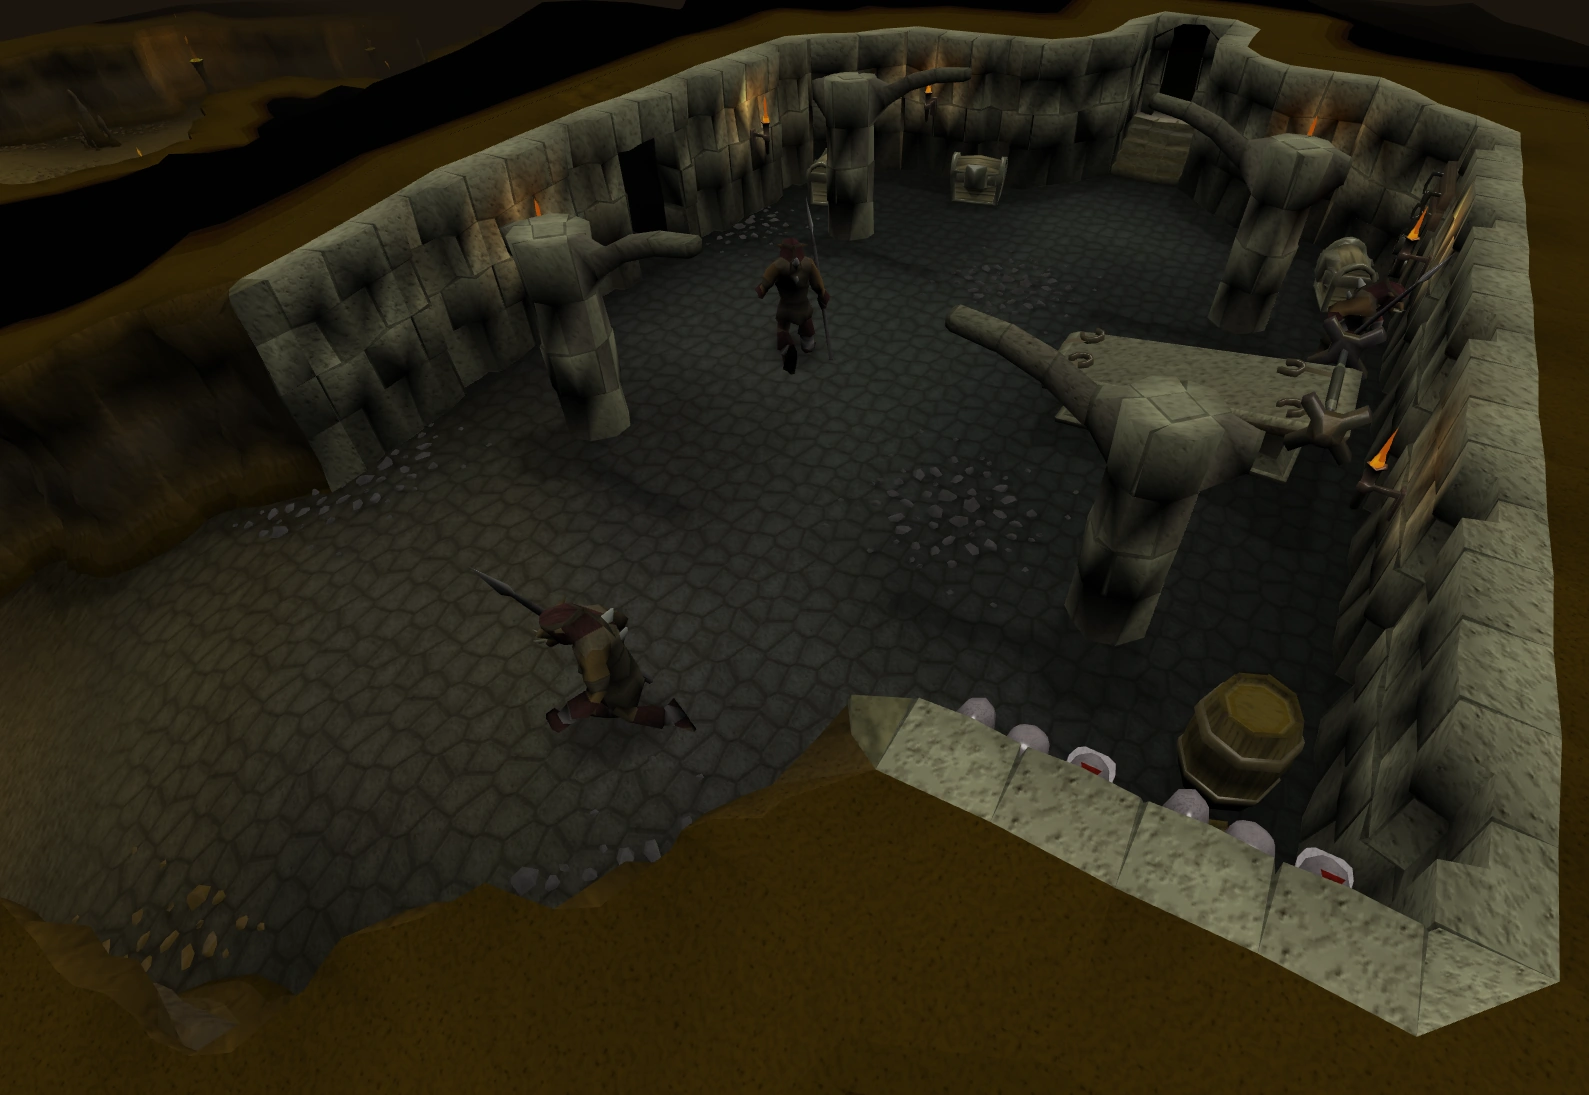
When you enter the dungeon you will come into a room containing aggressive level 35 hobgoblins. To the north lies a section which leads into 3 rooms. The north and south rooms contain level 67 ogres. The east room contains two hellhounds.
To the north and south of the hellhounds are two rooms with levers in and outside of them. In order to get into the room containing hellhounds, you'll have to solve a puzzle involving those levers.
(If you logout while doing the puzzle you will have to start over.)
- Head to the Northern lever located outside the room and pull it up.
- Head to the Southern Lever, located inside the room and pull it up.
- Return to the Northern lever and pull the lever outside the room down.
- Enter the Northern Room and push the lever in there up.
- Leave the room and pull the one outside the Northern Room up.
- Go back to the Southern Room and pull the inside lever down.
- Now you are free to enter the room with the hellhounds.
Note: You only have to do the puzzle once to gain access to the hellhounds. If you leave and come back much later you can simply walk into the room via the door and it will not be locked.
Second section

Secret wall leading to the second section
The second section will be discovered during the Slug Menace quest. This part of the dungeon is filled with level 58 Giant lobsters. Players will also fight a level 74 Slug prince later in the quest near the end of the hall. There is also an agility shortcut which makes passage through the dungeon much quicker. Finally at the very end of the dungeon is the prison where Mother Mallum probably stayed through her years of imprisonment. Once you start Kennith's Concerns there will be a mine with two female villagers guarding it near the imposing doors.
Third section
The third section of the dungeon is accessed during the Kennith's Concerns quest. There are a series of puzzle rooms which must be traversed. The room at the end has the NPCs Clive and Katherine, and at the end of the quest, Kimberly as well.
Monsters
")
")
")
")
")
Personalities
- Mother Mallum (only during Slug Menace)
- Clive
- Katherine
- Kimberly
Music
Quests
The following quests are involved with the dungeon:
| NPCs |
| ||||
| Enemies |
| ||||
| Items |
| ||||
| Rewards |
| ||||
| Locations |
| ||||
| Miscellaneous | Quick guide • Transcript | ||||
| Part 3 of the Temple Knight quest series • Part 2 of the Sea Slug quest series | |
| NPCs | |
| Enemies |
|
| Items |
|
| Locations |
|
| Music |
|
| Miscellaneous | Quick guide • Transcript |
| Part 3 of the Sea Slug quest series | |
| NPCs | |
| Items |
|
| Locations |
|
| Music |
|
| Miscellaneous |
|